Arcam rPLAY Instruction manual
Connections and Quickstart Guide
Connexions et Guide de démarrage rapide
Schnellstartanleitung
Aansluitingen en snelstartgids
Conexiones y Guía de Inicio Rápido
Краткое руководство по подключению и использованию
Connessione e Guida introduttiva
连接和快速入门指南


English
Connections and Quickstart Guide

1. Read these instructions
2. Keep these instructions
3. Heed all warnings
4. Follow all instructions
5. Do not use this apparatus near water
6. Clean only with dry cloth
7. Do not block any ventilation openings. Install in accordance with the manufacturer’s instructions
8. Do not install near any heat sources such as radiators, heat registers, stoves, or other apparatus (including
amplifiers) that produce heat
9. Do not defeat the safety purpose of the polarized or grounding-type plug. A polarized plug has two blades
with one wider than the other. A grounding type plug has two blades and a third grounding prong. The wide
blade or the third prong are provided for your safety. If the provided plug does not fit into your outlet, consult
an electrician for replacement of the obsolete outlet
10. Protect the power cord from being walked on or pinched particularly at plugs, convenience receptacles, and
the point where they exit from the apparatus
11. Only use attachments/accessories specified by the manufacturer
12. Use only with the cart, stand, tripod, bracket, or table specified by the manufacturer, or sold with the
apparatus. When a cart is used, use caution when moving the cart/apparatus combination to avoid injury from
tip-over
13. Unplug this apparatus during lightning storms or when unused for long periods of time
14. Refer all servicing to qualified service personnel. Servicing is required when the apparatus has been damaged in
any way, such as power-supply cord or plug is damaged, liquid has been spilled or objects have fallen into the
apparatus, the apparatus has been exposed to rain or moisture, does not operate normally, or has been dropped
15. The apparatus shall not be exposed to dripping or splashing and that objects filled with liquid, such as vases,
shall not be placed on apparatus
16. The apparatus should be connected to a mains socket outlet with a protective earthing connection
Important Safety Instructions

E-1
English
Welcome…
…and thank you for purchasing the Arcam rPlay wireless music receiver.
Arcam has been producing high-quality audio components for over thirty-ve years. During that time we have
amassed a wealth of knowledge on both the design and construction of audio components in order to give the
best sound performance for the price.
This handbook provides guidance for connecting and using your rPlay.
We hope that your rPlay will give you years of trouble-free operation. In the unlikely event of any fault, or if you
simply require further information about Arcam products, our network of dealers will be happy to help you. Further
information can be found on the Arcam website at www.arcam.co.uk.
The rPlay development team

E-2
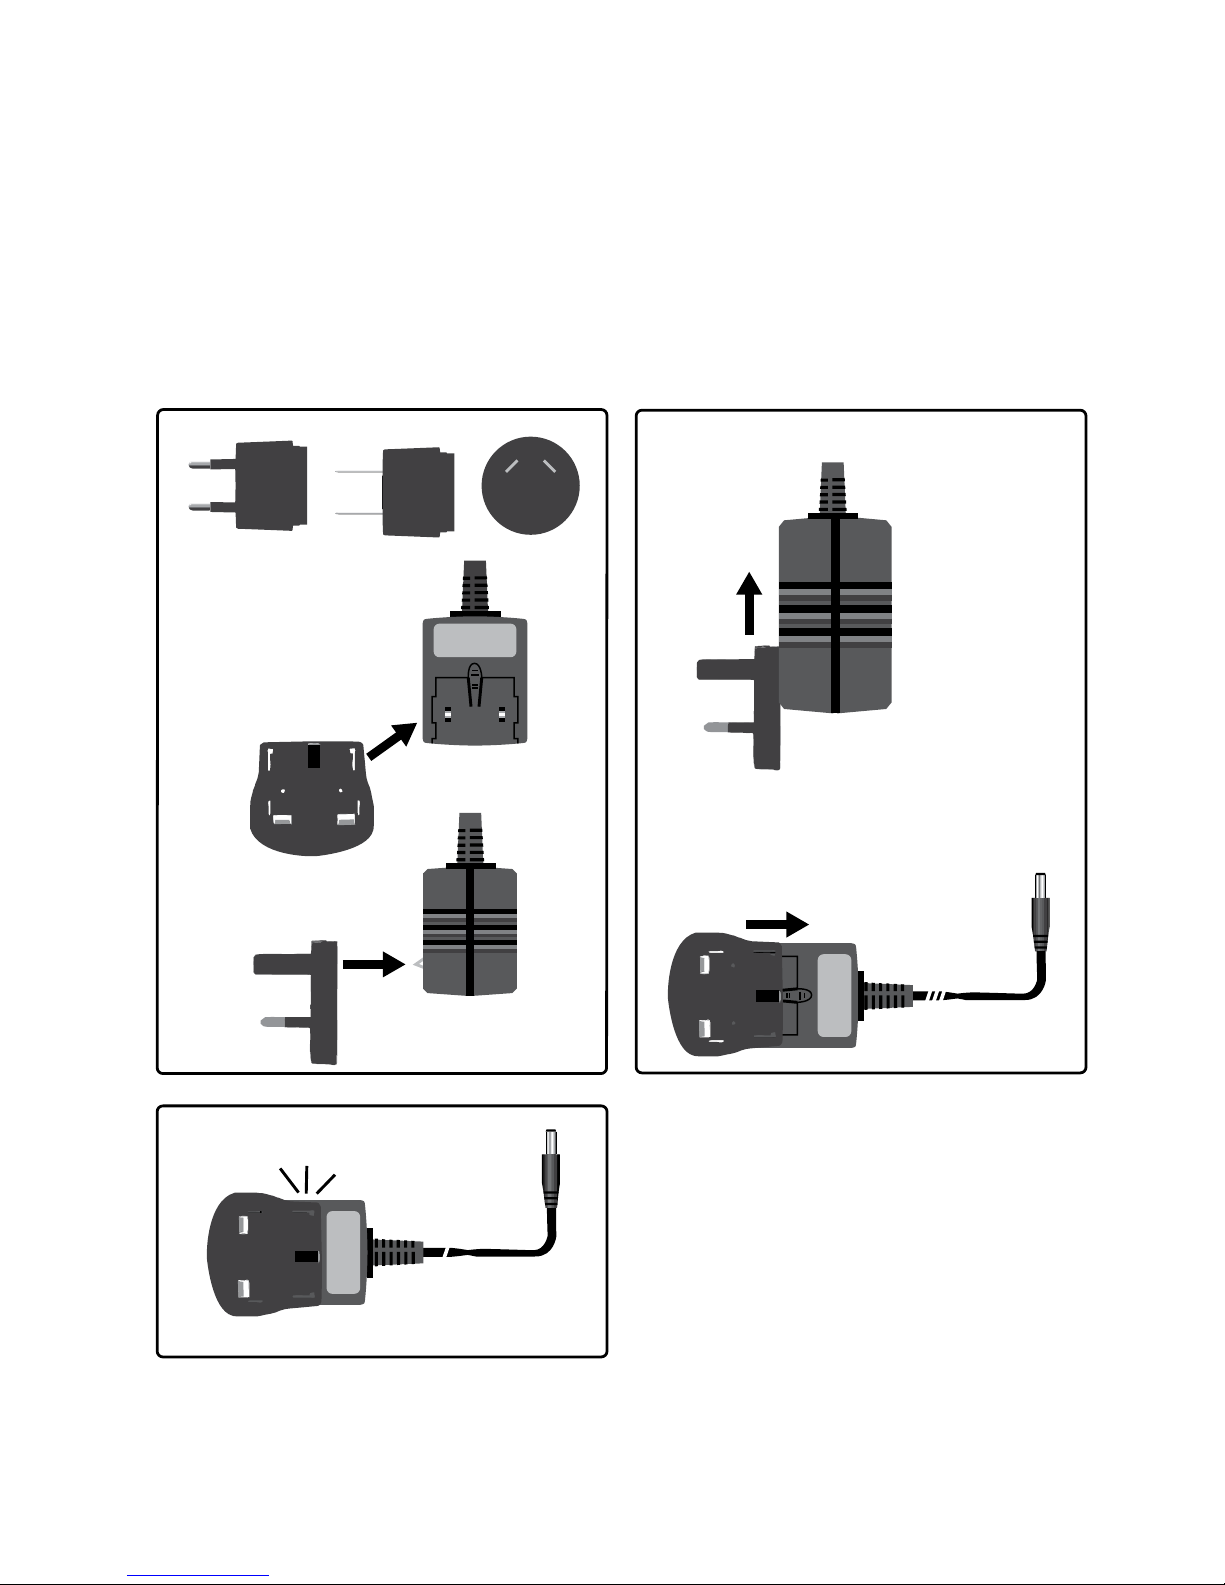
Click!
UK
1
2
3
EU
US AU
Power Supply Setup
E-3
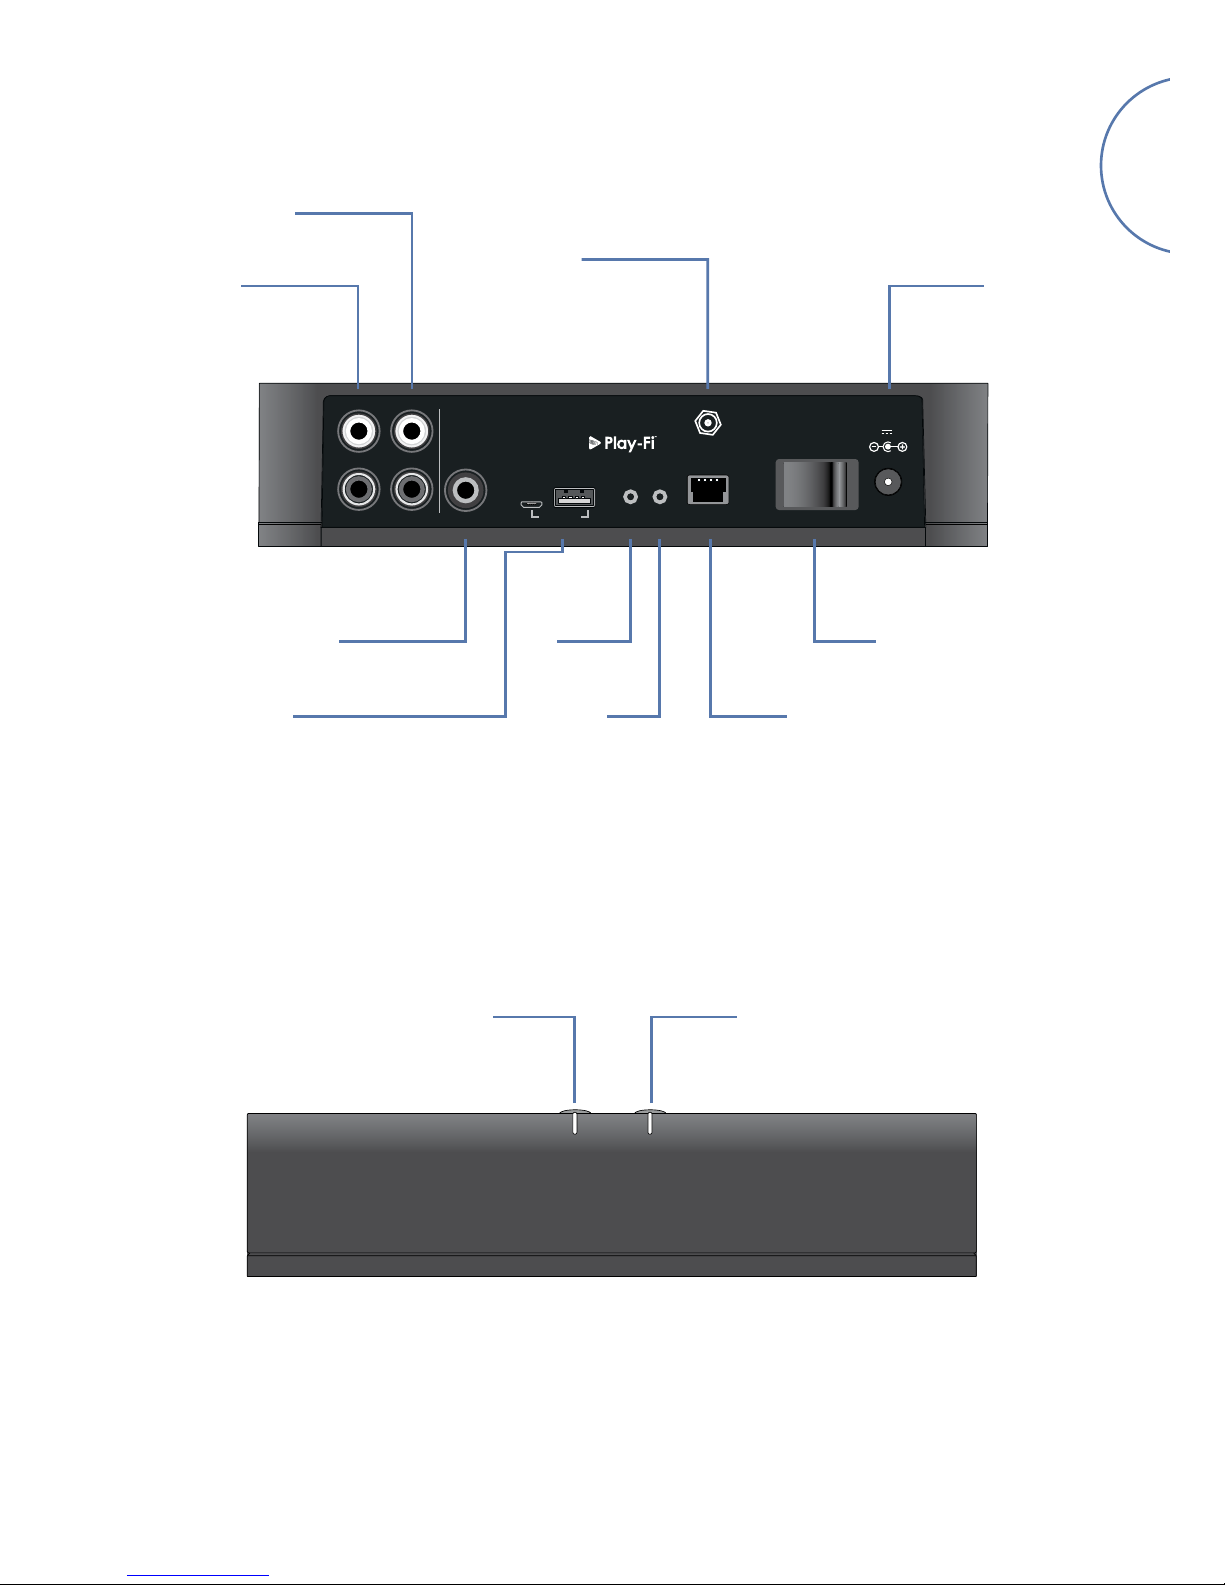
English
Variable Level
Audio Output
1
0
NET
12V 2.0A
POWER
SETUP RESET
DIG.OUTFIXED VARIABLE
R
L
LINE OUT
UPGRADE
ANT
Fixed Level
Audio Output
Power
Connector
Coaxial Digital
Output Wireless
Setup
Ethernet
Power
Switch
Connectors and Controls
Wi-Fi Antenna
Connector
ResetUSB Service Ports
(Software upgrade only)
NET STATUS
Volume +Volume –
Volume Control and Mute
The variable line output volume is adjusted by pressing the volume up (+) and down (-) buttons on the top panel.
Pressing both volume buttons at the same time will cause the output to mute and the front panel STATUS LED
will change to orange.
Note: The volume control does not affect the fixed line and S/PDIF outputs of the rPlay.

E-4
1
0
NET
12V 2.0A
POWER
SETUP RESET
DIG.OUTFIXED VARIABLE
R
L
LINE OUT
UPGRADE
ANT
POWER
1
0
COAX USB
FIXED VARIABLE OPT2 OPT1
R
L
2
112V DC
2.0A
ANT
LAN
VOLTAGE SELECT
AUDIO OUT
L
R
12
L
R
AUX
IN
REMOTE
IN
220 - 240V
~50Hz
110 -120V
~60Hz
L
R
VOLTAGE SELECT
PRE
IN
REMOTE
IN
220 - 240V
~50Hz
110 -120V
~60Hz
L
R
DAC
Connections
Integrated Amplifier
Power Amplifier
Network Router
Wi-Fi Antenna
Power Supply
rPlay

E-5
English
Before You Begin...
1. When setting up the rPlay using a wireless connection, always wait for the front LEDs to stop flashing after the
unit is switched on. This will allow the rPlay to boot up. The rPlay is ready when the STATUS LED turns red and
the NET LED starts pulsing blue.
2. When setting up the rPlay using a wired connection, always connect the Ethernet cable before the unit is
switched on. Power on the unit and allow the rPlay to boot up. Once a wired connection is established, the
NET LED will turn off and the STATUS LED will turn purple.
Android™ Users
Option 1: My Router Supports Wi-Fi Protected Setup™
1. Press and hold the SETUP button located on the rear panel of your rPlay for approximately 4 seconds. The NET
LED will blink twice at regular intervals.
2. Press the Wi-Fi Protected Setup button on your router.
3. The rPlay will now connect to your network and the NET LED will stop blinking and stay on.
4. Download the DTS Play-Fi® app from the Google Play™ store or the Amazon app store.
5. Connect your mobile device to the same network that the rPlay is connected to.
6. Launch the DTS Play-Fi app and follow the on-screen instructions.
Option 2: My Router Does Not Support Wi-Fi Protected Setup
1. Download the DTS Play-Fi app from the Google Play store or the Amazon app store.
2. Launch the app and you will be prompted to set up the new device. Follow the on-screen instructions and
complete the set-up.
3. The rPlay is now set-up and ready for use.
Option 3: Wired Connection To A Network
1. Download the DTS Play-Fi app from the Google Play store or the Amazon app store.
2. Using the supplied Ethernet cable, connect the rPlay to your router.
3. Turn on the rPlay.
4. Connect your mobile device to the same network that you want the rPlay to be connected to.
5. Launch the DTS Play-Fi app and wait for the app to automatically detect the rPlay and connect it to your home
network.
6. The rPlay is now set-up and ready for use.
Setup

E-6
iOS Users
Option 1: AirPlay Speaker Setup
1. Press and hold the SETUP button located on the rear panel of your rPlay for approximately 8 seconds.
2. Select the wireless network settings on your iOS device.
3. Go to the Wi-Fi settings on your mobile device and navigate to "SET UP NEW AIRPLAY SPEAKER..."
4. Select the speaker called "rPlay-XXXXXX" (where XXXXXX is a unique number assigned to the rPlay).
5. Select the network you want the rPlay to connect to and press "Next".
6. Follow the on-screen instructions to complete the rPlay setup as an AirPlay speaker.
Option 2: My Router Supports Wi-Fi Protected Setup
1. Press and hold the SETUP button located on the rear panel of your rPlay for approximately 4 seconds. The NET
LED will blink twice at regular intervals.
2. Press the Wi-Fi Protected Setup button on your router.
3. The rPlay will now connect to your network and the NET LED will stop blinking and stay on.
4. Download the DTS Play-Fi app from the Apple App Store.
5. Connect your mobile device to the same network that the rPlay is connected to.
6. Launch the DTS Play-Fi app and follow the on-screen instructions.
Option 3: My Router Does Not Support Wi-Fi Protected Setup
1. Download the DTS Play-Fi app from the Apple App Store.
2. Launch the app and you will be prompted to set up the new device. Follow the on-screen instructions and
complete the set-up.
3. Exit the app and access the settings on your mobile device.
4. Go to the Wi-Fi settings on your mobile device, select the wireless network called "PlayFi2DeviceXXXXXX" and
connect to it (where XXXXXX is a unique number assigned to the rPlay).
5. Exit the Wi-Fi settings and launch the DTS Play-Fi app again. Select your home wireless network and allow the
rPlay to connect to it. Once connected the NET LED will stop blinking and stay on.
6. The rPlay is now set-up and ready for use.
Option 4: Wired Connection To A Network
1. Download the DTS Play-Fi app from the Apple App Store.
2. Using the supplied Ethernet cable, connect the rPlay to your router and turn on the rPlay.
3. Connect your mobile device to the same network that you want the rPlay to be connected to.
4. Launch the DTS Play-Fi app and wait for the app to automatically detect the rPlay and connect it to your
home network.
5. The rPlay is now set-up and ready for use.

E-7
English
Windows® PC Users
Option 1: My Router Supports Wi-Fi Protected Setup
1. Press and hold the SETUP button located on the rear panel of your rPlay for approximately 4 seconds. The NET
LED will blink twice at regular intervals.
2. Press the Wi-Fi Protected Setup button on your router.
3. The rPlay will now connect to your network and the NET LED will stop blinking and stay on
4. Download the DTS Play-Fi app from https://play-.com/apps/windows/.
5. Connect your Windows device to the same network that the rPlay is connected to.
6. Launch the DTS Play-Fi app and follow the on-screen instructions.
Option 2: My Router Does Not Support Wi-Fi Protected Setup
1. Download the DTS Play-Fi software from https://play-.com/apps/windows/ and install it on your PC.
2. Once the installation is complete, click on the Settings icon and choose "Set-Up Play-Fi Device".
3. The app will automatically find your device and it will guide you through the set-up procedure.
4. The rPlay is now set-up and ready for use.
Option 3: Wired Connection To A Network
1. Download the DTS Play-Fi app from https://play-.com/apps/windows/.
2. Using the supplied Ethernet cable, connect the rPlay to your router.
3. Turn on the rPlay.
4. Connect your mobile device to the same network that you want the rPlay to be connected to.
5. Launch the DTS Play-Fi app and wait for the app to automatically detect the rPlay and connect it to your home
network.
6. The rPlay is now set-up and ready for use.
NOTE
Once the rPlay is fully configured, make sure that the rPlay is selected as the default Windows playback device.

E-8
Operation
Using the DTS Play-Fi app on your Android
1. Download the DTS Play-Fi app from the Google Play store or the Amazon app store.
2. Launch the DTS Play-Fi app installed on your device.
3. The app will automatically find all connected Play-Fi speakers on your network.
4. Select the speaker(s) you want to connect to.
5. Select your music and start playing
Using the DTS Play-Fi app on your iOS device
1. Download the DTS Play-Fi app from the Apple App Store.
2. Launch the DTS Play-Fi app installed on your device.
3. The app will automatically find all connected Play-Fi speakers on your network.
4. Select the speaker(s) you want to connect to.
5. Select your music and start playing
Using AirPlay on your iOS device
1. Locate and press the AirPlay icon on your iOS device
2. Choose the rPlay as the AirPlay speaker
3. Select your music and start playing
Using the DTS Play-Fi app on your Windows PC
1. Download the DTS Play-Fi app from https://play-.com/apps/windows/.
2. Launch the DTS Play-Fi app installed on your Windows PC or open the DTS Play-Fi app from the Windows
system tray
3. Select any one of the available Play-Fi devices
4. Select your music and start playing

E-9
English
Device Usage
Device App Content Multi-Room
Android Play-Fi Select music services
Music stored on device
Up to eight rPlay devices
Multiple simultaneous users
Speakers can be zoned
UPnP All audio content One to one only
iOS
AirPlay iTunes
All iOS music apps One to one only
Play-Fi Select music services
iTunes, music stored on device
Up to eight rPlay devices
Multiple simultaneous users
Speakers can be zoned
UPnP All audio content One to one only
Windows Play-Fi All audio content
Up to eight rPlay devices
Multiple simultaneous users
Speakers can be zoned
UPnP All audio content One to one only
NET LED
Pulsing BLUE The rPlay is waiting to be configured for a wireless connection
Flashing BLUE The rPlay is initializing or a firmware update is in progress or
the rPlay is attempting to connect to a wireless network
Flashing BLUE (twice at regular intervals) Wireless setup is enabled
Solid BLUE The unit is connected to a wireless network
Off A wired network is connected or
unit is booting up
STATUS LED
Solid BLUE The rPlay is on, connected to a network and playing
Solid PURPLE The rPlay is on, connected to a network, but not playing
Solid RED The rPlay is on and not connected to a network
Solid ORANGE The rPlay is muted
Flashing ORANGE The rPlay is initializing or a firmware update is in progress
Flashing RED An error has occurred

E-10
Specications
DAC Texas Instruments PCM5102
Frequency response 20Hz–20kHz
Total Harmonic Distortion + Noise 0.0007%
Signal-to-noise ratio (A-weighted) 117dB
Output level Fixed level 2.15V RMS
Variable level 0–2.15V RMS
Supported audio file formats mp3 (MPEG Layer III)
m4a, aac (Advanced Audio Coding / Apple Lossless)
flac (Free Lossless Audio Codec)
wav (Waveform Audio File)
File quality (see note below) Up to 24-bit/192kHz
Power requirements (max) 12V DC, 2.0A
Dimensions (WxHxD) 194 x 44 x 124mm
Net weight 1.1Kg
Supplied accessories Power supply with interchangeable plugs
Wi-Fi antenna
Stereo phono–phono cable
Digital phono cable
Ethernet cable
User manual and registration card
E&OE. All specification values are typical unless otherwise stated
Compatibility and System Requirements
• A Windows PC running Windows 7 or higher (32 or 64 bit)
• An Android device running Android 2.2 or higher
• Supports iOS 7 or later for setup using Wireless Accessory Configuration
• AirPlay works with iPhone, iPad, and iPod touch with iOS 4.3.3 or later, Mac with OS X Mountain Lion or later, and
PC with iTunes 10.2.2 or later
• For optimal Play-Fi streaming experience, a wireless router rated at least N600 is recommended
NOTE:
Files up to 16-bit/48 kHz are streamed without compression or transcoding. High resolution audio files
(24-bit/192kHz), are down-sampled to 16-bit/48kHz for transmission. This allows for the most reliable streaming
experience over Wi-Fi to multiple speakers.
For those who wish to hear high resolution audio as originally intended, Critical Listening mode in the DTS
Play-Fi app will enable native rendering of high resolution files up to 24/96, without down-sampling or network
synchronization adjustment. In this way, audio files retain their original audio integrity. For more details regarding
the Critical Listening mode please refer to https://play-.com/faq/entry/critical-listening-mode.

E-11
English
This entitles you to have the unit repaired free of charge for two years after purchase, provided that it was
originally purchased from an authorised Arcam dealer. The manufacturer can take no responsibility for defects
arising from accident, misuse, abuse, wear and tear, neglect or through unauthorised adjustment and/or repair,
neither can they accept responsibility for damage or loss occurring during transit to or from the person claiming
under the guarantee.
The warranty covers:
Parts and labour costs for two years from the purchase date. After two years you must pay for both parts and
labour costs. The warranty does not cover transportation costs at any time.
Claims under guarantee
This equipment should be packed in the original packing and returned to the dealer from whom it was
purchased, or failing this, directly to the Arcam distributor in the country where the product was purchased.
It should be sent carriage prepaid by a reputable carrier – not by post. No responsibility can be accepted for the
unit whilst in transit to the dealer or distributor and customers are therefore advised to insure the unit against loss
or damage whilst in transit.
For further details contact Arcam at support@arcam.co.uk.
Problems?
If your Arcam dealer is unable to answer any query regarding this or any other Arcam product please contact
Arcam Customer Support at the above address and we will do our best to help you.
Correct disposal of this product
This marking indicates that this product should not be disposed with other household waste
throughout the EU.
To prevent possible harm to the environment or human health from uncontrolled waste disposal
and to conserve material resources, this product should be recycled responsibly.
To dispose of your product, please use your local return and collection systems or contact the
retailer where the product was purchased.
Technology Licensing
Amazon is a trademarks of Amazon.com, Inc. or its affiliates.
Android and Google Play are trademarks of Google Inc.
Apple, AirPlay and iTunes are trademarks of Apple Inc., registered in the U.S. and other countries. App Store is a
service mark of Apple Inc.
IOS is a trademark or registered trademark of Cisco in the U.S. and other countries and is used under license.
The Spotify software is subject to third party licenses found here: www.spotify.com/connect/third-party-licenses
Windows is either registered trademark or trademark of Microsoft Corporation in the United States and/or other
countries.
For DTS patents, see http://patents.dts.com. Manufactured under license from DTS Licensing Limited. DTS, Play-Fi,
the Symbol, and Play-Fi together in combination with the Symbol are trademarks of DTS, Inc. DTS and Play-Fi are
registered trademarks of DTS, Inc. © DTS, Inc. All Rights Reserved.
Wi-Fi Protected Setup is a trademark of Wi-Fi Alliance®.
Worldwide Guarantee

E-12
FCC Information (for US customers)
1. PRODUCT
This product complies with Part 15 of the FCC Rules. Operation is subject to the following two conditions: (1) this device may not cause harmful
interference, and (2) this device must accept any interference received, including interference that may cause undesired operation.
2. IMPORTANT NOTICE: DO NOT MODIFY THIS PRODUCT
This product, when installed as indicated in the instructions contained in this manual, meets FCC requirements. Modification not expressly approved by
ARCAM may void your authority, granted by the FCC, to use the product.
3. NOTE
This product has been tested and found to comply with the limits for a Class B digital device, pursuant to Part 15 of the FCC Rules. These limits are
designed to provide reasonable protection against harmful interference in a residential installation.
This product generates, uses and can radiate radio frequency energy and, if not installed and used in accordance with the instructions, may cause
harmful interference to radio communications. However, there is no guarantee that interference will not occur in a particular installation. If this product
does cause harmful interference to radio or television reception, which can be determined by turning the product OFF and ON, the user is encouraged
to try to correct the interference by one or more of the following measures:
• Reorient or relocate the receiving antenna.
• Increase the separation between the equipment and receiver.
• Connect the product into an outlet on a circuit different from that to which the receiver is connected.
• Consult the local retailer authorized to distribute this type of product or an experienced radio/TV technician for help.
This equipment complies with FCC RF radiation exposure limits set forth for an uncontrolled environment. This equipment should be installed and
operated with minimum distance 20cm between the antenna and your body.
INDUSTRY CANADA Information (for CANADIAN customers)
This Class B digital apparatus complies with Canadian ICES-003
1. "This device complies with Industry Canada licence-exempt RSS standard(s). Operation is subject to the following two conditions: (1) this device
may not cause interference, and (2) this device must accept any interference, including interference that may cause undesired operation of the
device.
Le présent appareil est conforme aux CNR d'Industrie Canada applicables aux appareils radio exempts de licence. L'exploitation est autorisée
aux deux conditions suivantes : (1) l'appareil ne doit pas produire de brouillage, et (2) l'utilisateur de l'appareil doit accepter tout brouillage
radioélectrique subi, même si le brouillage est susceptible d'en compromettre le fonctionnement"
2. "This radio transmitter 11138A-CAPRICA2L has been approved by Industry Canada to operate with the antenna types listed below with the
maximum permissible gain and required antenna impedance for each antenna type indicated. Antenna types not included in this list, having a
gain greater than the maximum gain indicated for that type, are strictly prohibited for use with this device.
Le présent émetteur radio 11138A-CAPRICA2L a été approuvé par Industrie Canada pour fonctionner avec les types d'antenne énumérés
ci-dessous et ayant un gain admissible maximal et l'impédance requise pour chaque type d'antenne. Les types d'antenne non inclus dans cette
liste, ou dont le gain est supérieur au gain maximal indiqué, sont strictement interdits pour l'exploitation de l'émetteur."
Wanshih WSS002, Antenna Gain +2dBi
3. "This equipment complies with IC RSS102 radiation exposure limits set forth for an uncontrolled environment. This equipment should be installed
and operated with minimum distance 20 cm between the antenna and your body.
Cet équipement est conforme aux limites IC RSS102 d'exposition aux rayonnements définies pour un environnement non contrôlé. Cet
équipement doit être installé et utilisé à distance minimale de 20 cm entre l'antenne et votre corps."
IMPORTANT ANTENNA INFORMATION
The rPlay is only designed to operate with the supplied antenna. Any other antenna is strictly prohibited for use with the rPlay.
Français
Connexions et Guide de démarrage rapide


F-1
Français
Bienvenue…
... et merci d’avoir choisi le récepteur de musique sans l Arcam rPlay.
Arcam produit des composants audio de haute qualité depuis plus de trente-cinq ans. Pendant ce temps, nous
avons accumulé de vastes connaissances autant sur la conception que sur la construction des composants audio
an d’obtenir la meilleure performance audio pour le prix.
Ce manuel fournit des instructions pour connecter et utiliser votre rPlay.
Nous espérons que votre rPlay vous assurera des années de fonctionnement sans le moindre problème. Dans
l’éventualité, peu probable, où une panne surviendrait, ou si vous recherchez simplement des informations
supplémentaires sur les produits Arcam, les représentants de notre réseau de revendeurs se feront un plaisir de
vous aider. D’autres informations sont disponibles sur notre site web d’Arcam à l’adresse www.arcam.co.uk.
L’équipe de développement rPlay
F-2
Click!
UK
1
2
3
EU
US AU
Installation de l’alimentation
Table of contents
Languages:
Other Arcam Media Player manuals


