manuals.online logo
Brands
  1. Home
  2. •
  3. Brands
  4. •
  5. Argent
  6. •
  7. Mixer
  8. •
  9. Argent 107409 User manual

Argent 107409 User manual

I N S T A L L A TIO N TIP S
CARE + MAINTENANCE
Avoid acetone silicones upon installation, harsh chemicals and abrasive
cloths when cleaning (as these will scratch the chrome surface), waxed
based furniture creams (as these can result in a build up of deposits and may
detract from the appearance). Clean using a soft soapy cloth and polish with
a dry soft cloth and do not use undue pressure whilst cleaning. Ensure all
new installations are fully flushed prior to installing the ceramic headparts to
prevent any possible damage to the product and voiding of the warranty.
LICENCED PLUMBER/ INSTALLER
This water saving range of tapware and outlets have been fitted with flow
restrictors which can create greater hydrostatic back pressure to the ceramic
cartridge.
Always flush water inlet lines on new installations before fitting tapware to
avoid damage to ceramic valve.
Please Note:
- These tapware sets contain ceramic disc 180° turn spindles.
- Product not installed by a licensed plumber or in accordance with
relevant industry standards and regulations may void the manufacturers
warranty terms & conditions.
Please ensure the operating pressure to all points in the building conforms to
AS/NZS 3500.1 and does not exceed 500KPA .
Failure to limit the operating flow pressure, may void the warranty on this
fixture.
PRESSURE + TEMPERATURE REQUIREMENTS
Ensure operating water pressure is between 1-5 bar
(100-500Kpa).
If pressure is in excess of 500Kpa fit pressure reduction valve to ensure
installation conforms to AS/NZ 3500.1
This tapware set is not recommended for use with low pressure gravity feed
water systems.
Maximum hot water temperature 80°C.
WARRANTY
All Argent products are covered by a three (3) year warranty from the date
of purchase. Argent will undertake to rectify free of charge for parts and
labour, within this period any fault due to defects in materials or workmanship.
Regardless of interim service within that period, the warranty shall expire after
three (3) years from the date of original purchase.
Finishes
All Argent finishes are warranted against chipping and flaking, excluding
normal wear and tear for three (3) years from date of purchase.
Headpart s
All Argent replacement headparts will only be covered by warranty if the
fault can be clearly shown to have existed as a result of defect in manufac-
ture. There is a twelve (12) month warranty period only applicable for these
replacement parts.
Exclusions
This warranty is for normal domestic and commercial use only and excludes
any defect or injury caused by or resulting from misuse, abuse or neglect, ac-
cidental damage, improper installation or installation by unlicensed plumber,
products not installed to relevant National Standards and State Regulations.
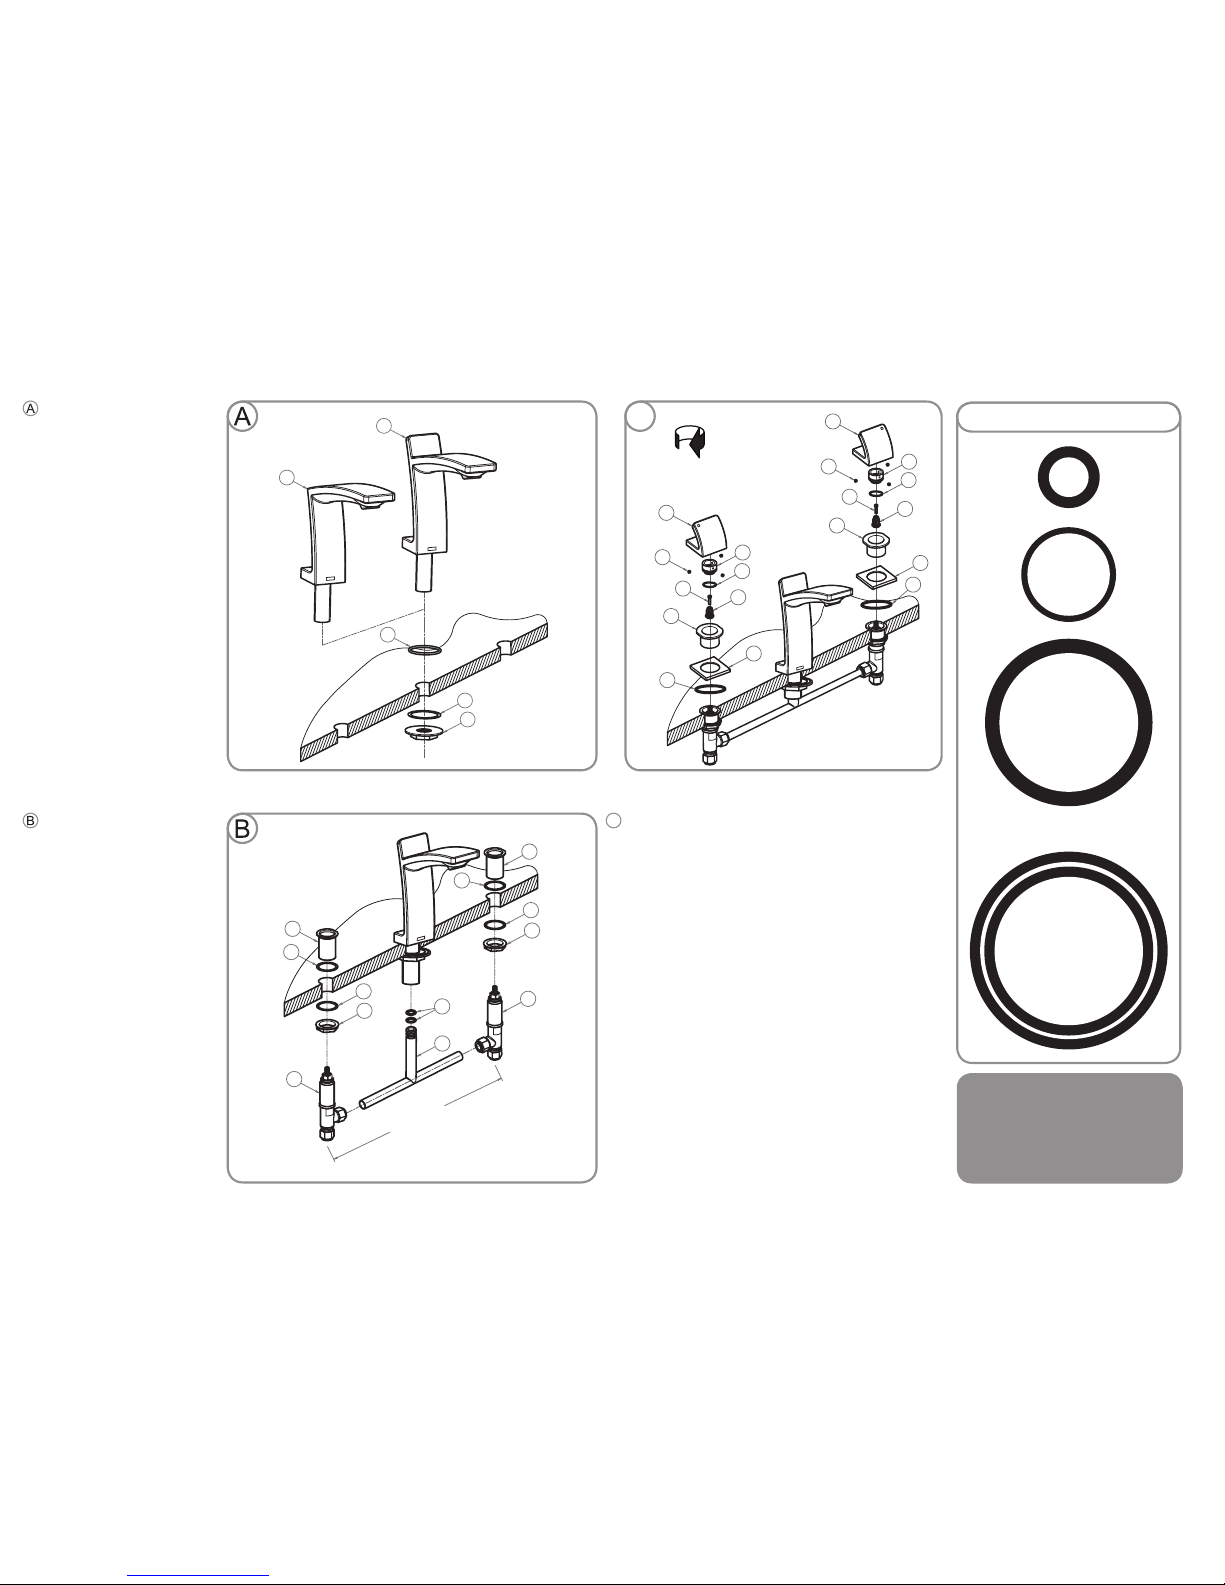
Z e n Basin S e t
I N S T A L L A TION INSTRUCTIO N S
WELS 5 star rated
Nominal flow rate 5Lpm
AS 3718
WMKA21008
SAI GLOBAL
107509
Zen S Basin Set
107409
Zen Basin Set
Brisbane
Level 3 / 18Wandoo Street
Fortitude Valley QLD 4006
Sydney
80 Abercrombie Street
Chippendale NSW 2008
Melbourne
198 Coventry Street
South Melbourne VIC 3205
Perth
Unit 1 / 40 Collingwood Street
Osborne Park WA 6017
Technical Advice
1800 356 717
Fax
1300 656 057
www.argentaust.com.au
The more
stars the more
water efficient
A joint government and industry program
Licence No. 0008
Whentested in accordance with Standard AS/NZS 6400
For more information and tocompa re
products,refer to:
www.waterrating.gov.au
5
Water Consumption
litres per minute
WATER
RATING
ARG-001-254, InsIns Zen BasinSet
Australian Design Registration
AUST. DES. REGN. NO. 307310
AUST. DES. REGN. NO. 307311
AUST. DES. REGN. NO. 307312
FIT BODY ASSEMBLY
Fit body assembly (7) to basin/
bench top ensuring that the back
nut & washer (8) & (9) are tted
prior to assembly.
Fit body nut (11) from the top
of basin / bench top ensuring
sealing O-ring (8) is fitted to
seal the top of basin / bench top
opening.
Tighten nut (9) onto body
assembly (7)
FIT BASIN SPOUT
Install basin spout (1) to basin/
bench ensuring washer & seal
ring (2) & (3) are tted to the
centre outlet hole.
NOTE: For O-ring identication
please refer to the O-ring
Template.
FIT ‘T’ PIECE
Measure basin tap hole centres
and cut the ‘T’ piece (5) to
required length to suit bodies (7)
and t the two O-rings (6) with
silicon based grease to the centre
spigot on the copper ‘T’ piece.
Fit O-ring (17) to spline (18) and
apply silicon based grease.
Seal around tap bodies with
approved sealant to ensure
the basin top is water tight,
tighten all back nuts tted to
underside.
Fit O-ring (12) to underside
of dress ange (13) and use
ange nut (14) to tighten down
over body assembly (7). Ensure
alignment of square anges.
Fit nylon snap connector (15)
to spindle shaft and secure with
locating screw (16).
Do not over tighten this
screw!
Ensure O-ring (17) on spline is
lubricated prior to engaging!
Ensure ceramic valve is in a
closed/off position (CLOSE
DIRECTION)
Possition spline (18) onto
snap connector (15)
DO NOT SNAP ON YET!
Insert handle (20) into spline
(18) and align with ange (13)
Use one grub screw (19) to
fasten handle to spline (18)
then remove handle & spline
and add remaining 2 grub
screws (19).
Press t handle and spline
to nylon snap connector
(15) untill it clicks ensuring
alignment of handle to ange
and ‘H’ & ‘C’ indicators.
ASSEMBLE AND FIT DRESS FITTINGS
6
5
7
7
11
8
8
9
180mm - 240mm Centres
Adjust to Suit
8
9
8
11
2
3
4
1
1
107509
107409
C
CLOSE
DIRECTION
20
16
15
13
12
14
12
17
18
19
3 Grub Screws
20
16
15
13
14
17
18
19
3 Grub Screws
C
O-ring Template
O-ring (12)
QTY 2
O-ring (6)
QTY 2
Flat Washer (3)-(8)
QTY 5
O-ring (17)
QTY 2
O-ring (2)
QTY 1
SUITABLE GREASE
USAGE
Please use AS/NZS 4020
approved silicon based grease to avoid
deterioration of O-Rings.

This manual suits for next models

1

Popular Mixer manuals by other brands

Team Kalorik TKG BLS 1000 operating instructions

Team Kalorik

Team Kalorik TKG BLS 1000 operating instructions

Sulzer ABS RW 480 Installation and operating instructions

Sulzer

Sulzer ABS RW 480 Installation and operating instructions

Bosch MCM4006GB operating instructions

Bosch

Bosch MCM4006GB operating instructions

CombiSteel 7061 Series user manual

CombiSteel

CombiSteel 7061 Series user manual

Bose T1 ToneMatch Service manual

Bose

Bose T1 ToneMatch Service manual

MULTIQUIP EM120S series Operation and parts manual

MULTIQUIP

MULTIQUIP EM120S series Operation and parts manual

KitchenAid KSM3311 quick start guide

KitchenAid

KitchenAid KSM3311 quick start guide

Aerre Inox AMT Series Installation User Guide Maintenance

Aerre Inox

Aerre Inox AMT Series Installation User Guide Maintenance

Stow CMS-4S Operation and parts manual

Stow

Stow CMS-4S Operation and parts manual

Sunbeam MIXMASTER 2372 instruction manual

Sunbeam

Sunbeam MIXMASTER 2372 instruction manual

Morphy Richards Total Control 400405 user manual

Morphy Richards

Morphy Richards Total Control 400405 user manual

AKG AS 8 operating instructions

AKG

AKG AS 8 operating instructions

Alto TMX200DFX quick start guide

Alto

Alto TMX200DFX quick start guide

Grundfos AMG Series Installation and operating instructions

Grundfos

Grundfos AMG Series Installation and operating instructions

Wolfgang Puck WPPSM050C Use and care

Wolfgang Puck

Wolfgang Puck WPPSM050C Use and care

KitchenAid K45 user manual

KitchenAid

KitchenAid K45 user manual

KitchenAid KSM150AGBCA0 parts manual

KitchenAid

KitchenAid KSM150AGBCA0 parts manual

Farberware FDM300 Use and care instruction

Farberware

Farberware FDM300 Use and care instruction

manuals.online logo
manuals.online logoBrands
  • About & Mission
  • Contact us
  • Privacy Policy
  • Terms and Conditions

Copyright 2025 Manuals.Online. All Rights Reserved.