Argo NARCISO baby 10 User manual

CONTENTS
07/2009
MANUALE D'USO - INSTRUCTION MANUAL- NOTICE D’UTILISATION
BEDIENUNGSANLEITUNG -MANUAL DE USO
DEUMIDIFICATORE-DEHUMIDIFIER - DESHUMIDIFICATEUR
LUFTENTFEUCHTER – DESHUMIDIFICADOR

INDICE
AVVERTIMENTI / ATTENZIONE ..…………………..........................................0
DESCRIZIONE DEI COMPONENTI / FUNZIONI……………..…...……………1
ISTRUZIONI D’USO…………......…………………………………………………2
DRENAGGIO CONTINUO CONDENSA ………………………………………..3
AVVERTIMENTI...…………………………………………………………………..4
MANUTENZIONE / EMERGENZA.………..……………………………………...5
SPECIFICHE…..…………………………………………......................................6

AVVERTIMENTI
●Non piegate il cavo come mostrato
qui sotto
●
Assicuratevi che la spina sia inserita
in modo saldo
●
Non utilizzate spine multiple,
come mostrato qui sotto!
●Assicuratevi che la spina sia pulita!
●Dopo avere spento l’apparecchio,
estraete la spina dalla presa
●Non inserite la spina con le mani
bagnate!
ATTENZIONE
●
Non appoggiate nulla sul
pannello comandi!
●
Non coprite tutte le prese d’aria e
tutte le uscite d’aria dell’apparecchio!
●
Non permettete ai bambini di
giocare con l’apparecchio!
●
Non bagnate la macchina o il
pannello comandi!
●
Tenete gas o oli infiammabili
lontano dall’apparecchio!
●Non tentate di fare manutenzione da
soli: rivolgetevi a personale qualificato!
-0-

DESCRIZIONE DEI COMPONENTI
PANNELLO COMANDI
ASPIRAZIONE ARIA
UMIDA
FILTRO ARIA
USCITA ARIA
DEUMIDIFICATA
FORO DRENAGGIO
CONTINUO
TANICA PER
RACCOLTA CONDENSA
DESCRIZIONE DELLE FUNZIONI
CONTINUO
Il deumidificatore
rimuove
continuamente
l’umidità
OFF
Il deumificatore smette
di rimuovere l’umidità
LUCE BLU FUNZIONAMENTO
Quando la zona luminosa attorno alla
manopola si illumina di blu, significa che il
deumidificatore sta funzionando.
LUCE ROSSA TANICA PIENA
Quando la tanica dell’acqua
è piena, la zona luminosa attorno alla
manopola si illumina di rosso e il
deumidificatore smette di funzionare
immediatamente.
LUCE GIALLA SBRINAMENTO
Quando funziona a bassa temperatura per
un breve periodo, il deumidificatore inizia a
funzionare in modalità sbrinamento, la
zona
luminosa attorno alla manopola si illumina
di giallo.
NORMALE
Controllo dell’umidità tra
50%-60%.
-1-

ISTRUZIONI D’USO
●
Messa in funzione dell’apparecchio
1) Assicuratevi che la spina sia inserita in modo saldo
nella presa.
2) Assicuratevi che la tanica dell’acqua sia in posizione corretta.
(Dopo aver inserito la spina per la prima volta, se si illumina la luce
rossa di tanica piena, estraete la tanica dell’acqua e quindi rimettetela
al suo posto.)
3) Girate in senso orario la manopola per il controllo dell’umidità fino al livello
di umidità desiderato (solitamente nella posizione normale).
Se l’umidità in ambiente è sopra il livello desiderato, l’apparecchio inizia
ad estrarre umidità.
●Girate il selettore per il controllo dell’umidità nella posizione “continuo” per far
funzionare l’apparecchio continuamente quando l’ambiente è molto umido.
4) Quando l’umidità in ambiente raggiunge il livello desiderato, l’apparecchio smette di funzionare.
5) Quando il livello di umidità nell’ambiente torna al di sopra del livello desiderato, l’apparecchio
ricomincia a funzionare.
6) L’alternanza tra stop e funzionamento dell’apparecchio è regolata dal livello di umidità presente in
ambiente rispetto al livello impostato.
●Quando la luce rossa che segnala il riempimento della tanica si illumina
Quando la tanica per la raccolta della condensa è piena, la zona luminosa attorno alla manopola si
illumina di rosso e l’apparecchio smette di funzionare. Togliete l’acqua dalla tanica, rimettete la
tanica a posto e l’apparecchio riprenderà a funzionare normalmente.
Togliete l’acqua dalla tanica con
due mani
●
Sbrinamento
Quando l’apparecchio funziona a bassa temperatura (meno di 12℃) la superficie dell’evaporatore
può accumulare ghiaccio e questo influenza l’efficienza del deumidificatore. Quando succede ciò,
l’apparecchio va automaticamente in modalità sbrinamento. E’ una procedura consueta. La luce
gialla di sbrinamento si accende. Il tempo di sbrinamento può variare. Se si forma ghiaccio,
spegnete l’apparecchio per alcune ore e poi riavviatelo. Non è consigliabile l’utilizzo del
deumidificatore con temperature al di sotto dei 5°C.
EMERGENZA
Estraete la spina dell’apparecchio quando c’è qualcosa che non funziona bene.
Contattate il servizio assistenza tecnica immediatamente.
Non smontate il deumidificatore da soli!
-2-

DRENAGGIO CONTINUO
●
Drenaggio continuo condensa
Foro per il drenaggio
continuo
1) Inserite il tubo in PVC nell’apposito foro sul retro dell’apparecchio, c.s.:
1. Procurate un tubo in PVC (non fornito) per
estrarre l’acqua. (I tubi sono venduti nel mercato
con diametro interno 13 mm)
2. Togliete il cappuccio di scarico permanente sul retro
3. Togliete il cappuccio soffice, conservatelo insieme
al cappuccio di scarico.
Cappuccio soffice
Cappuccio dello scarico
Retro dell’apparecchio
Tubo per drenaggio
Cappuccio dello scarico
4. Collegate il tubo in PVC con l’uscita dello scarico.
Tubo del drenaggio in PVC
Tubo di crenaggio in PVC
Tanica
5. Rimettete la tanica nella sua posizione originaria..
Rimettete la tanica al suo
posto nella direzione indicata dalla
freccia
2) Rimettete la tanica al suo posto, secondo quanto indicato.
●
Come inserire il tubo in PVC per lo scarico continuo
Quando usate il drenaggio continuo, il tubo in PVC deve essere messo sotto il livello del
foro di drenaggio. Evitate di posizionarlo su un suolo irregolare e di piegare il tubo.
-3-

AVVERTIMENTI
●
Non tirate il cavo per evitare di romperlo, questo
potrebbe essere pericoloso.
●
Non usate insetticidi, oli o vernici a spruzzo attorno
all’apparecchio, questo potrebbe danneggiare la
plastica o causare un principio di incendio.
●Non collocate l’apparecchio su una superficie non
piana, per evitare rumore ed eventuale
perdita di acqua.
●Mantenete sempre almeno 20 cm dal muro per dissipare
il caldo correttamente. Dovete appendere i vestiti almeno
ad una distanza di 50 cm sopra l’apparecchio.
20 cm
50cm
●
E’ pericoloso inserire qualunque oggetto
nell’apparecchio.
●Chiudete tutte le finestre aperte per raggiungere la
massima efficienza di deumidificazione..
●
Mantenete l’apparecchio lontano dalle fonti
di calore.
●
Quando lo muovete o lo riponete, non mettete il
deumidificatore sul lato o sottosopra ed evitate di
scuoterlo violentemente.
-4-

MANUTENZIONE
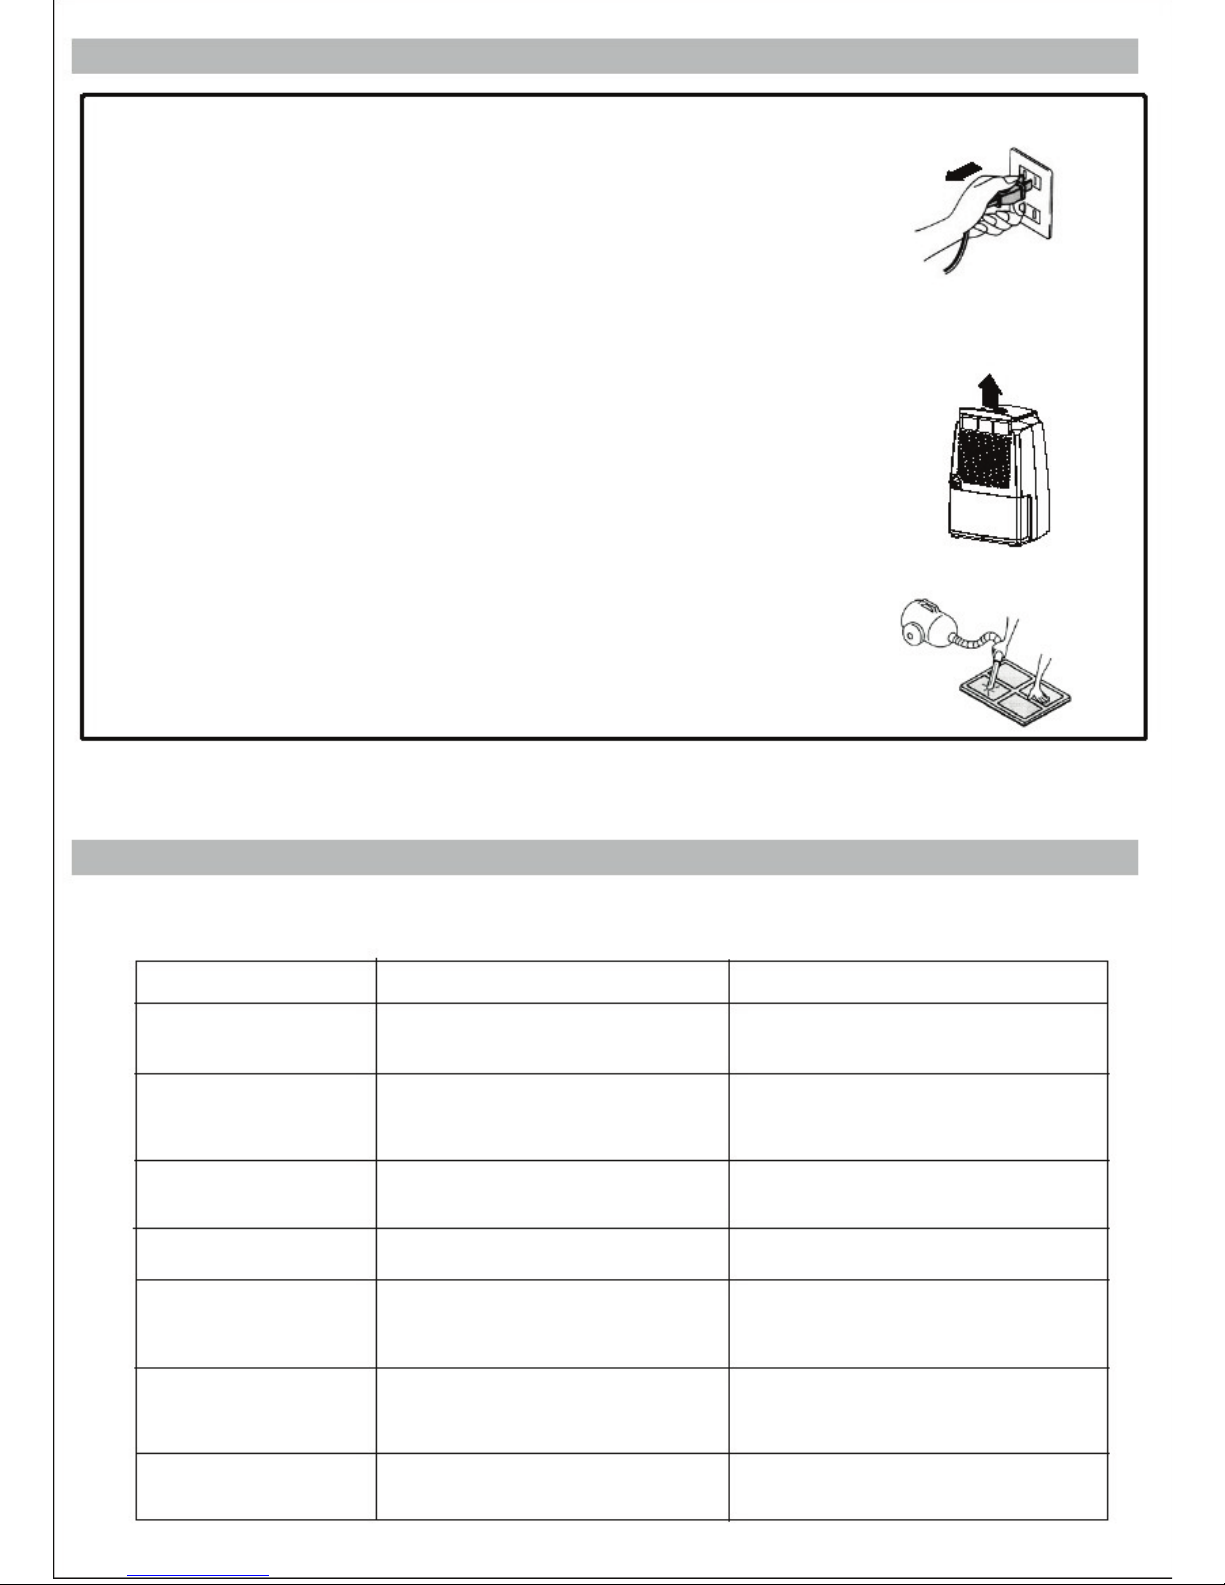
Estraete sempre la spina dalla presa prima di effettuare qualsiasi operazione di
manutenzione o pulizia dell’apparecchio, per ragioni di sicurezza!
1) Pulizia della superficie esterna dell’apparecchio
A. Pulite la superficie esterna del deumidificatore utilizzando uno straccio soffice ed
eventualmente un detergente neutro.
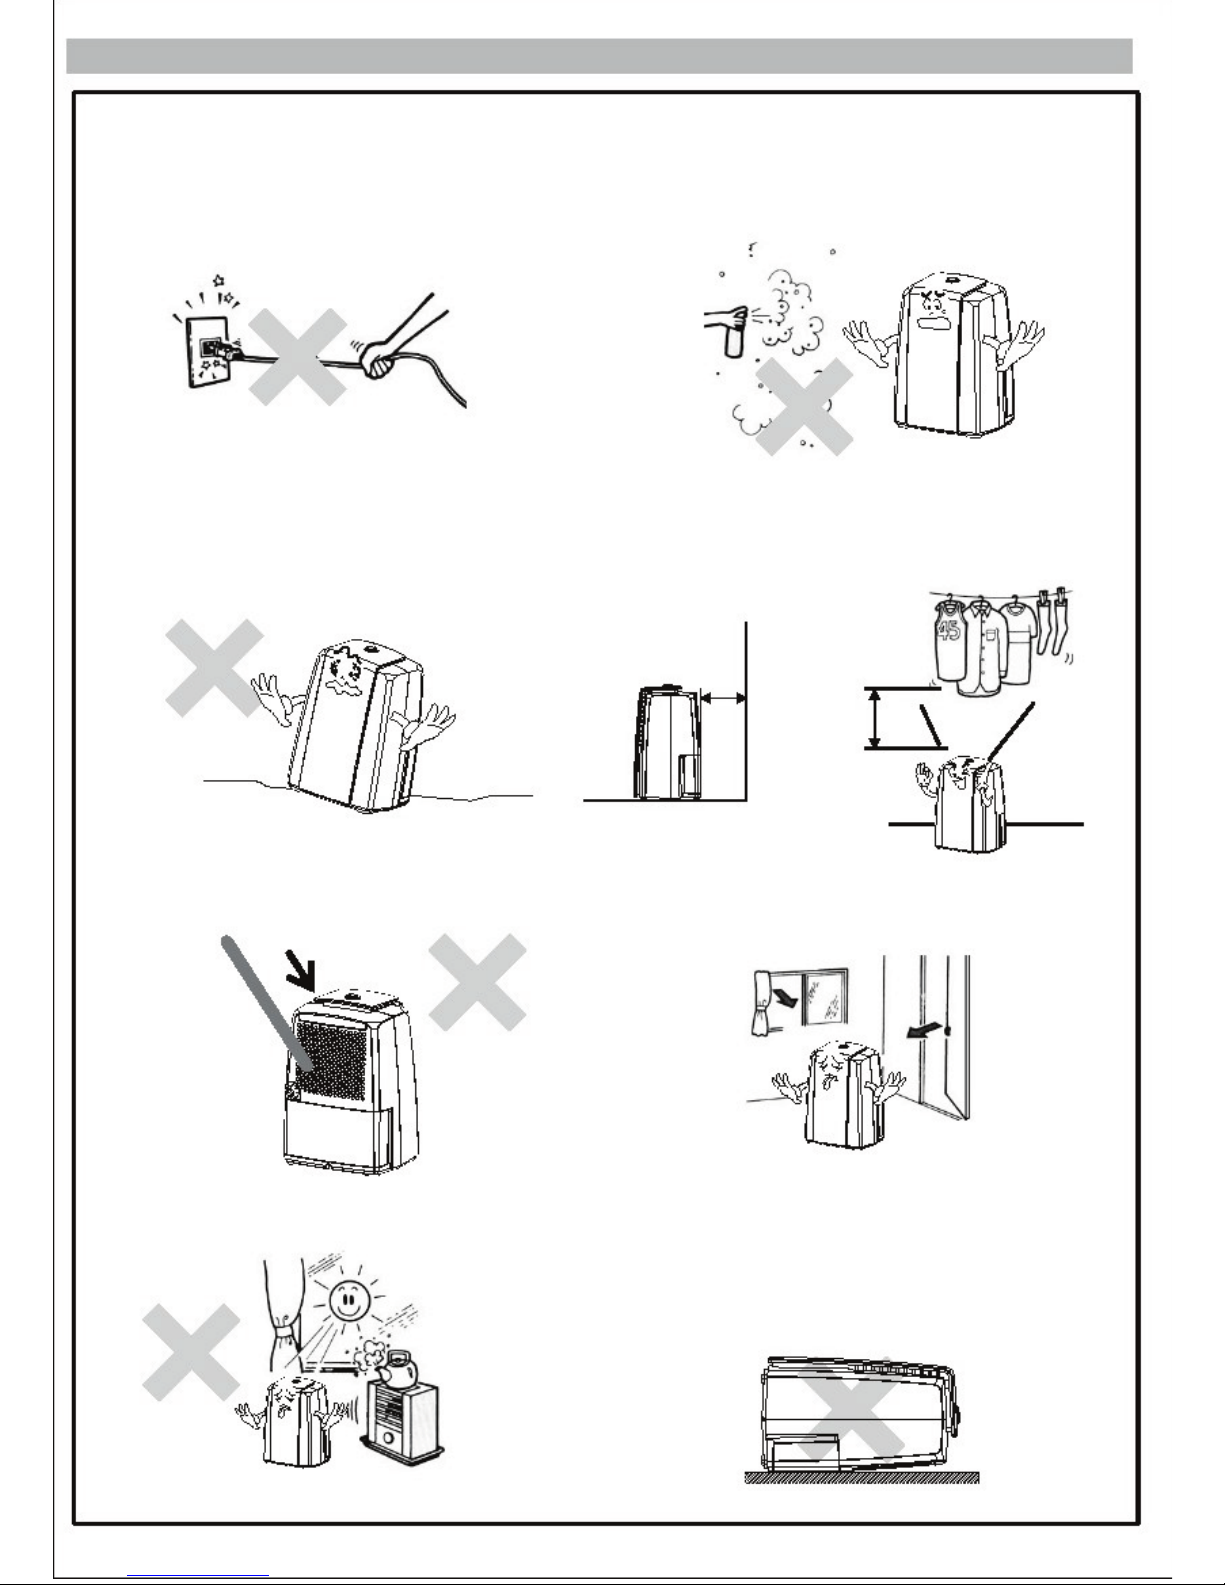
B. Non mettete l’apparecchio a contatto diretto con acqua, poiché potrebbe causare
scosse elettriche.
2) Pulizia del filtro dell’aria:
La funzione del filtro è trattenere la polvere presente nell’aria. Se il filtro è ostruito
dalla polvere il consumo elettrico aumenta. Per avere la massima efficienza, pulite
il filtro una volta ogni due settimane.
●Pulizia del filtro
A. Estraete il filtro.
B. Pulite il filtro con un aspirapolvere o lavandolo con acqua quindi
asciugatelo con un panno.
C. Rimettete il filtro al suo posto.
IDENTIFICAZIONE E SOLUZIONE PROBLEMI DI FUNZIONAMENTO
In caso di malfunzionamento del deumidificatore, controllate le possibili cause di problemi e le relative
soluzioni sotto indicate:
Problema
Possibile causa
Soluzione
Sia il ventilatore che il
compressore non funzionano
Il compressore o il ventilatore
non funzionano.
Manca l’alimentazione
Controllare che nella presa ci sia corrente.
Controllare che l’apparecchio sia stato
attivato.
Rivolgersi ad un centro assistenza.
Attendere che siano trascorsi 3 minuti.
Rivolgersi ad un centro assistenza.
Pulire il filtro dell’aria.
Rivolgersi ad un centro assistenza
E’ il normale funzionamento.
Porre su una superficie piana.
Pulire il filtro.
Spegnere l’apparecchio e attendere
che la temperatura esterna aumenti.
Mettere a posto la tanica.
Rivolgersi ad un centro assistenza.
Spegnere l’apparecchio ed attendere che il
ghiaccio si sciolga.
Problema al motore.
Ritardo avviamento di 3 min in corso.
Elettronica difettosa.
Filtro dell’aria ostruito dalla polvere
Mancanza di refrigerante.
Livelli di temperatura ed umidità dell’aria troppo bassi.
Il pavimento è irregolare.
Il filtro è ostruito.
La temperatura esterna è troppo bassa.
Non raccoglie acqua
Unità rumorosa
Sul condensatore c’è ghiaccio
Perdite di acqua
Tanica non posizionata correttamente.
Elettronica difettosa.
Presenza di ghiaccio.
Rivolgersi ad un centro assistenza del
produttore.
Altri problemi
-5-

SPECIFICHE TECNICHE
NARCISO baby 10
MODELLO
220-240V /50Hz
ALIMENTAZIONE
CAPACITA’ DI DEUMIDIFICAZIONE
10 litri/giorno (30 ℃80%U.R.)
CONSUMO
185W
435*321*258 mm
DIMENSIONI (Alt./Larg./Prof.)
PESO
10.6 kg
5℃~32℃
TEMPERATURA DI FUNZIONAMENTO
•Se il cavo dell’apparecchio è danneggiato, deve essere sostituito dal centro
assistenza o da personale qualificato per evitare incidenti.
•Questo apparecchio non è fatto per essere utilizzato da bambini o altre persone
senza assistenza o supervisione se le loro capacità psichiche sensoriali o mentali
impediscono loro di utilizzarlo correttamente. I bambini dovrebbero essere sorvegliati
per essere sicuri che non giochino con l’apparecchio.
-6-
INFORMAZIONE PER IL CORRETTO SMALTIMENTO DEL PRODOTTO AI
SENSI DELLA DIRETTIVA EUROPEA 2002/96/CE
Alla fine della sua vita utile questo apparecchio non deve essere smaltito insieme ai rifiuti
domestici. Deve essere consegnato presso appositi centri di raccolta differenziata oppure
presso i rivenditori che forniscono questo servi-zio. Smaltire separatamente un
apparecchio elettrico ed elettronico consente di evitare possibili effetti negativi
sull’ambiente e sulla salute umana derivanti da uno smaltimento inadeguato e permette di
recuperare e riciclare i materiali di cui è composto, con importanti risparmi di energia e
risorse. Per sottolineare l’obbligo di smaltire separatamente queste apparecchiature, sul
prodotto è riportato il simbolo del cassonetto barrato. Lo smaltimento abusivo del prodotto
da parte dell’utente comporta l’applicazione delle sanzioni amministrative previste dalla
normativa vigente.
F-GAS REGULATION (EC) no. 842/2006
Non disperdere R-134a nell'atmosfera: R-134a è un gas fluorinato a effetto serra, coperto
dal protocollo di Kyoto, con potenziale di riscaldamento globale (GWP) = 1300.

CONTENTS
WARNING/CAUTION………………………………........................................... 0
DESCRIPTION OF COMPONENTS/FUNCTION EXPLANATION……………1
OPERATING INSTRUCTIONS……………………………………………………2
CONTINUOUS DRAINAGE………………………………………………………..3
CAUTIONS…………………………………………………………………………..4
MAINTENANCE/EMERGENCY…………………………………………………...5
SPECIFICATION………………………………………………............………… 6

WARNING
●
Do not fold the power cord as
shown below!
●
Make sure the plug is placed fully &
firm into the socket!
●
Do not use multiple socket as
shown below!
●Make sure the plug is clean!
●After turning the unit off, please take
plug out of the socket.
●Do not have wet hands when
connecting the power plug.
CAUTION
●
Do not place anything on top
of the control panel!
●
Do not place anything over the inlet
or outlet points.
●
Do not let children play
with the unit or control!
●
Do not wet the machine or
the control panel!
●
Keep the flammable gas/oil away from
the machine!
●
Ask professionals to do the
servicing!
-0-

DESCRIPTION OF COMPONENTS
CONTROL PANEL
HUMID AIR
INLET
AIR FILTER
DEHUMIDIFIED
AIR VENT
CONTINUOUS
DRAINAGE OUTLET
DRAIN TANK
FUNCTION EXPLANATION
CONTINUOUS
Dehumidifier
continuously
removes moisture.
OFF
Dehumidifier stops
removing moisture.
BLU RUNNING LIGHT
When the Blue lamp lights up which
means dehumidifier is operating.
RED FULL TANK LIGHT
When the water tank is full the full
tank red lamp will light up, the
dehumidifier will stop operating
immediately.
YELLOW DEFROST LIGHT
When operating under low temperature
for a short period, the dehumidifier will
starting defrost process, the indicating
yellow lamp will light up.
NORMAL
Humidity control between
50%-60%.
-1-

OPERATING INSTRUCTIONS
●Start Operation
1) Ensure that the unit is connected to the power socket.
2) Make sure the water tank is placed in proper position. (After plug
on the machine for the first time, if the full tank lamp light up, just
pull out the water tank then push it back to the proper position.)
3) Turn clockwise the humidity control knob to the suitable humidity
(usually at normal position). If the humidity indoor is over the set
humidity, then the machine will start removing moisture.
●Please turn the humidity control knob to the position of "continuous"
to make the machine working continuously when exploded to a high
humidity environment.
4) When the humidity in the room reached the set humidity then the machine will
stop operating.
5) When the humidity in the room is over the set humidity then the machine will
start removing moisture again.
6) The alternance between point 3). 4). 5) is controlled by the set humidity.
●When RED Full Tank Light is On
When the water tank is full, the red light will light up, the dehumidifier will stop
operating. Remove the water from the tank, then place the water tank back to its
proper position and the machine will start operating again.
Remove the water in the water
tank with two hands
●
DEFROST
When operating in low temperatures (less than 12°C) the surface of the evaporator will
accumulate frost
and effect the efficiency of the dehumidifier. When this happens
the machine will go into periodic defrost
mode automatically. This is quite normal. Defrost light will come on. The unit will operate in
temperatures down to 5°C. Defrost time may vary. If the dehumidifier freezes up turn the unit off for few
hours and then restart. It is not recommended to use the dehumidifier in temperatures below 5°C.
EMERGENCY
Please unplug the machine when there is sometime wrong.
Contact the service agent immediately
Do not disassemble the dehumidifier yourself!
.
-2-

CONTINUOUS DRAINAGE
●
Continuous Drainage Under Good Condition
Continuous
drainage hole
1) Put in the PVC hose into the back of the closed hole, and then connect the PVC hose to the front.
1. Prepare PVC hose to drain out water
(The hose sold in market with inner dia. 13mm)
2. Take out the stopple of the drainage outlet.
3. Take out the soft cover, put it and tube stopple
into the bucket for storage.
Soft cover
Tube stopple
Back of the unit
For drainage
Tube stopple
4. Connect the PVC hose with the drainage outlet.
Drainage PVC hose
Drainage PVC hose
Bucket
5.Place the bucket on its original location.
Push bucket back into
the unit toward the direction
as the arrow points to
2) Put the water tank back, according to the instructed way.
●
The Proper Way To Place The Water Drainage PVC Hose
When using continuous drainage, the PVC hose must be placed below the
drainage hole. Avoid uneven surfaces and do not "kink" the hose.
-3-

CAUTIONS
●
Do not pull the power cord to avoid broken
cord, which lead to danger.
●
Do not use insect, oil or paint spray around the
machine, it might cause damage to the plastic
parts or start a fire.
●Do not place the machine on an uneven
ground, to avoid shaking, noise and
leakage of water.
●
Please always keep the unit 20 cm away from
the wall to dissipate the heat properly. Hang
clothes at least 50 cm above the machine.
20 cm
50cm
●
It is dangerous to put anything into the
machine.
●Close all the open windows to reach the
maximum possible efficiency of removing
moisture.
●
Keep the machine away from any type of
heat sources.
●
When moving or put in storage, do not place
the dehumidifier on side way or upside down
and avoid violent shaking.
-4-

MAINTENANCE
Please make sure the dehumidifier is unplugged before serving or
cleaning the machine, for safety reasons!
1) Clean the Shell
:
A. Wipe the shell using soft cloth and eventually mild detergent.
B. Do not wash the machine with a hose, it will cause leakage of electricity.
2) Clean the Air Filter:
The propose of the air filter is to filter the dust or unclean material in the air.
If the filter is blocked by the dust the usage of the electricity will be greater
than normal. For the best more efficient of removing moisture, please clean
the filter once in two weeks.
●Cleaning Steps:
A. Pull out the filter gently.
B. Clean the filter by vacuum cleaner or washing with clean water then
dry the filter using dry cloth.
C. Place the filter back to it's position.
TROUBLESHOOTING
In case your dehumidifier shows any abnormality, please check the items mentioned below at first:
Problem
Possible cause
Solution
Both fan and compressor
not working
Compressor or fan not
working
No power to unit
Check power to socket
Check power switched on
Return for service
Wait
Return for service
Clean filter
Return for service
Normal operation
Place on a level surface
Clean filter
Switch off and wait for temperature arising
Fit the tank properly
Return for service
Unplug and allow ice to melt
Motor failure
In "3 min lag delay" period
Faulty electronics
Air intake filter blocked.
Refrigerant is low.
Temperature and humidity are too low.
Floor is uneven.
Filter is dirty.
Temperature is too low.
Not collecting water
Noisy unit
Condenser is frozen
Loss of water
Tank not installed properly.
Micro-switch failure.
Unit has frozen.
Return to supplier for service.
Other failure
-5-

SPECIFICATIONS
NARCISO baby 10
MODEL
220-240V /50Hz
POWER
MOISTURE REMOVAL
10 L/D (30 ℃80%R.H.)
POWER INPUT
185W
435*321*258 mm
SIZE OF SHELL (H W D)
WEIGHT
10.6 kg
5℃~32℃
OPERATING TEMPERATURE
•If the power cord on this unit is damaged it must be replaced by the manufacturer﹐its
service agent or qualified persons in order to avoid a hazard
•This appliance is not intended for use by children or other persons without assistance
or supervision if their physical, sensory or mental capabilities prevent them from using
it safely. Children should be supervised to ensure that they do not play with the
appliance.
-6-
INFORMATION FOR CORRECT DISPOSAL OF THE PRODUCT IN
ACCORDANCE WITH THE EUROPEAN DIRECTIVE 2002/96/EC
At the end of its working life this equipment must not be disposed of as an household
waste. It must be taken to special local community waste collection centres or to a dealer
providing this service. Disposing of electrical and electronic equipment separately avoids
possible negative effects on the environment and human health deriving from an
inappropriate disposal and enables its components to be recovered and recycled to obtain
significant savings in energy and resources. In order to underline the duty to dispose of
this equipment separately, the product is marked with a crossed-out dustbin.
F-GAS REGULATION (EC) no. 842/2006
Do not vent R-134a into atmosphere: R-134a is a fluorinated greenhouse gas, covered by
Kyoto Protocol, with a Global Warming Potential (GWP) = 1300.

TABLE DES MATIERES
AVERTISSEMENT/ATTENTION..…………………......................................... 0
DESCRIPTION DES COMPOSANTS/FONCTIONS………..…….……………1
INSTRUCTIONS POUR L’UTILISATION...………………………………………2
DRAINAGE CONTINU …....……………………………………………………….3
AVERTISSEMENTS………………………………………………………………..4
ENTRETIEN/URGENCE………...………………………………………………...5
SPECIFICATIONS.……………………………………........................................6

AVERTISSEMENT
●Ne pliez pas le câble comme dans
l’image!
●
Assurez-vous que la fiche soit insérée
de façon sûre
!
●
N’utilisez pas de connecteurs
multibroche comme dans l’image !
●Assurez-vous que la fiche soit propre.
●Après l'unité hors tension, retirez la fiche
de la prise.
●Ne pas inclure la prise avec les
mains mouillées!
ATTENTION
●
Ne placez rien sur le panneau des
commandes!
●
Ne couvrez pas toutes les prises et
toutes les sorties d’air de l’appareil !
●
Ne laissez pas jouer les enfants
avec l’appareil !
●
Ne mouillez pas la structure ou le
panneau de commandes!
●
Gardez les gaz ou huiles inflammables
loin de l’appareil !
●Ne vous occupez pas de l’entretien de
cet appareil: adressez-
vous à personnel
Qualifié !
-0-

DESCRIPTION DES COMPOSANTS
PANNEAU DES COMMANDES
ASPIRATION
AIR HUMIDE
FILTRE DE L’AIR
SORTIE DE L’AIR
DESHUMIDIFIEE
TROU DRAINAGE
CONTINU
RESERVOIR POUR
LES CONDENSATS
DESCRIPTION DES FONCTIONS
CONTINU
Le déshumidificateur
enlève continuellement
l’humidité
OFF
Le déshumidificateur
n’enlève plus l’humidité.
LUMIERE BLEUE FONCTIONNEMENT
Su la lumière autour de la poignée s’allume
de bleu, le déshumidificateur est en fonction.
LUMIERE ROUGE RESERVOIR PLEIN
Lorsque le réservoir de l’eau est plein, la
lumière autour de la poignée s’allume de
rouge. Le déshumidificateur arrête
immédiatement de fonctionner.
LUMIERE JAUNE DEGIVRAGE
Lorsqu’il marche à basse température
pendant une période courte, le
déshumidificateur commence à marcher en
modalité dégivrage, la lumière jaune
s’allume.
NORMAL
Contrôle de l’humidité
entre 50%-60%
-1-
POIGNEE
FONCTIONNEMENT
Table of contents
Languages:
Other Argo Dehumidifier manuals

Argo
Argo NARCISO 12 User manual

Argo
Argo LILIUM EVO 11 User manual

Argo
Argo DRY COMPACT 21 User manual

Argo
Argo ALICE 13 User manual

Argo
Argo DRY PURY 25 User manual

Argo
Argo DRY PURY 25 User manual

Argo
Argo NARCISO 12 User manual

Argo
Argo DEOLO BABY 11 User manual

Argo
Argo DRY DIGIT EVO 13 User manual

Argo
Argo Dry 41 User manual

Argo
Argo DRY BABY 11 User manual

Argo
Argo DRY PURY EVO 11 User manual

Argo
Argo DRY NATURE 11 User manual

Argo
Argo PLATINUM EVO 21 User manual

Argo
Argo PLATINUM EVO 21 User manual

Argo
Argo LILIUM EVO 11 User manual

Argo
Argo DRY BABY 11 User manual

Argo
Argo DRY PURY 11 User manual

Argo
Argo LILIUM 11 User manual

Argo
Argo DRY NATURE 17 User manual