Argo PLATINUM EVO 21 User manual

13
V 07/21
DEHUMIDIFIER
PLATINUM EVO 21
PLATINUM EVO 41
OPERATING INSTRUCTIONS
Read the instructions carefully before operating or servicing the dehumidifier.
Observe all the safety instructions; failure to observe the instructions may lead to accidents and/or damage.
Keep these instructions in a safe place for future reference.
EN

14
V 07/21
The Refrigerant R290
To realize the function of the air conditioner unit, a special refrigerant circulates in
the system. The refrigerant is the fluoride R290 = 3 GWP (Global warming
potential). This refrigerant is flammable and inodorous. It can lead to explosions
under certain conditions, however the flammability of this refrigerant is very low and
it can be ignited only by fire.
Compared to other common refrigerants, R290 is a non-polluting refrigerant with no
harm to the ozonosphere and a no effect upon the greenhouse effect. R290 has
very good thermodynamic features which lead to a really high energy efficiency.
The units therefore need less filling.
Warning:
Do not try to accelerate the defrosting process or to clean the appliance in different ways
other than those recommended by the manufacturer. Should repair be necessary, contact
your nearest authorized Argoclima Service Centre. Any repairs carried out by unqualified
personnel may be dangerous. The appliance has to be stored in a room that doesn’t have
any continuously operating ignition sources. (for example: open flames, an operating gas
appliance or an operating electric heater.) Do not pierce or burn.
Appliance has to be installed, operated and stored in a room with a floor area larger than 4
m2.
For repairs, strictly follow manufacturer’s instructions only for appliances filled with R290
flammable gas. Be aware that refrigerants do not have any odour.
Appliance filled with flammable gas R290.
Before installing and using the appliance, read the owner’s manual.
Before repairing the appliance, read the service manual.

15
V 07/21
GENERAL OPERATING AND SAFETY INSTRUCTIONS
This appliance is a highly efficient dehumidifier, designed for
domestic use only!
Use this dehumidifier only as outlined in this manual. Any other
use not recommended by the manufacturer may cause fire,
electric shock or malfunctions.
The unit contains refrigerant; keep it vertical at all times.
Once you have opened the unit, keep it vertical to allow the
refrigerant to stabilise and wait two hours before operating it.
Ensure that the required voltage and frequency (220-240V/50Hz)
match the available power source(220 - 240V/50Hz).
This appliance can be used by children aged from 8 years and
above and people with reduced physical, sensory or mental
capabilities or lack of experience and knowledge if they have been
given supervision or instruction concerning use of the appliance in
a safe way and understand the hazards involved.
Children shall not play with the appliance.
Cleaning and user maintenance shall not be made by children
without supervision.
Make sure the plug is inserted fully. Do not use multiple adapters.
Do not touch the plug with wet hands. Make sure the plug is
clean.
Children aged between 3 and 8 years must only be able to turn
the appliance on/off, provided that the appliance has been placed
in its normal operating position, that instructions have been given
on how to use the equipment safely, and that its risks have been
understood.
Children aged between 3 and 8 years must not be able to plug in,
adjust, clean or perform any maintenance on the appliance.
Disconnect the mains power when the appliance is not in use
or during cleaning. Keeping the appliance plugged in may
cause electric shocks or accidents.
To disconnect the appliance, set the switch to OFF and remove
the plug from the socket. Pull on the plug only. Do not pull the
cord.
Do not bend, drag or twist the cord, or apply force to remove it. Do
not operate the unit if its cable or plug are damaged; doing so

16
V 07/21
can cause fires or electric shocks. If the power cord is
damaged, it must be replaced by a service centre.
Do not place heavy objects on top of the appliance.
To prevent water spills, empty the water tank before moving the
appliance.
Do not tilt the dehumidifier onto one side or turn it upside down, as
the water which runs out could damage the appliance.
Do not operate the unit on unstable or sloping surfaces:
water leaks can cause it to malfunction or cause excessive
vibration and running noise.
The dehumidifier must be positioned at least 50 cm away from the
wall or other obstacles, so that the heat can dissipate correctly.
Close all open windows to maximise dehumidification
efficiency.
Do not insert objects or sharp instruments into the air outlet
grille.
Do not cover the air intake and outlet grilles in any way.
WARNING!
In the event of an anomaly, switch the appliance off and
unplug it immediately. Do not dismantle, repair or modify this
product freely. In the event of a malfunction, contact the after-
sales service centre directly.
Do not immerse the power cord, plug or any other part of the
appliance in water or other liquids.
Do not expose the dehumidifier to direct sunlight.
Keep the appliance well away from sources of heat which could
cause plastic parts to become warped.
Do not spray insecticides, oils or paints near the appliance; doing
so may damage its plastic parts or start a fire.
Keep flammable gases and oils away from the appliance!
Do not move the appliance while it is operating; doing so can
cause leaks and malfunction.

17
V 07/21
DESCRIPTION OF PARTS
CHECKS BEFORE START UP
Check that the float and the condensation collection tank are correctly positioned
1. Remove the tank using both hands and following the direction of the arrow.
1) CONTROL PANEL
2) DEHUMIDIFIED AIR OUTLET
3) CONTINUOUS CONDENSATION
DRAINAGE HOLE COVER
4) AIR INTAKE
5) POWER CORD ATTACHMENT
HOLE
6) CONDENSATION COLLECTION
TANK
7) POWER CORD
(2)
(1)
(4)
(3)
(6)
FRONT VIEW
(7)
(5)
REAR VIEW

18
V 07/21
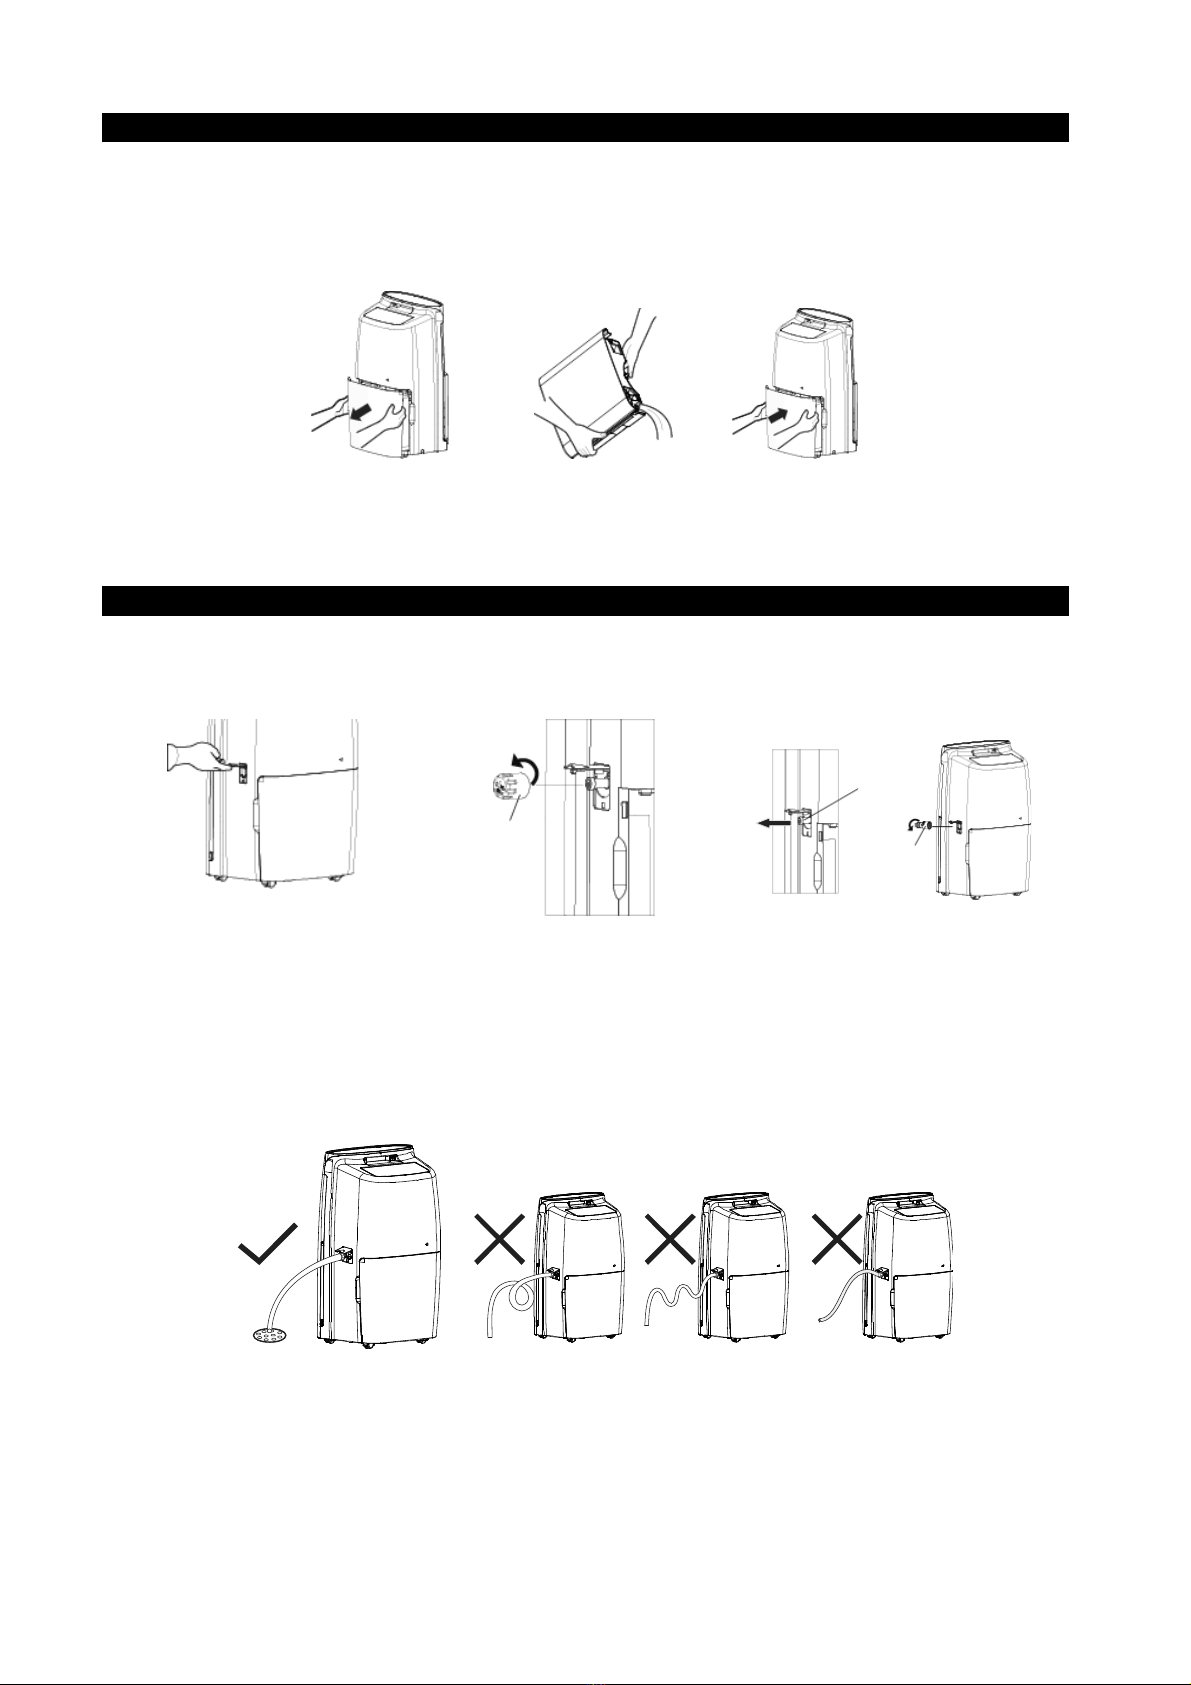
2. Check the position of the float inside the tank; it may have shifted during the move. If it is not positioned
correctly, reposition it before using it.
3. Then, reposition the tank.
OPERATING INSTRUCTIONS
APPLIANCE START-UP
Place the product on a flat and stable heat-resistant surface, at least 1 metre away from flammable or heat-sensitive
materials and 50 cm away from walls or other obstructions.
Make sure the water tank is in the correct position.
Connect the power cord to a suitable electric socket (220-240V/50Hz).
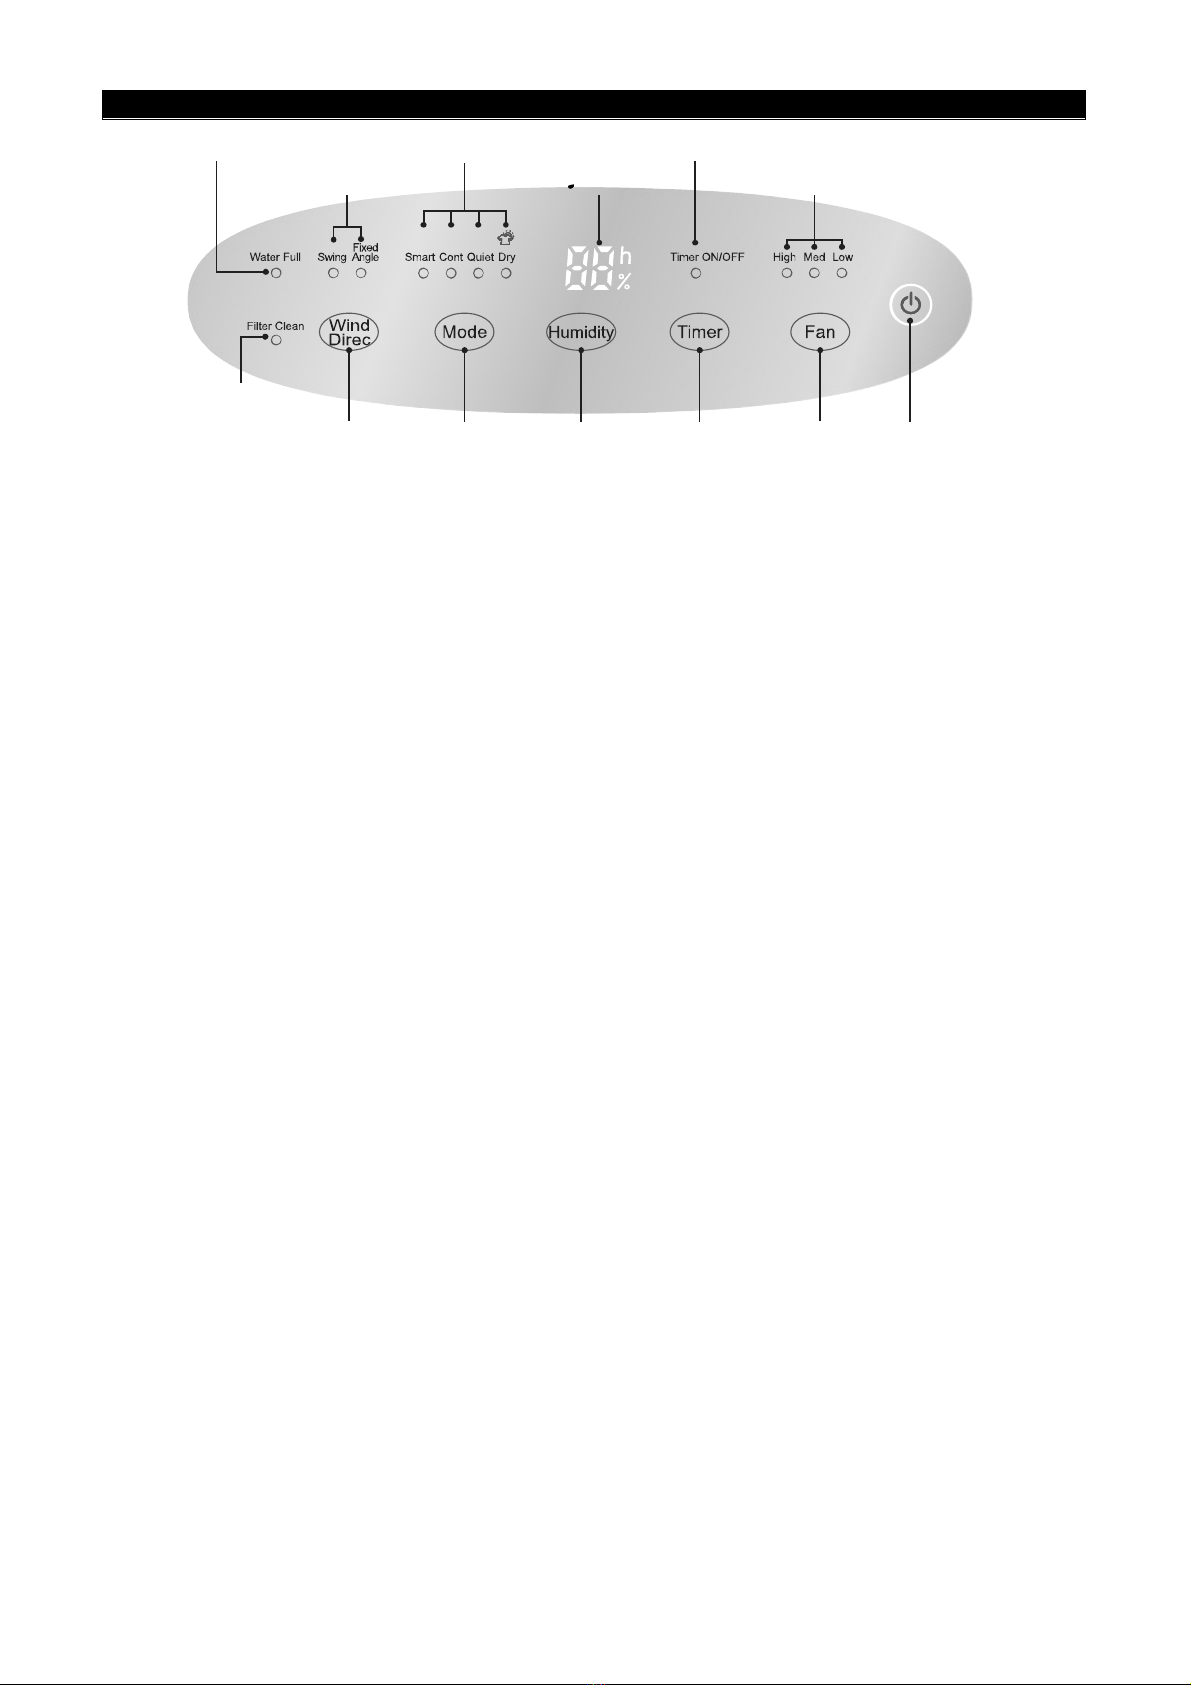
Power the unit on with the ON/OFF button on the control panel.
The dehumidifier is designed to operate at room temperature from + 5 °C to + 35 °C.
If it is operated at low temperatures, ice may form on the evaporator, degrading its operation.
When this happens, the dehumidifier goes into defrost mode. The compressor stops, but the fan continues running.
We recommend not using the dehumidifier in room temperatures lower than 5 °C.
OPERATING PRECAUTIONS
The appliance will only start operating if the humidity level in the room is above the set value.
The dehumidifier will continue to operate until the set humidity level has been reached, with the exception of
interruptions caused by a full tank. In this case, empty and reinstall the tank: the dehumidifier will now start running
again.
WARNING:
After each interruption of its operation, at least 3 minutes must pass before the dehumidifier starts up again:
this delay prevents the compressor being damaged.
If, on the other hand, the set humidity percentage is higher than the level currently found in the room, the
dehumidifier will not start.
If, after following the start-up instructions, the dehumidifier does not start or stops for no reason, make sure the plug
and power cord are in good working order. After doing so, wait for 10 minutes and then restart the appliance.
If the dehumidifier still does not start after 10 minutes, or if either the power cord or plug are damaged, switch off the
appliance and contact an after-sales service centre.
WARNING:
When the dehumidifier is running, the compressor produces heat and the appliance emits warm air into the
room. The room temperature will therefore tend to increase. This is completely normal.
TURNING THE DEHUMIDIFIER OFF
To turn the dehumidifier off, press the ON/OFF button. This shuts off power to the unit.
Unplug the appliance if you do not intend to use it for some time.
Float
Correct
position
Wrong
position

19
V 07/21
REMOVING THE CONDENSATION - FILLING THE INNER TANK
The water extracted from the air can be collected in the rear tank.
When the tank is full, the unit turns off. The FULL TANK led turns on and the unit beeps for about 10 seconds.
To switch off the appliance, press the ON/OFF button and wait a few seconds.
1. Carefully remove the tank using both hands and following the direction of the arrow.
2. Empty the tank.
3. Reposition the tank following the direction of the arrow.
N.B.
Do not use the drain hose when you are collecting condensation in the tank, otherwise water can leak out of the hose.
CONTINUOUS CONDENSATION DRAINAGE
You can fit a PVC hose with an internal diameter of 14 mm and length of 1.3-1.5m(not included) to drain the tank
continuously.
Turn off the appliance and remove the plug before connecting the hose.
Open the hatch covering the drain
hole on the side of the appliance.
To remove the hole cover, turn it in
the direction of the arrow (1).
Remove the protective cover (2) and
screw the drainage hose adapter (3)
(included ) onto the drainage hole.
Connect a PVC hose (not included) to
the continuous drainage hole.
Connect the hose to a continuous
drainage channel.
The height of the drainage hose must not exceed that of the hole: do not block the drainage hose exit.
Occasionally check that the adapter and drainage hose are tightly connected and not damaged or blocked.
(1) (2) (3)
(1) (2)
(3)

20
V 07/21
CONTROL PANEL
BUTTONS
(1) ON/OFF BUTTON: press to turn the dehumidifier on and off.
(2) FAN BUTTON: press to adjust the fan speed: High, Med, Low.
(3) ON/OFF TIMER BUTTON: the unit can be programmed to switch on (when it is off) and switch off(when it is running)
at increments of 1 hour, from 1 to 24 hours. After setting it, the display will show the time per 5".
(4) HUMIDITY BUTTON: In SMART and QUIET mode, the humidity can be adjusted from 30% to 80% at increments of
10%. After setting it, the display will show the set humidity. The appliance will only start operating if the humidity
level in the room is above the set value.
(5) MODE BUTTON: you can select one of the following dehumidification modes: the corresponding LED will turn on.
Smart: the unit will intelligently select the optimum humidity level based on the current temperature.
Cont (Continuous): the unit will run continuously until the room humidity has reached 50%.
Quiet: the unit will intelligently select the optimum humidity level based on the temperature; the fan is kept to a
minimum to ensure it is as quiet as possible. In this mode, the fan cannot be adjusted.
Dry: special laundry drying feature: the airflow is directed straight up to make it easier to dry the clothes.
(6) WIND DIRECT BUTTON: you can select to make the deflector swing continuously to optimize the airflow around the
room, or decide where to fasten the flap (fixed angle).
LED
FILTER CLEAN LED (CLEAN FILTER SYSTEM): THE FILTER CLEAN LED will turn on to indicate that the filter must
be cleaned. Take the filter out and clean it. Then press the FAN and HUMIDITY button at the same time to turn off the
Filter Clean LED.
WATER FULL LED: when the tank is full, the WATER FULL LED will come on and the appliance will stop running. A
beep will sound lasting approximately 10 seconds. Remove the tank and empty it (as described in "HOW TO REMOVE
CONDENSATION"), then reposition it correctly; the dehumidifier will start running again.
TANK FULL ALARM: when the internal tank is full, or the tank is not correctly positioned, the unit will sound a beep
lasting approximately 10": then the LED will turn on. Empty the tank or reposition it correctly.
DEFLECTOR POSITION LED: this indicates your selection of a continuous swing or a fixed angle flap position.
DEHUMIDIFICATION MODE LED: this indicates your selected mode.
DISPLAY: this shows the set humidity.
TIMER LED: this indicates the time it is set to on or off.
TANK FULL LED TIMER LED
FILTER RESET
LED
HIGH-MEDIUM-LOW
FAN SPEED LED
(1)
ON/OFF
BUTTON
(2)(3)(4)(5)
(6)
HUMIDITY
SETTING
TIMER FAN
DEHUMIDIFICATION
MODE LED
DEFLECTOR
POSITION LED DISPLAY
AIR FLOW
DIRECTION
SETTING
DEHUMIDIFICATION
MODE SELECTION:
- SMART
- CONTINUOUS
- QUIET
- DRY

21
V 07/21
FAN SPEED LED: this shows the fan speed: HIGH, MID or LOW.
AUTO-STOP: automatic shut-down of the unit if the tank is full or incorrectly positioned, or when the room humidity is 5%
below the set humidity.
AUTO RESTART: the dehumidifier starts up again after a power failure.
MEMORY FUNCTION: the dehumidifier maintains its settings during a power failure.
CHILD LOCK: to disable the buttons, press the Mode and Timer BUTTONS for 1 second: the LC symbol will appear on
the display. To reactivate the control panel, press the Mode and Timer buttons again for 1 second.
DEFROST: The dehumidifier can function properly with a room temperature between + 5 °C and + 35 °C. When the
dehumidifier works with a low room temperature, the surface of the evaporator may accumulate ice, which could make
the dehumidifier less effective.
When this happens, the dehumidifier goes into defrost mode. The compressor stops, but the fan continues running.
We recommend not using the dehumidifier in room temperatures lower than 5 °C.
CLEANING AND MAINTENANCE
MAINTENANCE OF THE HUMIDIFIER’S EXTERIOR SURFACE
Warning
Always pull the dehumidifier's plug out of the power socket before cleaning it, to prevent electric shock and
malfunction.
Warning
Do not wet the appliance or immerse it in water, otherwise electric shocks may occur.
Use a damp and soft cloth to clean the exterior surface of the dehumidifier.
Do not use solvents, petrol, xylene, talcum powder or brushes to clean the unit: these may damage the surface
or colour of the casing.
CLEANING THE WATER TANK
We recommend removing the tank once every few weeks to prevent mould and bacteria from forming. Fill the tank with
clean water a small amount of detergent; swill the water around in it, then it out and rinse it thoroughly.
PLATINUM EVO 21
1. Remove the tank and pour out any remaining water.
2. Press the 4 tabs around on top (1). Lift the cover (2)
3. After cleaning, replace the cover and check that the float is correctly positioned.
4. The side with the foam must fit together perfectly with the cover. Do not remove the foam from the float.
PLATINUM EVO 41
1. Remove the tank and pour out any remaining water.
2. Turn the handle (3) to lift it and remove it from the cover holes (5).
3. Open the 4 hooks on the cover (4) and lift the cover (6).
4. After cleaning, replace the cover and check that the float is correctly positioned.
(1)
(2)
(3) (4)
(5)
(6)

22
V 07/21
5. The side with the foam must fit together perfectly with the cover. Do not remove the foam from the float.
CLEANING THE AIR FILTER
The filter is designed to remove dust or dirt from the air.
If the filter is clogged by dust, electricity consumption will be higher than
normal.
To optimise humidity removal efficiency, clean the filter when the
FILTER CLEAN LED turns on.
Cleaning instructions:
1. Press the side levers and slightly separate the front panel from the
bottom, then the top.
2. Remove the filter by pulling the top towards you.
Clean the filter with a vacuum cleaner or wash it with clean water
at no more than 40 °C.
DO NOT USE ALCOHOL, BENZENE OR OTHER AGGRESSIVE
PRODUCTS TO CLEAN THE FILTER.
Leave the filter to dry naturally, then reposition it in the relevant
slot.
3. Reinsert the filter by fitting the lower hooks into the unit (in the
correct "UP" position) and pushing down the filter until you hear a
sound.
Do not use the dehumidifier without the filter as dust may affect the
efficiency of the evaporator, resulting in higher energy consumption.

23
V 07/21
TROUBLESHOOTING
PROBLEM
POTENTIAL CAUSE
SOLUTION
The dehumidifier is not working.
It is not possible to adjust the settings.
The temperature is above 35 ° C or below 5
°C.
The internal tank is full.
The tank is not positioned correctly.
The set humidity level is higher than that in the
room.
Empty the tank
Position the tank correctly
The noise suddenly increases while
running
The compressor has just started.
There is a power connection problem.
The unit is placed on an uneven surface.
Condensation is not collected in the
tank
The room is too big for the unit's capacity.
The doors are open.
There are other devices producing moisture in
the room.
Reduced dehumidification effect The room temperature is too low.
The set humidity level is inadequate.
The filter is full of dust.
The doors and windows are open.
If the unit is running with a temperature
between 5 and 15 °C, the unit will pause for
automatic defrosting. The compressor will
pause for short periods. After the defrost, the
unit will resume normal operation.
Reduce the humidity level.
Clean the filter.
Close any doors and windows.
At first, the air might have a musty
smell
Due to the temperature difference of the heat
exchanger, the air might have a strange smell
at first.
There is water in the tank even when
using the hose for continuous
condensation drainage
Check the drainage connections.
The drainage hose is not connected properly.
Connect the hose correctly.
Remove the drainage hose and
replace it.
The ON/OFF LED does not turn on
when the power is connected
There is no power or the plug is not inserted
correctly.
Check the electrical power supply.
Make sure that the electric circuit
and plug are not damaged.
Make sure that the cable is not
damaged.

24
V 07/21
REGULATION (EU) No. 517/2014 – F-GAS
PLATINUM EVO 21
The unit contains R290, a natural greenhouse gas with global warming potential (GWP) = 3 - Kg. 0.06 = 0.00018
Tons CO2equiv.
PLATINUM EVO 41
The unit contains R290, a natural greenhouse gas with global warming potential (GWP) = 3 - Kg. 0.15 = 0.00045
Tons CO2equiv.
Do not release R290 into the atmosphere.
INFORMATION FOR THE CORRECT DISPOSAL OF THE PRODUCT IN ACCORDANCE WITH EUROPEAN
DIRECTIVE 2012/19/EU
This appliance may not be scrapped with domestic waste at the end of its life cycle. We call your attention to the
crucial role played by the consumer in the re-use, recycling and other forms of recovery of such waste.
The appliance must be scrapped by a sorted waste disposal centre or by returning it to the retailer (no charge is
levied for this service), when you purchase a new equivalent appliance.
Sorted disposal of electric and electronic equipment prevents the negative effects on the environment and human
health resulting from improper scrapping, and also allows the materials from which it is made to be recovered and
recycled, with significant savings in terms of energy and resources.
The sorted disposal requirement is indicated by the crossed wastebin label affixed to the appliance.
www.argoclima.com
Other manuals for PLATINUM EVO 21
1
Table of contents
Other Argo Dehumidifier manuals

Argo
Argo Dry 41 User manual

Argo
Argo DRY NATURE 11 User manual

Argo
Argo DRY PURY EVO 11 User manual

Argo
Argo DRY PURY 11 User manual

Argo
Argo LILIUM 11 User manual

Argo
Argo DEOLO BABY 11 User manual

Argo
Argo LILIUM EVO 11 User manual

Argo
Argo DRY PURY 25 User manual

Argo
Argo DRY PURY 25 User manual

Argo
Argo ALICE 13 User manual

Argo
Argo PLATINUM EVO 21 User manual

Argo
Argo DRY COMPACT 21 User manual

Argo
Argo DRY BABY 11 User manual

Argo
Argo NARCISO 12 User manual

Argo
Argo DRY NATURE 17 User manual

Argo
Argo LILIUM ART 11 User manual

Argo
Argo LILIUM EVO 11 User manual

Argo
Argo PLATINUM 21 User manual

Argo
Argo DRY BABY 11 User manual

Argo
Argo NARCISO 12 User manual