ARGSeguridad L100II User manual
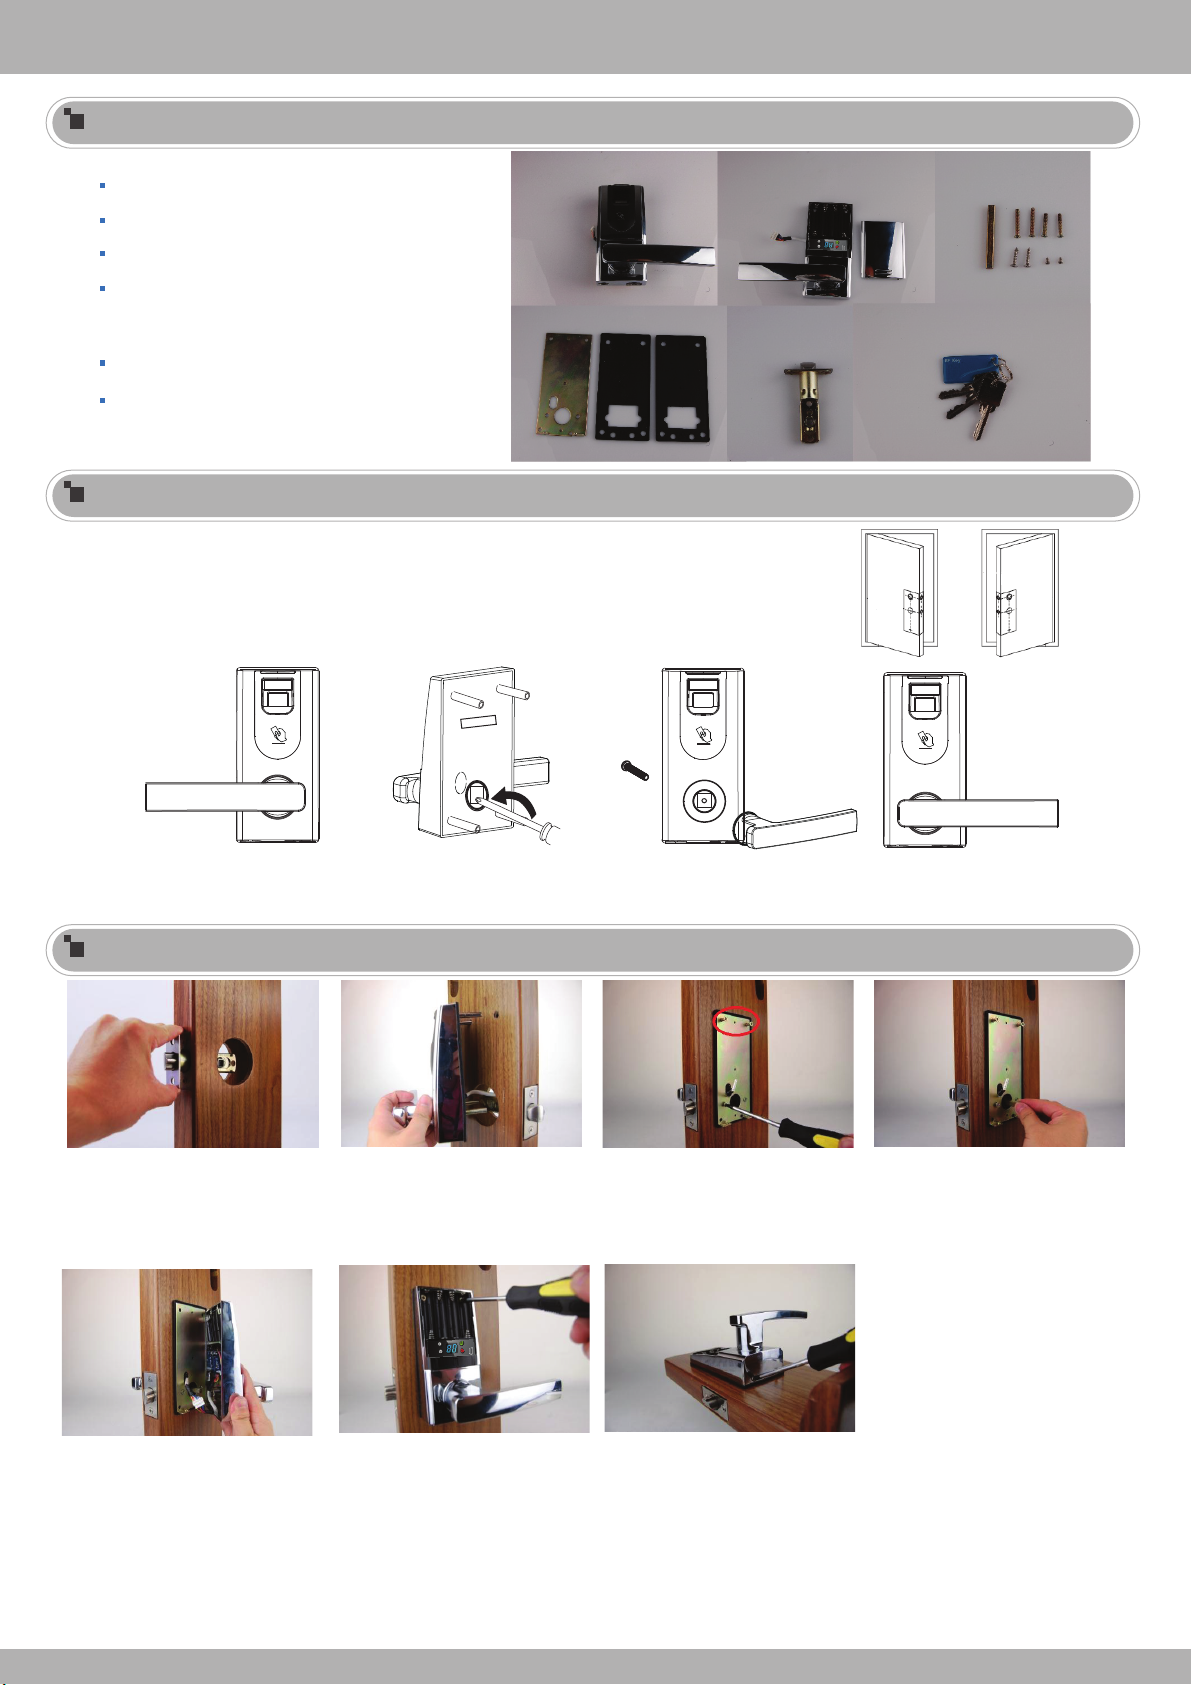
A Front panel
B Back panel
C Lock Bolt and Fixed Screws
D Rubber Mat and Fixed board
(4 long screws to attach front panel)
(2 short screws to attach back panel)
E Latch Strip
F Emergency keys and RFID card
1. Door type: Wooden door; Door thickness: 35-50mm;
2. Door open method: left-hand and right-hand. Please verify and adjust it before installation.
Note 1: Make sure you install
new Strike Plate on door frame
and cut hole appropriately. It
maybe necessary to enlarge
existing hole.
Note 2: Make sure the Front
Panel on door frame and cut
hole appropriately and buttom
brace screw need through the
latch hole.
Note 3: Latch and Back Thumb
Turn should be in unlocked
position.
L100II INSTALLATION INSTRUCTIONS
A B C
DEF
3. Please follow the below steps to change the handled:
1 Left handle 2 Remove the
handle’s screw.
3 Change handle
direction and replace
the screw into hole of
the handle.
4 Right handle
Right handleLeft handle
* See Note 1
Step 1
Insert Latch Strip in door is shown in
the diagram.
Step 2
Install the Front Panel with Rubber
Mat on the door and route wire loom
ABOVE the Latch.
* See Note 2
Step 3
Install Fixed Board with Rubber Mat
and route wire loom through left hole.
Recommendation: Install 2 screws
on the Fixed Board to fixed position.
Step 4
Install the Lock Bolt through the Latch
Strip and make sure the Lock Bolt is
pluged in the Front Panel.
Step 5
Connect the wire loom from the Front
Panel to Back Panel and remove the
battery cover.
Step 6
Remove screws which have been
installed on the Fixed Board before,
and fasten Back Panel to the fixed
board.
DO NOT OVER TIGHTEN IT.
Step 7
Fasten last two screws on the Back
Panel.Turn the handle to make sure
that you can unlock the door with the
handle. Then tighten all the screws on
the lock and Install alkaline batteries
and replace the battery cover.
* See Note 3
Preparation Before Installation
Product And Accessories
Installation

1 Mark Door
Select 2 3/8’’ or 2 3/4’’(60mm or 70mm)
from backset and mark center of hole on
door face. And two holes for fixed lock
body. (Templates provided)
2 Drill Holes
Dirll 2 2/7’’ (58mm) hole on door
face. Drill 1 1/40’’ (26mm) hole in
door edge for the latch strip. And
two 5/18’’ (7m) holds.
60/70
2 3/8” or 2 3/4”
25
110
25
77
58
26
3 Install Latch
1) Insert latch strip in the hole and
keep it parallel to door face. Mark
outline of face plate and remove
latch.
2) Chisel 1/8’’(3mm) deep or untill face
plate is fill with door edge.
3) Inter latch and tighten screw.
The clip of regulator pin
Regulator pin
Pull
The right edge of adjusthole
Screw-post hole
The left of adjustment hole
Screw-post hole
The backset is at the 2 3/8‘’(60mm) position,
when the product is shipped from the facory.
Pull regulator pin to the right edge.
The backset has been adjusted to 2 3/4’’ position.
Make sure the regulator pin is at the correct angle as
shown.
4 Verify Backset
1) The backset is a distance from door
edge to center of hole on door face.
2) All locks are supplied with adjustable
latches which fit 2 3/8‘’ or 2 3/4‘’(60mm
or 70mm) backsets.
5Adjust Latch’s Backset
Regulator pin
A
B
C
D
New Door Preparation


