ARIS POWER DCU150M1224S User manual

Document: UMA-DCU150M1224S Date Name Notes
Description
User’s Manual for DC-UPS DCU150M1224S ISSUE 12/01/2021 M. Beltrami
R01 30/10/2021 P. Garavaso Formerly Manuale 150_rev005
DCU150M1224S
DC-UPS User’s Manual

2
Table of Contents
1.1 Symbols ............................................................ 3
1.2 Safety and Warning Notes..................... 4
2 Installation Check List ......................................... 5
3 Description ................................................................. 6
3.1 General ............................................................... 6
3.2 Layout .................................................................. 7
3.3 Dimensions ...................................................... 8
3.4 Block Diagram ............................................... 9
4 Installation ................................................................ 10
4.1 Normal Mounting Position .................. 10
4.2 Mounting the DC-UPS ........................... 10
4.3 Removing the DC-UPS .......................... 10
5 Connection ................................................................. 11
5.1 Wiring Cables Cross-sections .............. 11
5.2 Mains Input ....................................................... 11
5.3 Load Output ................................................... 12
5.4 Battery Output ............................................. 12
5.5 Alarm contacts connection .................. 13
5.6 SBS Temperature Smart Battery
Sensor connection ..................................................... 13
5.7 Data Link Connection ............................. 14
6 DC-UPS Configuration....................................... 15
6.1 Output Voltage Setting .......................... 15
6.2 Maximum Charge Current Setting (
7 ) 15
6.3 Battery Type Setting ................................. 15
6.4 Buffer Time Setting (6) ............................ 16
6.5 Fast Charge .................................................... 17
6.6 Life test .............................................................. 17
6.7 Setting Power Supply mode ............... 17
6.8 Setting Rest Mode ..................................... 18
7 Operation Modes ................................................. 18
7.1 Standby Mode .............................................. 18
7.2 Backup Mode ............................................... 18
7.3 Power Supply Mode .................................. 19
8 Power Boost ............................................................. 19
9 Battery Start ............................................................. 19
10 Battery Management ....................................... 20
10.1 Types of Batteries ..................................... 20
10.2 Battery charging ....................................... 20
10.3 Charging Phases ......................................... 21
10.4 Battery Tester function .......................... 22
10.5 Battery replacement ............................... 22
11 Signaling and communication ................... 23
11.1 LED signals ..................................................... 23
11.2 Alarm contacts ............................................ 23
11.3 MODbus-RTU ............................................... 23
12 Output Configurations ..................................... 25
12.1 Standard Output configuration ....... 25
12.2 Redundancy Output configuration
25
12.3 Series Output configuration .............. 25
13 Derating ..................................................................... 27
13.1 Derating for Ambient temperature
27
13.2 Derating for Elevation above sea
level 27
14 Technical Data ....................................................... 28

3
1.1 Symbols
Throughout this document, the following
symbols will be used to display instructions
and possible dangers:
NOTE
When this symbol appears, along with the
“NOTE” word, the
reader is notified about
situation which may cause
damage or
malfunction to the device,
hardware/software, or surrounding
property.
When this
symbol
appears
,
the
reader
is
provided with additional information
or
referred to detailed sources of information.
Different categories of personal injuries are
indicated by different signaling.
WARNING
This word implies a hazardous situation
which, if
not prevented, could result in
death
or
serious
inju
r
y.
CAUTION
This word implies a hazardous situation
which, if
not prevented, could result in
minor
or
moderate
inju
r
y.
When this
symbol
appears,
safety
hazards
are involved. Extreme care must be taken
as potential personal injury hazards may
occur.
Comply with all safety measures indicated
in the following text to avoid potential
personal injuries.

4
1.2 Safety and Warning Notes
WARNING
:
Electric
shock risk!
This device must be properly installed,
started up, and operated only by
qualified technicians.
Always verify no voltage is present
before beginning to work.
Ensure correct wiring connection and
safety regulation compliance to
protect against electric shock.
Connect the protection conductor
terminal “PE” with ground.
Cover terminals’ area after installation
to avoid accidental contacts with live
parts (e. g., installation in control
cabinet)
.
WARNING
:
Explosion Hazard
Do not disconnect Equipment unless
power has been switched off or the area is
known to be non
-
hazardous
CAUTION
Before servicing, disconnect both Mains
and the energy storage to de-energize the
unit.
CAUTION
: Fire Prevention
Do not place flammable or exploding
material nearby the device.
To reduce the risk of fire, connect only
to a circuit provided with a maximum
branch circuit overcurrent protection
in accordance with the Norms
To reduce the risk of fire, replace only
with
same
type
and rating of
fuse.
NOTE: Battery Connections
When batteries are being connected,
check for correct polarity. Make sure not
to short circuit the battery terminals.
NOTE: Wiring selection
Copper cables must be used for
operating temperatures above 75 °C.
Refer to the associated table for the
connection parameters, such as the
necessary stripping length for the
wiring with and without ferrule (see
section Wire cross sections).
NOTE:
General Installation Notes
National safety and accident
prevention guidelines must be
followed according to UL508 or
UL60950.
Assembly and electrical installation
must correspond to the state of the
art.
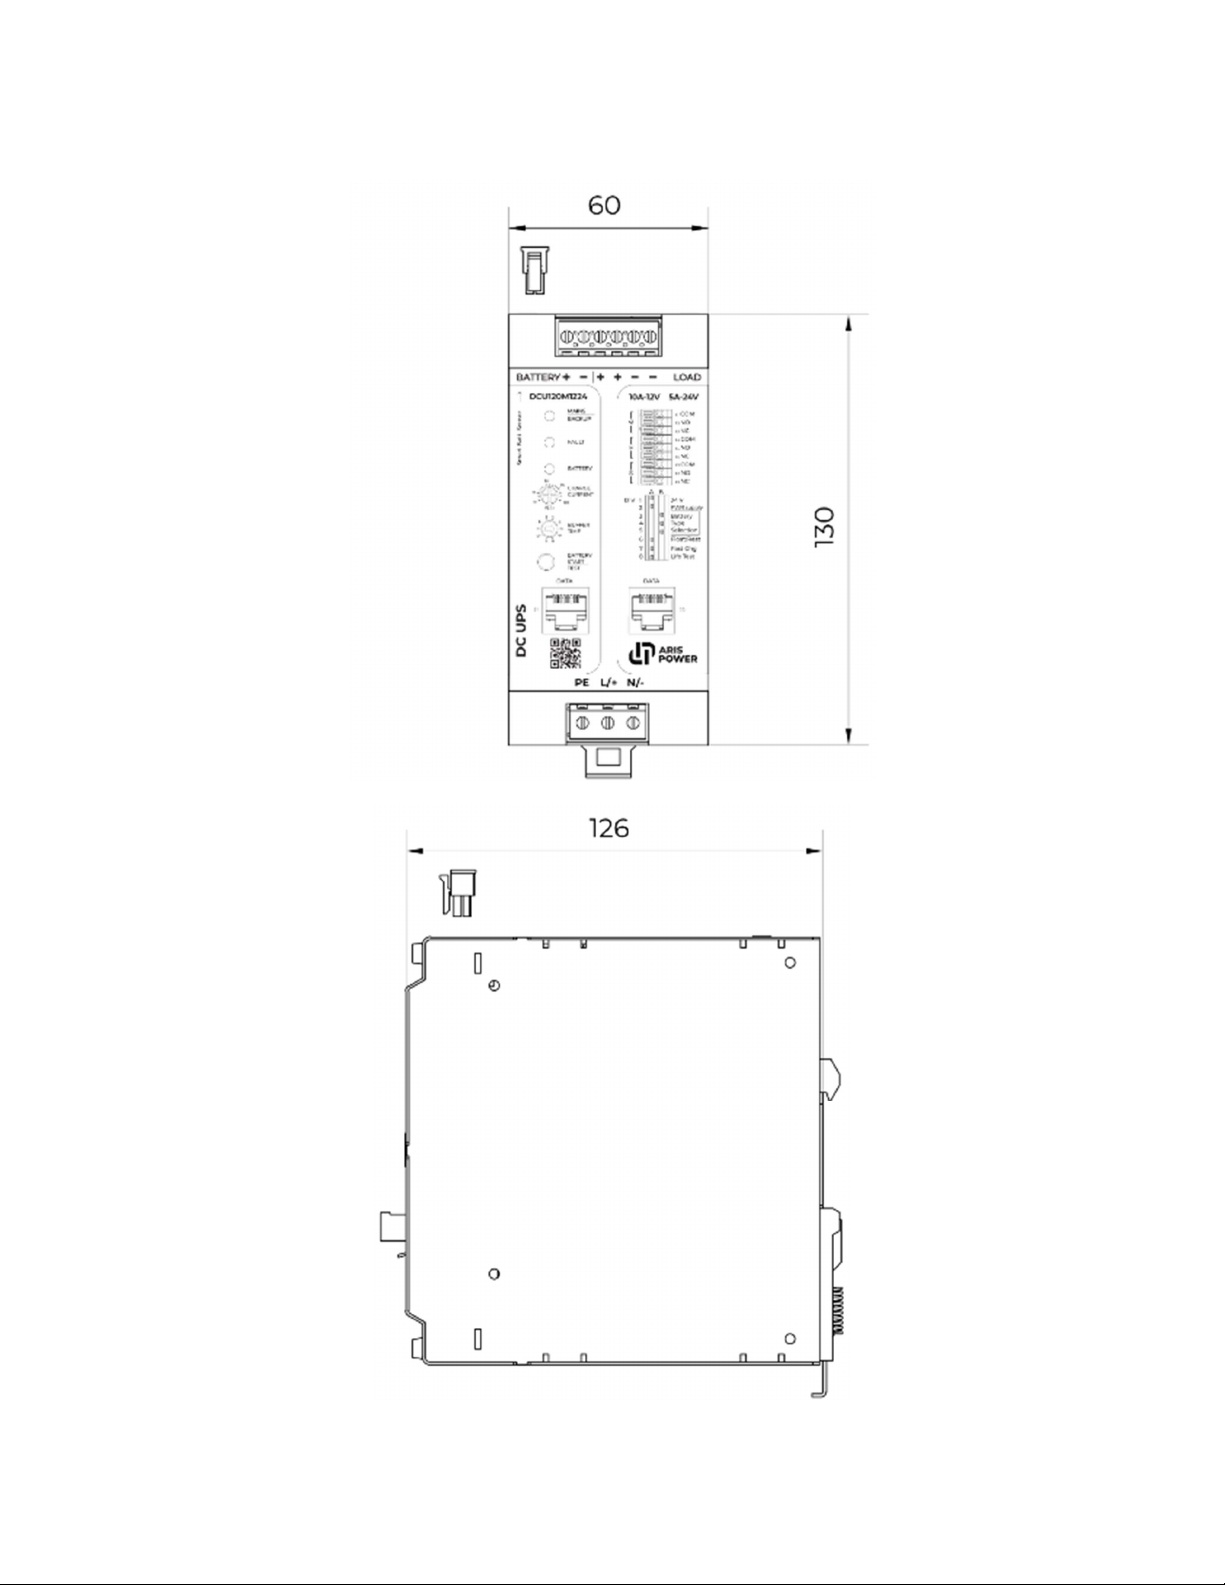
The DC-UPS is a built-in device. The
protection class of the device is IP20. It
is meant to be installed in a clean and
dry environment.
Protect the device against foreign
bodies penetrating it, e.g., paper clips
or metal parts.
The device must be installed in a
control cabinet that can be locked
and only opened by specialist staff.
Vertical mounting is the normal and
only authorized mounting position
Observe mechanical and thermal
limits.
NOTE
: Protection
s Selection
Install a switch/circuit breaker close to
the device at the Mains input, Load
output and at the battery terminals
which are labeled as the
disconnecting device for this device.
Ensure that the primary-side wiring
and secondary-side wiring are the
correct size and have sufficient fuse
protection.
Do not disconnect the fuse and/or
battery connection when in hazardous
locations.
Use current-limited source or suitable
fuse.
The switching outputs are active
outputs according to SELV. These may
only be operated on permitted SELV
circuits.
The
device
is maintenance
-
free.
Repairs may only be carried out by the
manufacturer. The warranty no longer
applies if the housing is opened.
The device may only be used for its
intended use.
Improper use invalidates the device
protection.
Keep these instructions in a safe place
– it contains important safety notes
which must be observed during
installation and maintenance of the
DC
-
UPS devices and batteries.
CAUTION: Hot
surface
Both the ambient temperature and
heat losses due to the load operation
may overheat the device housing
surfaces.
Ensure sufficient convection
(minimum gap above/below: 50 mm),
sides 10 mm.

5
2 Installation Check List
Please carefully follow this check list during installation. We suggest printing, fill out and
file it as installation report. Add notes as felt necessary.
Figure 2.1 - Installation Device Check List
Device: DCU150M1224S Ref:
Item Action Setting device
Reference ✓ Notes
1 Read Safety and Warning
notes Chapt. 1
2 Set Output Voltage,
12V or 24V Dipswitch 1
3 Set Maximum Charge Current Selector 7,
Chapt. 6.2
4 Mount the DC-UPS Chapt. 4
5 Wire the DC-UPS Chapt. 5.1
5.1 Wire Mains Chapt. 5.2
5.2 Wire Load Chapt. 5.3
5.3 Wire Battery Chapt. 5.4
5.4 Wire Alarm contacts Chapt. 5.5
5.5 Wire SBS Temperature
sensor Chapt. 5.6
5.6 Wire Data Link Chapt. 5.7
6 Configure the DC-UPS
6.1 Set Battery Type Dipswitch 3-4-5, Chapt.
6.3
6.2 Set Buffer Time Selector 6, Chapt. 6.4
6.3 Enable or disable Fast
Charge Dipswitch 7, Chapt. 6.5
6.4 Enable or disable Life Test Dipswitch 8, Chapt.6.6
6.5 Enable or disable Rest
Mode Dipswitch 6, Chapt. 6.8

6
3 Description
3.1 General
Congratulation for choosing an Aris
Power innovative, high performance and
safety power product. Install it in your
application to achieve higher reliability
and extended lifetime.
DCU150M1224 is a 150 W DC-UPS
belonging to the DCU Series, AC to DC
Uninterruptable Power Supply systems.
Its mission is providing Power Security to
critical DC loads. For flexibility of use, it
features selectable output voltage, 12 Vdc
or 24 Vdc, via dip switch. Input is very
flexible and can be AC or DC
Main Features - Designed following a
mains-connected, on-line, All-in-One
architecture, the device contains:
Power supply + Back-up Module +
Battery Charger + Battery Monitoring
+ Battery Tester, all packaged in one
box.
Its wide input range, makes it suitable
for connection to mains with 115–230-
277 Vac single-phase voltage rating or
110-240 Vdc
Load-first, Dynamic Load/Battery
power sharing logic
In Power Boost Mode it can deliver up
to 4 times the rated current. It is
therefore uniquely suitable to backing
up DC loads with high inrush current
Buffer time setting of load backup
Manual Battery start-up with no
mains via push button
Full set of protections. Both Load and
Battery outputs are protected against
overload and short circuit. On safety
grounds, the battery output is
disabled when the battery is
disconnected
Adjustable maximum charging
current to protect the battery against
overcurrent damages
Remote alarms via 3 dry relay contacts
Standby/Backup
Battery Low & Common Fault
Rectifier Failure
Smart Battery Sensor (SBS) for
temperature compensation via USB
port
Battery management is performed by
Aris Power BattSafe, a comprehensive
battery management firmware.
BattSafe includes:
Universal Charger with factory-set
charging curves for the most common
battery types: Vented Lead Acid, VRLA,
Valve Regulated AGM or Gel Lead
Acid, Ni-Cd, Li-Io
flat batteries which are not irreversibly
damaged can be recovered
real time diagnostic during
installation, preventing installation
errors
continuous battery monitoring during
operation, minimizes the risk of
battery damage and allows a fully safe
operation while keeping battery in
permanent connection with the DC-
UPS. Extended battery life is the
result.
Device and system faults are also
detected by auto-diagnostic features.
Battery Tester - Life test can be
activated manually through a
dedicated push button, to facilitate
maintenance checks
All status and faults signals are shown
on the front panel LEDs.
Data Link Communication (DLC), on
devices with this feature, allows
availability of status and faults signals
also in remote mode.

7
3.2 Layout
Figure
3
.
1
–
Device layout
N.
Description N.
Description
1 INPUT VOLTAGE TERMINALS 9 BATTERY STATUS LED
2 QR CODE LINK TO ONLINE USER’S
MANUAL
10 FAULT LED
3 CAN BUS/MODE BUS RJ45
CONNECTOR 1
11 MAINS/BACKUP LED
4 CAN BUS/MODE BUS RJ45
CONNECTOR 2 12 ALARMS PUSH-IN TERMINALS
5 BATTERY START/TEST PUSH BUTTON 13 BATTERY OUTPUT TERMINALS
6 BUFFER TIME SELECTOR 14 LOAD OUTPUT TERMINALS
7 CHARGE CURRENT TRIMMER 15 SENSOR FOR BATTERY TEMPERATURE
COMPENSATION (UART CONNECTOR)
8 FUNCTIONS DIP-SWITCHES

8
3.3 Dimensions
Figure
3
.
2
–
Side
and front view
s

9
3.4 Block Diagram
Block
Description
Block
Description
Buffer Time
Selector
Rectifier
Max Current
Setting
Regulator
Electrically
Isolated Signal
Transmission
RJ45 Serial
Communication
Fuse
Smart Battery
Sensor UART USB
LED - Battery
Safety Switch
LED - Fault
Supply Swapping
Switch
LED –
Mains/Backup
Temperature
Protection Sensor
Microcontroller
Transformer
Battery Start /
Test Push Button
Figure 3.3 - Device block diagram. Black continuous lines represent power connections, dashed
lines indicate functional links

10
4
Installation
4.1
Normal Mounting
Position
The device can be snapped onto all DIN
rails
according to EN 60715 and should
only be mounted in the normal
mounting position, as shown in Figure
4.1.
Figure
4
.
1
–
Device mounting position
NOTE
The device must be installed
in a control
cabinet that can
be locked and only opened
by specialist staff.
The device must be installed
at least 10 mm apart from all
other devices to allow
proper ventilation. While in
operation, be aware that the
temperature of the external
case can become very high
depending on load/battery
current and ambient
temperature
4.2 Mounting the DC-UPS
To mount the device, proceed as follows:
1. In the normal mounting position,
the device is mounted on the DIN
rail from above. Make sure that the
DIN rail bracket is in the correct
position above the DIN
rail.
2. Place a suitable screwdriver on
the tab of the DIN rail bracket.
3. Pull the tab down by lifting the
screwdriver.
4. Press the device down until the
bracket snaps into place
5. Check that the device be securely
fastened onto the DIN
rail
Figure
4
.
2
-
Mounting the device
4.3 Removing the DC-UPS
To remove the device, proceed as follows:
1. Place the screwdriver on the tab
of the DIN rail bracket
2. Unlock the tab from the DIN rail
by lifting the screwdriver.
3. Carefully pull the lower part of the
device forward so that the tab
slides back into the initial position.
4. Remove the device from the DIN
rail
Figure
4
.
3
–
Removing the device

11
5
Connection
5.1
Wiring Cables Cross-
sections
For connection use copper wires only,
suitable for minimum 75°C. Wiring
terminals shall be marked according to
best industry practice to indicate proper
connection to and from the DC-UPS.
Table 1 - Cable cross-sections to be used for
wiring
Connect
to
Terminal
Type
Solid
(mm
2
)
Stranded
(mm
2
)
Mains
Screw 0.2 - 2.5
0.2 - 2.5
Load
Screw 0.2 - 2.5
0.2 - 2.5
Battery
Screw 0.2 - 2.5
0.2 - 2.5
Signals
Push in 0.2 - 1.0
0.2 - 1.0
Connect
to AWG Torque
(Nm)
Stripping
Length
(mm)
Mains
26 - 12 0.5 - 0.6
7
Load
26 - 12 0.5 - 0.6
7
Battery
26 - 12 0.5 - 0.6
7
Signals
24 - 20 0.5 - 0.6
11
5.2
Mains Input
AC or DC mains input is connected via
the terminals at the bottom of the DC-
UPS.
Figure
5
.
1
-
Mains input connection
5.2.1 Primary side protection
To switch on / off the device, a proper
disconnection device must be installed on
the mains connection. This function can be
performed by the
recommended
primary-
side line protection, either a delayed
Fuse
or an MCB, curve C
.
The device is also protected against
device faults. by an internal fuse.
Figure
5
.
2
–
Primary side protection
If,
due
to
a
device
fault, the
internal fuse trips, the device
must not be opened. It must be
returned for factory inspection.
Un-authorized opening or
repairing of the device is not
allowed and would void the
guarantee
coverage.
5.2.2 Mains connection
The DC-UPS can be operated on AC
single-phase and DC power grids in
accordance with the rated
input voltage.
Connection is via the input L/+ N/– PE
terminals.
Figure
5
.
3
–
Mains connection

12
5.3 Load Output
Buffered loads are connected to the DC-
UPS on the LOAD output terminals. There
are two plus (“ + ”) and two minus (“ – “)
terminals available. Use a 3 mm flat-head
screwdriver.
Figure
5
.
4
-
Load connection
Load output cables must be properly
dimensioned for the maximum output
current. They should also have
a
large
cross section to keep voltage drop as low
as possible.
5.4 Battery Output
The BBX battery module or customer
own battery module is connected to the
DC-UPS via the first two terminals in the
upper terminals area. Use a 3 mm flat-
head screwdriver.
Battery output cables must be properly
dimensioned for the maximum output
current. They should also have
a
large
cross section to keep voltage drops as
low as possible
Figure
5
.
5
–
Battery connection
Connection to the Battery must be done
according to the following instructions:
1. The DC-UPS must be switched off
before connecting the battery
2. Install the Battery Box as close as
possible to the DC-UPS
3. Open the
front cover of the housing.
4. Remove the fuse (see Figure 5.5a).
5. Connect the wiring between the DC-
UPS and the Battery Box
6. Insert back the fuse (see Figure 5.5b).
7. Close the front cover
8. Secure the housing to prevent it from
being opened.
9. Power up the DC-UPS
a

13
b
Figure
5
.
6
–
BBX Battery box
–
a) Removing and
b) Inserting fuse
WARNING
When connecting the batteries
take note of the polarity.
Do not short circuit the pole
terminals.
The batteries are maintenance
free and may
not be opened.
NOTE
Before storing Battery modules,
note
the latest recharge or
recha
r
ge it,
if
necessary.
5.5 Alarm contacts
connection
The DC-UPS is equipped with three built-in
alarms, as follows:
Mains/Backup
Battery Fault
Rectifier Failure
The three alarms are on dry change-over relay
contacts and are brought to push-in terminals
on the front of the device.
Connect the push-in terminals using
wiring cables according to above given
instructions.
a
b
Figure 5.7 – Alarm contacts connection
5.6 SBS Temperature
Smart Battery Sensor
connection
The SBS sensor is necessary when
battery temperature compensation of
charging voltage is required by the
norms.
Table 2 - Battery Charging Voltage
Compensation as a function of Temperature
deviation from 20 °C (*)
NOTE
Risk of short circuit - When
installing or replacing the battery,
the fuse of the battery module
must be removed. This will
prevent the risk of short circuit
and ensure safety for the
operator.

14
Parameters
Fast
Charge
Float
charge
𝛥𝑈
°
𝐶
⋅
𝐶𝑒𝑙𝑙
±5 mV ±3 mV
Temperature
range
−8 °C to
+60 °C
−20 °C to
+60 °C
𝛥𝑈
𝐶𝑒𝑙𝑙
+140 mV /
−200 mV
+120 mV /
−120 mV
Reference
temperature +20 °C +20 °C
(*) This value does not apply to NiCd batteries
The DC-UPS is designed to perform
temperature compensation battery
charging voltage in compliance with the
specifications of EN54-4 fire protection
norm or other international equivalent
norms, as follows
5.6.1 Customer selected battery
pack
To activate this function, locate the UART
connector on top of the device. Connect
the SBS001 cable (separate article, not
included) to the device and to the
battery. Once connected, the device will
self-configure to perform battery voltage
temperature compensation.
5.6.2 Aris Power BBX battery box
In case a BBX with built-in Temperature
Smart Battery Sensor is designed in the
system, to activate this function, locate
the UART connector on top of the device.
Connect the SBS002 cable (separate
article, not included) to the device and to
the customer own battery pack. Once
connected, the device will self-configure
to perform battery voltage temperature
compensation.
Figure
5
.
8
-
SBS001
Temperature
Smart Battery
Sensor with cable for customer battery pack
Figure
5
.
9
-
Smart Battery Sensor Scheme
5.7 Data Link Connection
To activate this function, locate the RJ45
connectors on the front of the device.
Connect the DLC001 cable (separate
article, not included) to the device and to
the Custom logic unit. The device will
self-configure.
a
b

15
Figure
5
.
10
–
Data Link (a) connectors and (b)
DLK001 connecting cable
6
DC-UPS Configuration
Before powering on, the DC-UPS must
be configured via
the selectors and
dipswitches on the front panel.
6.1 Output Voltage Setting
This is a
Selectable Output Voltage
DC-UPS
device, 12 Vdc or 24 Vdc.
Before powering on the device, it is
fundamental to select the correct output
voltage to match load and battery rated
voltage.
WARNING
Special care must be paid
when setting this
parameter since a wrong
configuration may cause
damages to load and
battery.
Do not change dip switch 1
position while the device is
energized. It might cause
damages to load and
battery. If in need to do so,
power off the device first.
Factory setting is always 12 Vdc, the
lowest of the two featured voltages. This
corresponds to top dip switch n. 1 in
position A.
Figure
6
.
1
-
Setting Output Voltage
In case 24 Vdc is required, before
powering on the device, move dip switch
n. 1 to position B.
6.2 Maximum Charge
Current Setting ( 7 )
It is a key setting in enabling a safe and
extended battery lifetime. Adjustment of
the maximum Charge Current selector
allows to protect the battery from
excessive charging currents.
To determine this value, refer to the
battery manufacturer’s datasheet. If this
is not available, consider a maximum
charge current in the range between 1/10
and 1/8 of battery rated capacity given in
Ah. (Example: for a 10 Ah battery = 1.0 – 1.3
A). This approximate value is suitable for
Lead Acid and NiCd but not necessarily
for other types of batteries.
Figure
6
.
2
–
Maximum Charge Current Se
tting
To select the desired maximum charge
current, rotate the corresponding
selector (7). Current can be set between
10-100% of DC-UPS nominal current.
Factory setting is 10%.
B
attery
charging
current is
capped by the maximum
charging current set on the
selector (7).
6.3 Battery Type Setting
This device allows different battery
charging operations based on the
installed battery type. To select the
correct type, the 3
rd
, 4
th
and 4
th
dip switch
must be configured according to the
following table.
WARNING
Switch off the system before
selecting battery type on the
Dip Switch
.

16
Figure
6
.
3
–
Battery Type setting
Table 3 - Battery type selection via Dipswitch
Dip
Switch
Position
Battery Type
Vented
Lead
VRLA
AGM
Lead
VRLA
Gel
Lead
Li-
ion
Ni
-
Cd,
Ni-
Mh
Dip 3 B B B A B
Dip 4 B B A B A
Dip 5 B A B A A
Factory setting is always Vented Lead.
This corresponds to dip switch n. 3, 4, 5 in
position B.
6.4 Buffer Time Setting (6)
Different buffer times can be set via the
Buffer Time selector on the device (6).
Ten positions are available. The selector
default factory set position is set on “ 10 ” ,
meaning that loads will be fed until the
battery voltage reaches the Low Voltage
Disconnect (LVD) value. Below this value,
the device will autonomously switch off
to prevent unnecessary discharge and
consequent battery shorter life. In case
the buffer time switch is set at a different
position, the device will switch off after
the corresponding time has elapsed, as
shown in the table below.
Rotating the selector in clockwise
direction will result in an increased buffer
time.
Figure
4
6.4
–
Buffer Time setting
Table 4 - Buffer Time selection
Selector
Position
Buffer Time
(minutes)
1
0.5
2
2
3
5
4
10
5
15
6
20
7
30
8
45
9
60
10
∞
If the buffer time rotary switch is set on
the default position ∞, the battery will
supply the load until it reaches the Low
Voltage Disconnect (LVD) threshold.
The rotary
selector switch (6)
must be set using a suitable
screwdriver.
The maximum Buffer Time duration
depends on the battery capacity rating
and status of charge. Assuming backup
occurs when the battery is fully charged,
the times given in the table below can be
used as reference.

17
Table 5 - Typical max buffer time with Aris
Power Battery Boxes BBX Series, 24 V
Load
Current
(A)
M
inutes
BBX012
024
1.2 Ah
BBX034
024
3.4 Ah
BBX07
2024
7.2 Ah
1.5 20 60 200
3 8 30 120
5 3 15 55
7.5 2 10 30
10 NA 7 20
15 NA NA 9
20 NA NA 7
Load
Current
(A)
Minutes
BBX120024
12.0 Ah
100 Ah
1.5 400 NA
3 240 NA
5 100 NA
7.5 60 NA
10 45 1200
15 20 400
20 12 240
6.5 Fast Charge
To speed up the battery charging
process, the Fast Charge function can be
selected, hence applying the bulk
voltage on the battery. To enable this
function, the corresponding dip-switch n.
7 must be set at position B.
Figure
6
.
5
–
Fast Charge setting
Factory setting is Fast Charge OFF. This
corresponds to dip switch n. 7 in position
A
6.6 Life test
The Life test function allows to perform a
diagnosis of the battery and to get
notified whether the battery is in a good
or a bad condition.
Figure
6
.
6
–
Life Test Enable/Disable
Factory setting is Life Test OFF. This
corresponds to dip switch n. 8 in position
A.
6.7 Setting Power Supply
mode
This function allows the device to supply
energy while the battery is disconnected.
To enable this function, place the
corresponding dipswitch to the right.
Present on all DC-UPS and battery
charging devices but necessary and
factory configured on Battery Charging
devices only.
Figure
6
.
7
-
Power supply mode setting
Factory setting is Power Supply OFF. This
corresponds to dip switch n. 8 in position
A.

18
6.8 Setting Rest Mode
To extend battery life, the Rest option
can be selected. When reaching the
Float state, the battery will disconnect for
a time frame depending on the battery
type. Throughout this time period, the
voltage on the battery output terminals
will be monitored. Once the voltage
drops below a predefined threshold, the
battery will be reconnected. To enable
this function, place the corresponding
dipswitch to the B position.
Figure
6
.
8
–
Rest Mode setting
Factory setting is Rest Mode OFF. This
corresponds to dip switch n. 6 in position
A
7
Operation Modes
7.1
Standby Mode
This is the default status of the device.
When mains is present and the battery is
present and connected, the device sets
automatically to Standby Mode.
Figure
7
.
1
–
Standby Mode
In this mode, load output voltage follows
the battery voltage. Current sharing
between load and battery is
autonomously managed by the device,
always giving priority to load demand.
Signaling
With mains present, the Mains/Backup
LED ( 11 ) will be set on a steady green
color.
Overload and Short Circuit protection
If the load demand increases, taking the
current value up to its short circuit
threshold, the short circuit protection will
trigger. Both Overload and Short circuit
conditions will be shown by the common
FAULT LED and status change of F Relay
output.
7.2 Backup Mode
When the battery is connected and
charged, in case mains either fails, falls
below a threshold value (50% of the rated
input voltage) or is anyhow not present,
the device sets automatically to Backup
Mode. The battery is immediately
connected to the load output, without
any interruption.
Figure
7
.
2
–
Backup Mode
From this moment on, the battery is
entirely in charge of supplying power to
the load. During this mode, load output
voltage will follow battery voltage while it
discharges. The current going to the load
is limited in time according to the
battery status of charge.
Signaling
This condition is shown by a Orange light
on the Mains/Backup LED and a status
change of (M) relay output.
DCU
DC-UPS
BBX
BATTERY BOX
-
BUFFERED
DC LOAD
L/+ N/
–
PE
–
+
–
+
–
+
–
+
Mains
Input
Battery
Output
Load
Output

19
Overload and Short Circuit Protection
While in Backup the load and the DC-
UPS will be protected against overload
and short circuit as in the above Table.
Both Overload and Short circuit
conditions will be shown by the common
FAULT LED and status change of F Relay
output.
7.3 Power Supply Mode
When mains is present and the battery is
either absent, faulty, or disconnected, the
device turns into Power Supply Mode. In
this case, load output voltage is stabilized
at the selected rated value. Available
output current is completely absorbed
by the load.
Figure
7
.
3
–
Power Supply Mode
Signaling
This condition is shown by a RED light on
the FAULT LED and status change of F
Relay output.
Overload and short circuit protection
During Power Supply mode, if the load
demand increases, the DC-UPS can take
an overload up to 20% of its nominal
current. This corresponds to the short
circuit threshold. Above this value, the
short circuit protection will trigger, as
shown in the figure below. Both
Overload and Short circuit conditions will
be shown by the common FAULT LED
and status change of F Relay output
8
Power Boost
Since the priority task of the DC-UPS is
ensuring the continuity of load power
supply, the current delivered to the
battery may vary to accommodate load
demand first.
The current to the load will follow the
demand of the load. When the load
demands more than rated, Power Boost
is enabled. Under this condition, battery
charging will stop or be limited, and the
battery will start instead contributing to
the load power supply. The total current
going to the load is limited in time
according to overload current intensity.
During Standby mode, part of the Boost
power will come from the mains via the
device power supply circuit, part will
come from the battery.
During Backup mode all Boost power
will come from the battery.
Unless the device is in Power Supply
mode (i.e. without battery), when Boost is
equal to +20% of I
R.
during the other
modes, if the battery is fully functional,
Power boost will be as follows.
Table 6 - Power Boost while in Standby or
Backup modes.
Load Current 12 V 24 V
Rated 10 A 5 A
Continuous
15 A
10 A
< 30 sec 17 A 15 A
< 15 sec 20 A 20 A
< 5 sec
25 A
25 A
9
Battery Start
When mains voltage is not available, and
the load must be powered up from the
battery, the DC-UPS must first be started
using the Battery Start push button ( 5 ).
Figure
9
.
1
-
Battery Start (5)
Keeping the Battery Start button pressed
for 2 s, the three LED will turn on in
orange color, the DC-UPS will power-on

20
and power the load under the same
conditions as in Backup Mode.
This is a facility particularly useful during
commissioning if mains is not available
to test load operation.
10
Battery
Management
10.1
Types of Batteries
BATTSAFE firmware includes factory-set
charging curves for the most common
battery types: Vented Lead Acid, AGM
and Gel Lead Acid, Ni-Cd, Li-Io.
Lead Acid batteries follows a 4-stage
charging curve: IUoU (Bulk, Absorption,
Float) plus Recovery stage for deeply
discharged batteries.
Charging curves can be selected by
dipswitch (see Chapt. 6.3). They can also
be customized via Data Link.
Table 7 - Charging voltage for battery type
Battery Type
Charging Voltage
(V/cell)
Float Bulk
Vented Lead 2.23 2.4
VRLA AGM Lead 2.25 2.4
VRLA Gel Lead 2.3 2.4
Li-ion 3.45
1
3.65
1
Ni-Cd, Ni-Mh 1.40
2
1.50
2
Note:
1
12 V : 4 cells, 24 V : 8 cells;
2
12 V : 10 cells, 24
V : 20 cells, 48 V : 40 cells.
The
Charg
e
Current trimmer (
7
)
allows to select the maximum
charging current from the
device to the battery. This is a
critical setting to protect the
battery
10.2 Battery charging
Battery management is performed by
Aris Power BATTSAFE, a comprehensive
battery management firmware based on
algorithms for automatic and optimized
battery charging.
BATTSAFE includes:
Universal Charger with factory-set
charging curves for the most
common battery types: Vented Lead
Acid, AGM and Gel Lead Acid, Ni-Cd,
Li-Io
flat batteries which are not
irreversibly damaged can be
recovered
real time diagnostic during
installation, preventing installation
errors
continuous battery monitoring
during operation, to minimize the risk
of battery damage and allow a fully
safe operation while keeping battery
in permanent connection with the
DC-UPS. Extended battery life is the
result.
Device and system faults are also
detected by auto-diagnostic features.
Battery Tester - Life test can be
activated manually through a
dedicated push button, to facilitate
maintenance checks
All status and faults signals are
shown on the front panel LEDs.
Data Link Communication (DLC), on
devices with this feature, allows
availability of status and faults signals
also in remote mode.
BATTSAFE can diagnose battery fault
conditions, among them:
o Battery cells in short circuit
o Sulfated battery
o Reverse polarity connection
o Battery missing or disconnected
o Battery Life Test
Table of contents
Popular UPS manuals by other brands

Tripp Lite
Tripp Lite SMART 2200 NET owner's manual

Georator
Georator T3UPS-11-15K instruction manual

inform
inform SAVER PLUS DSP SERIES user manual

Eaton
Eaton 93PM 150 kW SIAC-B Three-Wire Installation and operation manual

Energenie
Energenie EG-AVR-0501 user manual

Eaton
Eaton 9PX 1000i Installation and user manual