ARKY CORE PLUS User manual

1
MANUAL

General information 4
Installation 6
1 Important information 6
2 Identification plate 7
3 Setting the pinlock code 8
4 Changing the pinlock code 9
5 Changing the pinlock code aer attachment 10
6 Attachment/location 11
7 Step-by-step instructions for attachment 12
8 Schematic view of attachment 15
9 Power adapter 16
10 Pictograms/stickers 17
Use 18
1 Opening the ARKY Core Plus 18
2 Closing the ARKY Core Plus 19
3 Step-by-step instructions for emergencies 20
4 Aer using the AED 21
5 Maintenance and cleaning 21
Specifications 22
Table of contents

54
Environment
• Do not dispose of the ARKY Core Plus and its packaging in the household waste. Make
use of the collection system available in your locality. The use of collection systems
helps to preserve the environment and health.
• Use the original packaging of the ARKY Core Plus if you wish to return it.
Warranty
Failure to comply with the following will void any warranty, explicitly or implicitly:
• Do not remove any parts that belong to the ARKY Core Plus.
• Do not insert objects into the openings on the ARKY Core Plus.
• Only authorised personnel are permitted to carry out maintenance and repairs on the
ARKY Core Plus.
Important
• Maintenance and installation of the ARKY Core Plus should only be carried out by a
qualified electrician for safety reasons.
• The ARKY Core Plus should ideally be fitted in a shaded location and never in full
sunlight. Place the cabinet against a flat wall, taking into account the minimum
clearance space and applicable fire safety regulations.
Safety
• Ensure that the power is off when carrying out maintenance and/or when connecting
the ARKY Core Plus.
• Leave a clearance of at least 30 cm around the ARKY Core Plus to ensure proper
ventilation.
• Take into account the minimum clearance space and applicable fire safety regulations.
• Always keep the area under the ARKY Core Plus clear. • Do not fit the ARKY Core Plus
close to adiators or other sources of heat.
• To prevent the risk of fire and electric shock, avoid naked flames in the vicinity of the
ARKY Core Plus.
• Do not insert pointed objects into the recesses/openings on the ARKY Core Plus.
General information
Please read these instructions in full before installing and using the ARKY Core Plus.
GENERAL INFORMATION
ARKY Core Plus
Maximum protection for your AED
Five fans
Two heating elements with thermostat
Electronic lock with pincode
Internal lighting
Acoustic alarm
P I N L O C K
F E AT U R E S
VINKJE
W A R M E T E M P E R AT U U R
V E NTI L ATO R
PA D PA K
V E R WA R M I N G WAT E R-E N S T O FB E S T E N D I G
A L A R MA F M E T I N G E NW O R L DW I D E DEL I V E R Y
L A M P
KO U D E T E M P E R A T U U R
T E M P E R A T U U R
AED

76
1
2
3
4
5
1 Important information
PLEASE NOTE
Never fit the ARKY Core Plus in full sunlight. It should ideally be situated in a
shaded location on a flat wall. Take into account the minimum clearance space
and applicable fire safety regulations.
Front Back
1
3
6
2
2 Identification plate
Always state the type designation and serial number when contacting customer service
or your supplier.
Identification plate
Installation
Please read these instructions in full before installing and using the ARKY Core Plus.
INSTALLATION
1Wall section
2Cap
3Base
4Two heating elements
5Pinlock
6PCB compartment

98
3 Setting the pinlock code
4 Changing the pinlock code
Changing the code
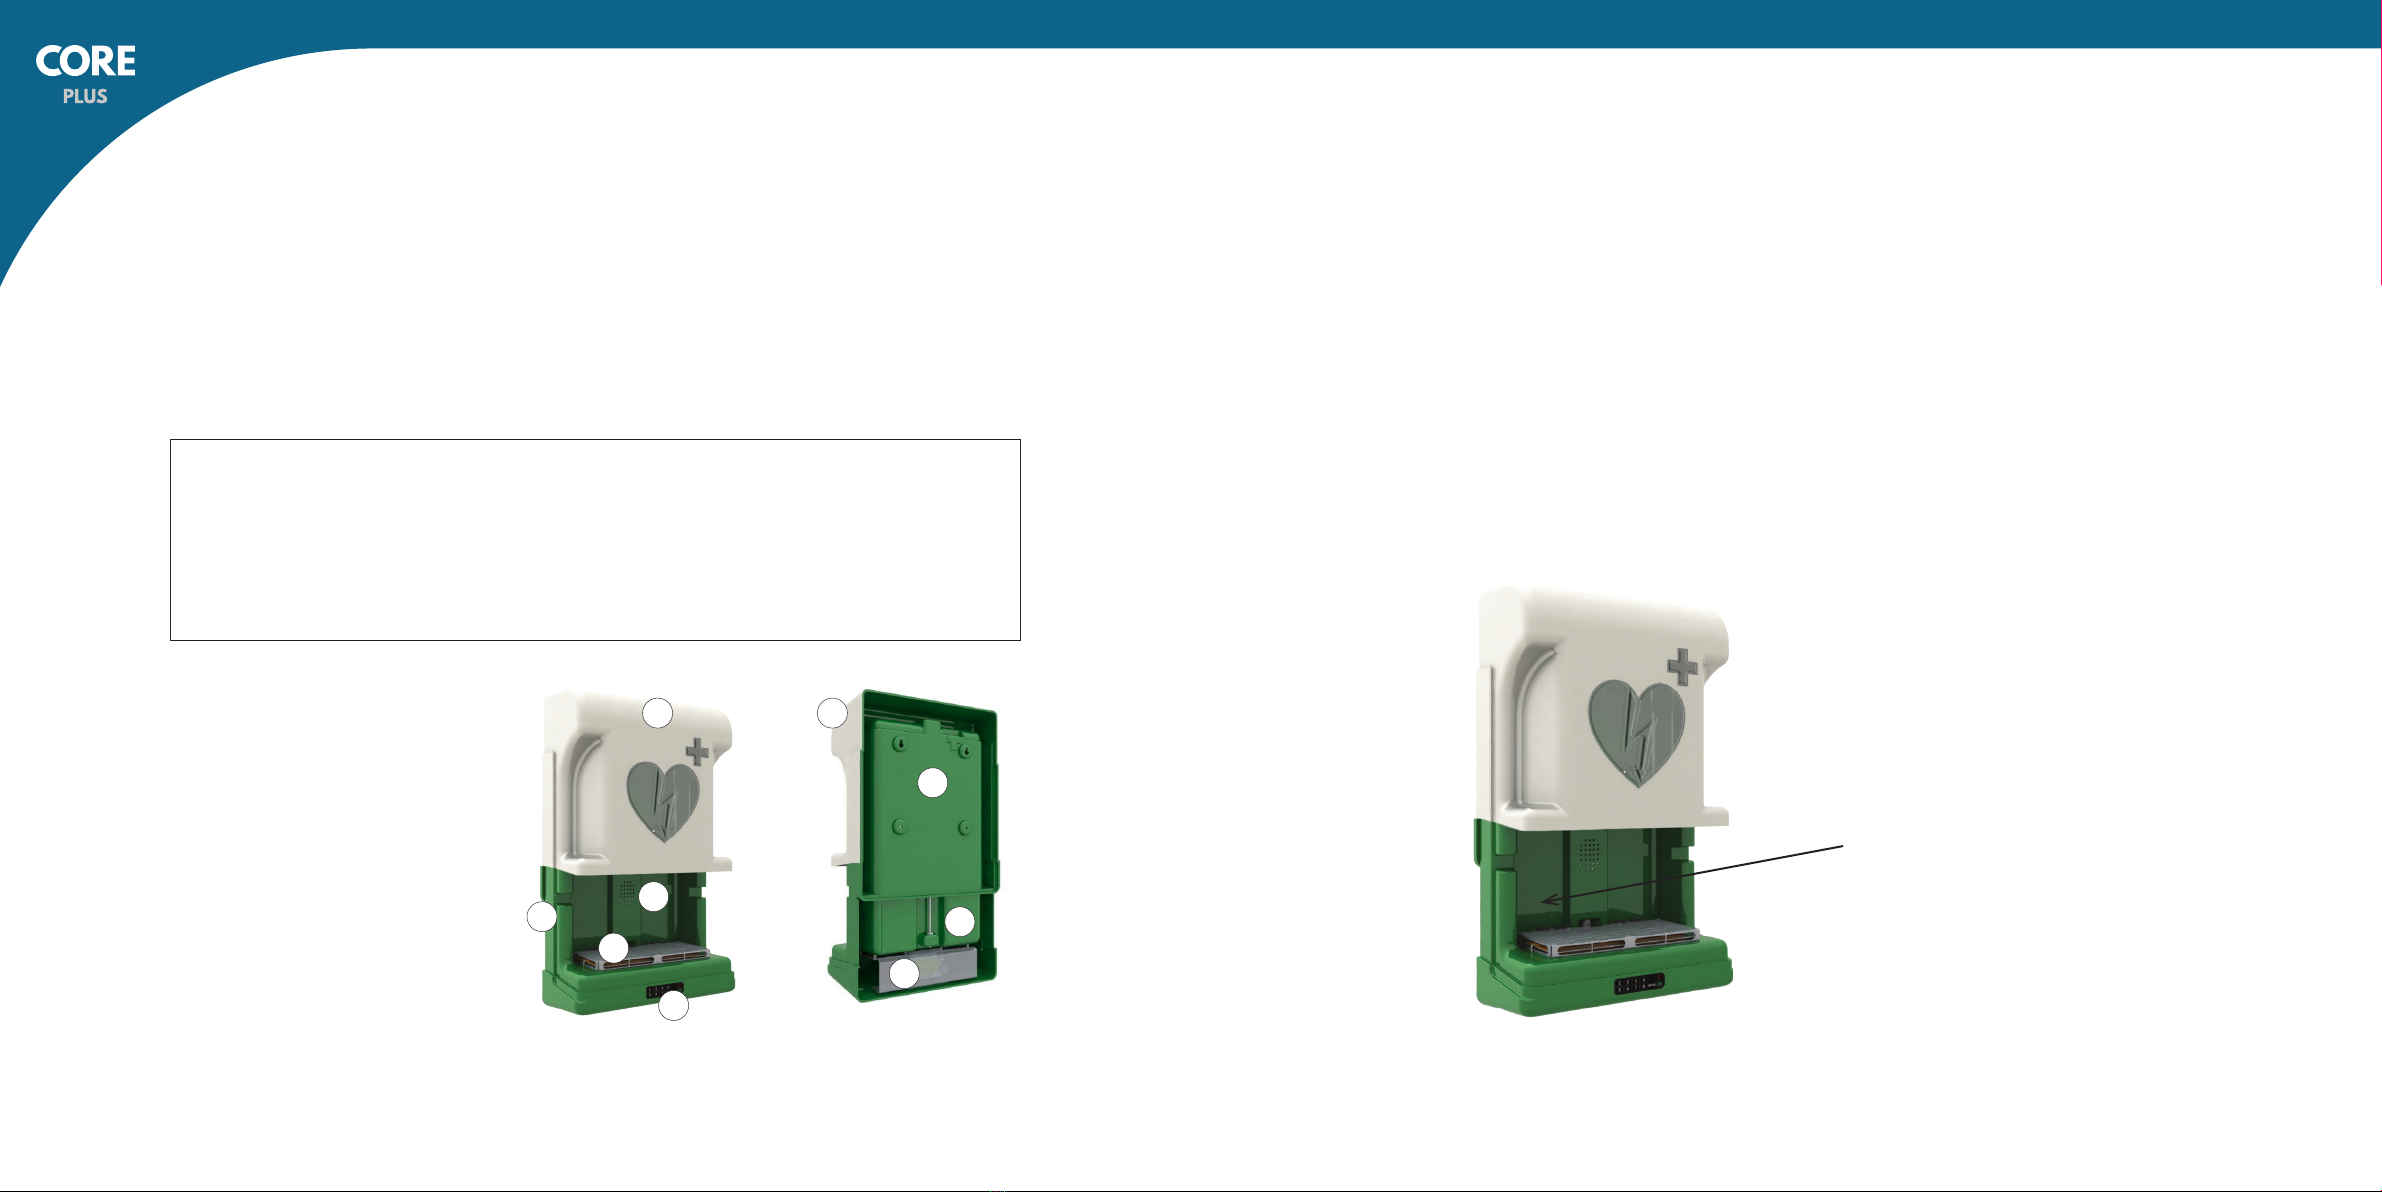
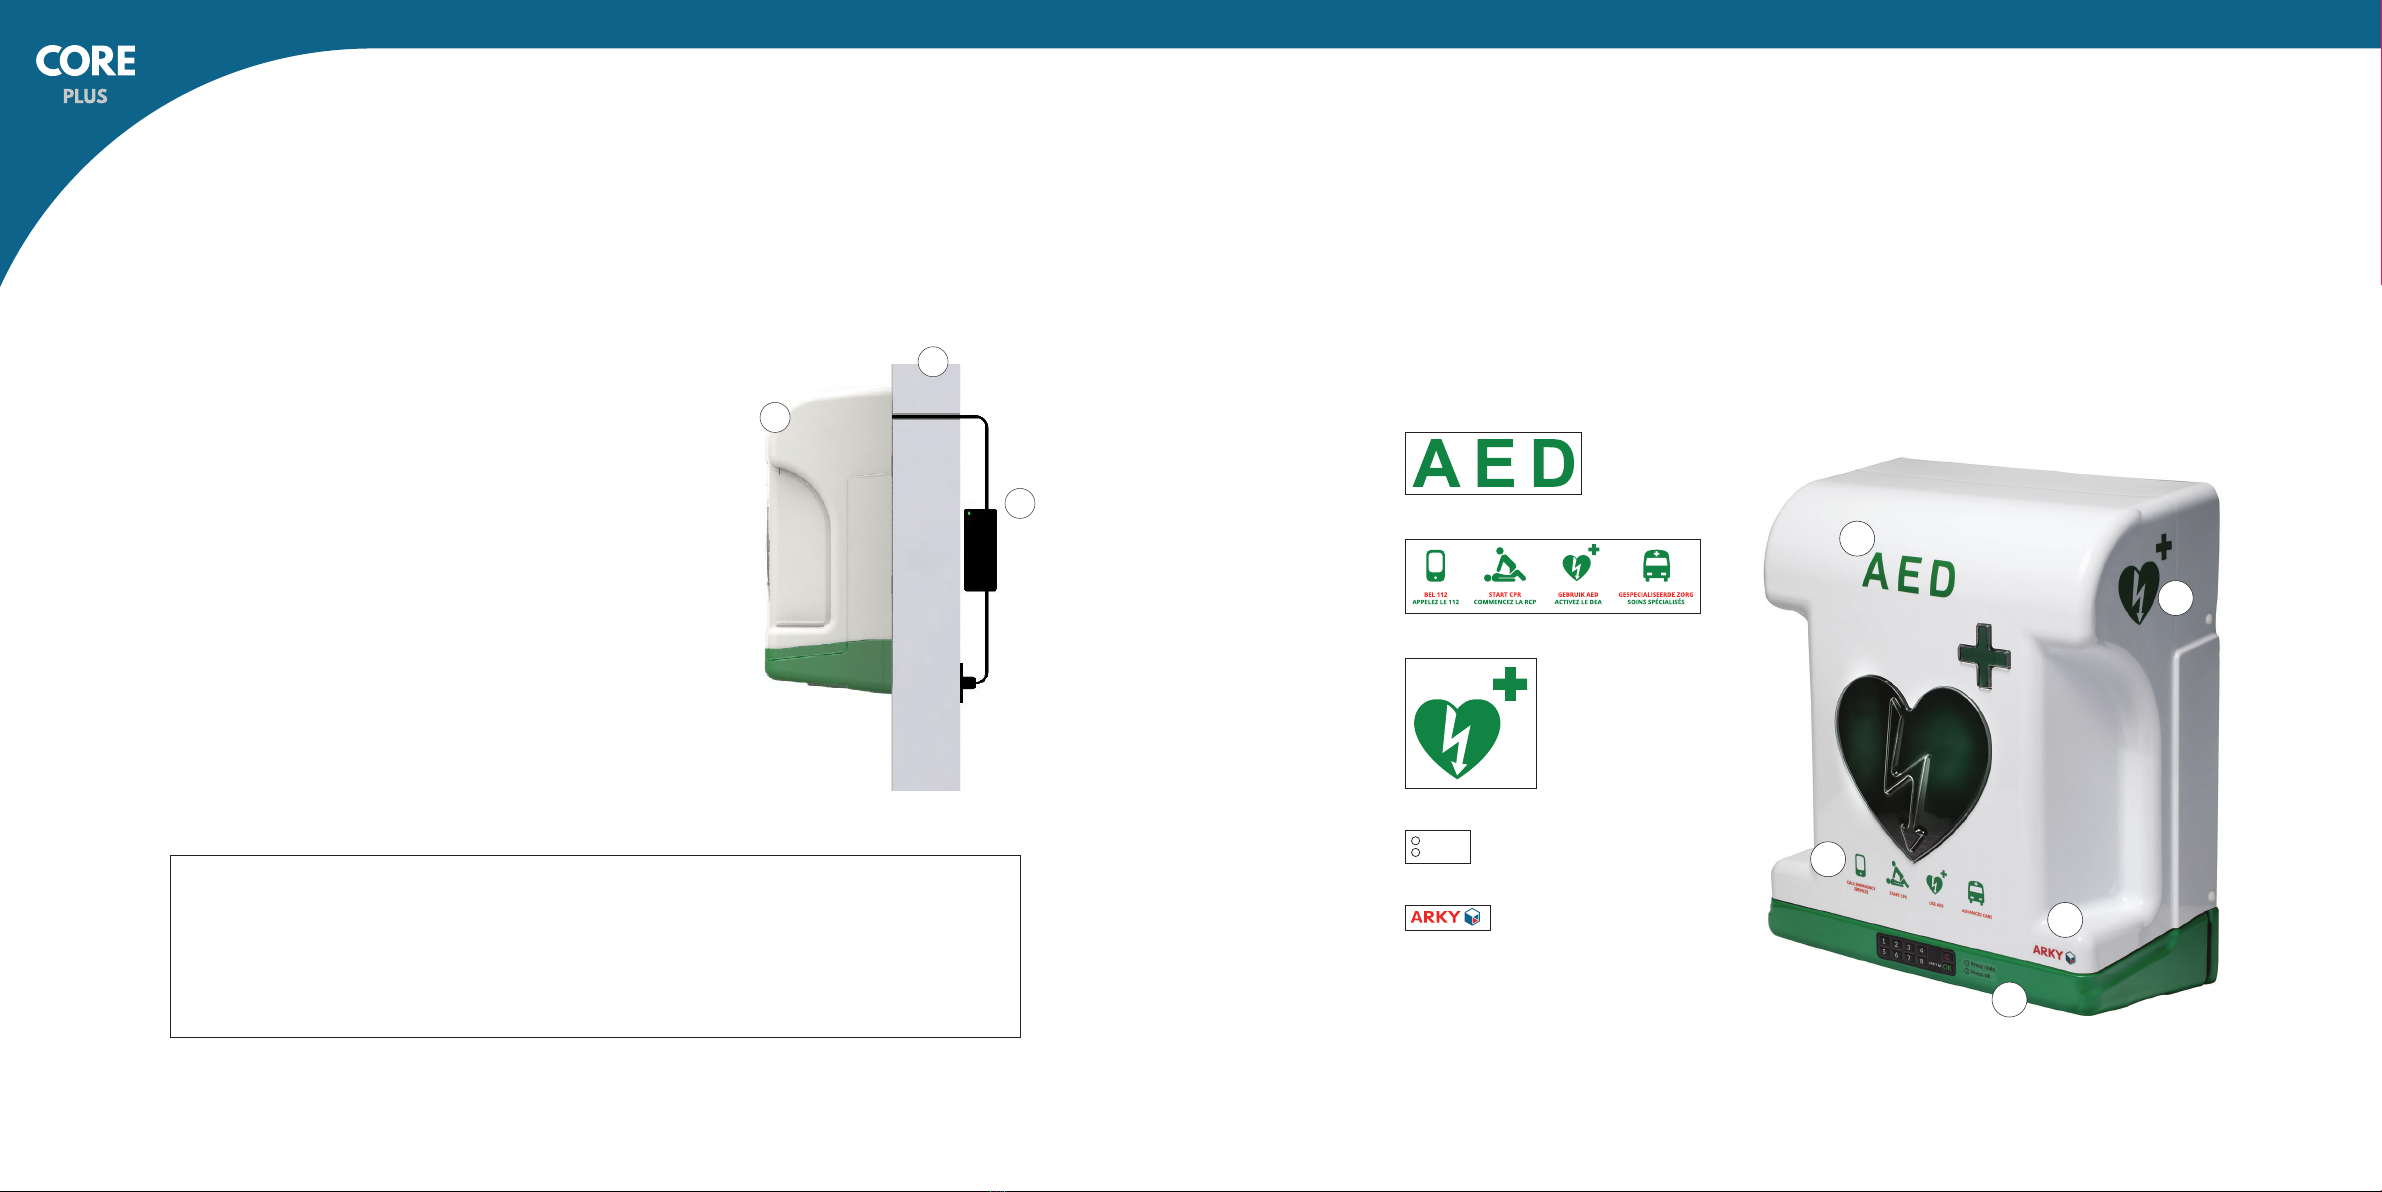
Open the cabinet with the default code (1-
5-1-5 + OK). The electronics compartment
at the rear of the cabinet becomes visible.
Remove the transparent cover. The PCB
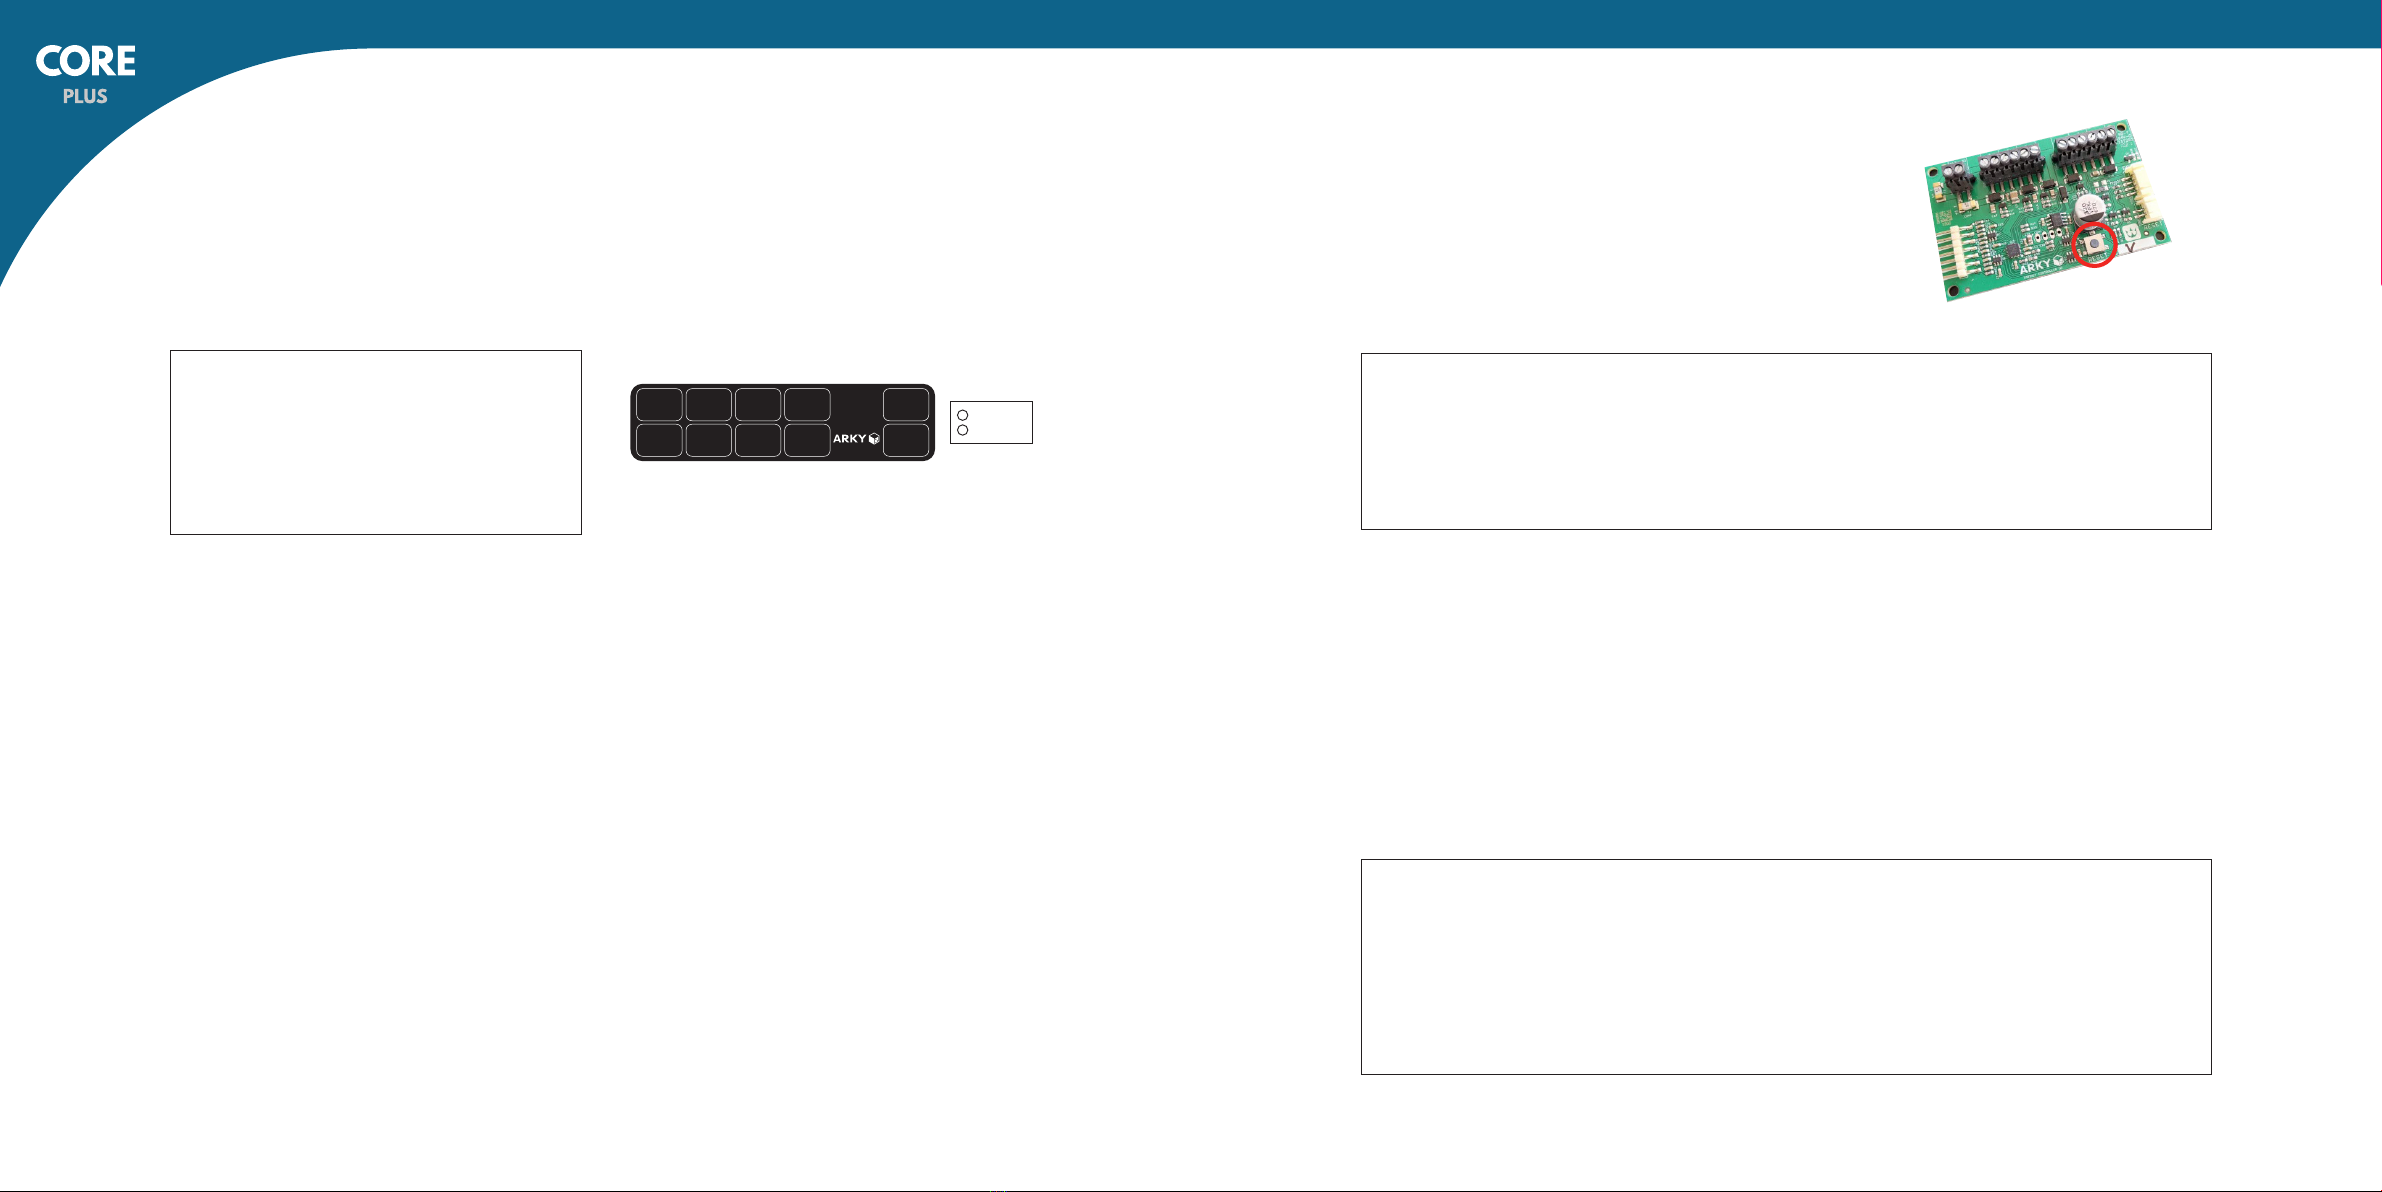
is now accessible. Briefly press the reset
button on the PCB and set a new code.
1 Aer releasing the reset button, enter
the current code.
2 Press ‘OK’.
3 Enter a new code.
4 Press ‘OK’.
5 The new code is saved and can be used
immediately.
Default code: 1-5-1-5 (+OK)
Entering a code on the pinlock
• Enter the code on the pinlock.
Enter the correct code on the pinlock,
Followed by OK. An alarm will sound and
the lock will be released for 7 seconds.
• There was an error when entering the
code.
Press ‘C’. The code can then be entered
again, starting from the first digit.
• ‘OK’ was pressed aer entering an
incorrect code.
There will be two beeps. The code can
then be entered again, starting from the
first digit.
• The pinlock was pressed in or the code
was not entered in full (without pressing
‘OK’).
Aer 20 seconds, the entry is
automatically deleted. The code can then
be entered again, starting from the first
digit.
TIP
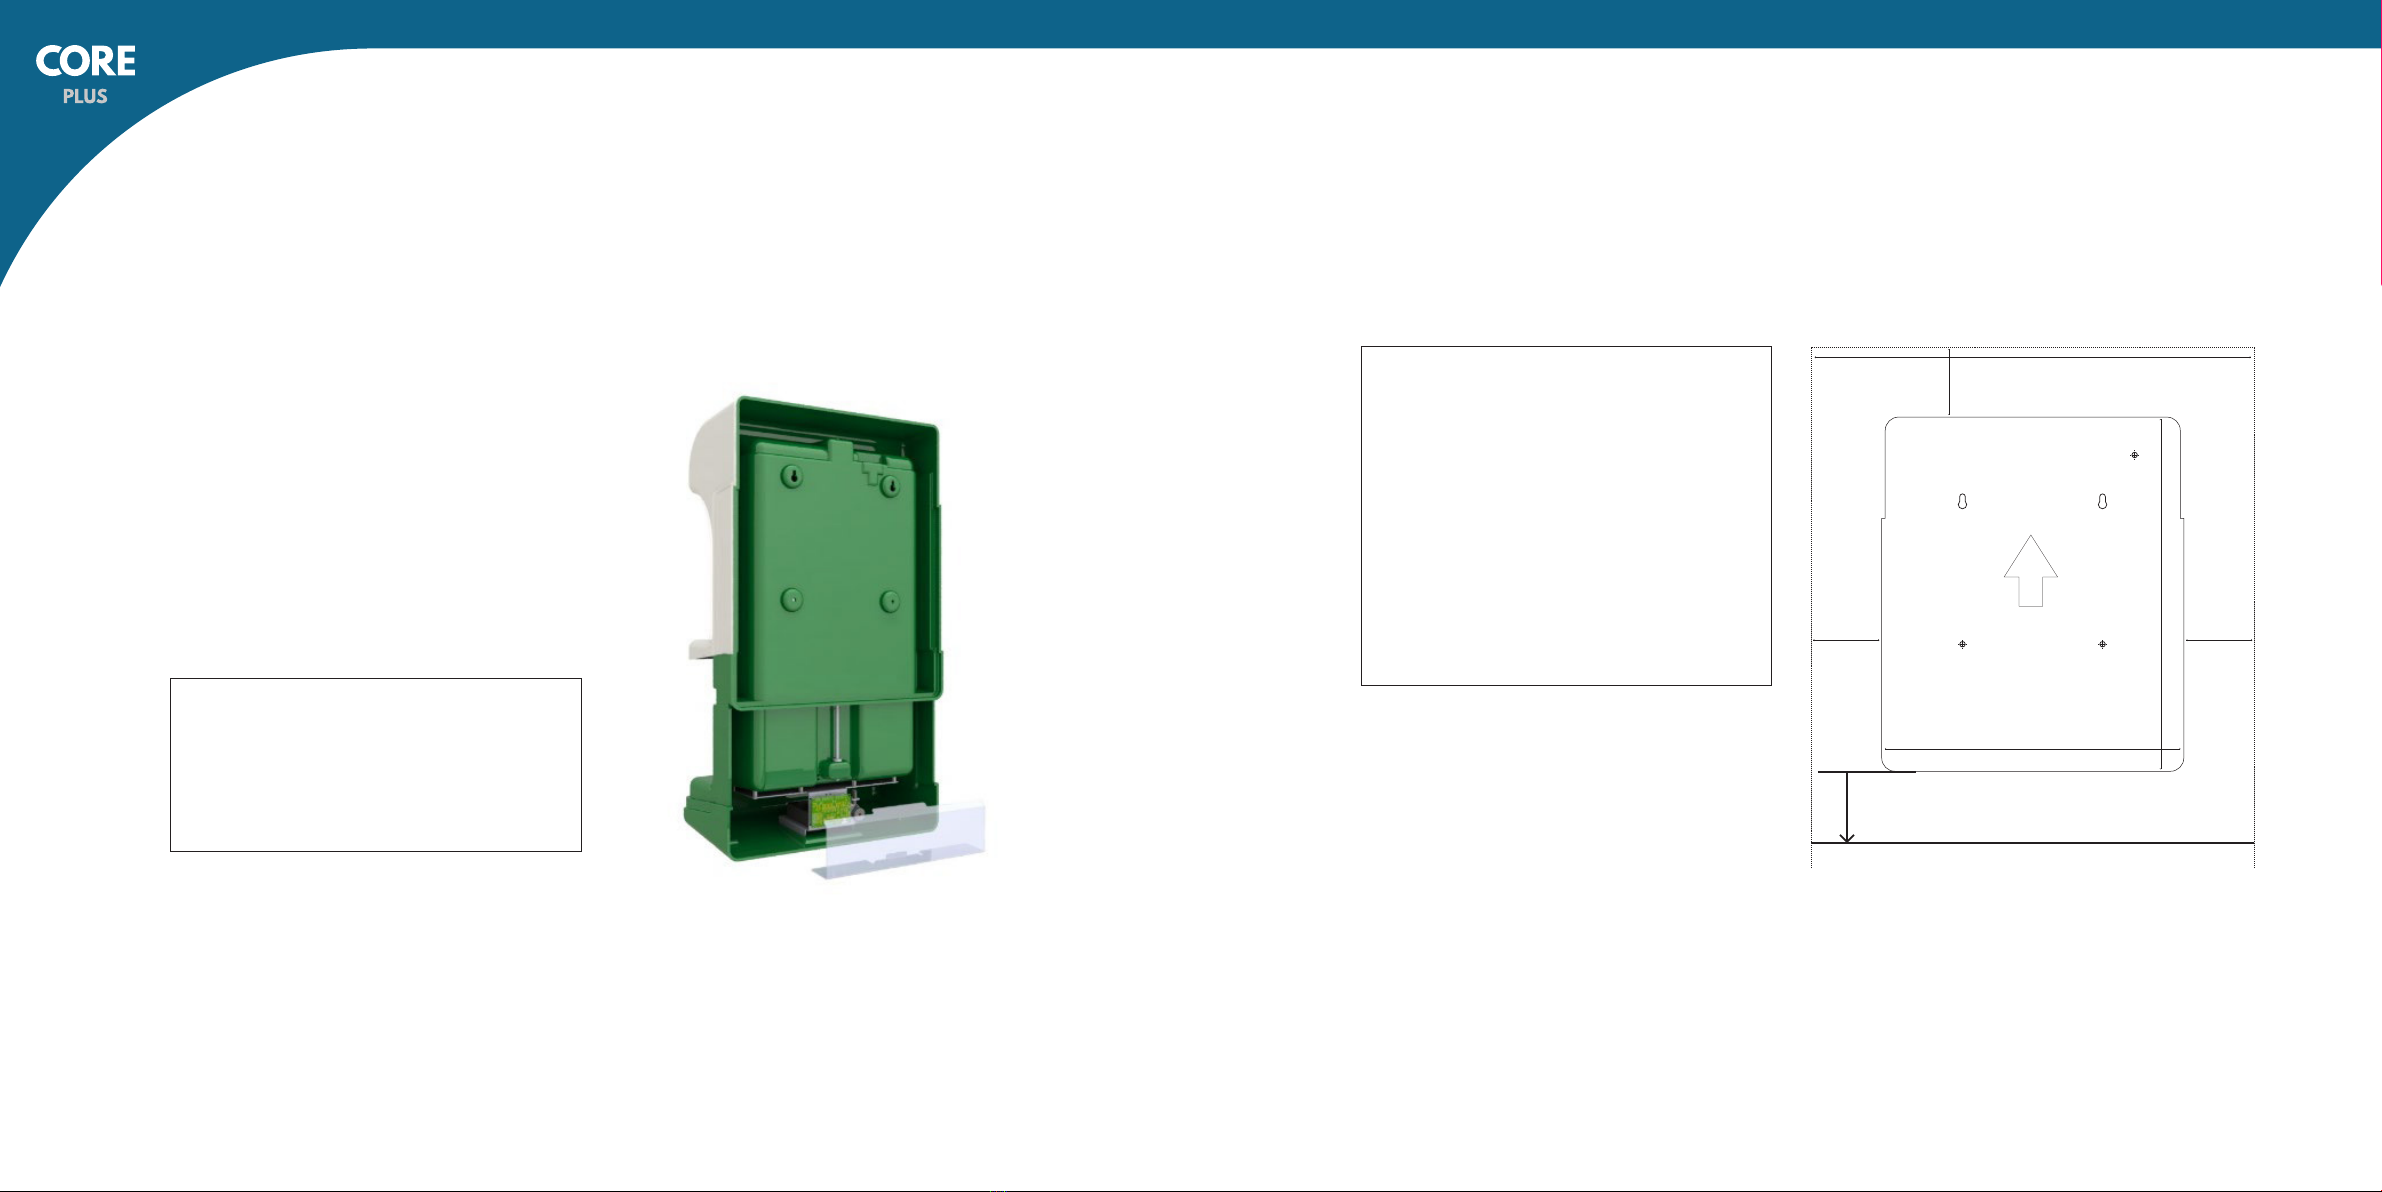
Change the code before suspending the cabinet. When setting a new code, the
cabinet must be supplied with power. The changed code will remain saved if the
power is disconnected.
Conditions
1A pin code consists of between 4 and 8 numbers.
2These codes will be rejected when setting a new code:
a1234
bCodes starting with 4 equal numbers (0000, 1111, 222254, etc.)
PLEASE NOTE
To use the pinlock, the ARKY Core
Plus must be powered by a suitable
power supply.
PCB reset button
Pinlock
Press code
Press ok
1
2
INSTALLATION
1 3
5 7
2 4 C
6 8 OK

1110
5 Changing the pinlock code after attachment
To change the code aer the cabinet has
been suspended, carry out the following
steps first:
aRemove the (opened) cabinet from the
wall. The cabinet can be lied slightly to
allow it to be removed from the wall.
bCarefully set the cabinet down on the
ground/table or ask a second person to
hold it.
c Carefully remove the transparent cover
from the rear (see the adjacent figure).
6 Attachment/location
Enclosed fixing materials
• 2 x washer M5 zinc plated
• 4 x plug (8 x 40 mm)
• 4 x Torx screw (5 x 50 mm)
• 1 x Torx driver
• 1 x drilling template
PLEASE NOTE
Use fixing materials that are
suitable for the type of surface
to which the ARKY Core Plus is
being fitted. The minimum bearing
capacity required is 20 kg.
Screw diameter: max. 8 mm
Collar diameter: max. 12 mm
630 mm
430 mm
100 mm100 mm
100 mm
504 mm
1400 mm van de grond
kabeldoorvoer
Enclosed drilling template
PLEASE NOTE
Pull the power cable back from the
wall at the same time to prevent
tension on the cable.
INSTALLATION
Transparent cover

1312
1Identify a suitable location for installation of the ARKY Core Plus.
2Mark the attachment points and cable inlet on the wall. Use the enclosed drilling tem-
plate to help you.
3Place the drilling template on the wall. Ensure that the arrow is visible and pointing
upwards. If necessary, fix the drilling template in place with adhesive tape.
Recommended distance from ground: 140 cm, see drilling template.
4Use a pencil/marker to mark the holes on the wall.
5Remove the drilling template from the wall.
6Drill the appropriate holes according to the fixing materials selected.
aBased on the enclosed fixing materials: drilling diameter 8 mm.
bCable inlet: min. 8 mm.
PLEASE NOTE
aNever fit the ARKY Core Plus in full sunlight. It should ideally be situated in a
shaded location on a flat wall.
bTake into account the minimum clearance space and applicable fire safety
regulations.
7Fit the mounting holes with plugs (except for the cable inlet).
8Only fit the top two mounting holes with a Torx screw and washer. Tighten the screw
and washer with the Torx driver and ensure a minimum distance of 3 mm between the
collar and the wall.
9 Route the power cable through the cable inlet and feed through as far as possible.
10 Suspend the ARKY Core Plus at the upper mounting holes. At the same time, continue
to feed the power cable through. Ensure that the cable does not come between the
cabinet and the wall.
11 Secure the connector to the power cable.
TIP
The mounting holes are visible through the transparent window on the front.
PLEASE NOTE
Brown is + and blue is -
7 Step-by-step instructions for attachment
INSTALLATION

1514
Schematic view of wall attachment
(with enclosed fixing materials)
View of wall attachment cross-section
AWall
BARKY Core Plus
CPlug
DTorx screw
12 Connect the cabinet to a power source/mains using the enclosed power adapter.
13 If the ARKY Core Plus has been connected correctly, the LED strip in the cabinet will
light up.
14 Open the cabinet with the default code: 1-5-1-5-OK (carry out the steps outlined in
section 3 if a different code is required).
15 With the cabinet open: fit the lower mounting holes with a bolt/screw and a sheet-
metal washer, if necessary.
16 Tighten all bolts (including the top two) with the enclosed open-end spanner or use a
ratchet spanner.
17 The cabinet has been installed and is ready for use.
PLEASE NOTE
The minimum voltage requirements for building-related installation:
100 - 240 V/AC, 50/60Hz. Never place the power adapter outside.
8 Schematic view of attachment
INSTALLATION
DC
A B

1716
• Only connect the ARKY Core Plus to a
power source/mains grid that can be
switched off and locked (always
disconnect the power supply for
maintenance and/or troubleshooting).
• Maintenance and installation of the
ARKY Core Plus should only be carried
out by a qualified electrician.
• Ensure that the power is off when
carrying out maintenance and/or
when connecting the ARKY Core Plus.
PLEASE NOTE
When setting a code other than the default code, it can be helpful to (temporarily)
keep the power cable on the inside as long as possible and not to fix it with cable
clips, for example, so as to ensure freedom of movement.
Always place the power adapter inside
10 Pictograms/stickers
Press code
Press ok
1
2
A
B
C
D
E
A
B
C
D
E
9 Power adapter
1 Wall
2ARKY Core Plus
3Power adapter
Side view cross-section
1
2
3
INSTALLATION

1918
1 Opening the ARKY Core Plus 2 Closing the ARKY Core Plus
USE
Open the ARKY Core Plus
by entering the correct
code on the pinlock, then
confirm with ‘OK’.
The base moves down
automatically.
Centre the AED on the
aluminium plate against
the rear wall as soon as
the base moves no farther
downwards.
Place a hand on either side of the base and push upwards until the base locks firmly into
the wall section.
Use
1 2 3
Enter the code The base moves down Place AED in the centre

2120
4 After using the AED
5 Maintenance and cleaning
3 Step-by-step instructions for emergencies
In the event of an emergency, carry out the following steps. 1Place the AED back in the cabinet.
2Close the cabinet.
3Contact your supplier.
For safety reasons, maintenance and installation of the ARKY Core Plus/connection to the
mains should only be carried out by a qualified electrician. Ensure that the power is off
when carrying out maintenance and/or when connecting the ARKY Core Plus.
Cleaning the ARKY Core Plus
• Clean the surfaces of the ARKY Core Plus with a so, damp cloth. Do not use chemical-
based products or cleaning agents as these may damage the cabinet’s plastic enclosure.
• Dry the ARKY Core Plus with a so, dry and clean cloth.
• Do not rub the cabinet with a hard object. This may permanently damage the cabinet.
• Do not use a high-pressure cleaner to clean the ARKY Core Plus.
1 Call emergency services
• Speak loudly and clearly, outline the situation and state the location.
2 Start resuscitation (CPR)
3 Open the cupboard
• Enter the correct code and confirm with ‘OK’.
4 Take the AED out of the cabinet
5 Go to the victim
6 Switch the AED on
7 Follow the instructions on the AED
USE

2322
Dimensions
430 x 504 x 214 mm
Weight
4,25 kg
Materials
Wall section: ABS
Base: ABS
Cover: PETG
PCB cover: PETG
Mounting bracket: Aluminium
Heater pack: Aluminium
Power supply/voltage limits
Power adapter:
Meanwell GST120A24-P1M
Input: 100-240VAC, 50/60Hz
Output: 24V – 5.0A, 120W MAX
Operating temperatures
The ARKY Core Plus is designed for the
protection and storage of an AED at
ambient temperatures of between -30°C
and +50°C.
Heating/ventilation
The ARKY Core Plus is equipped with
five fans and two heating elements of
24 V/45 W.
Heating:
Switches on at <7°C
Switches off at >10°C
Ventilation:
Switches on at >40°C
Switches off at <35°C
Alarm
If the correct code is entered on the pinlock
(when the ARKY Core Plus is powered by
a suitable power supply), the cabinet will
open and an acoustic alarm will sound.
The alarm will switch off automatically
aer a few seconds.
IP degree of protection
The ARKY Core Plus has IP55 degree of
protection. Overall dimensions in mm.
Globale afmetingen in mm
Specifications
SPECIFICATIONS

ARKY
Verlengde Bremenweg 12
9723 JV Groningen
The Netherlands
+31 (0)50 31 16 085
sales@arkycase.com
www.arkycase.com
Table of contents