Armada Avenger User manual

ELECTRIC SCOOTER
INSTUCTIONAL MANUAL
SCOOTER MODEL:
SERIAL NUMBER:
Date of Purchase:
Ltd.

INSTRUCTIONAL MANUAL
2 | P a g e
TABLE OF CONTENTS
1. Electric Scooter Component Description & Indicator Function
2. Essentials of Safely Driving an E-Scooter
2.1 Battery
2.2 Helmet
2.3 Lights
2.4 Brakes
2.5 Tires
2.6 Carrying Capacity
2.7 Appropriate Riding Gear
2.8 Electrical Care
2.9 Security
3. Operational Instruction
3.1 Start Up
3.2 Opening under seat & truck
3.3 Parking
3.4 Charging
4. Maintenance and Care
4.1 Battery type and care
4.2 Handling the battery
4.3 Distance and power
4.4 Effects of temperature
4.5 Battery Storage
4.6 Cleaning care
4.7 Regular Maintenance Time Table
5. General Technical Info –Tips & Trouble shooting
6. Warranty

INSTRUCTIONAL MANUAL
3 | P a g e
2
7
9
10
12
13
14
16
18
17
15
1. On/Off key ignition
2. Battery charger port
3. Battery indicator (display
gage)
4. Forward/Reverse lever
5. Three speed switch
6. Rt. brake lever (Front brake)
7. Lf. brake lever (Rear brake)
8. Rt/Lt turn signal switch
9. Digital speedometer display
10. Throttle
11. Horn
12. Ft Lf. Turn signal light
13. Ft Rt. Turn signal light
14. Back Turn signal light
15. Seat
16. Peddles
17. Kickstand
18. Middle kickstand
19. On/off Front Headlight switch
20. High beam/low beam
1
3
4
6
8
11
11
5
7
10
19
20

INSTRUCTIONAL MANUAL
4 | P a g e
2. ESSENTIALS OF SAFELY DRIVING AN E-SCOOTER:
Before embarking on your E-scooter, it’s important to check the following for safety:
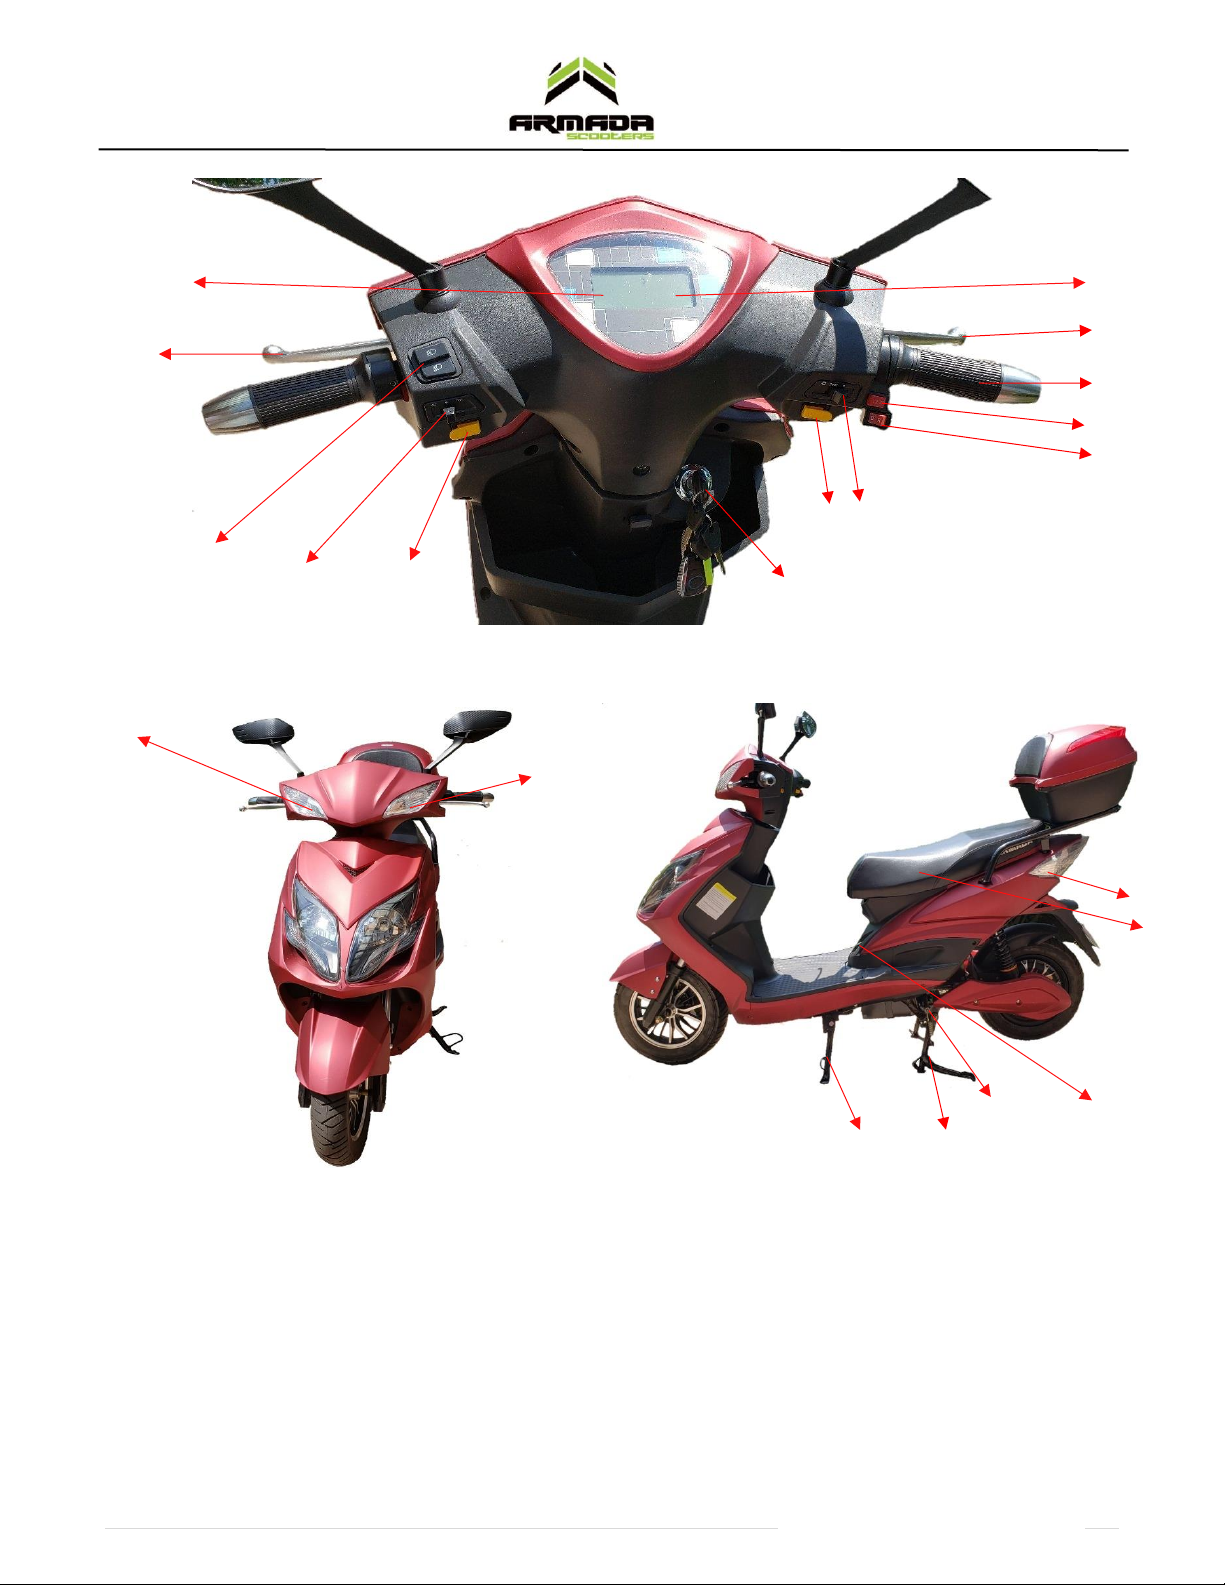
2.1 BATTERY: Check the battery level on the LCD digital display monitor
before going on a long ride (30-60km). The battery level is indicated by the filled in bar levels.
Consider taking the charger with you.
2.2 HELMET: Always wear a helmet to prevent head injuries. It’s the law in
most provinces to wear a helmet while riding on a E-Scooter.
2.3 LIGHTS: Check headlight, brake lights and both right and left turn signals
are working properly before riding. Use hand signals if your signaling
lights stop working. Always use your headlight so cars and pedestrians
can see you.
2.4 BRAKES: Squeeze the right and left brake levers on the E-scooter to
ensure they engage. Visually inspect the brake pads for wear.
2.5 TIRES: Typically, rear tires should be kept closer to 35-40psi for less
rolling resistance although the front tire bears less weight , it can be
set at a bit lower, closer to 30-35psi. Inflate your tires on a regular basis
to the recommended pressure as shown on the tires. keep a tire plug kit
handy to plug a hole once you find it. Inner tire coating also known as
"slime" also works. If you have a tire with an inner tube in it, either repair
the tube with a patch kit or better yet, replace it. Most ARMADA
ELECTRONIC VEHICLES have tubeless tires.
2.6 CARRYING CAPACITY: Typical carrying capacity for most E-scooters is
330lbs. Do not over-load max carrying weight of the scooter. Doing so
will affect performance and may cause damage to components on the
scooter. Securely fix cargo on the vehicle to ensure safe drive and do not
hang anything on handlebars, so as not to affect normal driving.
2.7 APPROPRIATE RIDING GEAR: Wear appropriate clothing for all riding conditions
such as; a long sleeve shirt, long pants, boots/shoes, reflective gear or bright
clothing, gloves, waterproof outerwear/poncho. Avoid wearing loose clothing that
might get caught while riding.

INSTRUCTIONAL MANUAL
5 | P a g e
2.8 ELECTRICAL CARE: To prevent water from getting on electrical components keep
the E-scooter covered when not in use. Avoid riding in deep water that could
submerge your wheels above the axle. The rear axle is where the wiring goes into
your motor so you should not get water inside. Electric components can get over
heated if the scooter is driven for long periods of time in hot weather or driving
it up steep hills (more then a 20 degree incline).
2.9 SECURITY: Set your alarm when parked for a period of time. Consider using the
left wheel lock position to make it more difficult for thieves to roll it away. Use
an additional lock for extra security to secure your E-scooter or use a wheel lock
to make it immobile.
3. OPERATION INSTRUCTION:
3.1 STARTING UP: Drive in ideal conditions for optimal scooter performance.
a. Make all safety checks on battery level, both break levers, both right and left turn signals, horn,
and headlight. Check and tighten any bolts and nuts. Adjust mirrors for proper visibility.
b. Check air pressure in tires. Make sure air in tires are holding and there are no leaks.
c. Turn alarm off. If alarm is on when the E-scooter ignition is turned on the scooter will jolt
forward, then stop.
d. Retract main kickstand or side kickstand.
e. Ensure forward drive is switched on and not reverse drive.
f. Driver sits on seat, insert the key in ignition, turn key clockwise to ON position. The dash display
will be visible but there will be no engine sound.
g. Place hands on both Rt and Lt brake leaver for safety when you are ready to drive. Turn the
throttle towards you slowly to start accelerating.
3.2 OPENING UNDER SEAT AND TRUNK: Do not forcefully turn key. When the key is in the right
position it will open properly.
•Put key in ignition and turn slightly to the left. The under-seat storage compartment will pop
open. Push down seat to lock into position.
•Use the smaller key to open the trunk. Insert key into trunk lock and turn to the left.
3.3 PARKING: Park in designated public areas using the alarm and a good heavy-duty lock.
•Turn off ignition by turning the key left counter clockwise before parking.
•Use the front wheel lock by turning the handlebars fully to the left; turn the key in the ignition to left
again counter clockwise.
•It is recommended to use a heavy duty bike lock or chain looped through the wheel to secure the bike
when parked.

INSTRUCTIONAL MANUAL
6 | P a g e
3.4 CHARGING:
•Turn off ignition before using the charger.
•On the E-scooter, plug the charger to the output socket then to a standard wall power outlet.
Disconnect the battery charger and unplug from E-scooter when not in use.
•Completely empty batteries will take 6-8 hours to charge with a standard charger. Chargers
will stop charging when the battery is fully charged. Do not charge more than 8-10 hours or
it will damage the batteries.
•The red light on the charger indicates that the E-scooter is being charged and the fan inside
the charger will be on. Once it’s fully charged the green light will turn on. Place the charger
back inside the seat storage.
•Charging should proceed in condition of good ventilation not in an environment with
corrosive gas or flammable condition.
•Avoid dropping the charger. The battery charger should be regularly examined for damage to
the cord, plug, enclosure and other parts. In the event of such damage, if any is found, the
scooter should not be charged until the battery charger has been repaired or replaced.
•During winter or any long-time storage of the electric vehicle, the battery should be recharged
every month to maintain functionality.
•If the charger becomes too hot, the charger lights will flash indicating a malfunction of the
charger or charging circuit. Disconnect charger immediately to prevent any damage. If the
lights continue to blink and there is no more fan noise, the charger will not charge the E-
Scooter.
•Charge the E-scooter after each use if possible, to condition the battery cycle.
4. MAINTENANCE AND CARE:
4.1 BATTERY TYPE AND CARE: 12v 20AH Lead acid non spill-able batteries; weight 15lbs.
The typical life cycle of these batteries are 1 ½ to 2 years. After approximately 300 charges,
a lead-acid battery will need to be replaced, you will notice that your battery cannot carry
as much of a charge as it could initially. Contact your local ARMADA Scooter shop to purchase
a new battery. Replace battery with an identical or similar battery. When replacing your
battery, dispose of it at a proper battery recycling facility or return to an ARMADA Scooter
Shop.
4.2 HANDLING THE BATTERY: The battery contains large amounts of electrical power. You
must use caution and respect when handling it. Not following these instructions can result
in serious injury.

INSTRUCTIONAL MANUAL
7 | P a g e
•DO NOT place your lead acid battery on concrete. Concrete drains the batter’s power and
will neutralize the lead-acid. Placing the battery on concrete for any length of time will
likely result in the battery being drained of power and possibly losing its ability to store
electricity.
•Always lift the battery with both hands and carry it with care. Never drop the battery. If the
case is damaged, the contents may leak out.
•Never puncture or open the battery case. The contents are dangerous and may cause injury.
Do not touch the contents of a leaking battery.
•Do not touch the two metal poles on the battery box at the same time. This can cause a short-
circuit. It could cause injury
to you or others and can cause serious damage to the
electrical system of the e-bike.
•Do not handle your battery if either you or the battery are wet. Water is an excellent
conductor of electricity. You may experience an electrical shock and serious injury.
4.3 DISTANCE AND POWER: The e-bike can go up to a distance of
35 to 50km before it must be recharged. The ability of your
battery to power your e-bike depends on many variables. These
variables include the weight of the rider and cargo, the
prevailing wind resistance, steep hills and inclines, and tire
pressure.
4.4 EFFECTS OF TEMPURATURE:
Temperature plays a critical role in the battery performance and life
cycle. At higher temperatures, battery capacity generally increases; as
the temperature drops, so does the capacity. This is why riding your
scooter at 20 degrees Celsius will give you better performance and
range than riding at 5 degrees Celsius. While keeping the batteries cold
may seem like a great idea in theory, you need to make sure that they
do not get too cold. In our climate here in Canada, storing E-bike
batteries in an unheated garage, garden shed or outdoors will most
likely cause them to freeze. This results in permanent damage to the
internal lead plates or plastic casings. Make sure you store your
batteries where it wont freeze.

INSTRUCTIONAL MANUAL
8 | P a g e
4.2 REGULAR MAINTENANCE TIME TABLE:
Items
Travel Mileage (KM)
200km
1000km
3000km
5000km
8000km
10,000km
12,000km
All bolts & nuts
A
A
A
A
A
A
A
Tires
A
A
A
A
A
A
A
Wheel bearing
A
C
A
C
C
A
Lubrication of all position
L
L
L
L
Motor bearing
A
C
C
Ft & Bk braking block
A
A
A
Ft & Bk shock absorber
A
A
A
Front fork bearing
A
A
A
Main & side kickstand
A
A
A
Charger
A
A
Controller
A
A
5. GENERAL TECHNICAL INFO –TROUBLE SHOOTING:
Q. Why won't my Electronic Vehicle turn on? There is no lights or power when I turn the key
switch?
•Check the main power switch also known as circuit breaker or main breaker.
•Make sure the power wires are securely tightened inside the main power breaker switch.
•Make sure all your battery wires are tightly connected and all power connections are not
loose or not attached.
Q. My lights work but my Electronic Vehicle will not move?
•Make sure it is charged. If it is not, once voltage reaches a low level the controller will not
turn on and as a result the bike will not move even if the low voltage can power the lights.
For example, a 48v battery will go down to 42v and it is considered empty because the
controller turns off to protect the batteries from low voltage. It is also known as an LVC which
is an acronym for Low Voltage Cut Off.
•Check the brake handle switch wire as it could activate the motor cut off if not fully released.
•Check all connections of the only 3 other parts that would cause this. They are the throttle,
controller or motor. It is rare that the motor has any issues because it is the most robust
component of the vehicle. However, there are hall sensors inside the motor that could go bad
A-check, adjust, replace when necessary, L-Lubricate, C-Clean

INSTRUCTIONAL MANUAL
9 | P a g e
•on rare occasion. A remedy for this is using a sensor less controller. It may be a better
alternative to replacing the hall sensor or motor completely.
•To recap, this issue can be due to a number of reasons, but we will start with the most likely
and simple fix.
•1. The brake switch is stuck on. Check your rear stop lamp to see if the light is activated by your brakes.
•2. The kill switch or kickstand switch (if equipped) is stuck on.
•3. The controller needs to be replaced.
•4. The throttle wire has a loose connection or needs to be replaced.
•It is not common to be a motor issue because it is typically the most robust electrical component on
the vehicle.
Q. The battery voltage/gauge/meter drops when I ride. Why does it do that?
•As you draw power from the battery you will get some voltage drop that will settle up once you stop.
It is recommended that you charge the bike as frequently as possible to maintain battery capacity for
both speed and range. As your voltage is depleted the Electronic Vehicle speed will lower
incrementally.
Q. What should my battery voltage reading be when it is full?
•It is recommended for all Electronic Vehicle owners to have a multimeter to read the voltage.
•For 48V bikes the voltage range when full is typically around 52V-53V
•For 60V bikes the voltage range when full should be around 64V-67V
•For 72V bikes the voltage range when full should be around 77V-80V
•Lithium batteries have a similar but slightly different total cell voltage.
•If you want to do a voltage check you must own a multimeter and put it on the voltage
setting if the bike does not have a factory voltage display as a feature already.
Q. Is there a way to condition the batteries? How do I take care of my batteries?
•We suggest that brand new batteries should be charged fully then discharged fully for 3-5X
to condition the batteries for full range. It's best to keep your batteries power level stay
closer to the fully charged status rather than in a depleted status. Batteries won't perform
as well in really cold temperatures. We recommend charging wherever you go whether it is
at work or wherever you go if possible. Freezing your batteries will damage them. Over-
charging or leaving them in a state of discharge will also harm them. Battery set should
never charge more than 8-10 hours max.
Q. What should I set my tire pressure at?
•Typically, rear tires should be kept closer to 35-40psi for less rolling resistance although the
front tire bears less weight so it can be set at a bit lower, closer to 30-35psi.

INSTRUCTIONAL MANUAL
10 | P a g e
Q. What should I do if I get a flat tire due to puncture?
•You should keep a tire plug kit handy to plug the hole once you find it. Inner tire coating also
known as "slime" also works. If you have a tire with an inner tube in it, you need to either
repair the tube with a patch kit or better yet, replace it. Most ARMADA ELECTRONIC
VEHICLES have tubeless tires.

INSTRUCTIONAL MANUAL
11 | P a g e
SCOOTER MODEL:
SERIAL NUMBER:
Date of Purchase:
7. WARRANTY:
No Refunds-Exchange Only if item(s) unused within 7 days.
Bike warranty is for 1 year parts replacement only. (Batteries & chargers are 3 months.)
All warranty claims will be examined for failure analysis in case of customer misuse or
damage. Normal scratches or wear & tear & wearable products such as tires & bulbs are
excluded. Warranty does not include delivery or installation of parts which could cost
extra. The persons stated on this warranty form is fully aware and understands that only
they are responsible for any and all damage to any property involving the vehicle on this
invoice and/or injury to themselves or other people/property and/or penalties from
contravening any laws of Canada or any nation outside of Canada. Armada Trading Ltd. is
not liable or responsible for any actions or consequences of the end users of its products.
Usage of products on this invoice are completely at your own risk. All conditions of sale
are understood & product(s) received are in good condition.
Name: Date:
For more information on all ARMADA Electric Vehicles and Frequently Asked
Questions go to
www.armadascooters.com
Parts and Accessories available for all models of scooters
Table of contents
Other Armada Scooter manuals