Armstrong Steam QM-1 User manual

Steam QM-1 Steam Quality Monitor
Installation and Operation Manual
247-EN V1.17
Armstrong InternationalArmstrong International
North America • Latin America • India • Europe / Middle East / Africa • China • Pacific Rim
armstrongarmstronginternational.com
Keep this manual with equipment
for future reference.
Certified

Armstrong InternationalArmstrong International
North America • Latin America • India • Europe / Middle East / Africa • China • Pacific Rim
armstrongarmstronginternational.com
Table of Contents
Revision History . . . . . . . . . . . . . .1
Safety . . . . . . . . . . . . . . . . . . .2
Abbreviations and Acronyms. . . . . . . . . 3
General Description . . . . . . . . . . . . . 4
Specifications. . . . . . . . . . . . . . . . . . . . . . . . . . . . . . . . . . . . . . . . . . . . . . . . 4
Assembly. . . . . . . . . . . . . . . . . . . . . . . . . . . . . . . . . . . . . . . . . . . . . . . . . . . . . . 5
Cabinet. . . . . . . . . . . . . . . . . . . . . . . . . . . . . . . . . . . . . . . . . . . . . . . . . . . . . . . . . 6
Dimensions. . . . . . . . . . . . . . . . . . . . . . . . . . . . . . . . . . . . . . . . . . . . . . . . . . . 7
Installation . . . . . . . . . . . . . . . . . 8
General Considerations (Site Selection). . . . . . . . . . 8
Typical Installation . . . . . . . . . . . . . . . . . . . . . . . . . . . . . . . . . . . . . . . . 8
Start-Up Procedure . . . . . . . . . . . . .10
Software Navigation. . . . . . . . . . . . . 11
Standard Screens . . . . . . . . . . . . . . . . . . . . . . . . . . . . . . . . . . . . . . . . . . 11
Special Screens . . . . . . . . . . . . . . . . . . . . . . . . . . . . . . . . . . . . . . . . . . . . 13
Troubleshooting . . . . . . . . . . . . . . . 15
Maintenance . . . . . . . . . . . . . . . .16
Software update . . . . . . . . . . . . . . . . . . . . . . . . . . . . . . . . . . . . . . . . . . . . 16
Calibration. . . . . . . . . . . . . . . . . . . . . . . . . . . . . . . . . . . . . . . . . . . . . . . . . . . . 17
Recalibration Procedure . . . . . . . . . . . . . . . . . . . . . . . . . . . . . . . . 17
Change / Replace Orifice. . . . . . . . . . . . . . . . . . . . . . . . . . . . . . . . 19
Component and Parts List . . . . . . . . . . 20
Components. . . . . . . . . . . . . . . . . . . . . . . . . . . . . . . . . . . . . . . . . . . . . . . . . . 20
Parts. . . . . . . . . . . . . . . . . . . . . . . . . . . . . . . . . . . . . . . . . . . . . . . . . . . . . . . . . . . . . 20
Product Certifications . . . . . . . . . . . . 21
Appendix One: Wiring Diagram . . . . . . .22
Appendix Two: Data Logger Connection . . .23
Appendix Three: Dryness Fraction . . . . . . 24
Limited Warranty and Remedy. . . . . . . . 25

Armstrong InternationalArmstrong International
247-EN V1.17
Steam QM-1
Page 1 of 25
Revision History
Version Release Date Description of Changes
1.0 May 12, 2014 Initial
1.1 June 3, 2014 Page 4, chart with tiltle: Specication, 5th line with electrical information: "12 VAC or 15 -
24 VDC 5 W" replaced by " 12VAC 50/60Hz or 15-24 VDC / 30W"
Page 4, bottom of the page. The remark : "The product must be powered by an isolated
external power supply in low voltage." has been added.
Page 21, Appendix one: wiring diagram. "F1 : 1A" replaced by "F1 : 1AT 250V"
1.2 October 22,
2014
Page 1, updated drawing
Page 4, updated specications table
Page 7, updated cabinet drawings
Page 9, added drawing to start-up procedure
Page 18, added recalibration procedure
Page 19, revised the 5 volt drawing
Page 23, Modbus slave and master connection
1.3 March 25, 2015 Page 13, added serial mode information on screen section
Page 21, updated standard comformity list with UL 61010-1
Page 23, added address and updated mode on chart Parameters / Value
added slave information on charts (Function 0x02 and Funcitons 0x04)
Contents, updated pages nr.
1.4 August 25,
2016
Page 8, modication of the ambient temperature.
IOM reference update: 1249 turn to 247.
1.5 April 5, 2017 Page 4, updated specications
Page 24, updated max pressure
1.6 January 22,
2018
Page 20, item nr. updated: D60740 to D94998
Page 23, update to the chart Function 0x04 Read Inputs Registers remove (barre) as it is a
misprint
Page 24, Appendix 3, minimum value of the dryness fraction graphic update
1.7 August 9, 2018 Page 5: graph has been updated. Flange information is now: EN 1092-1 DN15 PN100
Page 20: components list updated. Part Nr. updated: D60722 to D60738
spare part and components lists updated: for D94998 and D60738 PN40RF becomes
PN100RF
1.11 April 29, 2020 Cover, updated image
All pages - Version update from 1.6 to 1.8, psi and bar to psig and barg
Page 4, updated specications and warning statement, 12VAC changed to 15VAC
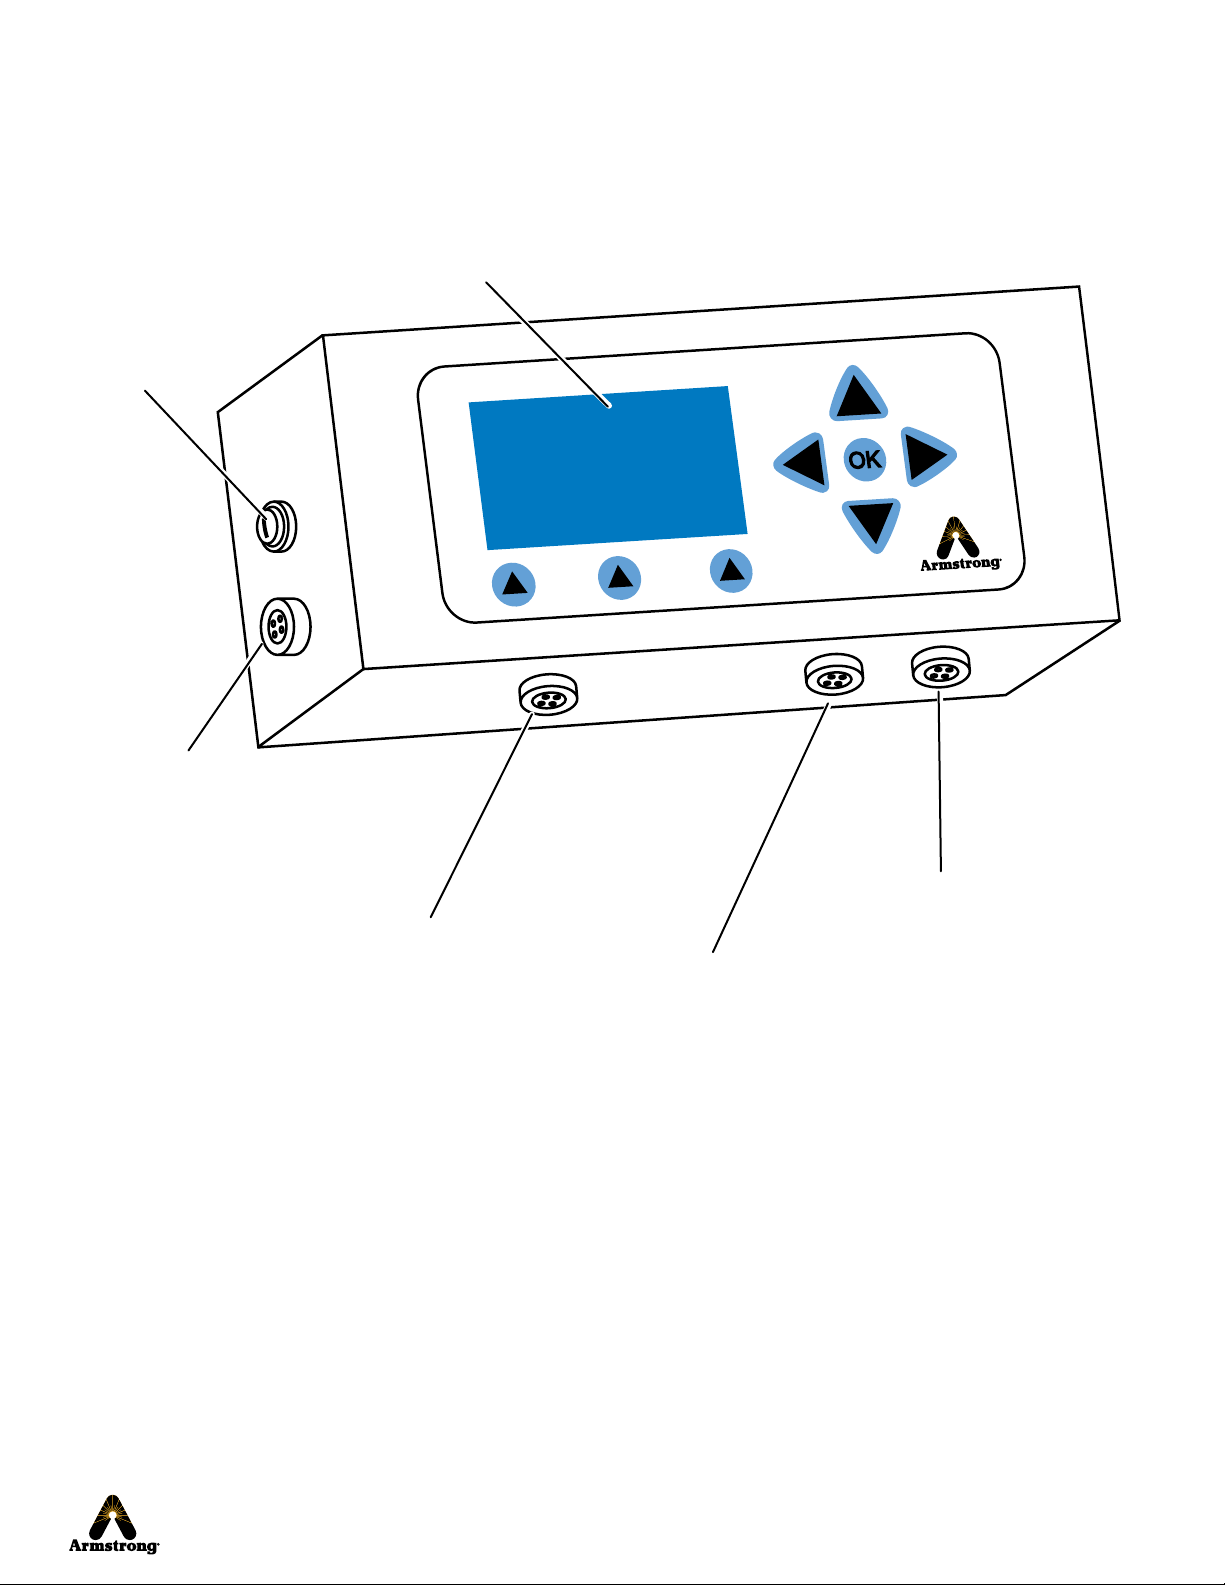
Page 5, updated image and some callouts
Page 6 & 7, updated image
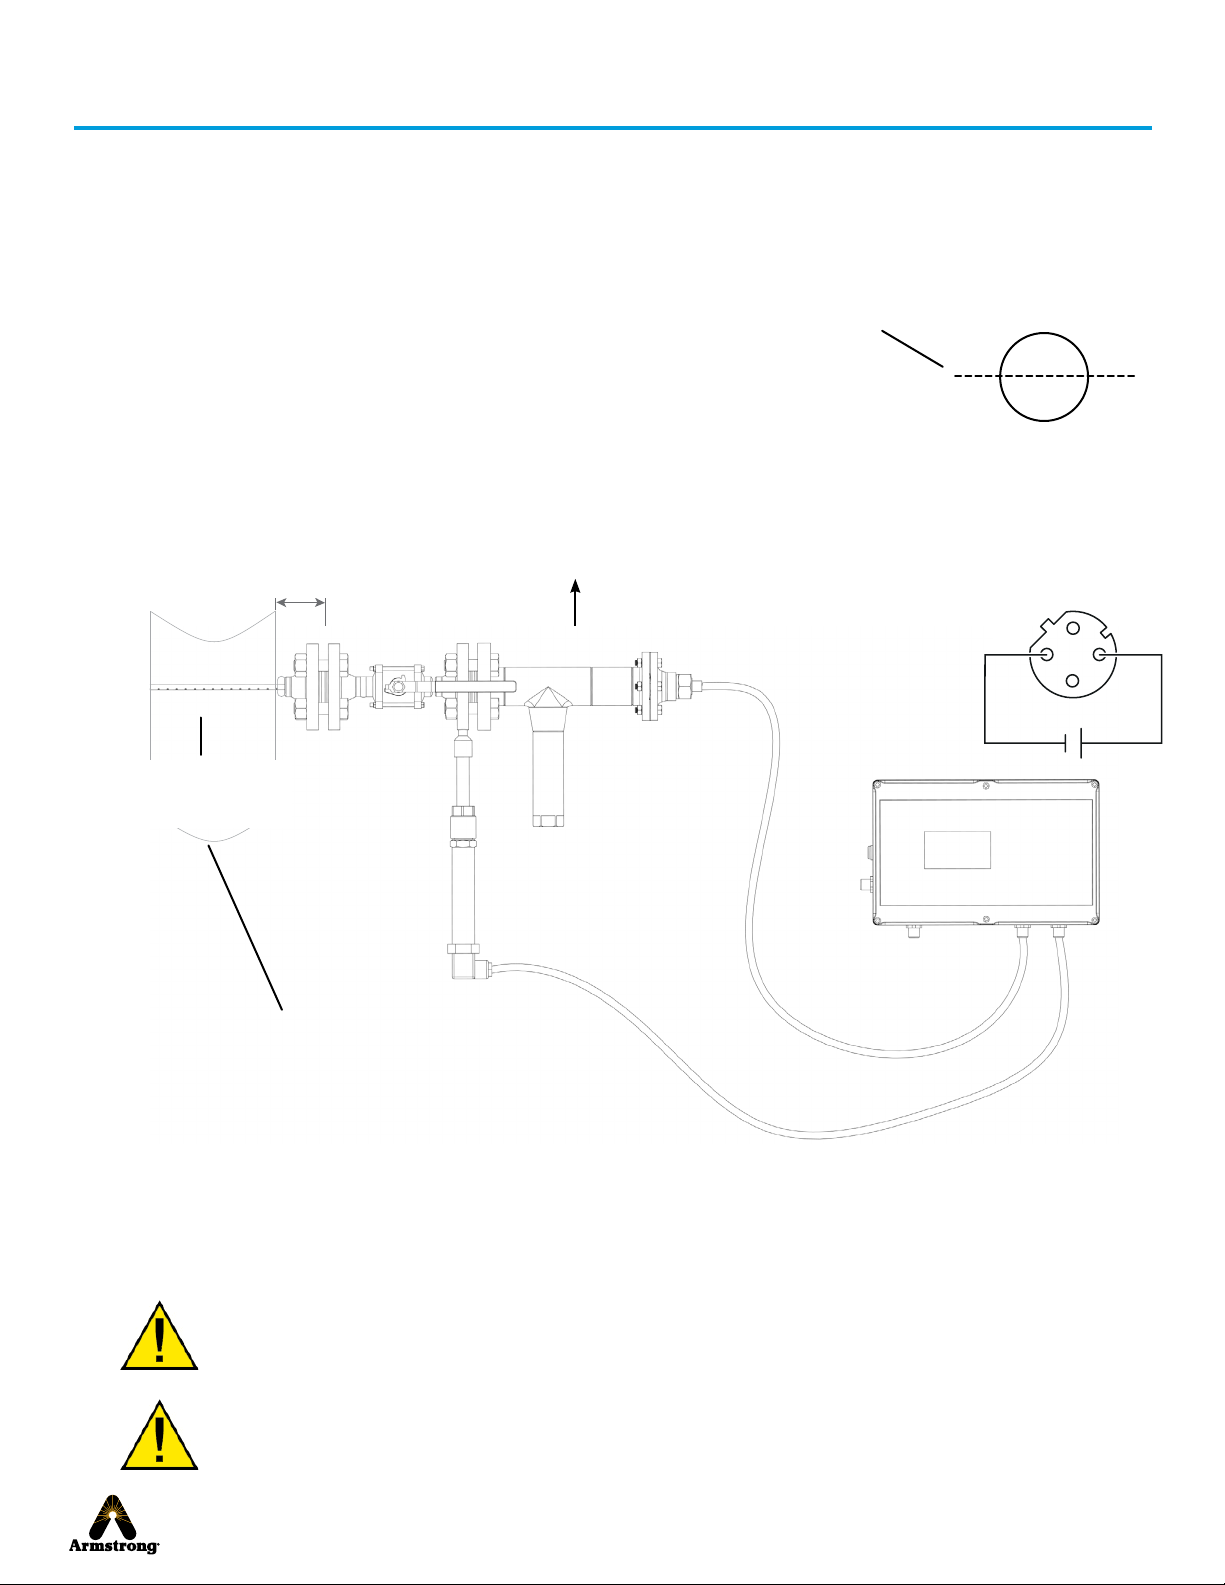
Page 8, updated image and added callouts, changed hose to pipe in warning statement
Page 9, added callout and extended Note copy
Page 10 updated image, changed hose to pipe in copy, additional statement added to
waring symbol.
Page 13, changed specic minutes to x-xx
Page 15, changed exible hose to discharge pipe
Page 17, updated Pressure transmitter and Materials needed statements. Added 'or dry
well' to Caibration Procedure
Page 18, updated statement 2 and removed 'caution' statement
Page 19, updated image, added callouts 7 and 8 to image and table
Page 22, added copy for supply drawing
Page 23, replaced entire Modbus Connection page
Page 24, added startement regarding graph values

Armstrong InternationalArmstrong International
247-EN V1.17
Steam QM-1
Page 2 of 25
Safety
Icon Legend
Burn hazard! Uninsulated components upstream of cabinet may be hot.
• Do not touch when unit is working.
• Allow to cool before moving or servicing unit.
Live steam will cause burns; condensate water may cause them. Skin exposure to
140 °F (60 °C) water for only five seconds may cause a second degree burn.
This device must be installed in accordance with appropriate local, national,
and international standards, codes, and practices.
Read this manual. It contains important information.
Service must be performed by a qualified person.
Installation should always be accompanied by competent technical assistance.
Improper installation, start-up, operation, maintenance, or service may void warranty.
You are encouraged to contact Armstrong International or its local sales
representative for additional information.
Shock hazard!
• Electrical installation must be performed by qualified personnel.
• Disconnect power before performing any electrical service.
Equipment must be disposed of according to applicable environmental requirements.
Indicates Power On
Indicates Power Off
Indicates important information concerning potential
for personal injury or damage to equipment
Indicates electrical hazard
Indicates hot surface
Keep unit away from heat-sensitive equipment and installations.

Armstrong InternationalArmstrong International
247-EN V1.17
Steam QM-1
Page 3 of 25
Abbreviations and Acronyms
Term Meaning Explanation
Al Alarm Indicates an out-of-limit situation, but has no impact on operation.
Al: Dryness below user-defined set point longer than two minutes.
C Celsius
cm Centimeter
DIN Deutsches Institut für Normung eV
EC European Community
EEC European Electrotechnical Commission
EN European Norm
F Fahrenheit
gal Gallon
h Hour
imp Imperial [measure]
in. Inch
kg Kilogram
L Liter
lb(s) Pound(s)
max Maximum
min Minimum
mm Millimeter
P Pressure P is steam pressure upstream of calibrated orifice.
psig Pounds per Square Inch (gauge)
QM Quality Monitoring
sec(s) Second(s)
SI International System of Units
T Temperature T: Temperature after the calibrated orifice.
X Dryness Fraction (sometimes called steam
quality or moisture content)
Xmin is the lower dryness limit. Alarm indicates the limit has been exceeded.

Armstrong InternationalArmstrong International
247-EN V1.17
Steam QM-1
Page 4 of 25
General Description
Steam QM-1 is intended to replace manual testing of steam dryness and provide real-time
data proving that steam quality meets applicable requirements.
Principle of operation:
A sample of steam is taken continuously.
Steam pressure is measured.
Steam passes through a calibrated orifice and expanded to atmospheric pressure.
Steam temperature is measured.
Sample of steam is discharge to drain (atmospheric pressure).
Dryness fraction is determined according to the Mollier Diagram.
Armstrong recommends that the Steam QM-1 unit be installed in one location and not used as a portable unit.
Advantages over manual testing are:
• Improved safety
• Ease of use
• Real time results
• More accurate and objective results
• Ability to trend data over time
Data from Steam QM-1 can be integrated in a control system using a data historian with Modbus output (see appendix two for
connection information.)
1
2
1
3
4
5
6
T
P
1
2
3
4
5
Materials of construction comply with all standards known at the time of manufacture.
Armstrong reserves the right to make design or specification changes without notification.
Specifications
Parameter Specification
Maximum Operating Pressure 465psig @ 500°F (32.1barg @ 260°C)
Maximum Allowable Pressure 465psig (32.1barg)
Maximum Allowable Temperature 500°F (260°C)
Dryness fraction See Appendix 3
Electrical 15VAC* 50/60Hz or 15-24 VDC/30W
The product must be powered by an isolated external power supply in low voltage.
*If supplied with less than 15VAC, unit will still operate, however all measurements/readings will be incorrect!

Armstrong InternationalArmstrong International
247-EN V1.17
Steam QM-1
Page 5 of 25
Assembly
Note: The assembly shown below is configured to be mounted horizontally.
Assembly (without flange) weighs approximately 20 lbs (9 kg).
Flange ½" ASME B16.5
Class 300 RF or EN 1092-1
DN15 PN100 Face Type B
Inlet Ball Valve
(stainless steel)
Calibrated Orifice
Tee Assembly with Calorimeter
Temperature Sensor
Discharge Connection (3/4" NPT
ID Hard Piping) Max. 7lbs/hr
(3kg/hr)
Pressure Transmitter
Connection Flange
(not provided)
Flange needed
for connection:
Class 300RF or
EN109201
DN15 PN40 Face
Type B
Pitot Tube (cut to fit). Orientation of
holes in pitot tube have no impact on
measurements
Steam line
Flow Direction

Armstrong InternationalArmstrong International
247-EN V1.17
Steam QM-1
Page 6 of 25
Cabinet
Cabinet weighs approximately 2 lbs (0,9 kg)
Fuse
Display & Navigation Pad
Male M12 Connector for
Pressure Transmitter
Male M12 Connector for
Temperatur Sensor
Male M12 Connector
for RS485
Male M12 Connector
for Power Supply

Armstrong InternationalArmstrong International
247-EN V1.17
Steam QM-1
Page 7 of 25
Dimensions (approx.)
Assembly
B
Cabinet
A
D
C E
Dimensions & Weight
in mm
A – Assembly Width 20 500
B – Assembly Height 15 375
C – Cabinet Width 10 250
D – Cabinet Height 6.5 160
E – Cabinet Depth 2.5 60
Assembly Weight 20 lb 9 kg
Cabinet Weight 2 lb 0.9 kg

Armstrong InternationalArmstrong International
247-EN V1.17
Steam QM-1
Page 8 of 25
Installation
General Considerations (Site Selection)
Connection to vertical steam line is optimal.
The steam sample can be taken from horizontal and vertical steam
lines, as long as the steam sampling tube is in a horizontal plane.
Connection into
horizontal steam line
must be at center line.
Ambient temperature must be 5–40 °C (41–104 °F)
Relative humidity must be 30–80%
Altitude must not exceed 2000 m (6562 ft)
Indoor Use
Pollution Degree 2
Typical Installation
By default, orifice 0.5mm is installed. For pressure below
10barg (150 psig), use the 0.8mm orifice provided.
To clean or replace the orifice, see page 19.
Power Supply
To insure accuracy the discharge tubing must discharge to atmospheric pressure.
Warning: Steam and condensate up to 320 °F (160°C) will flow from the discharge. Precautions to safely discharge the steam and
condensate must be taken.
Note: Orientation of the holes in the pitot tube have no impact on the measurement
Note: Shortening or replacing a cable will require recalibration.
Note: See page 9 for details to cut pitot tube if necessary.
The inlet ball valve is not designed to carry the weight of the assembly especially if a heavy steam discharge hose is
connected. It is recommended to support the end of manifold.
Steam line
Max. 5" (127 mm)
At first use, fill pressure transmitter tube with water.
A blocked steam discharge pipe is a safety hazard as the parts after the orifice are not designed for pressure.
To
Atmospheric
Drain
Support as needed
#1
RS485
Orientation of holes in
pitot tube have no impact
on measurements
#1 - Brown Negative
#3 - Blue Positive
#3

Armstrong InternationalArmstrong International
247-EN V1.17
Steam QM-1
Page 9 of 25
Pitot tube must be cut accordingly if the diameter of the line is less than 6".
Measuring the length of the pitot tube.
Installation
Note: If pilot tube is shorter than the measured length, then it is not necessary to cut the tube. It can be installed
without any modifications. Orientation of holes in pitot tube have no impact on measurements.
Connection Flange
Flange needed for connection:
Class 300RF or EN109201
DN15 PN40 Face Type B
Steam Line
Measure Length = X
Inside
pipe
wall
X (Measured from
pipe described
above)
Remove Section

Armstrong InternationalArmstrong International
247-EN V1.16
Steam QM-1
Page 10 of 25
Start-Up Procedure
Note: Parameters will display in about 10 minutes.
To prevent damage to the pressure sensor, be sure to fill the
tube before it with water before start-up
Confirm all connections:
• Power
• Drainage
• Sensor connections
Turn power onto the Steam QM-1. The main screen will display
1
4
3
2
Caution: Uninsulated components will become hot once steam is applied.
5
Slowly open the inlet ball valve, to allow steam to flow into the assembly.
6
Check for leaks and tighten connections as necessary
7
8
Check that steam or water flows through the discharge pipe (up to 7 lbs/hr (3 kg/h) depending on the steam
pressure)
In the settings menu, set the Xmin, the unit, the time and altitude (see pages 11 and 12)
If you are using the ModBus Connections, follow instruction in appendix 2
A blocked steam discharge pipe is a safety hazard as the parts after the orifice are not
designed for pressure. Do not cover ball valve handle in insulation due to inherent safety risk.
Fill with Water

X 0.963
P [barg] 10.1
!
[X.XXX- X.X] [X.XXX- X.X]
[X.XXX- X.X] [X.XXX- X.X]
[X.XXX- X.X] [X.XXX- X.X]
!
Armstrong InternationalArmstrong International
247-EN V1.17
Steam QM-1
Page 11 of 25
Main Screen
Arrow keys navigate in a screen
or in some cases access special
screens as defined later.
Press "OK" to
accept changes.
Line 4 shows
navigation for
option keys.
Option keys
Note: During initialization, a progress bar is
displayed until readings become available.
Ringing bell symbol
accesses alarm settings
menu.
Gear symbol accesses
settings menu.
Standard Screens
Exclamation point
indicates a new alarm.
Software Navigation
X = dryness fraction
Refresh rate : 1 min.
Average screen shows average dryness fraction and pressure
over a period of time as defined in the menu 007 (see page 12).
Example ∆t = 10 min, the six values give you an overview of the
last hour.

Setting Xmin X.XX
Unit SI
HH : MM
!
HH:MM D HH:MM D
HH:MM D HH:MM D
HH:MM D HH:MM D
!
Armstrong InternationalArmstrong International
247-EN V1.17
Steam QM-1
Page 12 of 25
Settings Menu
To get to the settings menu press the option key
with the symbol. Scroll through the settings
using up/down arrows (or). Move arrow to
value (activate selection) by pressing right arrow
().
Change value by pressing up/down arrows (or).
To save change press left arrow () or exit screen.
Unit switches between
imperial (lbs - °F) and
SI units (kg - °C).
Alarm Menu
Alarm indicated on main screen (exclamation
point) will reset automatically when consulting
this screen.
HH = hour
MM = minutes
D = Nr. of day(s) ago when alarm occurs.
e.g. 0 = today
1 = yesterday
2 = 2 days ago
Alarm below that value
Set the time
eg 16:30
To get to the alarm menu, press the option key with
the symbol. The alarm menu lists the last 6
instances the measured dryness fraction was less
than the Xmin value (from the settings menu).

logger Add 1
Freq 5min
Serial Mode Master
0 0 0
x.xx
Software Version
Armstrong InternationalArmstrong International
247-EN V1.17
Steam QM-1
Page 13 of 25
Code Menu
Access menu by pressing and
at same time.
Navigate between
digits by pressing
or . Change value by
pressing or .
Press OK after screen code is
entered to proceed.
Advanced Setting Menu
Access code is 007.
"logger Add" specifies Modbus address
of data logger (default is "1").
Special Screens
Calibration Sensor
P 0barg 17.5 barg
T 80 °C 140 °C
ALT 1500 m (∆ 100 m)
Access code is 152.
Calibration Menu Screen
∆t for the average screen (average value
calculated during that period).
Value from x-xx minutes
Altitude: value from x-xx meters.
(only metric value)
Ener access code here
Select only ALT on this screen. If P or T are selected, calibration will be lost and the QM-1 will
have to be recalibrated before returning to service.
This can be Master or Slave. For
more details see Appendis 2 Modbus
communication.

P 3.0 T 101.2
974
Armstrong InternationalArmstrong International
247-EN V1.17
Steam QM-1
Page 14 of 25
Sensor Information Screen
Access screen by pressing and at same time.
Note:
• Information displayed are real time values, which may be irrelevant if unit is not connected to steam.
• This screen is for information only, and is intended for use during commissioning, debugging, etc.
Values cannot be changed on this screen.
X value. Displays:
• 1000 during initialization
• 10 if T1 < 212 °F (100 °C) (no steam)
• > 1000 if superheated steam
• 920–1000 (dryness fraction x 1000) during normal operation
Pressure (barg)
Temperature °C

Power
on?Turn on
Yes
No
Display Off
NCG Burette Overflowing
Exit
tubing full of
water?
Water
in burette?
Condensate
draining?
Check for plugged line.
1. Remove tubing to burette.
2. Remove water from tubing.
3. Replace tubing.
Check for missing
calibrated orifice.
Reduce steam pressure
below 60 psi (4 barg).
1. Remove tubing to burette.
2. Remove water from tubing.
3. Replace tubing.
4. If dP2 not working, contact Armstrong.
Check EV2 (see “Solenoid
Valve” on p. 23).
1. Remove tubing to burette.
2. Remove water from tubing.
3. Replace tubing.
4. If dP2 not working, contact Armstrong.
No
Yes
Yes
No
No
Yes
.
.
Check fuse.
Q value >
6.6 lbs/h
(3 kg/h)?
Yes
No
1. Remove tubing from dP1 to burette.
2. Remove water from tubing.
3. Replace tubing.
4. If dP1 not working, contact Armstrong.
Call Armstrong
Is the ball
valve
open?
Open valve
Yes
No
No steam or water through discharge pipe
Clean/Replace
Orifice
Is the
orifice
plugged?
Check discharge pipe
No
Yes
Armstrong InternationalArmstrong International
247-EN V1.16
Steam QM-1
Page 15 of 25
Troubleshooting
Components and water may be hot.
Disconnect power before performing electrical work.
If problem cannot be resolved, contact Armstrong.

Note: Recalibration is not required with code updates.
Armstrong InternationalArmstrong International
247-EN V1.16
Steam QM-1
Page 16 of 25
Unplug all M12 connector starting with unplugging the power supply.
Maintenance
16V
16V
25V
1
3
2
PLCC Extractor tool
Memory
1
Open cabinet.
2
Find the electronic board.
3
4Remove cautiously the memory with the adapted tool (like a PLCC extractor).
Replace the memory (with your thumb, push cautiously respecting the coded pin).
5
Plug and turn on the QM-1, light is ON and screen is activated.
6
Check the version software in the code menu (press simultaneously on and ).
7
Software Update

Armstrong InternationalArmstrong International
247-EN V1.16
Steam QM-1
Page 17 of 25
This chapter will walk a technician through the steps necessary to calibrate/recalibrate the Steam QM-1. It is estimated this
process will take one hour. Once recalibration has begun, all components must be recalibrated before returning the unit to
service.
Recalibration is required annually or whenever any component is changed.
What To Expect:
Temperature Sensors:
The temperature sensor is calibrated by true measurement method.
Pressure Transmitter:
The pressure sensor is calibrated by using a calibrated reference gauge.
Materials Needed:
• Calibrated oil bath or dry well
• Calibrated reference pressure and temperature gauge
Calibration
Code Menu
Access the code menu by pressing < and > at the same time.
In the code menu, enter code 152 and press OK.
Calibrating The Temperature Sensor:
1. Remove the temperature sensor from QM-1 with a 27 mm wrench.
2. Place the tip of the temperature sensor in the calibrated oil bath or dry well.
3. Set the oil bath or dry well on 80°C
4. When the oil bath or dry well temperature has stabilized, move the arrow to the left of 80°C and press OK.
5. Set the oil bath or dry well on 140°C.
6. When the oil bath or dry well termperature has stabilized, move the arrow to left on 140°c and press OK.
7. Reconnect the temperature sensor on the QM-1.
Calibration Procedure
Calibration Sensor
P 0barg 17.5 barg
T 80 °C 140 °C
ALT 1500 m (∆ 100 m)
T 80 °C
T 80 °C 140 °C
0 0 0
x.xx
Software Version
Navigate between digits by pressing or .
Change value by pressing or .
Pressure
Calibration
Temperature
Calibration

Armstrong InternationalArmstrong International
247-EN V1.16
Steam QM-1
Page 18 of 25
Calibrating the Pressure Transmitter
Calibration T Sensor
P 0 barg 17.5 barg
T 80 °C 140 °C
ALT 1500 m
Remove the screw on top of DIN connector and unplug the DIN connector from the pressure transmitter.
Attach the pressure transmitter to the calibrated reference gauge.
1
2
3
In the code menu, enter code 152 and press OK. (If already in the calibration menu, skip this step.)
Select 17.5 barg.
Press OK, wait for the check mark.
4
5
Code Menu 152
Pressure Calibration
Temperature Calibration
This manual suits for next models
2
Table of contents
Other Armstrong Measuring Instrument manuals
Popular Measuring Instrument manuals by other brands

ETI
ETI ENA33LCD User and service manual

Amprobe
Amprobe TH-1 user manual

Agilent Technologies
Agilent Technologies HP E5574A user guide

RS PRO
RS PRO RS-3893 instruction manual

Endress+Hauser
Endress+Hauser Proline Prosonic Flow93C Description of Device Functions

Unihedron
Unihedron SQM-LU-DL Operator's manual

DeFelsko
DeFelsko PosiTector CMM IS instruction manual

Blueview
Blueview AM8-D quick start guide

Absolute Process Instruments
Absolute Process Instruments Cecomp F20B quick start guide

HP
HP HP 8901A Product overview

SMC Networks
SMC Networks IZH10 Series Operation manual

PCB Piezotronics
PCB Piezotronics IMI SENSORS 605B02 Installation and operating manual