manuals.online logo
Brands
  1. Home
  2. •
  3. Brands
  4. •
  5. ARREDO
  6. •
  7. Food Warmer
  8. •
  9. ARREDO Illusion 1000 User manual

ARREDO Illusion 1000 User manual

1(10)
Monteringsanvisning Handdukstork
Instruction manual Towel warmer
Artikelnummer / Article number:
Produktnamn / Product name:
8754189 8754190
Rsknummer / Rsk number:
Version: 2017-08-31
581000-51420 581600-51420
Illusion 1000 Illusion 1600
2(10)
Före installationen / Before the installation
Innehållsförteckning Table of Contents
Före installation 2-3
Teknisk information 3
Rengöring 3
Installation 4-6
Felsökning 6-7
Before the installation 2-3
Technical information 3
Cleaning 3
Installation 4-6
Troubleshooting 6-7
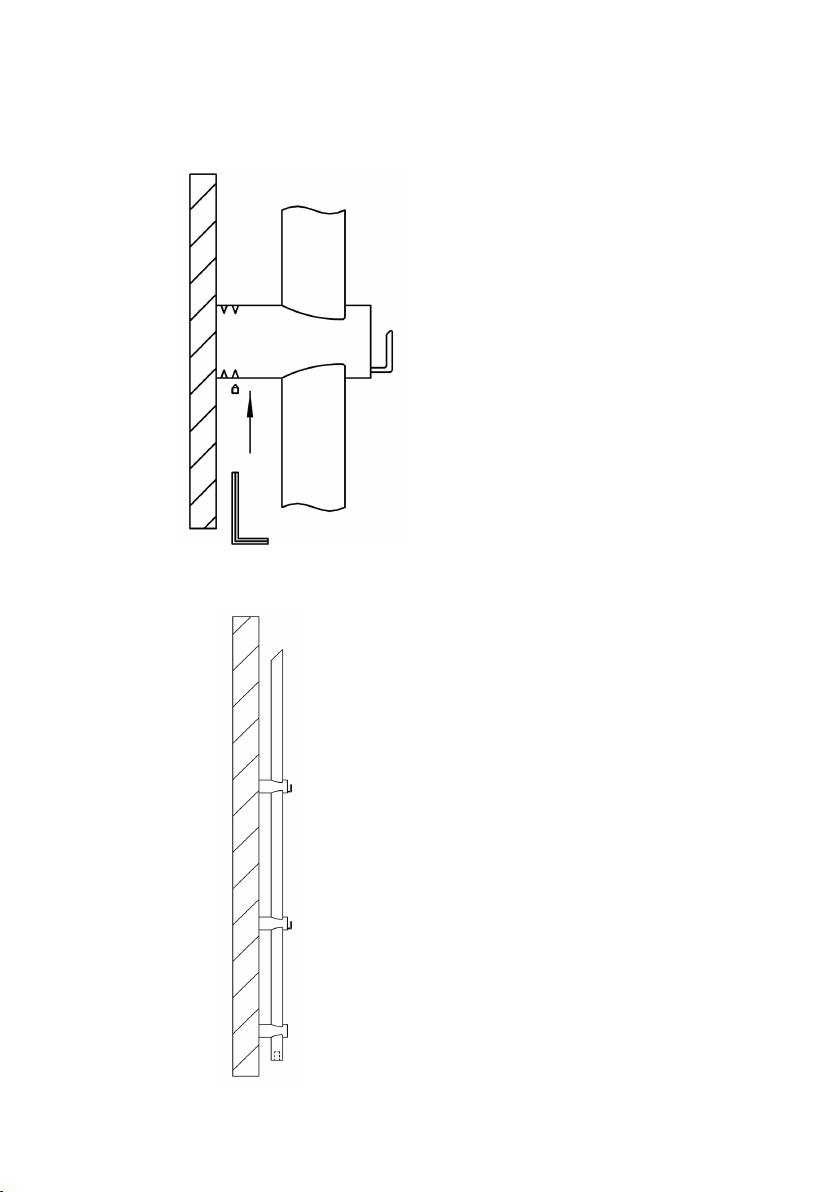
OBS! Endast behörig elektriker får installera denna produkt. Läs igenom och
förstå hela monteringssanvisningen före montering.
Illusion 1000 & 1600 handdukstork är avsedd för torkning och uppvärmning av
handdukar, badlakan och kläder i badrum och våtutrymme.
Handdukstorken får enbart monteras i den zon som är klassad för IP66 all
annan typ av montering är ej tillåten.
Handdukstorken är avsedd för normalt hushållsbruk inomhus. Felaktig använd-
ning kan förorsaka en elektrisk chock.
Produkten skall endast installeras / användas som beskrivs i den här monte-
ringsanvisningen. All annan typ utav installation och användning kan orsaka
skada på person eller egendom.
Klättra ej på handdukstorken.
Barn får ej leka med handdukstorken.
Barn skall hållas under uppsikt för att garantera att de inte leker med handduk-
storken.
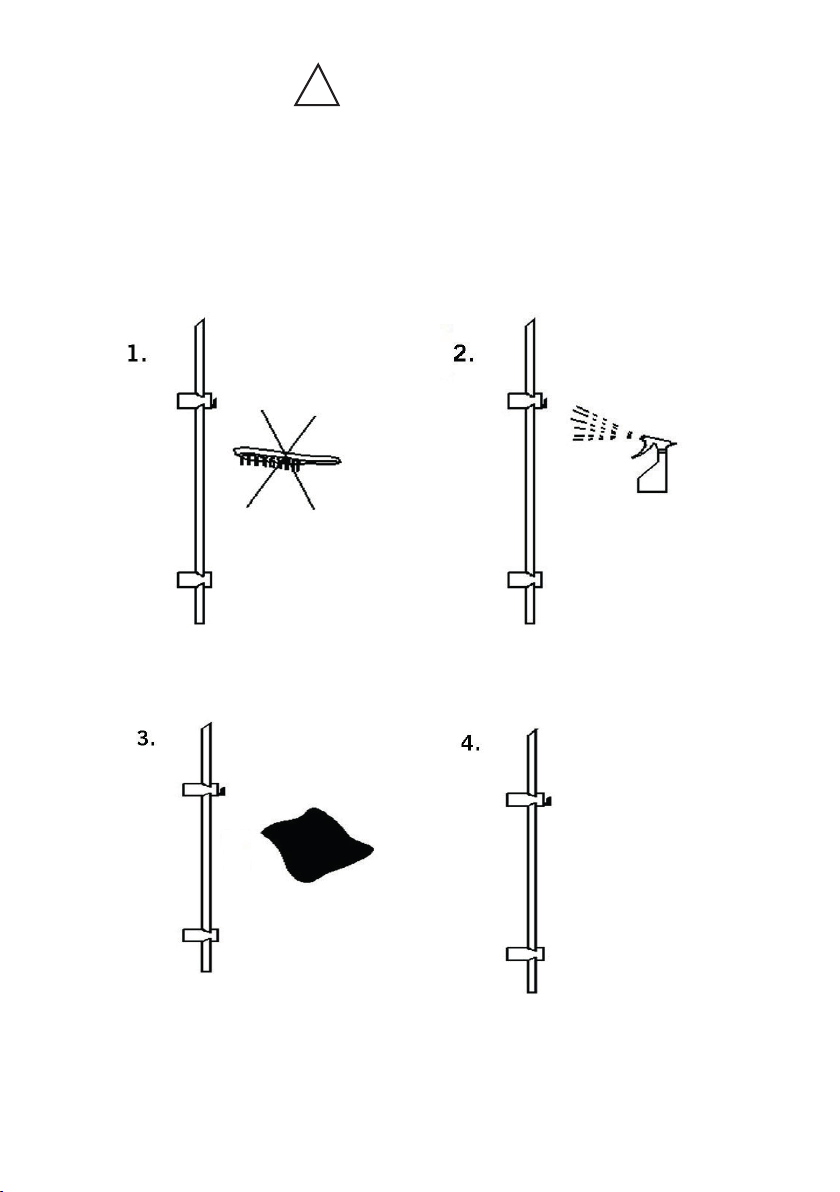
Vid rengöring, stäng av handdukstorken.
För att ta bort smuts, kalkäckar och avlagringar, räcker det oftast med en
blandning av ett tvålliknande medel och vatten, som du sedan sköljer bort med
rent vatten. Torrtorka med trasa eller en frottéhandduk. Kromade, färgade eller
metallytor skadas lätt av syra, stålull och rengöringsmedel med ammoniak eller
slipmedel.
3(10)
Teknisk information / Technical information
Illusion 1000
230V~ 50Hz
20W
IP66
1,2kg
Illusion 1600
230V~ 50Hz
35W
IP66
2kg
Attention! The installation should be carried out by a qualied electrician.
Read and understand the instructions before installation.
Illusion 1000 and 1600 towel warmer is intended for drying and heating
towels, bath sheets and clothes in bathrooms.
The towel warmer can only be installed in the area where IP66 is classied.
Other installation is not allowed.
The towel warmer is intended for normal household use indoors. Improper use
may cause an electric shock.
This product shall only be installed and used as described in this manual, All
other usage or installation can damage the unit or the user.
Do not climb on the towel warmer.
Children must not play with the towel warmer.
Children must be under supervision in order to guarantee that they do not play
with the towel warmer.
The unit must be switched off while cleaning it.
The easiest way to remove dirt, limescale and other deposits is with soap and
water. Rinse clean and polish with a cloth or terry towelling. Avoid scouring
powder or cleansers that contain abrasives, acid or ammonia.
4(10)
SE
Skruvinfästningar i våtzon ska göras i betong eller annan massiv konstruktion såsom träreglar,
träkortlingar eller i konstruktion som är provad och godkänd för infästning, till exempel
Wskivkonstruktion.
Se exempel på konstruktion på www.säkervatten.se.
Tätning av skruvhålen ska utföras med material som
ska fästa mot underlaget, och vara vattenbeständigt, mögelresistent och åldringsbeständigt.
Rätt metod för borrning och skruvning i träregel eller godkänd skivkonstruktion (Skiss A):
1. Borra, 2. Täta och 3. Skruva.
Rätt metod för borrning och skruvning för massiv konstruktion (Skiss B):
1. Borra, 2. Täta, 3. Plugga, 4. Täta och 5. Skruva
EN
Fixing screws in wet zones must be anchored in structural components such as concrete, studding,
special structural details. Fixing screws in wet zone 1 must not be anchored solely in oorboards or
wallboards. See drawings (A & B).
The correct method for drilling and screwing in a wooden stud (Sketch A):
1. Drill 2. Seal and 3. Screw.
The correct method for drilling and screwing in a massive construction (Sketch B):
1. Drill 2. Seal 3. Plug 4. Seal and 5. Screw.
A B
5(10)
Installation / Installation
Find a proper location for
the upper hook, then use the
screwdriver to tight up the
screw (C) inside the hook.
A
B
C
D
E
F
Illusion 1000 x2
Illusion 1600 x3
Illusion 1000 x2
Illusion 1600 x3
Illusion 1000 x1
Illusion 1600 x2
Illusion 1000 x2
Illusion 1600 x3
Illusion 1000 x2
Illusion 1600 x3
Illusion 1000 x1
Illusion 1600 x1
Insert the two upper hooks on to the
towel rail. Illusion 1000 has only one
hook.
1
2
För på de två krok-väggfästena ovani-
från på handdukstorken. Illusion 1000
har endast ett krok-väggfäste.
Justera höjden på krok-vägg-
fästet efter önskemål och
använd sedan en stjärn-
skruvmejsel och skruv (C)
för att fästa krok-väggfästet i
handdukstorken.
6(10)
Installation/Installation
Use a mark pen to make
mark on the wall, and prepa-
re to drill holes through the
middle hole of the back plate
(E).
Use a screwdriver to install
the back plates (E) with
screw (A), and possibly plug
(B) the bottom plate (E)
should insert the power cable
through another hole and
connect to the towel rail back
plates (E).
3
Använd en markeringspenna
för att markera var på väggen
du skall borra hålet för vägg-
fästplattorna (E).
Använd en stjärnskruvmejsel
för att montera väggfästplat-
torna (E) med skruv (A) och
eventuellt plugg (B). Den
nedersta plattan (E) skall
även ha ett hål som är till för
genomföring av strömslad-
den.
4
OBS! Se sida 4 för
skruvinfästningar i våtzon.
Attention! View page 4 for
xing screws in wet zones.
silicone
7(10)
Installation/Installation
Use the screwdriver to tighten
the back plate (E) with screw
(A) and optional plug (B) for the
upper hook.
After you have installed all the
back plates (E) and connected the
power cable, put the towel warmer
on to the back plates (E).
5Skruva även fast väggfästplattan
(E) med skruv (A) och eventuellt
plugg (B) i krokväggfästet.
6
Efter att installationen av plattorna
(E) är gjord och strömsladden är
kopplad, fäst då handdukstorken
på väggfästplattorna (E).
Koppla strömkabeln till
kopplingsplinten.
Connect the power ca-
ble to the terminal.
OBS! Se sida 4 för skruvin-
fästningar i våtzon.
Attention! View page 4 for
xing screws in wet zones.
silicone
8(10)
Installation/Installation
Use hex wrench (F) and
screw (D) to tight up the
back plate (E) with the
towel warmer.
Finished. Use a soft cloth
to clean the towel warmer
and the wall.
Använd insexnyckel (F) och
insexskruv (D) för att skruva
åt krokväggsfästet på vägg-
fästplattorna (E).
7
8
Installationen är färdig.
Använd en mjuk trasa för
att torka av handdukstor-
ken och väggen.
9(10)
För att handdukstorken ska hållas ren och snygg över tid måste ni iaktta följande avseende vad
beträffar dess rengöring: Handdukstorken skall rengöras med rengöringsmedel och en mjuk trasa.
Använd ej sura eller korniga lösningsmedel, sträva rengöringssvampar eller stålull.
Rengöring / Cleaning
To preserve the surface nish of the towel warmer, it is necessary to observe some instructions re-
garding the aftercare: To remove dirt and limescale, use only liquid cleaning spray and a soft cloth.
!
10 (10)
Arredo AB
Godsvägen 9
231 62 Trelleborg
+46410-472 00
www.arredo.se
[email protected]
Om du är osäker på någon del av installationen eller har frågor så
kontakta ditt inköpsställe eller en auktoriserad el-installatör.
If you are unsure of any part of the installation, or if you got
further questions. Please contact your retailer or an authorized
electrician.
Monteringsanvisning Handdukstork
Instruction manual Towel warmer

This manual suits for next models

1

Popular Food Warmer manuals by other brands

Hatco LW-2 Specifications

Hatco

Hatco LW-2 Specifications

APW Wyott W-3V Specifications

APW Wyott

APW Wyott W-3V Specifications

Orbegozo TH 8000 instruction manual

Orbegozo

Orbegozo TH 8000 instruction manual

Bloomfield MOD-400 installation instructions

Bloomfield

Bloomfield MOD-400 installation instructions

Equipex SODIR RE-2 Operation manual

Equipex

Equipex SODIR RE-2 Operation manual

APW Wyott W-46V Installation and operating instructions

APW Wyott

APW Wyott W-46V Installation and operating instructions

Omcan FW-CN-0002-H instruction manual

Omcan

Omcan FW-CN-0002-H instruction manual

ARDES AR4H05 manual

ARDES

ARDES AR4H05 manual

Galaxy Equipment 177GW50E user manual

Galaxy Equipment

Galaxy Equipment 177GW50E user manual

NutriChief Pyle PKWTR30 user manual

NutriChief

NutriChief Pyle PKWTR30 user manual

SMEDBO DRY Series Fitting instructions

SMEDBO

SMEDBO DRY Series Fitting instructions

Cadco CMLW-2 Use & care manual

Cadco

Cadco CMLW-2 Use & care manual

Hatco Glo-Ray GR3SDH-27 Specifications

Hatco

Hatco Glo-Ray GR3SDH-27 Specifications

Hydas 4684 instruction manual

Hydas

Hydas 4684 instruction manual

Franke CW FCS4054 user manual

Franke

Franke CW FCS4054 user manual

NUTRICHEF PKBFWM24 user manual

NUTRICHEF

NUTRICHEF PKBFWM24 user manual

DELTA-SPORT 290394 Instructions for use

DELTA-SPORT

DELTA-SPORT 290394 Instructions for use

Nemco 6101A 11QT operating instructions

Nemco

Nemco 6101A 11QT operating instructions

manuals.online logo
manuals.online logoBrands
  • About & Mission
  • Contact us
  • Privacy Policy
  • Terms and Conditions

Copyright 2025 Manuals.Online. All Rights Reserved.