Arrowquip 3E Q-CATCH YOKE GATE User manual

CONTENTS
Safety Precautions 1
3E Q-Catch Yoke Gate Assembly 2
Emergency Yoke Gate Release 2
Recommended Maintenance 4
Regular Maintenance (Every 6 Months) 4
When Necessary 5
Friction Lock Maintenance 6
Troubleshooting Guide 6
Warranty 7
3E Q-Catch Yoke Gate Series Add-ons 8
Manual Head Restraint: 3rd Generation Head Scoop / Chin Bar 8

PLEASE FOLLOW ALL SAFETY INSTRUCTIONS PROVIDED IN THIS MANUAL
BEFORE OPERATION. ARROWQUIP DOES NOT ACCEPT RESPONSIBILITY
FOR ANY ACCIDENTS OR INJURY WHEN THIS SAFETY MANUAL HAS
NOT BEEN READ IN FULL AND KEPT WITH THE PRODUCT AT ALL TIMES.
OPERATORS OF THIS PRODUCT TAKE AND ACCEPT RESPONSIBILITY FOR
ANY HARM OR INJURY TO THE ANIMAL OR OPERATOR WHEN IT PERTAINS
TO HOW THE EQUIPMENT IS USED AND MAINTAINED.
Please keep this manual for frequent reference and to pass on to new users or owners.
SAFETY PRECAUTIONS
PLEASE FOLLOW ALL SAFETY PRECAUTIONS OUTLINED HEREIN. ANY
HARM TO THE ANIMAL OR INJURY TO THE OPERATOR WHICH OCCURS
DUE TO HOW THE PRODUCT IS OPERATED, OR RESULTING FROM A LACK
OF SAFETY PRECAUTIONS ARE THE SOLE RESPONSIBILITY OF THE
OPERATOR.
All farm machinery and equipment are potentially dangerous. Careless use of any Arrowquip
livestock equipment may cause injury or damage to persons, cattle, or property. Arrowquip
has taken precautions in the design and manufacturing of this product to ensure that it is safe
and user-friendly. Therefore, the user must assume all responsibility and risk associated with
the possession and use of the cattle squeeze crush.
WARNING: READ BELOW BEFORE OPERATION.
Ensure the operator understands the contents of this manual before using the cattle
equipment.
1. DO NOT wear loose-tted clothing.
2. DO NOT stand in front of the yoke gate while operator is moving the cattle through.
3. DO NOT ALLOW CHILDREN UNDER THE AGE OF 18 NEAR AN OPERATING
MACHINE.
4. Follow safe cattle handling procedures in other areas of the yard so that cattle are more
docile in the yoke gate.
5. DO NOT make any modications to Arrowquip equipment. Non-factory modications to
the equipment can reduce the safety for the operator & livestock, and void warranty.
SAFETY PRECAUTIONS | 1

1. Q-CATCH DOOR
2. Q-CATCH TRACK SHAFT
3. LONG HAMMER
4. SQUEEZE ARM PLATE
5. CONTROL TOWER DOM TUBE
6. YOKE GATE HAMMER
7. Q-CATCH CONTROL HANDLE
8. REAR CONTROL BAR STOPPER
9. Q-CATCH ROLLER
10. Q-CATCH ROLLER BOLT
3E Q-CATCH YOKE GATE ASSEMBLY
Your yoke gate will arrive fully assembled and ready for use. However, if you need to dissemble
your yoke gate for any reason, the following guide will help you to properly reassemble it.
ASSEMBLING THE Q-CATCH YOKE GATE
Fit the mechanism parts as shown in the diagram below.
EMERGENCY YOKE GATE RELEASE
Arrowquip equipment is designed to ensure the safety of both animal and operator. With
proper maintenance and lubrication, the yoke gate will not jam under pressure.
However, in the rare event that an animal becomes stuck in the yoke gate, the following
guidelines will ensure you are able to release your animal quickly and safely.
REQUIRED TOOLS
- Screw Driver/Pry Bar
1
2
7
8
5
4
3
6
9
10
1
2 | 3E Q-CATCH Yoke gate ASSEMBLY

EMERGENCY Yoke gate RELEASE | 3
STEPS TO RELEASE LOCK
1 Go to the offside of the crush, to ensure you will not be hit by the yoke gate handle. If
your crush is designed for offside operation, you will need to go to the nearside of the
crush.
2 Place screwdriver/pry bar under bottom yoke gate roller on the outer edge of the door.
(This is the side with the “L” curve, not the straight side.)
3 Insert screwdriver/pry bar into the small space above the spring in the yoke gate lock
plate.

4 | RECOMMENDED MAINTENANCE
4Tilt the screwdriver/pry bar up and into the yoke gate roller. This will push down the
spring, releasing the locking mechanism on the yoke gate door.
RECOMMENDED MAINTENANCE
All Arrowquip Products are made with precision parts to require minimal maintenance.
However, regular maintenance will keep your equipment running smoothly and safely.
REGULAR MAINTENANCE (EVERY 6 MONTHS)
✓ Inspect the yoke gate.
a. Bolts on the yoke gate hammers should be tensioned correctly. There should be
enough play for the hammers to move freely in their slots.
RECOMMENDED MAINTENANCE | 19

b. You should feel the yoke gate rollers moving when you open the yoke gate. The
rollers should be tight enough to be moved by hand, but not over-tight to cause the
rollers to bind.
✓ Clean bottom yoke gate door track to prevent dirt-build-up.
WHEN NECESSARY
✓ If needed, clean and lubricate the Q-Catch track shaft.
a. To clean: Use brake cleaner to remove build-up and degrease the shaft. Open and
close (or squeeze and un-squeeze) to clean the entire shaft.
b. To lubricate: Spray WD-40 Dry Lube on a rag. Open or squeeze. Wipe shaft. Close
or un-squeeze. Wipe shaft. Open and close (or squeeze and un-squeeze) a few
times to work the lubricant in.
RECOMMENDED MAINTENANCE | 5

FRICTION LOCK MAINTENANCE - IF HEAD GATE IS STICKING OR
HARD TO RELEASE
1. Clean the yoke gate shaft with brake cleaner.
2. Apply WD-40 Dry Lube sparingly WITH A CLOTH to the Yoke gate shaft, only when
necessary.
3. Use WD-40 Dry Lube only.
4. Use of other lubricants, including regular WD-40 may cause malfunction or slipping.
Contact 1-877-275-6075 for assistance.
TROUBLESHOOTING GUIDE
If you have a problem with your 3E Q-Catch yoke gate, please consider the following tips or
call us at 1-877-275-6075.
1. Make sure the unit is situated on level ground or base.
2. If yoke gate has minimal use over extended periods, this may cause yoke gate doors to
become stiff to operate and/or difcult to release. This can be easily xed by lubrication
of the rollers and the Q-Catch track shaft with WD-40 Dry Lube.
a. To lubricate the Q-Catch track shaft, wipe shaft with a rag sprayed with WD-40 Dry
Lube. Repeat with yoke gate doors closed and open to properly lubricate the entire
shaft.
b. Open and close the yoke gate a few times to work the lubricant in.
3. Make sure yoke gate door tracks are free of debris.
4. Keep oor clean. Excess build-up of manure or dirt inside crush can cause the squeeze
and yoke gate to malfunction.
5. Ensure bolts on the yoke gate are tightened correctly.
a. Too tight will cause the locking and releasing of yoke gate doors to malfunction.
b. Too loose will cause premature wear on yoke gate parts.
6 | TROUBLESHOOTING GUIDE

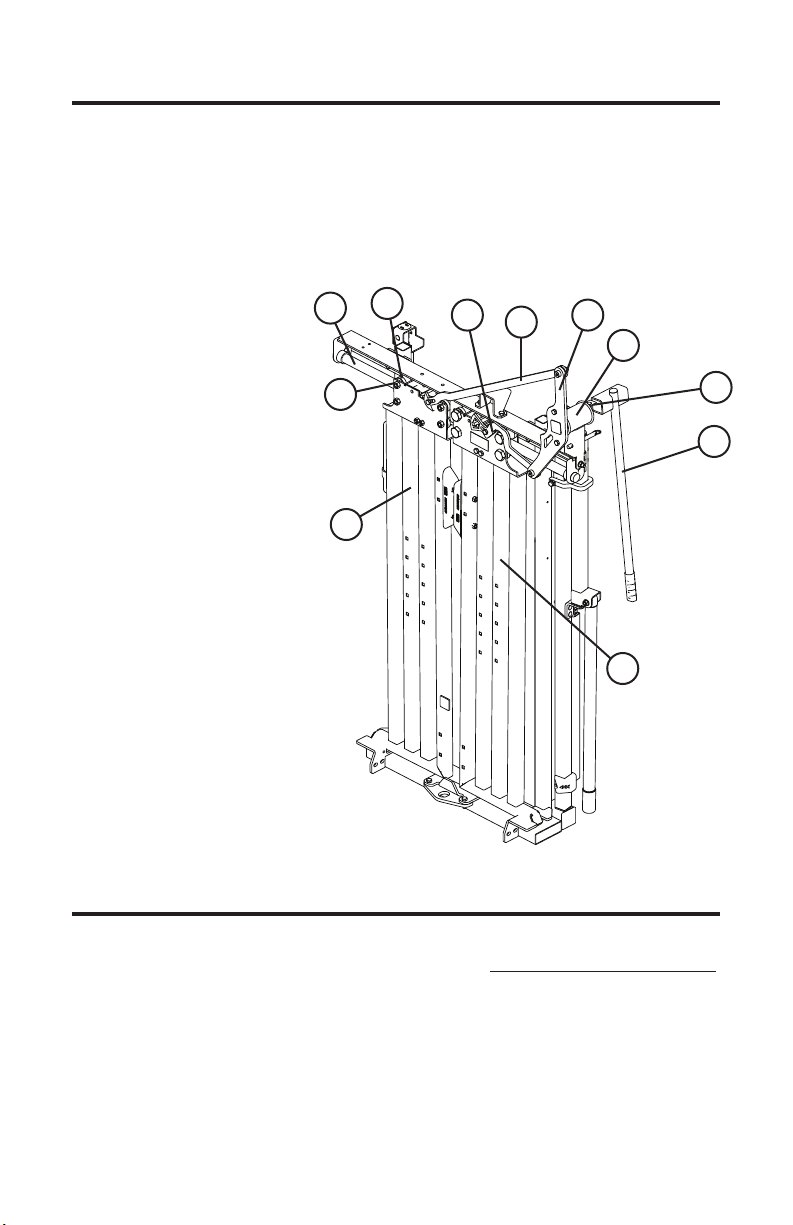
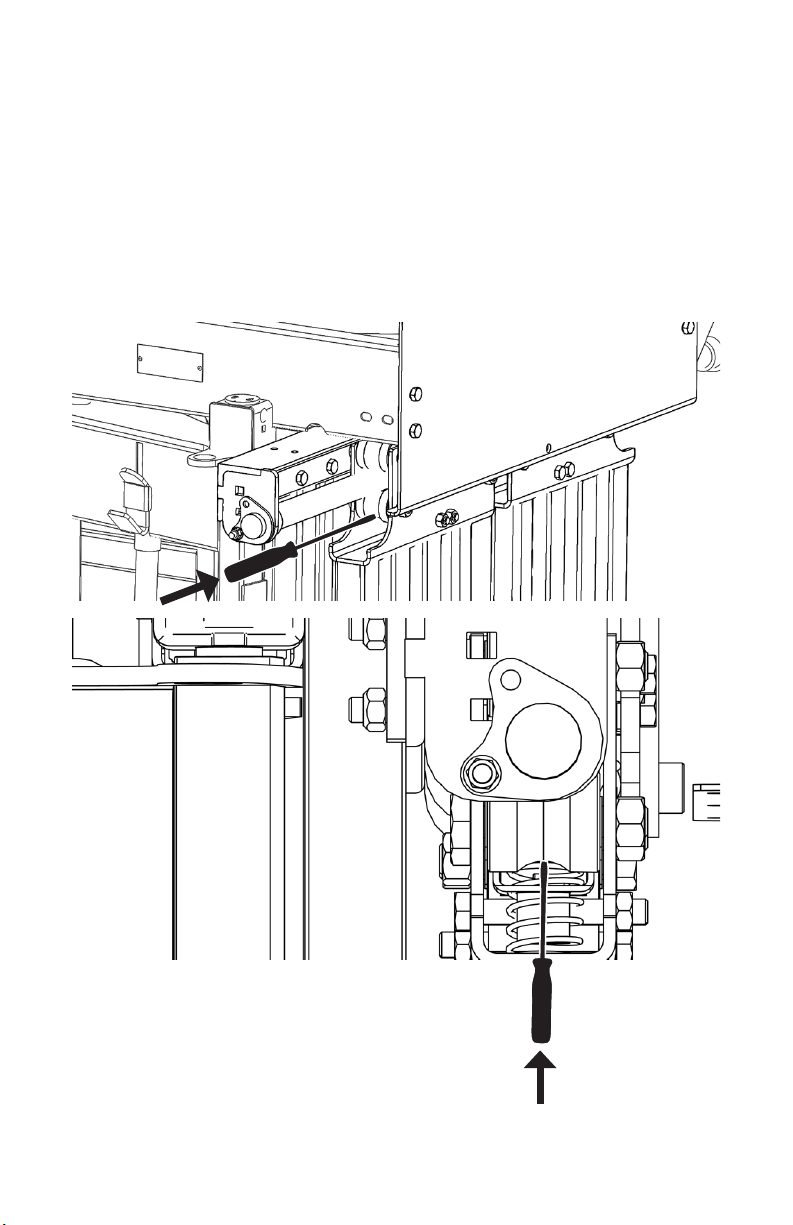
c. On the yoke gate, there is a short hammer and a long hammer between the handle
pivot and doors. These two hammers have a slot in them – check that there is free
movement for the bolt to move the entire length of this slot, and the lock nuts are
correctly tightened.
d. The door hammers also contact the release pins on the lock plates when the head
gate handle is pulled back. Ensure there is an air gap between levers and release
pins when yoke gate is being pushed or in an idle position.
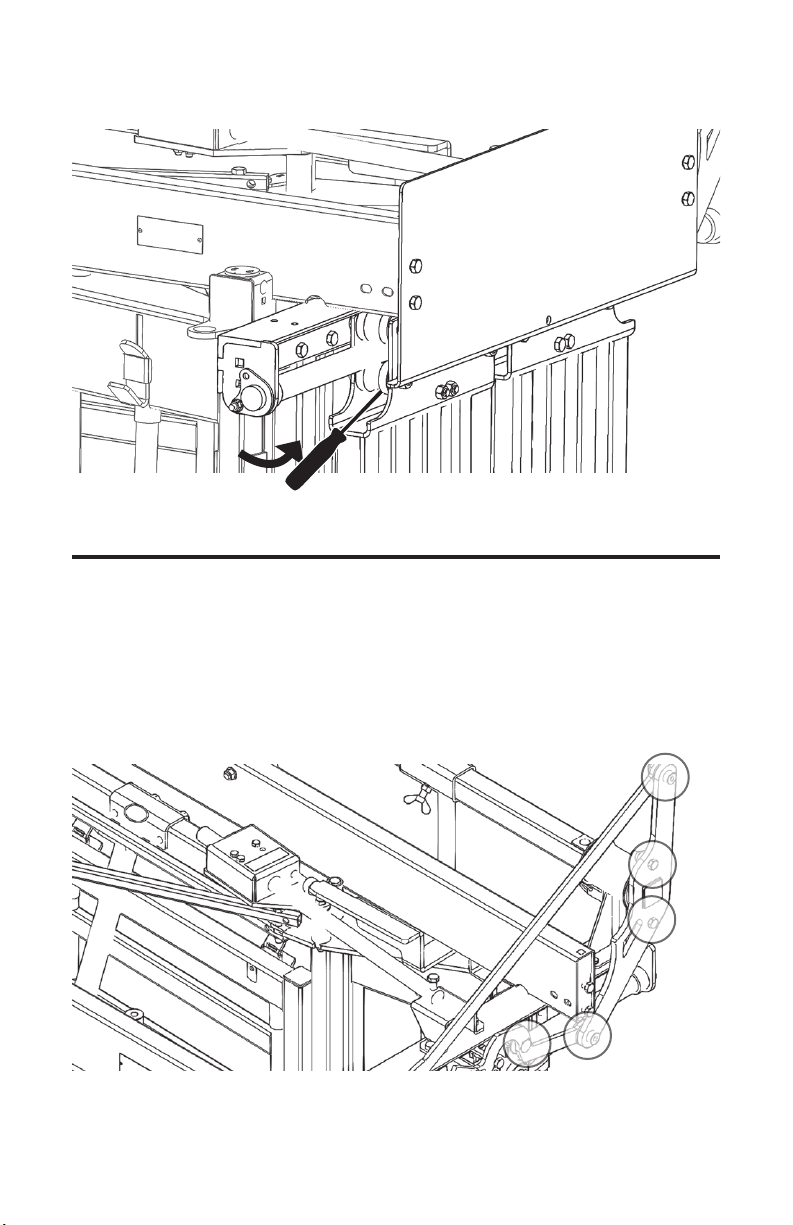
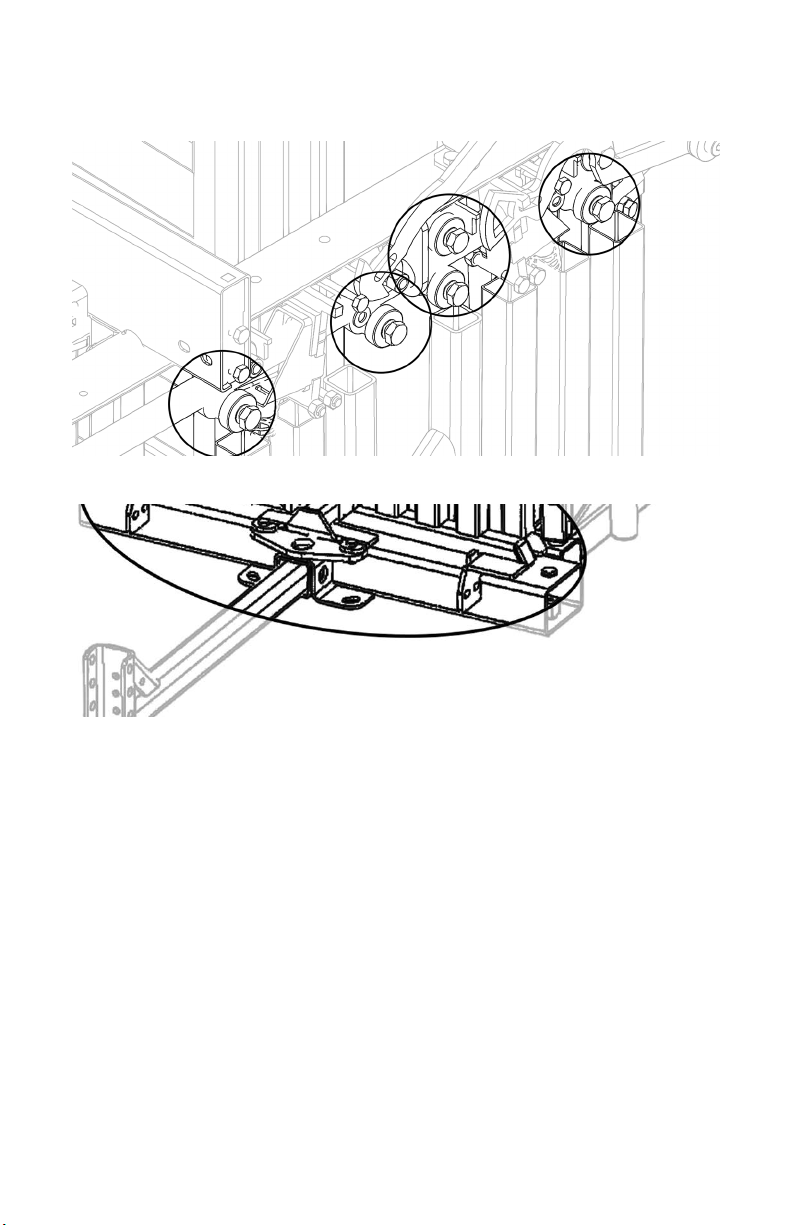
6. Check nuts and bolts on items and ensure that they are tightened correctly, and are not
binding.
7. All lock boxes and pivot points should be lubricated as needed with WD-40 Dry Lube.
WARRANTY
Your product must be registered to claim warranty, and to ensure that Arrowquip has the
required information to contact you in the event of a product or part recall. Any owner who
fails to register their product warranty with Arrowquip through their Authorized Arrowquip
Dealer voluntarily voids their warranty. Arrowquip will repair or replace products or parts of a
product that prove defective due to manufacturer defect during the Warranty Period, at their
sole discretion. This excludes defects resulting from normal wear and tear or product misuse.
Warranty does not cover corrosion. NOTE: Any modication, in any fashion, to any Arrowquip
equipment immediately voids the product warranty. This includes the parts contained therein.
Eg. If a modication is made to the squeeze mechanism in a squeeze crush, and the sternum
bar is bent afterwards, warranty for the damaged part, the sternum bar, contained in the
modied equipment, the squeeze crush, is void. In addition, any remaining warranty for the
squeeze crush and other parts contained therein, including, but not limited to, the yoke gate,
locking system, Q-Catch system, and rollers, is null and void.
REGISTER FOR WARRANTY NOW:
Online: arrowquip.co.uk/product-registration
WARRANTY | 7

3E Q-CATCH YOKE GATE SERIES ADD-ONS
3rd GENERATION Q-CATCH HEAD SCOOP
For complete information, read the Head Restraint manual.
Requirements:
- 2 people
- 3/4” wrench
Installation:
1 a. Insert 4x1/2-13x3" carriage bolts through the yoke gate door from inside the crush.
b. Align the head scoop to the slots in the yoke gate according to your desired height.
2 Secure the head scoop with 4 bolts.
6 | 3E Q-CATCH YOKE GATE SERIES ADD-ONS

Safety Precautions:
1. Ensure that the head scoop remains open until required to hold the animal’s head.
2. If not in use, use detent pin to hold the head scoop in place.
Maintenance:
1. Add grease through the grease nipples as needed.
2. Every 6 months:
a. Check bolts to ensure they are tightened properly.
b. Spray brake cleaner on a rag and wipe the lockbox shaft while opening and
closing the head scoop.
3E Q-CATCH YOKE GATE SERIES ADD-ONS | 7

Printed in Canada | October 2021
If you have any questions regarding your product or require assistance, please contact
Arrowquip’s Client Care Team at 01530 632002 or by email at [email protected].
Table of contents
Other Arrowquip Industrial Equipment manuals