Artika NSBLES-ONMB40 User manual

LED wall light - MettleTM
INSTRUCTION MANUAL
IMPORTANT: READ
CAREFULLYAND KEEP.
The light source of this luminaire is not replaceable; when the light source
reaches the end of its life, the entire luminaire must be replaced.
Luminaire mural à DEL - MettleMC
MANUEL
D’INSTRUCTIONS
IMPORTANT:À LIRE
ATTENTIVEMENTET
ÀCONSERVER.
La source lumineuse de ce luminaire n’est pas remplaçable;
lorsque la source lumineuse atteint la fin de sa vie,
le luminaire entier doit être remplacé.
Luminaria LED de pared
-
MettleMR
MANUAL DE
INSTRUCCIONES
IMPORTANTE: LEER
DETENIDAMENTEY
CONSERVAR.
La fuente de luz de esta luminaria no es reemplazable; cuando la fuente de luz
llega al final de su vida útil, toda la luminaria debe ser reemplazada.
Model / Modèle / Modelo: NSBLES-ONMB40
220 - 240 V~ Rev. 21-10-2020
Warm white
Blanc chaux
Blanco cálido
3000 K IP65
Made in China
Residential use only
Indoor or outdoor use
Fabriqué en Chine
Usage résidentiel seulement
Usage intérieur ou extérieur
Hecho en China
Uso residencial solamente
Uso interior o exterior

2
INSTRUCTION MANUAL / MANUEL D’INSTRUCTIONS / MANUAL DE INSTRUCCIONES
EN
INCLUDED
FR
INCLUS
ES
INCLUIDO
Item
Pièce
Pieza
Description
Description
Descripción
Quantity
Quantité
Cantidad
Fixation nut
Écrou de fixation
Tuerca de fijación
× 2
Washer
Rondelle
Arandella
× 2
Fixation screw
Vis de fixation
Tornillos de fijación
× 2
Wall anchor
Ancrage mural
Ancla de pared
× 2
Light fixture
Luminaire
Luminario
× 1

3
IMPORTANT: Please consult
your local hardware store for the
proper sealant and drill cit,suitable
for your wall.
IMPORTANT : Consulter votre
quincaillerie locale afin de vous
procurer le scellant et mèche qui
conviennent à votre mur pour
l’installation du luminaire
à l’extérieur.
IMPORTANTE: Por favor,
consulte con su ferretería habitual
para elegir el sellante e broca
adecuadas para su pared para
instalar la lámpara en el exterior.
Small flat screwdriver
Petit tournevis plat
Destornillador plano pequeño
Drill
Perceuse
Taladro
¼-in. drill bit (6.5 mm)
Mèche de ¼ po (6,5 mm)
Broca de ¼ plg (6,5 mm)
Pencil
Crayon
Lápiz
Sealant
Scellant
Sellant
WHAT YOU WILL NEED... VOUS AUREZ BESOIN DE... LO QUE NECESITARÁ...

4
INSTRUCTION MANUAL / MANUEL D’INSTRUCTIONS / MANUAL DE INSTRUCCIONES
EN
IMPORTANT
The installer and/or user must
read,understand and follow these
instructions before installing the
product.This product must be
properly installed before it is used.
If instructions are not followed,
the manufacturer will not be held
responsible for any problems or
product malfunction. Failure to
follow installation and/or operating
instructions voids the warranty.
We recommend that this product be
installed by a certified electrician.
In some states or provinces,it is
a legal requirement for this type
of product to be installed by a
certified electrician, according to
the electrical and building codes
effective in the region where the
unit is used.
FR
IMPORTANT
Avant l’installation de ce produit,
l’utilisateur et/ou l’installateur doit
avoir lu et compris ces instructions.
Cet appareil doit être installé
convenablement avant usage.
Si ces instructions ne sont pas
respectées, le fabricant ne
pourra être tenu responsable
d’aucun problème ou de
dysfonctionnement du produit.
Le non-respect des instructions
d’installation et/ou d’utilisation
annulera la garantie en vigueur.
Nous recommandons que
ce produit soit installé par
un électricien certifié. Dans
certains états ou provinces, il est
légalement requis que ce type
de produit soit installé par un
électricien certifié conformément
aux codes de l’électricité et du
bâtiment en vigueur.
ES
IMPORTANTE
El instalador o usuario debe leer
detenidamente las instrucciones
antes de instalar el producto y
seguirlas fielmente. El producto
debe estar correctamente instalado
antes de su utilización. Si no siguen
las instrucciones, el fabricante no
se hará responsable de problemas
o de un funcionamiento incorrecto
del producto.Si no sigue las
instrucciones de instalación o de
uso,se anulará la garantía.
Le recomendamos que el producto
sea instalado por un electricista
certificado.En algunos estados
o provincias, se requiere por ley
que este tipo de producto sea
conectado por un electricista
certificado siguiendo los códigos
eléctricos y arquitectónicos de la
región.
WARNING:
Risk of electrical shock.
Turn off breaker at the panel.
AVERTISSEMENT :
Risque de décharge électrique.
Éteindre le disjoncteur sur
le panneau électrique.
ADVERTENCIA:
Riesgo de descarga eléctrica.
Desconectar la corriente
eléctrica del panel (disyuntor).
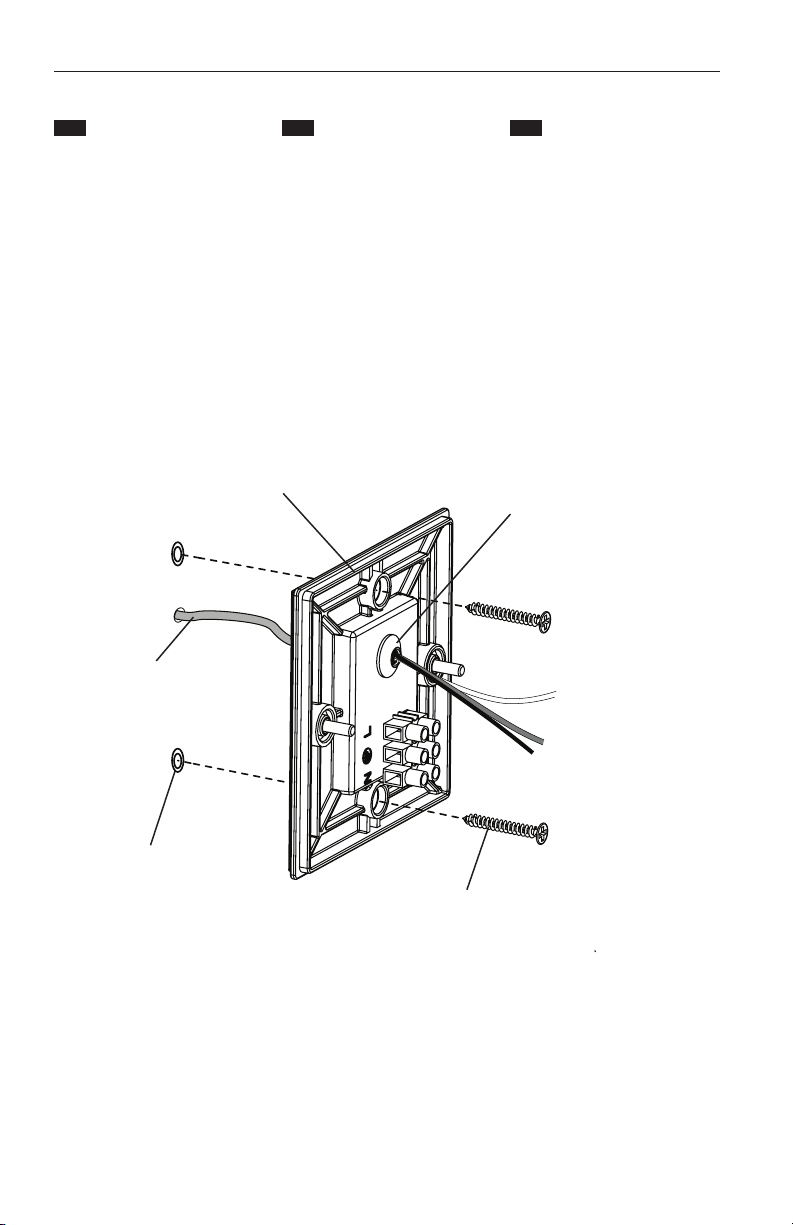
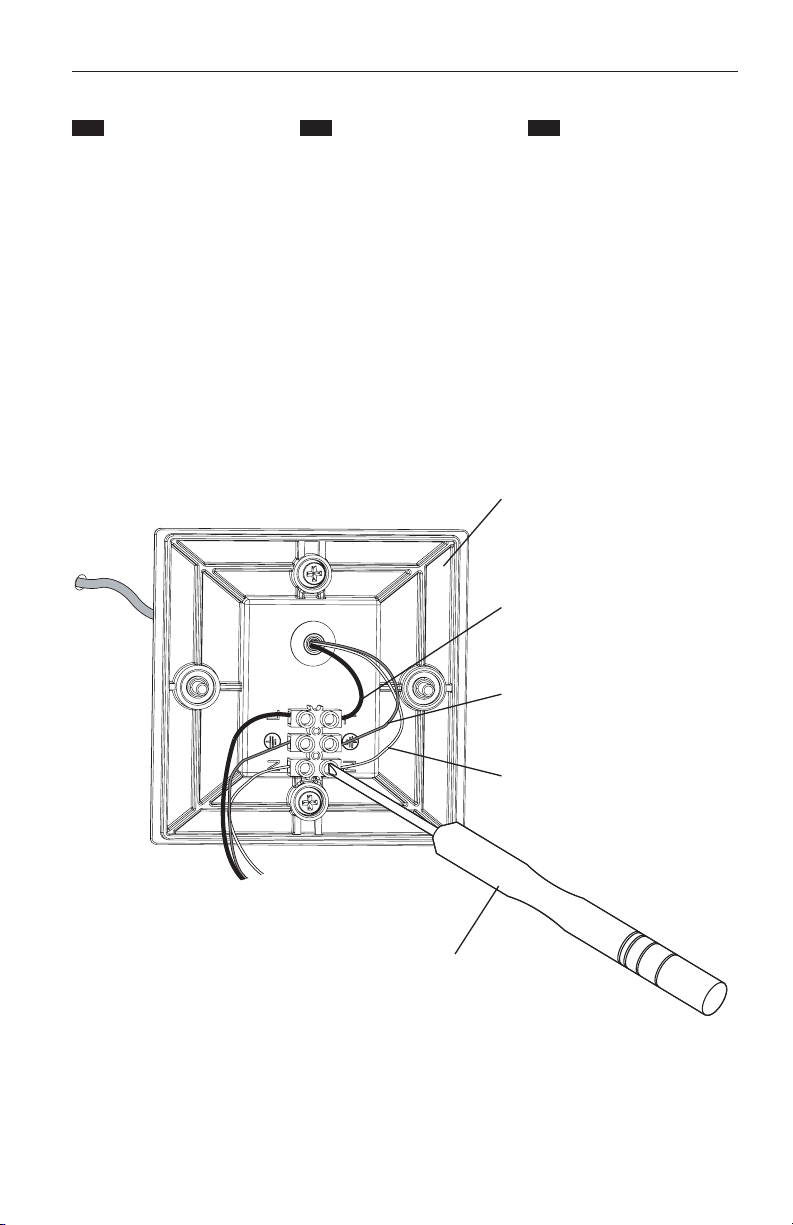
Switch off the main electrical
supply from the fuse box/circuit
breaker before installing the unit or
doing any maintenance.
Il est important de couper
l’alimentation électrique du
disjoncteur avant de procéder à
l’installation ou à l’entretien.
Desconecte la instalación eléctrica
en la caja de circuitos/disyuntor
antes de instalar esta unidad o
realizar tareas de mantenimiento
en ella.

5
EN
MINIMUM CLEARANCE:
Please ensure there is a minimum
clearance of 1.2 m between the
floor and the bottom of the light
fixture (fig.1).
FR
ESPACE MINIMUM:
S’assurer qu’il y ait un dégagement
minimum de 1,2 m entre le
plancher et le bas du luminaire
(fig.1).
ES
ESPACIO MÍNIMO:
Asegúrese de que hay una
distancia mínima de 1,2 m entre
el piso y la parte inferior de la
lámpara (fig.1).
1.2 m
4 ft / pi / ft
fig.1

6
INSTRUCTION MANUAL / MANUEL D’INSTRUCTIONS / MANUAL DE INSTRUCCIONES
EN
STEP-BY-STEP
INSTALLATION
1.Turn off power at the circuit
breaker and the light switch.
Ensure the power is off before
removing the old light fixture.
2. Unscrew the decorative nuts and
remove the mounting base from
the light fixture.
3. Place the mounting base on
the wall and mark the 2 locations
where the holes will be drilled
(fig. 2).
4. Drill 2 pilot holes in the wall.
Insert the wall anchors into the
holes (fig. 3).
Be careful, the anchors must be
adapted to the material of the wall,
if the anchors provided are not
suitable for your wall, you must
imperatively use others.
FR
INSTALLATION
ÉTAPE PAR ÉTAPE
1. Couper le courant à partir
du panneau électrique et du
disjoncteur.S’assurer que le
courant est bel et bien coupé avant
de retirer l’ancien luminaire.
2. Dévisser les écrous décoratifs et
retirer le support de montage du
luminaire.
3. Placer la base de montage
sur le mur et marquer les
2 emplacements où les trous
seront percés (fig. 2).
4. Percer 2 trous pilotes dans le
mur.Insérer les ancrages muraux
dans les trous (fig. 3).
Attention , les ancrages doivent être
adaptées au matériau du mur,si les
ancrages fournis ne conviennent
pas à votre mur, vous devez
impérativement en utiliser d’autres.
ES
INSTALACIÓN
ETAPA POR ETAPA
1.Apague la alimentación del
panel eléctrico y del interruptor.
Asegúrese de que la alimentación
esté apagada antes de retirar la
luminaria antigua.
2. Desatornille las tuercas
decorativas y retire el soporte de
montaje de la luminaria.
3. Coloque la base de montaje
en la pared y marque las
2 ubicaciones donde se
perforarán los orificios (Fig. 2).
4. Perfore 2 agujeros piloto en la
pared. Inserte los anclajes de pared
en los orificios (Fig. 3).
Tenga cuidado, los anclajes deben
adaptarse al material del pared.
Si las anclajes provistas no son
adecuadas para su pared,debe
utilizar imperativamente otras.
fig. 2
fig. 3
Mounting base
Support de montage
Soporte de montaje
Wall anchor
Ancrage mural
Anclare de pared
Drill with ¼-in. drill bit (6.5mm)
Perceuse avec mèche de ¼ po. (6,5 mm)
Taladra con broca de ¼ plg. (6,5mm)
Pencil
Crayon
Lápiz

7
EN
5. Pass the wires through the
washer.
6. Using the fixation screws attach
the mounting base into the wall
anchors (fig. 4).
FR
5.Passer les fils au travers de la
rondelle.
6.À l’aide des vis de fixation,
fixer la base de montage dans les
ancrages muraux (fig. 4).
ES
5. Pase los cables a través de la
arandela.
6. Usando los tornillos de montaje,
fije la base de montaje a los
anclajes de pared (fig. 4).
fig. 4
Wall anchor
Ancrage mural
Ancla de pared
Wires
Fils
Cables
Fixation screw
Vis de fixation
Tornillos de fijación
Mounting base
Support de montage
Soporte de montaje Washer
Rondelle
Lavadora
Drill with ¼-in. drill bit (6.5mm)
Perceuse avec mèche de ¼ po. (6,5 mm)
Taladra con broca de ¼ plg. (6,5mm)

8
INSTRUCTION MANUAL / MANUEL D’INSTRUCTIONS / MANUAL DE INSTRUCCIONES
To Fixture
fig. 5
Earth wire (Green/Yellow) (E)
Fil de masse (Vert/Jaune) (E)
Tierra (Verde / Amarillo) (E)
Neutral (Blue/Black) (N)
Neutre (Bleu/Noir) (N)
Neutro (Azul/Negro) (N)
Live wire (Brown/Red) (L)
Fil d’alimentation (Marron/Rouge) (L)
Alimentación (Marrón/Rojo) (L)
Small flat screwdriver
Petit tournevis plat
Destornillador plano pequeño
EN
7. Using the small flat screwdriver,
connect your live wire (Brown/Red)
(L) to the live input (Brown/Red) (L)
of the terminal.
Connect your neutral wire (Blue/
Black) (N) to the neutral input
(Blue/Black) (N) of the terminal.
Connect your earth wire (Green/
Yellow) (E) to the earth input
(Green / Yellow) (E) of the
terminal (fig. 5).
FR
7.À l’aide d’un petit tournevis plat,
connecter votre fil d’alimentation
(Brun/Rouge) (L) à l’entrée (Brun/
Rouge) (L) du terminal.
Connecter votre fil neutre (Bleu/
Noir) (N) à l’entrée (Bleu/Noir) (N)
du terminal.
Connecter votre fil de masse (Vert/
Jaune) (E) à l’entrée (Vert/Jaune)
(E) du terminal (fig. 5).
ES
7. Usando el destornillador plano,
pequeño conecte su cable de fase
(Marrón/Rojo) (L) a la entrada
(Marrón/Rojo) (L) del terminal.
Conecte su cable neutro (Azul/
Negro) (N) a la entrada (Azul/
Negro) (N) del terminal.
Conecte su toma de tierra (Verde/
Amarillo) (E) a la entrada (Verde/
Amarillo) (E) del terminal (fig. 5).
Terminal
Terminal
Terminal

9
FOR OUTSIDE
INSTALLATION:
9.Apply sealant to seal the sides
and top of the light fixture to the
wall.TO ALLOW MOISTURE TO
DRAIN, DO NOT SEAL BOTTOM SIDE
OF THE BACKPLATE (fig. 7).
10. Restore electrical power.
POUR INSTALLATION
EXTÉRIEURE :
9.Appliquer du scellant sur les
côtés et au-dessus du luminaire.
NE PAS SCELLER LE DESSOUS AFIN
DE PERMETTRE À L’HUMIDITÉ DE
S’ÉVACUER (fig. 7).
10. Réalimenter le courant
électrique.
PARA INSTALACIÓN
EXTERIOR:
9.Aplique sellant para sellar los
lados y fijar la lámpara a la pared.
NO SELLE LA PARTE INFERIOR PARA
PERMITIR DRENAJE DE HUMEDAD
(fig. 7).
10. Energizar la energía eléctrica.
fig. 7
Canopy
Base
Dosel
Sealant
Scellant
Sellador
fig. 6
Washer
Rondelles
Arandela
Fixation nuts
Écrous de fixation
Fijación de tuerca
EN
8. Push the wires into the junction
box. Mount the light fixture onto
the mounting base and secure it
with the washers and fixation nuts
(fig. 6).
FR
8. Remettre les fils dans la boîte de
jonction.Assembler le luminaire
sur le support de montage et le
fixer avec les rondelles et les écrous
de fixation. (fig. 6).
ES
8. Meta los cables en la caja de
conexiones. Monte la luminaria en
el soporte de montaje y asegúrela
con arandelas y tuercas (fig. 6).

10
INSTRUCTION MANUAL / MANUEL D’INSTRUCTIONS / MANUAL DE INSTRUCCIONES
EN
REPLACEMENT PARTS
TO ORDER REPLACEMENT
PARTS, PLEASE CONTACT
CUSTOMER SERVICE.
(Service available only in the USA
and Canada)
FR
PIÈCES DE RECHANGE
POUR COMMANDER DES
PIÈCES DE RECHANGE,
CONTACTEZ LE SERVICE À
LA CLIENTÈLE.
(Service offert seulement aux États-
Unis et au Canada)
ES
PIEZAS DE REPUESTO
PARA SOLICITAR PIEZAS
DE REPUESTO, CONTACTE
CON EL SERVICIO EN LA
CLIENTELA.
(Servicio disponible únicamente
en los E.E.U.U. y en Canadá)
Item
Pièce
Pieza
Description
Description
Descripción
Quantity
Quantité
Cantidad
Decorative nut
Écrou décoratif
Tuerca decorativa
NSBLES-C6/P1
End cap
Couvercle
Tapa
NSBLES-C6/P2
× 1
× 2
× 2
× 2
Hardware kit
Ensemble de quincaillerie
Conjunto de herramientas
NSBLES-C6/KIT

11
EN
WARRANTY
Artika For Living Inc. is proud to offer
you a three (3) years limited warranty
on manufacturing defects from the date
of purchase for residential use only.The
warranty is extended to the original owner
in USA, Canada, Mexico, UK, Iceland,
France and Spain and is non-transferable.
It does not apply to retailers, commercial
applications or establishments.The
original sales receipt is required for all
warranty claims.The remedy under this
limited warranty shall be product or part
replacement at Artika’s discretion as
provided herein and cannot exceed the
original purchase price.
This warranty is valid only on products
installed in accordance with the building
code and laws effective in the region
where the unit is used as well as in
accordance with the provided instruction
manual. It does not cover products
installed incorrectly or subjected to
abnormal use. Product(s) or component
part(s) may be required to be returned for
inspection and verification.
Normal wear and tear, misuse,
negligence, vandalism, improper
maintenance (surface damage due to
chemical interaction or cleaning agents
including, but not limited to, scouring
pads, use of cleaners containing abrasives,
alcohol or other organic solvents)
improper handling, accident, abuse,
fire, flood, theft, acts of God, neglect,
or alteration of the product will not be
covered under this limited warranty. It
excludes any accessories that accompany
the product including but not limited to
bulbs or batteries.
The warranty does not cover handling,
labor,transportation, or any other
cost associated with the installation
or replacement of the product.This
limited warranty is valid in the country
of purchase and by Artika authorized
retailers only.
Artika for Living Inc. will not be held
responsible for any direct or consequential
damages or injuries related to the use of
this product arising from improper use or
installation of this product.
Please visit www.artika.com to discover
more about Artika for Living Inc.
FR
GARANTIE
Artika For Living Inc. est fière de vous
offrir une garantie limitée de trois (3)
ans contre tout défaut de fabrication, à
compter de la date d’achat, pour un usage
domestique uniquement. Cette garantie
n’est valide que pour le propriétaire
d’origine est étendu au propriétaire
d’origine aux États-Unis, au Canada, au
Mexique, au Royaume-Uni, en Islande,
en France et en Espagneet est incessible.
Elle ne s’applique pas aux détaillants,
ni aux applications ou établissements
commerciaux. Le reçu de vente original est
exigé pour toute demande de garantie.Le
recours prévu par cette garantie limitée
est le remplacement du produit ou d’une
pièce du produit, à la discrétion d’Artika
conformément au présent document,
et ne peut pas excéder le prix d’achat
original.
Cette garantie couvre uniquement les
produits installés conformément au code
du bâtiment et aux lois en vigueur dans
la région où le produit est utilisé,et les
produits utilisés conformément au mode
d’emploi fourni. Elle ne couvre pas les
produits mal installés ou soumis à un
usage anormal. Le ou les produits ou
pièces peuvent vous être demandés aux
fins d’inspection et de vérification.
L’usure normale, une mauvaise utilisation,
la négligence, le vandalisme,un mauvais
entretien (surface endommagée à cause
d’une interaction chimique ou de produits
nettoyants,incluant sans s’y limiter
les éponges métalliques, l’utilisation
de produits nettoyants contenant des
agents abrasifs, de l’alcool ou d’autres
solvants organiques), une manipulation
inadéquate, un accident, un abus, un
incendie, une inondation, un vol, une
catastrophe naturelle ou la modification
du produit ne sont pas des motifs couverts
par cette garantie limitée.Elle exclut tout
accessoire fourni avec le produit,incluant
sans s’y limiter les ampoules et les piles.
Cette garantie ne couvre pas la
manutention, la main-d’œuvre, le
transport, ou tout autre coût lié à
l’installation ou au remplacement du
produit. Cette garantie limitée est valide
uniquement dans le pays où l’achat a été
effectué auprès de détaillants autorisés
Artika.
Artika for Living Inc. ne pourra être
tenue responsable en cas de blessure ou
de dommage direct ou indirect causé par
l’utilisation du produit si le produit a été
mal installé ou mal utilisé.
Visiter le www.artika.com pour en savoir
plus sur Artika for Living Inc.
ES
GARANTÍA
Artika For Living Inc. se enorgullece de
ofrecerle una garantía limitada de tres (3)
años en defectos de manufactura desde
la fecha de compra del producto para uso
residencial únicamente. Esta garantía
cubre al dueño original se extiende al
propietario original en EE. UU., Canadá,
México, Reino Unido, Islandia, Francia y
España, y no es transferible. No se aplica
a minoristas, aplicaciones comerciales ni
a establecimientos. Se deberá presentar
el recibo de venta original para todas
las reclamaciones de garantía.La
compensación ofrecida por esta garantía
limitada será el reemplazo del producto
o de la pieza a entera discreción de Artika
como aquí se indica, y no puede exceder
el precio de adquisición original.
Esta garantía solo es válida en productos
instalados de acuerdo con el código de
construcción y la legislación en vigor en
la región donde se use esta unidad, así
como el manual de instrucciones provisto.
Nuestra garantía no incluye productos
instalados incorrectamente o que hayan
tenido un uso anormal. Es posible que
se pida la devolución de los productos
o componentes para su inspección o
verificación.
El desgaste normal, uso incorrecto,
negligencia, vandalismo, mantenimiento
incorrecto (daños en la superficie por
interacción química o agentes de limpieza
incluyendo, entre otros, paños abrasivos,
sustancias de limpieza abrasivas, alcohol
o solventes orgánicos), uso incorrecto,
accidente, abuso, incendio, inundación,
robo,causas de fuerza mayor, negligencia
o alteración del producto no serán
cubiertos bajo esta garantía limitada. No
cubre ningún accesorio que acompañe
al producto,incluyendo entre otros
bombillas o baterías.
La garantía no cubre gastos de utilizacion,
gastos laborales, de transporte ni
cualquier otro coste asociado con la
instalación o reemplazo del producto.
Esta garantía limitada es válida en el
país de adquisición, siempre que se haya
adquirido en un minorista autorizado
por Artika.
Artika For Living Inc. no se hará
responsable de ningún daño directo,
consecuente o resultante, ni de lesiones
que puedan resultar de un mal uso o
instalación de este producto.
Visite www.artika.com para saber más
sobre Artika For Living Inc.

INSTRUCTION MANUAL / MANUEL D’INSTRUCTIONS / MANUAL DE INSTRUCCIONES
1-866-661-9606
www.artika.com
Customer Service
Monday to Friday
9 a.m. - 5 p.m. EST
Service à la clientèle
du lundi au vendredi
de 9 h à 17 h, heure de l’Est
Atención al cliente
Lunes a viernes
9 a.m. - 5 p.m. hora del Este
ARTIKA U.K. LIMITED
Hill House 1 Little Street
London, London
EC4A 3TR
Table of contents
Other Artika Lighting Equipment manuals

Artika
Artika Carat VAN-CALC-C1BL User manual

Artika
Artika OUT-WAC-HD2BL User manual

Artika
Artika Frosted Cube 3 User manual

Artika
Artika Swirl FLR-SWK-HD2BL User manual

Artika
Artika Gemini 8BOL-GELV-HD2BL User manual

Artika
Artika FM-SA-CR User manual

Artika
Artika OUT-BDC-HD2BL User manual

Artika
Artika UCL-S2C-C1 User manual
Popular Lighting Equipment manuals by other brands

V-TAC
V-TAC VT-1134 instruction manual

Light Emotion
Light Emotion MILKYWAY3 User instruction manual

Velleman
Velleman HQ POWER VDL6PDB user manual

Brightline
Brightline cMe3 Assembly and installation instructions

LIGHTSAFE
LIGHTSAFE EBXLEDST quick start guide

GM Lighting
GM Lighting LEDTask LTR-E Series installation guide