ARTVZ AE20C-02 User manual

Thank you for purchasing AE20C-02 Follow and ride smart suitcase.
Please read this product manual carefully before use and follow all instructions,
cautions and warnings contained in this manual.
Failure to do so may result in product damage and will not be covered by the warranty.
Please keep the product manual in a safe place.
WeChat official public number

product list
一 Quick start --------------------------------------------------------------------------------------------------
二 Products and accessories ------------------------------------------------------------------------------
三 product manual -------------------------------------------------------------------------------------------
四 Meet ARTVZ smart follow suitcase --------------------------------------------------------------------
五 Product parameters -------------------------------------------------------------------------------------
六 TSA fingerprint lock setting instructions ------------------------------------------------------------
七 Remote control instructions ---------------------------------------------------------------------------
八 APP instructions ------------------------------------------------------------------------------------------
九 Precautions ------------------------------------------------------------------------------------------------
十 Legal Notice -----------------------------------------------------------------------------------------------
十一 After sales service --------------------------------------------------------------------------------------
1
2
3
4
5
6
8
10
13
14
15

1
Quick start
1
WeChat official public number WeChat Official subscription number APP scan code download
The first step. Scan code to pay attention to the official WeChat public number,
you can get the APP download link
Step 2. Download and install the app
Step 3. Open the front cover, install the battery, and start the smart suitcase.
Step 4. Open the app and match it with the phone to match(password 888888)
Step 5. After the match is successful, you can use the APP to control
1.Open the plastic front cover 2.Install battery 3.Press the On/Off button to turn it on,
Press and hold the On/Off button to
turn it off.
Step 6. After completing the match, proceed to control
APP can only perform riding control, can not control automatic follow,Batteries can be plugged in
front and back.
button

2
Products and accessories
2
When taking the battery, turn the cover to the vertical position to prevent the battery from
bouncing against the cover.
Follow and ride smart suitcase Power Adapter
battery
Remote control Instruction manual
跟随骑行智能行李箱
使用说明书
Follow and ride smart suitcase
User’s Manual
Charging Cable

3
Qroduct manual
3
Product Description: The lower side of the lever is the power of the love luggage smart phone,
the power can be removed as a charging treasure.
1) Start the machine: press the power switch, the power display screen lights up, it is turned on.
2) Turn off the machine: Press and hold the power switch, and the power display screen will be turned off.
3) USB charging port: Plug the charging device into the USB charging port through the charging cable, and
the power screen will light up, that is, power the device.
4)Charge the machine power; press the PUSH button on the right side of the power supply, the machine
power is ejected, and the power is removed. There is a DC5.5 charging interface on the side of the power
supply, and the charger can be connected.
5) Power Charger: When the power charger is connected to the power supply, the indicator light is red and
charging is in progress. When the indicator light is green (or blue), the battery is fully charged. (According to
the color of the charger indicator, the power display screen shows that the power is sometimes virtual)
Boot Shut down
99%
PUSH
Take the battery

4
1. Main box 2. ‘ARTVZ’Logo 3. Telescopic pedal 4. Fingerprint lock 5. USB charging port
6. Battery display screen 7. On/Off button
If the power supply is about 30%, the luggage may not work. This is normal. It is not a product
quality problem. About 30% of the power can be used as a USB output.
1
3
7
4
Understand ARTVZ smart follow suitcase
4
2
65

5
Luggage parameters:
Product parameters
5
Basic Information
Intelligent function
Battery specification
Motor specifications
size
weight
Volume
Box material
Box material
Quantity
power
Torque
Maximum speed
Smart follow
One-click riding
APP manipulation
Three-in-one fingerprint lock
Automatic recall
Lost reminder
Externally disassembled battery
Power display
capacity
weight
Charging voltage
Charging time
USB output
Power Output
recharge mileage
3180mAh/80.1Wh
480g
29.4V
3.5H
5V/2.1A
24V/6A
Riding 7 km, following 10 km
355X235X525mm
5.5KG
36L
Bayer PC
Fabric material
2
150W
2.0N·m
7Km/h

6
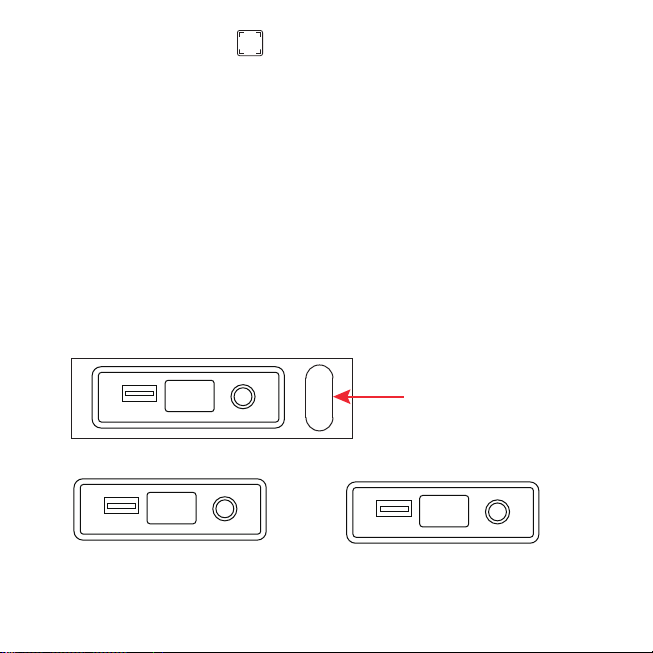
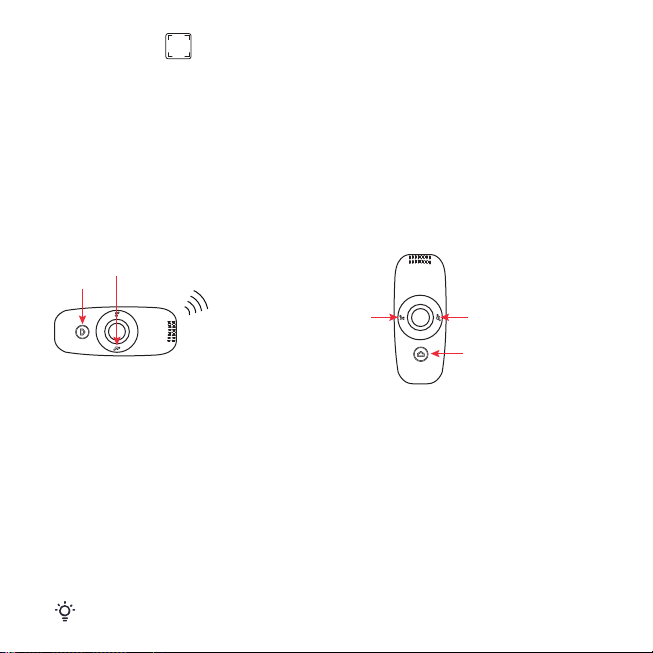
In the process of use, there is no battery, no lock can be unlocked, you can use the USB port
external power supply (charge treasure, etc.) emergency unlock
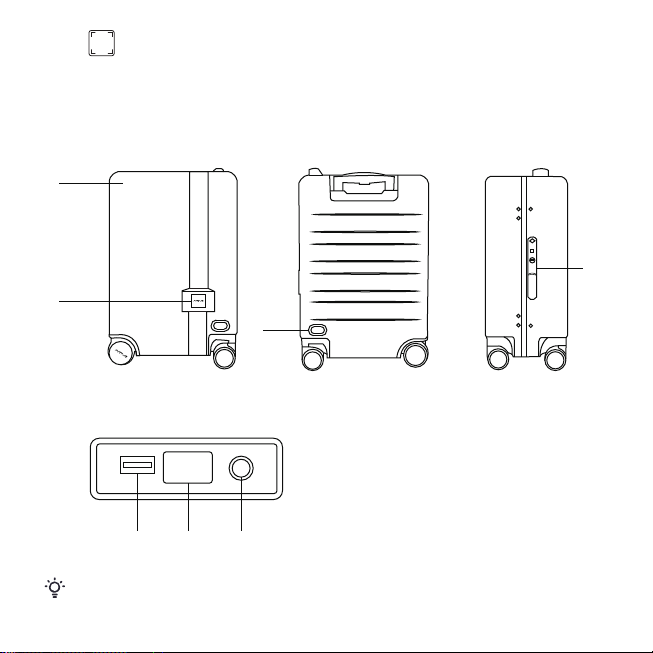
Fingerprint module Emergency power supply
Settings button
TSA fingerprint lock description
6
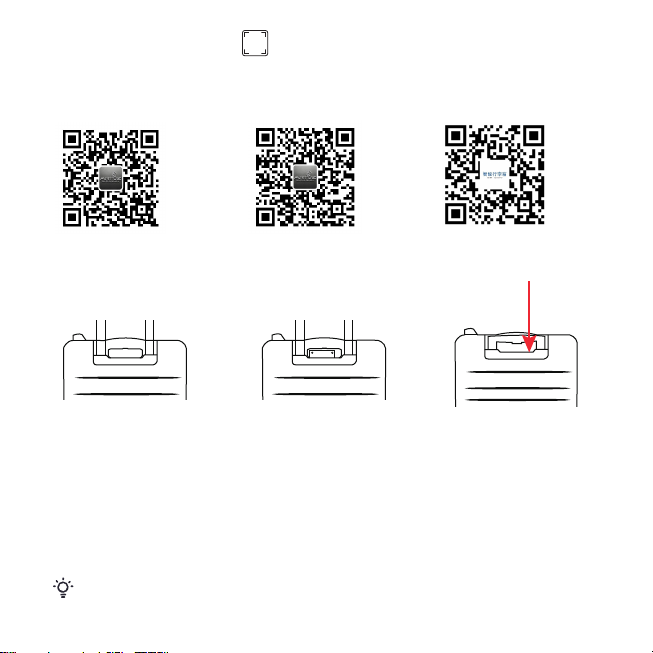
1)Fingerprint entry:
First touch the fingerprint module,Press the setting button (SET) on the back to enter the fingerprint
entry status. At this time, the LED blue light flashes quickly. Please press the finger fingerprint that
needs to be entered. Each time the fingerprint is successfully captured, the blue light will be
extinguished once and then continue to flash quickly. After the success, the green light is always on,
and the fingerprint is successfully entered. If the red light is on, it means that the fingerprint input
failed. You need to continue pressing the finger to be entered. After the fingerprint input error of the
same group is accumulated 4 times, the red light is on, indicating that the fingerprint has failed to be
entered, and the fingerprint needs to be restarted.
2)Fingerprint unlock:
Pressing the finger that has been successfully entered, the fingerprint is correct, and the blue light
flashes, the sound of the motor rotation will be heard. At this time, it is unlocked. After 10 seconds,
the motor will rotate and the lock will be locked automatically. If you press your finger and it flashes
red, it means that the fingerprint does not pass or the fingerprint is incorrect. You need to press the
finger that has entered the fingerprint again.
When shipped from the factory,any finger can be unlocked when the lock does not store fingerprints
3)Fingerprint delete:
Press and hold the setting button until the red light flashes and the light is on, the fingerprint is
deleted successfully.
LOCK
SET
(Not a charging port, used as an emergency
power supply when the battery is dead)
Note: The box body is made of German Bayer PC material, which belongs to the soft box series. In order to ensure smooth opening and
closing, do not put too much baggage. In order to prevent the box from opening, it is strictly forbidden to squeeze the box to lock the
fingerprint lock.

7
Smart lock lighting system:
TSA fingerprint lock description
6
colour
blue
blue
blue
blue
blue
red
green
red
Flashing frequency
Gradually brightening
After gradually getting darker, it flashes twice immediately
After flashing twice quickly, fade in and fade out once
Gradual lightening
Lighten up quickly
Gradually brighten and darken many times
Close after long light
Gradual lightening
status
Fingerprint status
Boot
Electronic lock unlock
Electronic lock normally closed
Shut down
Delete fingerprint
Fingerprint entry succeeded
Fingerprint recognition error

8
Remote control instructions
7
Remote control operation:
1) Remote control battery display: When the main button is pressed, the main button will flash, flashing
four times is about full power, flashing three times is about 75% of the power, flashing two times is
about 50% of the power, flashing about 25% of the power.
2)Follow mode: Start the trunk power switch and the remote control power switch, click on the puppy
pattern on the remote control to open the follow mode, the box will follow closely behind, please be
careful not to block the follower module on the trunk. The follow mode is not recommended in the case
of a large number of people. Short press the follow button to turn on the non-obstacle mode follow,
long press the follow button to start the obstacle avoidance mode follow.
Whether to open the obstacle avoidance division: follow the button flashing to avoid obstacle
avoidance, and the long light is to avoid obstacles.
Main button
Riding button
Remote control pairing:
Press the main button and the ride button at the same time, press and hold 1S until the buzzer emits a
drop, drop, .......... slow cycle sound, the LED of the ride button will flash at the same frequency, and the
main button The LED is long bright.
Then the user aligns the main button with the hole of the motor board. If the pairing is successful, the
buzzer will slam the drip 5 times, and the LED will flash 5 times, then return to normal. The buzzer in the
cabinet is also drastically dripping 5 times.
If it is not successful, then the drop of the remote control, the slow cycle will continue to ring, and the LED
will also strobe. The buzzer and LED are automatically turned off after 2 minutes. End the pairing.
The remote control has been paired successfully at the factory and does not need to be paired again:
Turn on the remote control, please wait until the main button flashes before proceeding.
follow ride
Main button

9
The obstacle avoidance of this product is 180° angle avoidance. The front and sides will trigger
obstacle avoidance. The colors such as black and transparent will not be recognized. This is normal.
7
2)Cycling mode: start the trunk power switch and the remote control power switch, press the
pedals on both sides, ride the trunk, gently step on the pedal, focus on the front, click on the villain
pattern on the remote control, you can ride Row, slow start during riding, control the rocker to
support front left and right operation, slide backwards to brake operation, slowly accelerate during
riding, do not push the rocker directly to the upper end, turn left to right should be The rocker
slides to the left or right and should be decelerated and turned when turning.
3)One-click recall mode: In the range of 8 meters(5-8meters), when the trunk is activated, click on
the puppy pattern on the remote control, and the suitcase can return to the owner (remote
control),the signal intensity is related to the surrounding environment.
Press the pedal
Click
Click
Remote control instructions

10
APP instructions
8
1. 1. It can be downloaded by public number, Apple App Store (search for “smart trolley case”) and
Huawei App Store (search for “smart suitcase”) or scan code.
2. Click "Download and install", download the file and install it. (figure 1)
3. If you are prompted to "trust the application" during the installation process, select Trust the
application and agree to the permissions required for the software to run.
4. Open the ARTVZ smart follow box and open the phone Bluetooth.
5. Click the Bluetooth icon in the upper left corner of the app page. (figure 2)
6. After scanning for a few seconds, click on the refreshed "TRUNK".
picture 1 picture 2
图2
Scan QR code
Download app

11
APP instructions
8
7. Enter the Bluetooth initial password (888888), and the “✓” symbol on the rear of TRUNK means the
connection is successful.
8. Return to the main page and click on the remote control below to enter the remote control interface.
9. Put down the pedals on both sides of the trunk, sit on the trunk, push the red remote control point,
support the front left and right operation, and slide back to the brake operation. When starting, you
must not directly push the remote sensing point directly to the top, and should accelerate slowly.
When turning left and right, the remote control point should be slanted to 45°, and the steering should
be decelerated beforehand. (picture3)
8. Click on the help on the home page to solve some problems. (picture 4)
picture 3 picture 4

12
APP instructions
8
9. Click on the map on the home page to see your current speed, current trip, time, and battery
level. (picture 5)
10. Click on the home page settings to change the suitcase name, Bluetooth password, and
restore the default. It is possible to switch units between kilometers and miles, turn on anti-lost
mode, and switch locks. (picture 6)
picture 5 picture 6

13
Precautions
9
Precautions for use:
Use warning:
1. Please do not use the lever handle to lift the trunk.The suitcase can only be pushed along, not sideways.
2. When you step over the steps or steps, lift the suitcase. Pulling the suitcase over the steps or steps may
cause the luggage to fall over and be damaged.
3. In a moving car, uneven or inclined, please put the suitcase on the ground to prevent the suitcase from
falling over and being damaged.
4. Please do not leave the suitcase in a humid, unventilated place and a strong acid environment for a long
time. It is forbidden to use in rainy days to prevent short-circuit of electronic devices caused by water
entering the suitcase. It is forbidden to place the suitcase at high temperature and fireworks.
5. Do not use a corrosive solvent such as banana water or petroleum spirit to wipe the suitcase.
6. When closing the suitcase, please be careful not to get your body or clothes caught by the aluminum frame
or lock.When riding, the center of gravity should be forward to prevent falling.
7. Store the battery in a dry environment, Long-term storage of the battery (more than three months), the
need to maintain the power capacity of more than 50% of the rated capacity.
8. Please be careful that the liquid in the trunk is leaking,Liquid leaks can cause a short circuit in the trunk's
internal circuitry.
1. Do not sit or stand on the trunk to play.
2. It is forbidden to disassemble, impact, squeeze the battery or put it into fire or water. Do not use the
battery after it has been immersed in water.
3. Do not touch the battery with corrosive substances, away from fire and heat. Do not continue to use the
battery if it is severely inflated.
4. When charging the battery, use only the power adapter for this product. If you use other types of power
adapters, the product will not function properly or may be damaged. Using other types of power adapters
may also cause a fire. Failure to repair due to the use of other power adapters will not result in a warranty.
5. Please periodically remove the dust from the power plug. Ash accumulation in a humid environment
can cause a fire hazard.
6. Do not damage, forcibly bend or bundle the power cord. Do not place heavy objects on the power cord
or expose them to excessive heat. Ignoring this warning may result in fire, electric shock, or product
malfunction.
7. Do not connect or disconnect the power adapter with wet hands. Ignoring this warning may result in
electric shock or product malfunction.
8. Do not insert foreign objects into the USB port, high voltage charge/discharge interface or other
openings in the product. If a metal object or foreign object is inserted into a port or other opening of the
product, it may cause product malfunction, fire or electric shock.
9. Keep away from heat, high pressure and direct sunlight during use. Avoid children playing with the
battery and never hit the battery.
10. Do not short the battery positive and negative.
11. Do not disassemble and disassemble the battery components.
12. Children and the elderly must use the riding function accompanied by a guardian to prevent accidents.
13. Do not use in a scene with poor road conditions to prevent damage to the product or personal injury.

14
Legal Notice
10
This manual contains as much functionality as possible when printing. However, due to continuous
improvement of product functions and design changes, the functions in the manual may still be
inconsistent with the products you purchased, please understand.
Legal Notice:
To the extent permitted by law, the company shall not be liable for any direct or indirect or other
forms of personal injury, property damage or legal dispute arising out of the user's failure to comply
with the instructions or precautions of this manual.
Copyright
All materials or contents contained in this manual are protected by copyright law, and all copyrights
are owned by the company, except for those cited by other parties. No part of this content may be
reproduced, distributed, reprinted, etc. or used for any commercial purpose in any way without the
prior written permission of the Company or other rights holders.
Trademark
All trademarks and logos used and displayed on this manual are owned by the company, except for
those trademarks, logos, and trade names owned by other parties. Any content contained in this
manual shall not be deemed to be without the company or other Licensee or right to use any of the
foregoing trademarks, logos, by implication, non-objection or otherwise, with the written permission
of the Rights Party. No one may use the company name and the company's trademark in any way
without prior written permission.
patent.
All product information, technologies, etc. used and displayed in this manual are owned by the
company, except for information and technology that are owned by other parties. No one may use
(including its own use, authorize the use of third parties, etc.), copy or modify the product
information and technology described in this manual without the prior written permission of the
company.
Limitation of Liability
The company is not liable for any indirect, special, punitive, incidental or consequential damages and
losses (including not limited to loss of profits, indirect losses, incidental losses, data loss, taxes or
other economic benefits).
Applicable law and dispute resolution
This manual applies to the laws of the People's Republic Disputes arising from this manual or the
products of the company shall be settled through consultation; if the negotiation fails, the people's
court in the locality of the company shall be subject to litigation.

For detailed maintenance procedures, please consult 0755-89232717
The above-mentioned after-sales service policy and additional explanations are finally
interpreted by ARTVZ.
After sales service
11
Warranty Policy:
15
Return policy:
・Within seven days from the date of receipt, there is no reason to return the goods. The goods must be
returned at the time of return, and the goods must be returned intact. If they are not used, the original
packaging must be returned together with the original products. The original packaging must include
all original accessories (such as Product label, box cover, warranty card). The cost of returning without
reason is borne by the consumer.
・If the returned product cannot be fully satisfied due to the return conditions, the payment will not be
refunded. Unacceptable returns will be returned to you and the items will be returned as they were
purchased.
・Within seven days from the date of receipt, you may choose to return or exchange the goods for free
due to the quality of the goods themselves.
・If it is beyond the 7th and within 15 days, you will be able to choose a replacement if there is a
malfunction caused by non-human damage.
・ Each of ARTVZ's products is rigorously tested at the factory to ensure that our products meet
stringent quality standards. Therefore, if the product has any defects and malfunctions caused by
materials and manufacturing processes during the free warranty period, this warranty is based on
this warranty. The terms and conditions stated in the Terms and Conditions will be repaired or
replaced free of charge for you.
・If the costs associated with the delivery of the product to the service center, including the packaging
fee, transportation fee and related taxes, are borne by the owner or the warranty client.
・Free warranty period: one year for the electronic part and two years for the non-electronic part. See
the warranty content form for details. The free warranty period begins at 0:00 on the second day of
the date of receipt of the item.
・Free warranty only applies to material defects and process defects, caused by personal negligence,
accidents, exposure to extreme temperatures, solvents, acids, water, normal wear and tear, etc., and
the user does not use the manual. Any damage, no warranty card, invoice or warranty card does not
match the invoice information, beyond normal use conditions, including but not limited to cycling,
overload, etc., private demolition or repair, malicious damage to the warranty card content, cabinet
information, including blurring Destruction, tearing, tampering, etc., the use of this product for
commercial use, etc., are not covered by the warranty. The following conditions are not covered by
the free warranty. Damage caused by air handling, rough handling, overload packing, improper
shipping, etc., causing damage caused by human negligence or accident, causing damage to the
cabinet, fabric, inner village, natural shabby, aging, fabric burns, hard outer impact bumps, package
The side strips are worn.

16
11
Free warranty content and deadline:
Types
Box
Battery and charger
Electronic locks
Motherboard
Motor wheel Motor wheel and corresponding electronic circuit board
Warranty content
Case, aluminum frame, wheel base, lever, handle
External charger, rechargeable lithium battery
Master lock
Main control board and other electronic circuit boards
保修期限
2 years
1 year
1 year
1 year
1 year
・A completed warranty or original purchase invoice must be presented to receive a free warranty.
・Products that exceed the free warranty period are subject to a fee-based repair service. The repair
price of different parts will be based on market price and labor cost adjustment.
After sales service

FCCWarningStatement
Changesormodificationsnotexpresslyapprovedbythepartyresponsibleforcompliance
couldvoidtheuser’sauthoritytooperatetheequipment.Thisequipmenthasbeentested
andfoundtocomplywiththelimitsforaClassBdigitaldevice,pursuanttoPart15oftheFCC
Rules.Theselimitsaredesignedtoprovidereasonableprotectionagainstharmful
interferenceinaresidentialinstallation.Thisequipmentgeneratesusesandcanradiateradio
frequencyenergyand,ifnotinstalledandusedinaccordancewiththeinstructions,may
causeharmfulinterferencetoradiocommunications.However,thereisnoguaranteethat
interferencewillnotoccurinaparticularinstallation.Ifthisequipmentdoescauseharmful
interferencetoradioortelevisionreception,whichcanbedeterminedbyturningthe
equipmentoffandon,theuserisencouragedtotrytocorrecttheinterferencebyoneor
moreofthefollowingmeasures:
‐‐ Reorientorrelocatethereceivingantenna.
‐‐ Increasetheseparationbetweentheequipmentandreceiver.
‐‐ Connecttheequipmentintoanoutletonacircuitdifferentfromthattowhichthe
receiveris connected. ‐‐ Consultthedealeroranexperiencedradio/
TVtechnicianforhelp.
This device complies with part 15 of the FCC Rules. Operation is subject to the
following two conditions: (1) This device may not cause harmful interference, and
(2) this device must accept any interference received, including interference that
may cause undesired operation.
Table of contents