Asahi KASEI AKD4140-B User manual

ASAHI KASEI [AKD4140-B]
<KM079203> 2009/10
- 1 -
GENERAL DESCRIPTION
The AKD4140-B is the evaluation board for the AK4140, BTSC decoder. The AKD4140-B has AKM’s D/A
as analog output and AKM’s DIT as digital (S/PDIF) output.
Ordering guide
AKD4140-B --- Evaluation board for AK4140
(A cable for connecting with printer port of IBM-AT compatible PC
and a control software are packed with this. The control software
does not operate on Windows NT.)
FUNCTION
Digital interface
-S/PDIF
1 channel output (Optical or BNC)
- Serial audio data I/F
1 input/output port (10-pin port)
-Serial control data I/F
1 input/output port (10-pin port)
ROUT
SIF AK4140
Serial Data
In/Out
Control
5V GND
LOUT
TX
Opt
REG
3.3V
AK4386
(DAC)
AK4103A
(DIT)
Analog Out
S/PDIF Out
Figure 1. AKD4140-B Block Diagram
*Circuit diagram and PCB layout are attached at the end of this manual.
AK4140 Evaluation Board Rev.2
AKD41
40
-
B

ASAHI KASEI [AKD4140-B]
<KM079203> 2009/10
- 2 -
Evaluation Board Manual
Operating sequence
(1) Set up the power supply lines.
[5V] (Red) = 5V
[3.3V] (Orange)=3.3V (open when JP1 is shorted)
[GND] (Black) = 0V
(2) Set up the switches and jumpers.
Refer to the following sections.
(3) Power on.
The AK4140 should be reset once by bringing PDN (SW1) “L” upon power-up.
Toggle switch set-up
SW1 AK4140_PDN Reset switch for AK4140. Set to “H” during normal operation. Bring to “L” once after the
power is supplied.
SW3 DAC/DIT_PDN Reset switch for DAC and DIT. Set to “H” during normal operation. Bring to “L” once
after the power is supplied.
Table 1. Toggle switch set-up
LED indication
LE1 INT0 Turn on when INT0 pin goes to “H”.
LE2 INT1 Turn on when INT1 pin goes to “H”.
Table 2. LED indication
Jumper set-up.
No. Jumper Name Function
1 REG Power supply setup.
Short: Regulator (default)
Open: +3.3V Jack
2 XTE Set-up of X’tal.
Short: GND
Open: X’tal (default)
3 MCLK Set-up of MCLK.
XTL: X’tal (default)
EXT: EXT
4 BICK
Set-up of BICK.
Open: Master mode (default)
1/2: 128fs
1/4: 64fs
5 LRCK
Set-up of BICK.
Open: Master mode (default)
1/256: 256fs
1/512: 512fs
6 TX Set-up of TX0 output circuit.
OPT : Optical (default)
BNC : BNC
7 TDMIN Set-up of TDMIN input circuit.
TDMIN: TDMIN
GND: GND (default)
Table 3. Jumper set-up

ASAHI KASEI [AKD4140-B]
<KM079203> 2009/10
- 3 -
DIP switch (SW2) set-up: -off- means “L”
No. Switch Name Function Default
1 MS Set-up of MS pin.
“L”: Slave mode. “H”: Master mode. ON
2 CAD1 Set-up of CAD1 pin. OFF
3 CAD0 Set-up of CAD0 pin. OFF
4 Always “OFF” OFF
5 TST2 Set-up of TEST pin. (always “OFF”) OFF
6 TST1 Set-up of TEST pin. (always “OFF”) OFF
7 TSTI2 Set-up of TEST pin. (always “OFF”) OFF
8 TSTI1 Set-up of TEST pin. (always “OFF”) OFF
Table 4. SW2 set-up
DIP switch (SW4) set-up: -off- means “L”
No. Switch Name Function Default
1 DIT_DIF0 Set-up of AK4103A_DIF0 pin. OFF
2 DIT_CKS0 Set-up of AK4103A_CKS0 pin. ON
3 DIT_CKS1 Set-up of AK4103A_CKS1 pin. OFF
4 DAC_DIF0 Set-up of AK4386_DIF0 pin. OFF
Table 5. SW4 set-up
DIT_DIF0
(SW4_1) AK4103A SDTI
0 24bit, Left justified Default
1 24bit, I2S
Table 6. Audio Interface Format of AK4103A
DIT_CKS1
(SW4_3) DIT_CKS0
(SW4_2) MCLK
0 0 128fs
0 1 256fs
Default
1 0 384fs
1 1 512fs
Table 7. Master Clock Frequency Select of AK4103A
DAC_DIF0
(SW4_1) AK4386 SDTI
0 24bit, Left justified Default
1 16/24bit, I2S
Table 8. Audio Interface Format of AK4386

ASAHI KASEI [AKD4140-B]
<KM079203> 2009/10
- 4 -
Serial control
The AK4140 can be controlled via the printer port (parallel port) of IBM-AT compatible PC. Connect PORT2
(uP-I/F) with PC by 10-line flat cable packed with the AKD4140-B. Take care of the direction of connector. There
is a mark at pin#1. The pin layout of PORT2 as shown Figure 2.
PORT2
uP I/F 6
5
10
1
NC
CDTO
CDTI
CCL
K
CSN
GND
GND
GND
GND
GND
Red
Figure 2. PORT2 pin layout

ASAHI KASEI [AKD4140-B]
<KM079203> 2009/10
- 5 -
Control Software Manual
Set-up of evaluation board and control software
1.Set up the AKD4140-B according to the Operating Sequence located on page 2.
2.Connect IBM-AT compatible PC with AKD4140-B by 10-line type flat cable (packed with AKD4140-B). Take care
of the direction of 10pin header. (Please install the driver in the CD-ROM when this control software is used on
Windows 2000/XP. Please refer “Installation Manual of Control Software Driver by AKM device control software”.
In case of Windows95/98/ME, this installation is not needed. This control software does not operate on Windows
NT.)
3.Insert the CD-ROM labeled “AKD4140-B Evaluation Kit” into the CD-ROM drive.
4.Access the CD-ROM drive and double-click the icon of “akd4140.exe” to set up the control program.
5.Please evaluate according to the following.
Operation flow
Keep the following flow.
1. Set up the control program according to explanation above.
2. Click “Port Reset” button.
Explanation of each buttons
1. [Port Reset] : Set up the USB interface board (AKDUSBIF-A) .
2. [Write default] : Initialize the register of AK4140.
3. [All Write] : Write all registers that is currently displayed.
4. [Function1] : Dialog to write data by keyboard operation.
5. [Function2] : Dialog to write data by keyboard operation.
6. [Function3] : The sequence of register setting can be set and executed.
7. [Function4] : The sequence that is created on [Function3] can be assigned to buttons and executed.
8. [Function5]: The register setting that is created by [SAVE] function on main window can be assigned to
buttons and executed.
9. [SAVE] : Save the current register setting.
10. [OPEN] : Write the saved values to all register.
11. [Write] : Dialog to write data by mouse operation.
Indication of data
Input data is indicated on the register map. Red letter indicates “H” or “1” and blue one indicates “L” or “0”. Blank is the
part that is not defined in the datasheet.

ASAHI KASEI [AKD4140-B]
<KM079203> 2009/10
- 6 -
Explanation of each dialog
1. [Write Dialog]: Dialog to write data by mouse operation
There are dialogs corresponding to each register.
Click the [Write] button corresponding to each register to set up the dialog. If you check the check box, data
becomes “H” or “1”. If not, “L” or “0”.
If you want to write the input data to AK4140, click [OK] button. If not, click [Cancel] button.
2. [Function1 Dialog] : Dialog to write data by keyboard operation
Address Box: Input registers address in 2 figures of hexadecimal.
Data Box: Input registers data in 2 figures of hexadecimal.
If you want to write the input data to AK4140, click [OK] button. If not, click [Cancel] button.
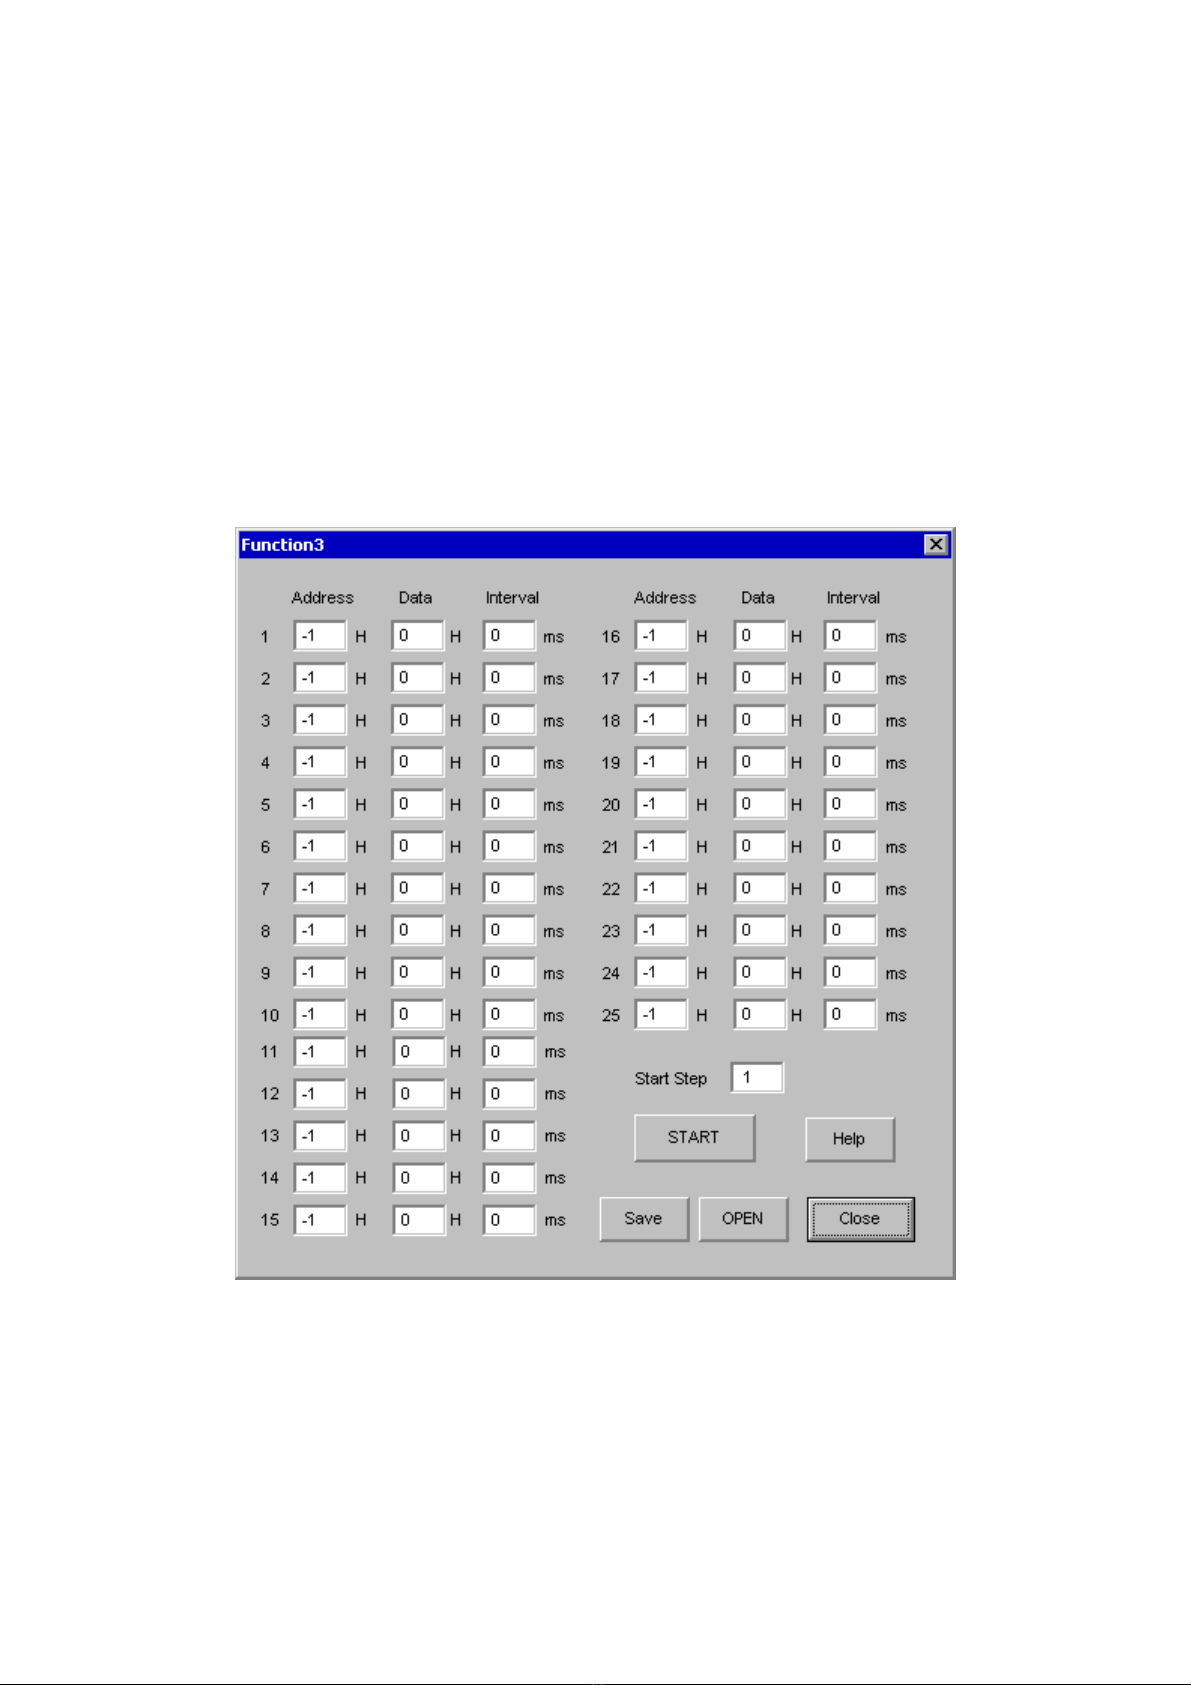
3. [Function2 Dialog] : Dialog to evaluate ATT
Address Box: Input registers address in 2 figures of hexadecimal.
Start Data Box: Input starts data in 2 figures of hexadecimal.
End Data Box: Input end data in 2 figures of hexadecimal.
Interval Box: Data is written to AK4140 by this interval.
Step Box: Data changes by this step.
Mode Select Box:
*If you check this check box, data reaches end data, and returns to start data.
[Example] Start Data = 00, End Data = 09
Data flow: 00 01 02 03 04 05 06 07 08 09 09 08 07 06 05 04 03 02 01 00
*If you do not check this check box, data reaches end data, but does not return to start data.
[Example] Start Data = 00, End Data = 09
Data flow: 00 01 02 03 04 05 06 07 08 09
If you want to write the input data to AK4140, click [OK] button. If not, click [Cancel] button.

ASAHI KASEI [AKD4140-B]
<KM079203> 2009/10
- 7 -
4. [Save] and [Open]
4-1. [Save]
Save the current register setting data. The extension of file name is “akr”.
(Operation flow)
(1) Click [Save] Button.
(2) Set the file name and push [Save] Button. The extension of file name is “akr”.
4-2. [Open]
The register setting data saved by [Save] is written to AK4396. The file type is the same as [Save].
(Operation flow)
(1) Click [Open] Button.
(2) Select the file (*.akr) and Click [Open] Button.

ASAHI KASEI [AKD4140-B]
<KM079203> 2009/10
- 8 -
5. [Function3 Dialog]
The sequence of register setting can be set and executed.
(1) Click [F3] Button.
(2) Set the control sequence.
Set the address, Data and Interval time. Set “-1” to the address of the step where the sequence should be paused.
(3) Click [Start] button. Then this sequence is executed.
The sequence is paused at the step of Interval="-1". Click [START] button, the sequence restarts from the paused step.
This sequence can be saved and opened by [Save] and [Open] button on the Function3 window. The extension of file
name is “aks”.
Figure 3. Window of [F3]

ASAHI KASEI [AKD4140-B]
<KM079203> 2009/10
- 9 -
6. [Function4 Dialog]
The sequence that is created on [Function3] can be assigned to buttons and executed. When [F4] button is clicked, the
window as shown in Figure 4 opens.
Figure 4. [F4] window

ASAHI KASEI [AKD4140-B]
<KM079203> 2009/10
- 10 -
6-1. [OPEN] buttons on left side and [START] buttons
(1) Click [OPEN] button and select the sequence file (*.aks).
The sequence file name is displayed as shown in Figure 5.
Figure 5. [F4] window(2)
(2) Click [START] button, then the sequence is executed.
3-2. [SAVE] and [OPEN] buttons on right side
[SAVE] : The sequence file names can assign be saved. The file name is *.ak4.
[OPEN] : The sequence file names assign that are saved in *.ak4 are loaded.
3-3. Note
(1) This function doesn't support the pause function of sequence function.
(2) All files need to be in same folder used by [SAVE] and [OPEN] function on right side.
(3) When the sequence is changed in [Function3], the file should be loaded again in order to reflect the change.

ASAHI KASEI [AKD4140-B]
<KM079203> 2009/10
- 11 -
7. [Function5 Dialog]
The register setting that is created by [SAVE] function on main window can be assigned to buttons and executed. When
[F5] button is clicked, the following window as shown in Figure 6 opens.
Figure 6. [F5] window
7-1. [OPEN] buttons on left side and [WRITE] button
(1) Click [OPEN] button and select the register setting file (*.akr).
(2) Click [WRITE] button, then the register setting is executed.
7-2. [SAVE] and [OPEN] buttons on right side
[SAVE] : The register setting file names assign can be saved. The file name is *.ak5.
[OPEN] : The register setting file names assign that are saved in *.ak5 are loaded.
7-3. Note
(1) All files need to be in same folder used by [SAVE] and [OPEN] function on right side.
(3) When the register setting is changed by [Save] Button in main window, the file should be loaded again in order to
reflect the change.

ASAHI KASEI [AKD4140-B]
< KM079203> 2009/10
- 12 -
MEASUREMENT RESULTS
[Measurement condition]
•Measurement unit : Audio Precision, System Two Cascade
•MCLK : 256fs
•SCLK :64fs
•fs : 48kHz
•Bit : 16bit
•Power Supply : AVDD = DVDD = 3.3V
•Bandwidth : 22Hz-15kHz
•Interface : DIT
•Temperature : Room
•ATTL bit = ATTR bit = “0” (attenuation = off)
Parameter Result (Lch / Rch) Unit
S/(N+D)
(−1dB Input, 1kHz)
MONO
Stereo
SAP
-57.1
-57.0 / -57.0
-41.4
dB
dB
dB
D-Range
(−60dB Input, A-weighting)
MONO
Stereo
SAP
76.4
74.9 / -74.9
86.8
dB
dB
dB
S/N
(Input off, A-weighting)
MONO
Stereo
SAP
76.1
74.8 / 74.7
88.7
dB
dB
dB

ASAHI KASEI [AKD4140-B]
< KM079203> 2009/10
- 13 -
Performance Plots
STEREO:
Figure 1. THD+N vs. Input Level (1kHz)
Figure 2. THD+N vs. Input Frequency (-15dB)
Figure 3. Linearity (1kHz)
Figure 4. Frequency Response (-15dB)
Figure 5. Crosstalk (Left Channel = Off, Right Channel = -15dB)
Figure 6. FFT Plot (-1dB)
Figure 7. FFT Plot (-60dB)
Figure 8. FFT Plot (no input)
MONO:
Figure 9. THD+N vs. Input Level (1kHz)
Figure 10. THD+N vs. Input Frequency (-15dB)
Figure 11. Linearity (1kHz)
Figure 12. Frequency Response (-15dB)
Figure 13. FFT Plot (-1dB)
Figure 14. FFT Plot (-60dB)
Figure 15. FFT Plot (no input)
SAP:
Figure 16. THD+N vs. Input Level (1kHz)
Figure 17. THD+N vs. Input Frequency (-15dB)
Figure 18. Linearity (1kHz)
Figure 19. Frequency Response (-15dB)
Figure 20. FFT Plot (-1dB)
Figure 21. FFT Plot (-60dB)
Figure 22. FFT Plot (no input)

ASAHI KASEI [AKD4140-B]
< KM079203> 2009/10
- 14 -
[Plot: STEREO]
AKM 04/19/06 17:29:47
-90
-40
-85
-80
-75
-70
-65
-60
-55
-50
-45
d
B
F
S
-100 -10-90 -80 -70 -60 -50 -40 -30 -20
dBr
Figure 1. THD+N vs. Input Level (1kHz)
AKM 04/19/06 17:37:04
-90
-40
-85
-80
-75
-70
-65
-60
-55
-50
-45
d
B
F
S
20 10k50 100 200 500 1k 2k 5k
Hz
Figure 2. THD+N vs. Input Frequency (-15dB)

ASAHI KASEI [AKD4140-B]
< KM079203> 2009/10
- 15 -
AKM 04/19/06 17:41:25
-100
+0
-90
-80
-70
-60
-50
-40
-30
-20
-10
d
B
F
S
-100 +0-90 -80 -70 -60 -50 -40 -30 -20 -10
dBr
TT
Figure 3. Linearity (1kHz)
AKM 04/19/06 17:44:51
-20
-10
-19
-18
-17
-16
-15
-14
-13
-12
-11
d
B
F
S
20 10k50 100 200 500 1k 2k 5k
Hz
Figure 4. Frequency Response (-15dB)

ASAHI KASEI [AKD4140-B]
< KM079203> 2009/10
- 16 -
Rch
CROSSTALK
Lch
Figure 5. Crosstalk (Left Channel = Off, Right Channel = -15dB)
AKM 04/19/06 17:48:52
-140
+0
-120
-100
-80
-60
-40
-20
d
B
F
S
20 20k50 100 200 500 1k 2k 5k 10k
Hz
Figure 6. FFT Plot (-1dB)
AKM 04/19/06 17:46:33
-80
+0
-70
-60
-50
-40
-30
-20
-10
d
B
F
S
20 10k50 100 200 500 1k 2k 5k
Hz

ASAHI KASEI [AKD4140-B]
< KM079203> 2009/10
- 17 -
AKM 04/19/06 17:49:52
-140
+0
-120
-100
-80
-60
-40
-20
d
B
F
S
20 20k50 100 200 500 1k 2k 5k 10k
Hz
Figure 7. FFT Plot (-60dB)
AKM 04/19/06 17:50:30
-140
+0
-120
-100
-80
-60
-40
-20
d
B
F
S
20 20k50 100 200 500 1k 2k 5k 10k
Hz
Figure 8. FFT Plot (no input)

ASAHI KASEI [AKD4140-B]
< KM079203> 2009/10
- 18 -
[Plot: MONO]
AKM 04/19/06 17:53:32
-100 -10-90 -80 -70 -60 -50 -40 -30 -20
dBr
-90
-40
-85
-80
-75
-70
-65
-60
-55
-50
-45
d
B
F
S
Figure 9. THD+N vs. Input Level (1kHz)
AKM 04/19/06 17:54:23
20 10k50 100 200 500 1k 2k 5k
Hz
-90
-40
-85
-80
-75
-70
-65
-60
-55
-50
-45
d
B
F
S
Figure 10. THD+N vs. Input Frequency (-15dB)

ASAHI KASEI [AKD4140-B]
< KM079203> 2009/10
- 19 -
AKM 04/19/06 17:59:38
-100 +0-90 -80 -70 -60 -50 -40 -30 -20 -10
dBr
-100
+0
-90
-80
-70
-60
-50
-40
-30
-20
-10
d
B
F
S
Figure 11. Linearity (1kHz)
AKM 04/19/06 18:22:16
20 10k50 100 200 500 1k 2k 5k
Hz
-20
-10
-19
-18
-17
-16
-15
-14
-13
-12
-11
d
B
F
S
Figure 12. Frequency Response (-15dB)

ASAHI KASEI [AKD4140-B]
< KM079203> 2009/10
- 20 -
AKM 04/19/06 18:04:41
20 20k50 100 200 500 1k 2k 5k 10k
Hz
-140
+0
-120
-100
-80
-60
-40
-20
d
B
F
S
Figure 13. FFT Plot (-1dB)
AKM 04/19/06 18:04:06
20 20k50 100 200 500 1k 2k 5k 10k
Hz
-140
+0
-120
-100
-80
-60
-40
-20
d
B
F
S
Figure 14. FFT Plot (-60dB)
Table of contents
Other Asahi KASEI Motherboard manuals

Asahi KASEI
Asahi KASEI AKD5538-B User manual

Asahi KASEI
Asahi KASEI AKD4709-A User manual

Asahi KASEI
Asahi KASEI AKM AKD5538-B User manual

Asahi KASEI
Asahi KASEI AKD4382A-SB User manual

Asahi KASEI
Asahi KASEI AK9720 Installation instructions

Asahi KASEI
Asahi KASEI AKD4220-A User manual

Asahi KASEI
Asahi KASEI AKD2300 User manual

Asahi KASEI
Asahi KASEI AK5704 User manual
Popular Motherboard manuals by other brands

Gigabyte
Gigabyte MZ62-HD4 Release notes

Intel
Intel BLKD915PGNL - LGA775 800FSB 4DDR Audio Lan SATA ATX... Technical product specification

Avalue Technology
Avalue Technology EPI-QM87 user manual

ASROCK
ASROCK AM1B-ITX user manual

MaxLinear
MaxLinear MxL7225 user manual

Gigabyte
Gigabyte GA-G41MT-S2PT user manual