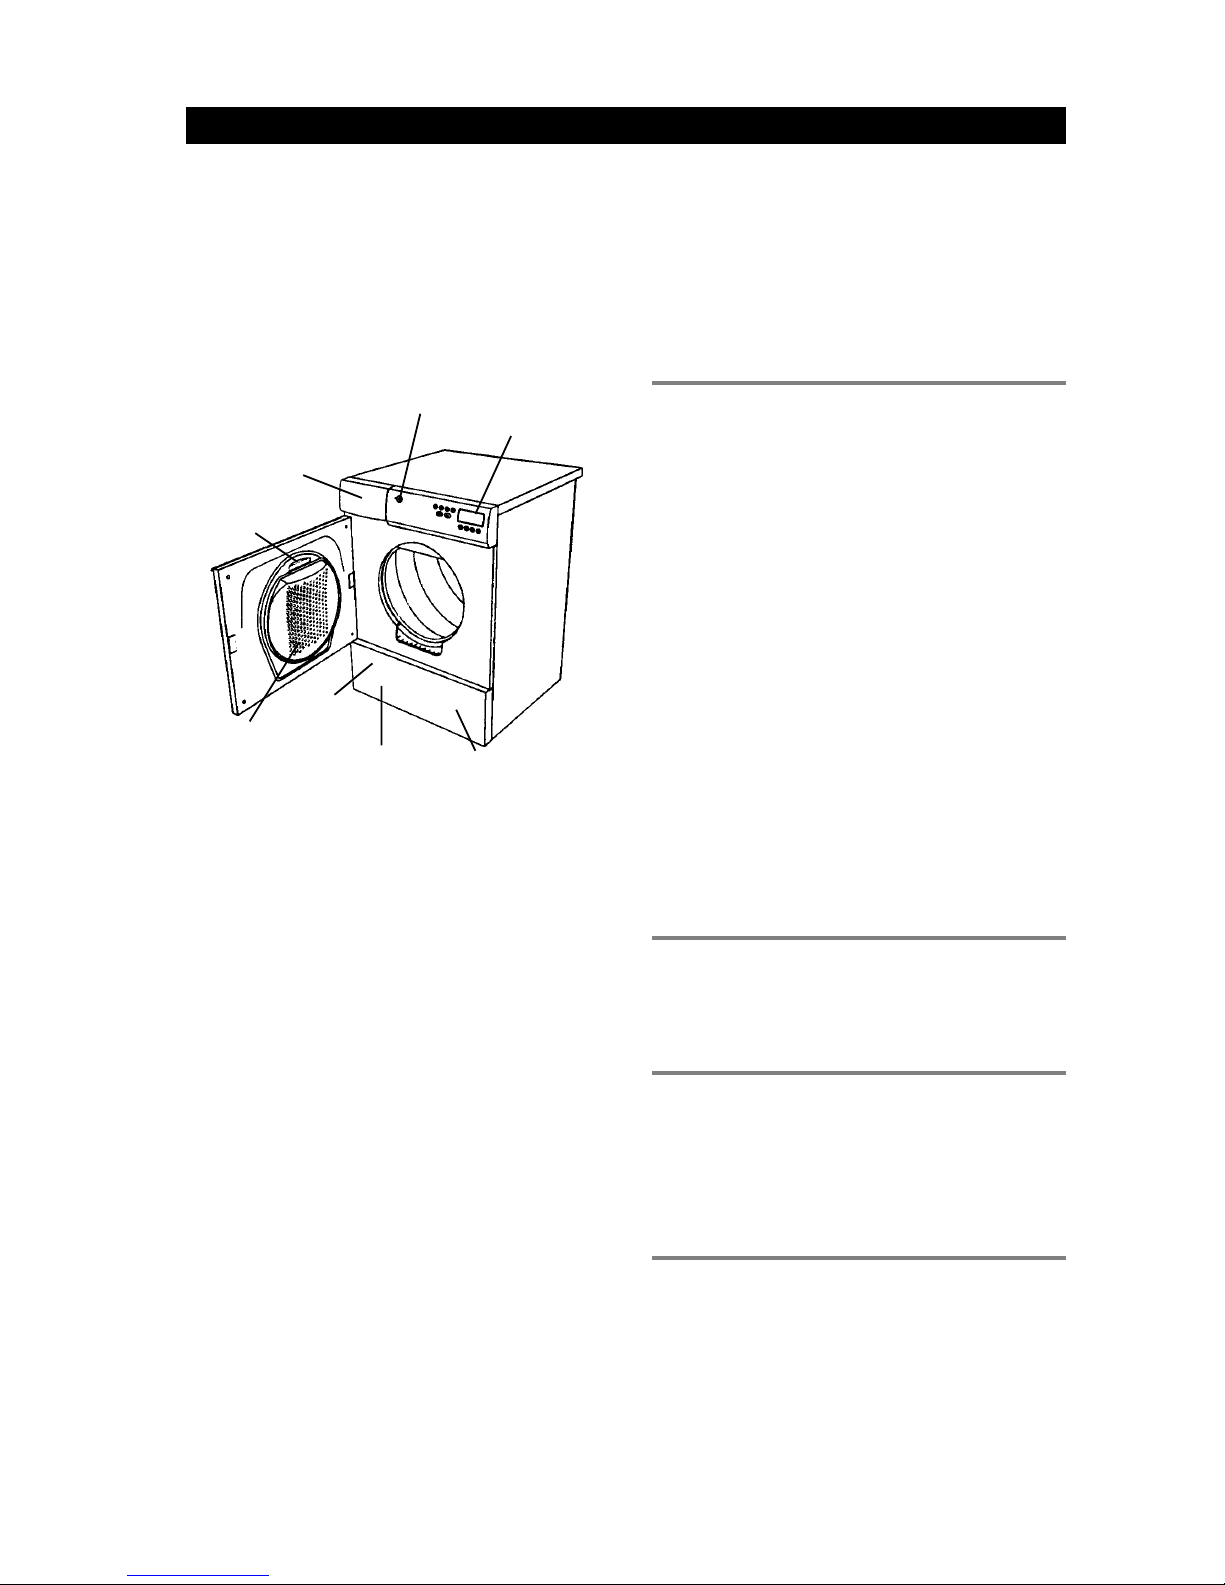
Asko T700 Series User manual

Page 1
ENGLISH
DRYER
USE AND CARE GUIDE
IMPORTANT!
To get the best performance from
your dryer, read all operating
instructions before using it for
the first time.
ASKO
CONTENTS
Important Safety Instructions 2
Safety Features 2
ASKO Dryer Features 3
Care and Maintenance Instructions 4
Overheat Protection
Troubleshooting
Energy Saving Tips
Customizing the Preset Programs T7 0/T780 7
Error Messages T7 0/T780 9
Installation Instructions 10
ASKO Product Warranty 15
Index 1
SAVE THESE INSTRUCTIONS FOR FUTURE REFERENCE
FRANÇAISESPAÑOL

Page 2
To reduce the risk of fire, electric shock, or injury to
persons when using your appliance, follow basic
precautions, including the following:
¨Electrical installation, if required, must be done by
a licensed electrician
¨Read all instructions before using the appliance
¨Do not allow children to play on or in the appliance
Close supervision of children is necessary when
the appliance is used near children
¨Before the appliance is removed from service or
discarded, remove the door to the drying compartment
¨Do not reach into the appliance if the drum is
moving
¨Do not install or store this appliance where it will
be exposed to the weather
¨Do not tamper with controls
¨Do not use fabric softeners or products to eliminate
static unless the manufacturer gives written assurance
that the product will not damage a tumble dryer
¨Do not heat dry items containing:
vinyl, plastic, foam rubber or similarly textured
rubberlike materials
fiberglass
wool unless the label specifies washable
¨Do not heat dry items that have been dry-cleaned
at home
¨Clean the lint filter before or after each load
¨Keep the area around the exhaust opening and
adjacent areas free from the accumulation of lint,
dust, and dirt
¨The interior of the machine and exhaust duct
should be cleaned periodically by an authorized
ASKO service agent
¨Do not attempt to repair or replace any part of the
appliance or perform any servicing unless
specifically recommended in this guide
Magnetic Door Lock
ASKO dryers have a magnetic door lock that allows the
door to be opened from the inside
Automatic Door Switch
A door switch automatically stops the dryer when the
door is opened The dryer will not start again until you
close the door and press the Start button
IMPORTANT SAFETY INSTRUCTIONS
SAFETY FEATURES
NOTE: This manual does not cover every possible
condition and situation that may occur Use
common sense and caution when installing,
operating, and maintaining any appliance
¨The dryer is made and marked to facilitate
recycling When it is no longer useful, contact your
local refuse collection service for advice on how to
properly dispose of the dryer for purposes of
recycling
WARNING!
This appliance must be properly grounded.
Improper connection of the equipment grounding
conductor can result in a risk of electric shock.
Check with a qualified electrician or serviceman
if you are in doubt as to whether the appliance is
properly grounded.
The plug must be plugged into an appliance outlet
that is properly installed and grounded in
accordance with all local codes and ordinances.
To reduce the risk of fire, this appliance must be
exhausted outdoors or the equivalent. Do not
exhaust into a chimney, wall, ceiling or concealed
space in a building.
Do not wash or dry articles that have been
previously cleaned in, washed in, soaked in, or
spotted with gasoline, dry cleaning solvents,
cooking oils, other flammable or explosive
substances as they give off vapors that could
ignite or explode.
WARNING!
Overheat Protection
ASKO dryers have an overheat protection switch that
automatically turns off the machine if the temperature
gets too high Refer to page 6 for more information
Child-Safe Start Feature
You can program Models T760 and T780 not to start
unless the Start button is held down for three seconds
This is to prevent children from inadvertently starting
the machine Refer to page 9 for instructions on how to
program this safety feature

Page 3
ENGLISH
Your new energy-efficient ASKO dryer is designed to
give you maximum drying performance using less
energy To make the most of the dryers functions and
features, we recommend that you read this manual
carefully before using your machine for the first time
For operating instructions specific to your model, refer
to the Quick Start Guide enclosed with this manual
Below is an illustration of the parts and features of your
ASKO dryer
ARE LABEL INSTRU TIONS
Read all permanent care labels carefully If the label
says Drip dry, Line dry or Dry flat, do not dry that item
in the dryer Certain fabrics will melt or become
dangerously flammable if heated, while others may lose
their shape
NOTE: Refer to Important Safety Instructions on the
previous page for a list of specific materials that should
never be put in a tumble dryer
SORTING THE LAUNDRY
For best drying results, clothes should be sorted
properly Below are some suggestions on how to sort
your laundry for drying
¨Permanent press items should be dried together
For the most wrinkle-free results when drying
permanent press items, you should fill the machine
only half full These items also should be removed
promptly from the dryer and hung up or folded right
away
¨Dry heavy fabrics together and lightweight fabrics
together
¨Dry fabrics that shed lint (chenille, terry cloth, etc )
separately from fabrics that collect lint (synthetics,
velveteen, corduroy, etc )
¨Separate non-colorfast fabrics from light-colored
items
¨If the care label says "Wash Separately," the fabric
is likely to lose color (excess dye) for the first few
washings To minimize the possibility of the dye
transferring to white or lighter colored items, dry
new colored garments with items of similar color
or alone Bright reds and oranges on cottons are
the dyes most likely to transfer colors
FABRI SOFTENER SHEETS
We recommend that you do not use fabric softener
sheets in the dryer Over time, the chemicals on these
sheets can build up inside the lint filter and clog the
holes that circulate the air
DRYING PROGRAMS
Refer to the Quick Start Guide that came with your dryer
for specific instructions and programs available with
the model you purchased
Models T760 and T780: Refer to the Customizing
the Preset Programs on page 7 of this guide for
instructions on how to change the preset programs
DRYING TIMES
Drying times will vary due to the amount of laundry in
the machine, moisture content, type of fabric, air
temperature and humidity The length of the vent hose
can also affect drying times (See Connecting to a
Ventilation Duct (T700/T760) on page 11 for the
recommended installation )
ASKO DRYER FEATURES
Condensed Water
Container
(Models T720 & T780)
Control
Panel
Front
Panel
ASKO dryers come with three different drying systems:
Sensidry
Models T760 and T780 have our state-of-the-art
Sensidry system These machines are equipped with
a humidity sensor that ensures different fabrics always
dry thoroughly This sensor turns off the heat when the
laundry has reached the appropriate dryness
Thermostat-Control
Model T700 has a thermostat that controls the
temperature by turning the heating element on and off
to maintain the selected drying temperature (Normal or
Low) within +/- 5° F
Timer-Control
Model T720 offers only timed drying You can set the
dryer to run from 30 minutes to 190 minutes
Model T700 has timer-controlled drying in addition to
the two automatic (thermostat-controlled) programs
When using a timed drying program, be careful not to
leave the clothes in too long Its best to use a shorter
time; then if the load isnt dry, you can set the timer for a
few more minutes
Power
Button
Lint Filter
Condenser Unit
(behind panel)
Lint Filter
Cover Cleanable Fan
(behind panel)

Page 4
Different fabrics require different load sizes and drying
temperatures The table below gives recommended
* Always refer to the care label on the garment to determine if it can be
tumble dried Some wool and silk and hand-washable items should not
be tumble dried These items should be removed from the washer then
pressed out in a terry towel to remove excess water before being hung up
or laid flat to dry
RE OMMENDED TEMPERATURE SETTINGS AND LOAD SIZES
temperature settings and load sizes for different fabrics
Temp Load
Fabric Type Setting Size
Cotton w/out elastic and/or decorative trim Normal Full
Linen white and colorfast Normal Half
Cotton/polyester blends Low Half
Polyester/acrylic blends Low Half
Rayon and acetate Low Half
Washable silk and nylon * Low Third
Washable wool and wool blends * Low Third
Handwash wool and silk * Low Third
CARE AND MAINTENANCE INSTRUCTIONS
LEANING THE LINT FILTER
The wear on fabrics in a tumble dryer is insignificant
The lint caught in the lint filter is dust and fiber residue
that has been formed when the garments have been
worn The lint filter must be cleaned after each load If
this is not done, drying performance will suffer, as
insufficient air will pass through the drum The machine
may also overheat after a while, which will cause it to
stop automatically
To clean the lint filter, follow the steps below:
1 Grasp the handle and pull it
toward you
2 Remove the filter
from the holder
3 Open the filter and
gently brush away
any lint
4 Fold the filter
together and return
it to the holder on
the door
5 Push the holder in
until it snaps into
place
LEANING THE EXHAUST HOSE
About once a year you should remove the exhaust hose
and clean it At this time, you should also clean the
exhaust outlet on the machine and the ventilation duct
Periodically, you should check the dryer exhaust outside
to be sure the air flow is strong and nothing is blocking
the vent
LEANING THE ONTROL PANEL
To clean the control panel, use only a soft, warm, damp
(not wet) rag To prevent penetration of water into the
door lock and electrical components, do not use a spray
cleaner of any kind Also, never use abrasive cleaners
or scouring pads on the outer surfaces because they
will scratch the finish and possibly remove the writing
on the control panels Some paper towels may also
scratch the finish
T720 AND T780 EMPTYING
THE WATER ONTAINER
If the dryer is not installed to pump out the condensed
water into a drain or sink, the condensation water collects
in the water container to the left of the control panel You
should empty the container every three to five dryer
loads, depending on the spin speed you use when you
wash the clothes For example, clothes spun at 800 rpm
will have more moisture when you take them out of the
washer than clothes spun at 1400 rpm Therefore, the
dryer will have to remove more water
1 Pull out the container
2 Pour out the water
3 Replace the container
You should hear it snap
into place
If the container becomes too full, the machine will shut
down To restart the program, empty the container and
press Start It may be a few minutes before the machine
starts because it drains the excess water from the sump
before it restarts
The condensed water is soft and safe to use
for watering plants
NOTE:
NOTE: Do not remove the water container while the
machine is running.

Page 5
ENGLISH
T720 AND T780 - LEANING
THE ONDENSER
The condenser should be cleaned on a regular basis,
preferably monthly If you have pets, you should probably
clean it more often To clean the condenser, follow the
steps below:
1 Turn off the main power to the machine
2 Remove the two 20 torx
screws on the bottom of
the front panel then grasp
the bottom of the panel and
pull it forward and down
3 Turn the levers on the
condenser cover counter-
clockwise to release it then
pull it down
4 Pull out the condenser
5 Spray the fins with warm water
until all of the lint is removed
6 Make sure the side marked
UP does face up and
carefully replace the filter into
the unit
7 Replace the condenser cover and the front panel
8 Turn back on the main power
WARNING!
Do not put the condenser
into a dishwasher. Do not
use any sharp metal ob ects
or a wire brush to clean the
condenser. Also, do not
poke anything between the
fins.
LEANING THE FAN
The fan should be cleaned at least once a year If you
have pets, you should clean it more often To clean the
fan, follow the steps below:
1 Turn off the main power to the machine
2 Remove the two 20 torx
screws on the bottom of
the front panel then grasp
the bottom of the panel and
pull it forward and down
3 Unscrew the 10 torx safety
screw on the bottom of the fan
cover and fold out the four tabs
4 Remove the fan cover
5 Hold the fan in place while
you unscrew the nut
6 Pull out the fan and clean it with
a brush and water
7 Replace the fan and screw
the nut securely
8 Replace the fan cover and fold
the lugs back into place
Replace the safety screw
9 Replace the front panel
10 Turn back on the main power
2
2

Page 6
The machine wont start.
¨Make sure the door is closed securely
¨Make sure the Power is turned on
¨Check that you set the program or time correctly
¨Check that the electric plug is securely in the
socket
¨Check the house breaker/fuses and the fuses on
the back of the dryer
¨If all of the above options are eliminated, the
overheat protection has probably been activated
(See below )
The machine starts but it stops when
I release the power button.
¨The overheating protection has probably activated
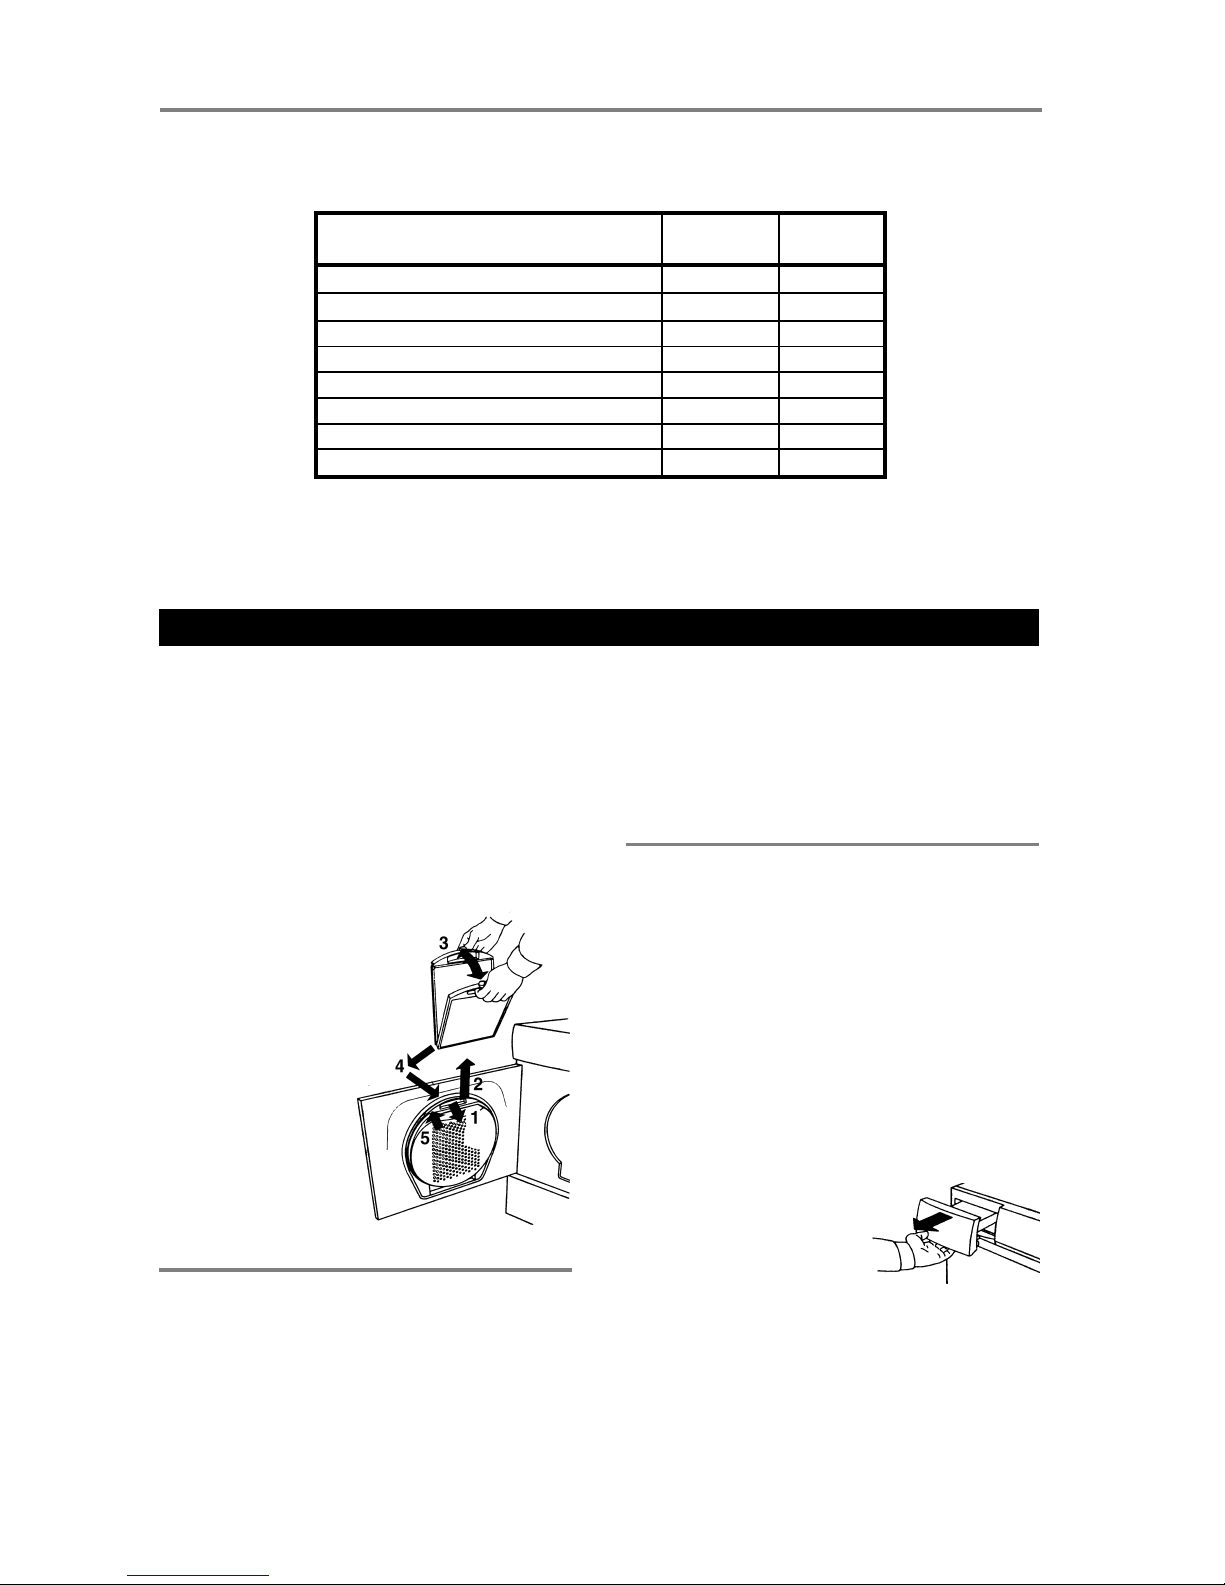
Clean the lint filter and let the machine cool down
before trying again (See below )
The machine takes too long to dry
my laundry.
¨Check that the lint filter is clean
¨If you use dryer sheets (not recommended), you
may need to wash the lint filter with warm water
and a soft brush to clean any blocked holes
¨Be careful not to overload the dryer because the
warm air needs sufficient room to circulate properly
TROUBLESHOOTING
and the clothes need room to tumble freely
¨The laundry should only be damp when it comes
out of the washer If it seems too wet, try using a
faster or longer spin cycle
¨Make sure the outside vent exhaust is not blocked
My clothes are coming out wrinkled.
¨You should remove the clothes as soon as the
dryer signals the end of the cycle If you cant remove
the clothes right away, use the Anti-crease option
¨Dry heavy fabrics together and light fabrics together
¨Dry only permanent press items together
¨Dry in smaller loads
¨Use slower spin speeds
¨Use fabric softener in the rinse program
¨You may be using the wrong wash temperature
Try using a lower wash temperature, especially
for permanent press and delicate items
The motor is running but the drum
isnt turning.
¨This usually means a belt is broken Call a servicer
The machine makes a funny noise.
¨A slight rumbling may be heard when you first turn
on the dryer This is normal and it should only last
a few seconds
¨Dry consecutive loads to avoid reheating the dryer
¨Do not overload the dryer
¨Use the highest spin speeds allowed for the
garments
¨Do not put extremely wet clothes into the dryer
ENERGY SAVING TIPS
If you experience a problem with your dryer, you should
review the following list of frequently encountered
situations It could save you the cost and inconvenience
of a service call
Even though the product is under warranty, if the problem
is not caused by defective product workmanship or
materials, you will be charged for a service call Refer
to page 15 to determine what is and is not covered
under your warranty If youre still not sure, contact the
ASKO Advisory Center before you call a serviceman
¨Dry like fabrics together (i e , heavy fabrics together,
light fabrics together)
¨Clean the lint filter after each load
¨Do not overdry clothes when using the timed program
¨Spin the clothes at no less than 800 rpm
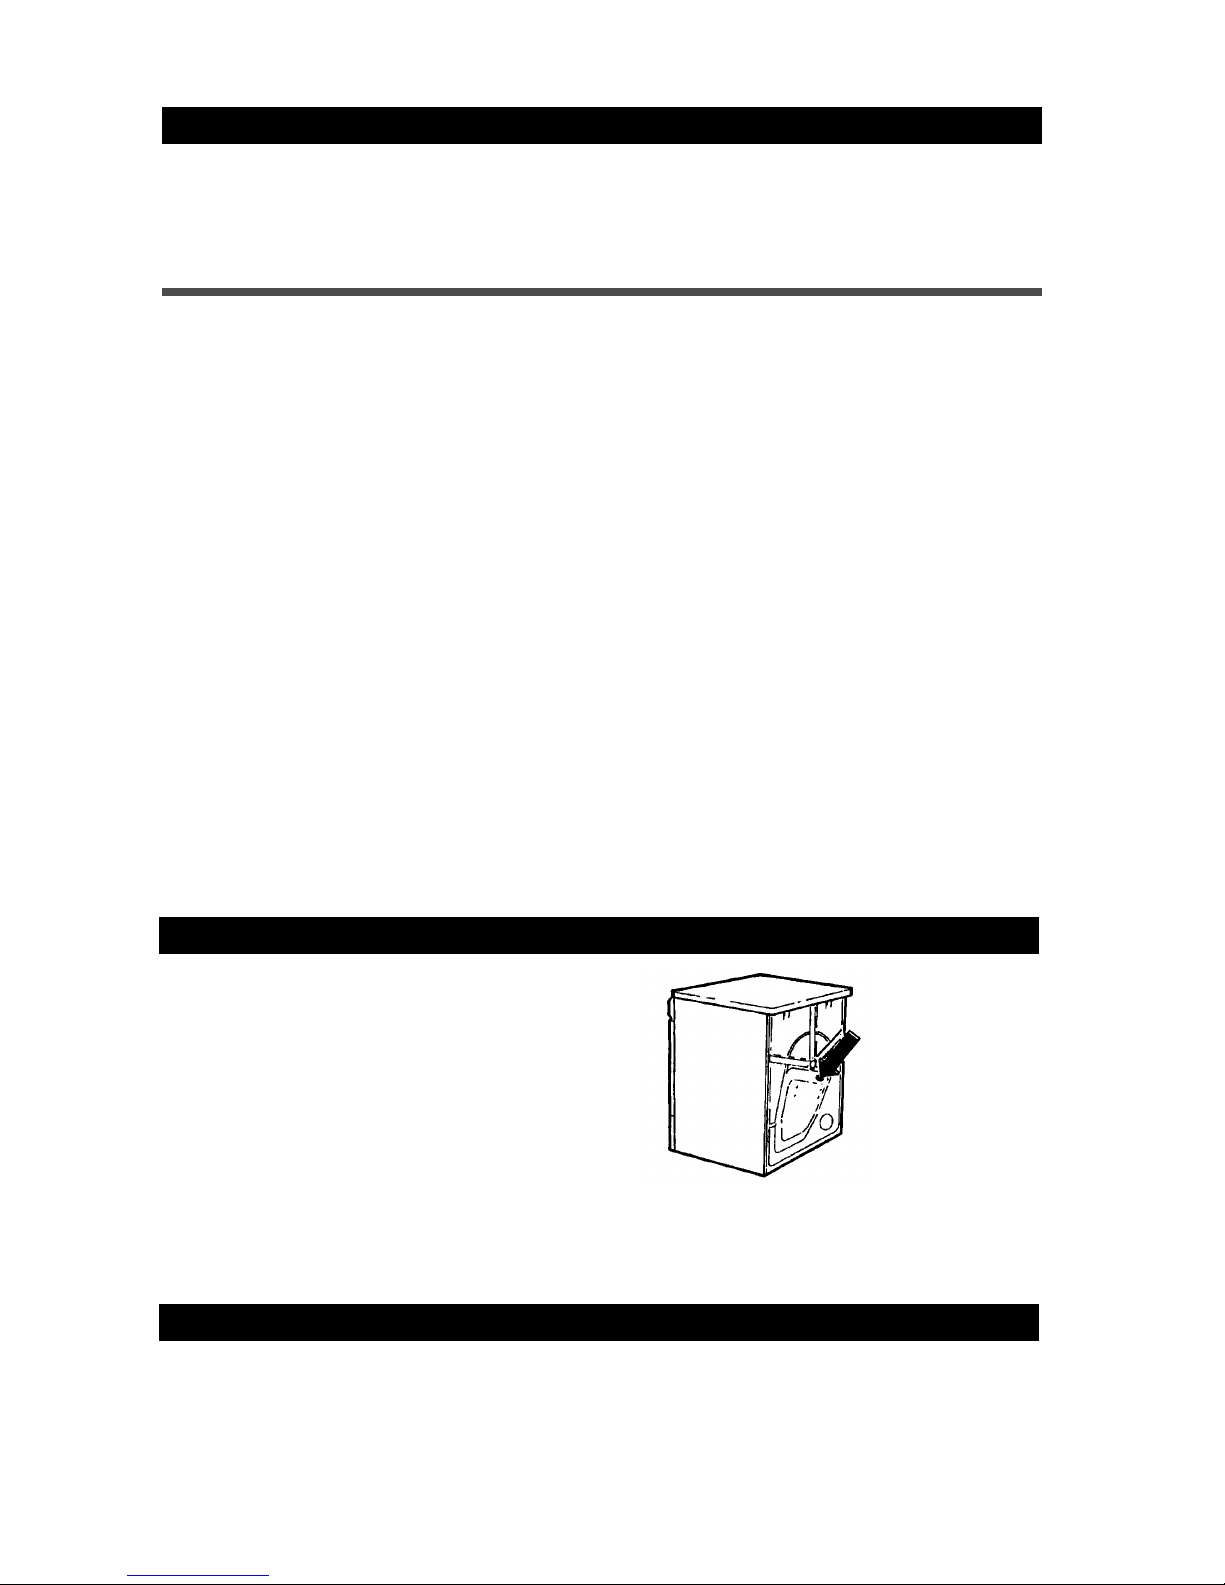
OVERHEAT PROTECTION
ASKO dryers are designed with an overheat protection
switch that automatically turns off the machine if the
temperature is too high This could happen if the lint
filter or exhaust hose becomes clogged with dust
Should the machine turn itself off because of
overheating, make sure the lint filter and exhaust hose
and vent duct are clean
If the overheat protection switch is activated, you have
to reset it before the machine will run To do this, press
the reset button (rubber disk) on the back of the
machine, as illustrated to the right You should hear a
click when it engages The machine will not start until it
has cooled sufficiently
If your dryer overheats frequently, it may not be
vented properly or the room in which it is located
may not have sufficient air circulation Contact
an installer to have these issues checked out
NOTE:
Press the reset
button to start the
machine.

Page 7
ENGLISH
T760/T780 CUSTOMIZING THE PRESET PROGRAMS
Before we tell you how to customize the preset programs,
you need to review what these programs are The table
below lists the four preset programs and the pre-
THE PRESET PROGRAMS P1 P2 P3 P4
ASKOs EasyControl panel makes it simple to
customize the preset programs to perfectly fit your
laundry needs You neednt worry about making an error
because you can easily restore the original program
settings (See page 9 )
1. Press the button for the preset program
you want to change (P1P4). The program
you select will display in the lower left
corner of the LED window.
2. Press MENU to display different program
and option settings.
3. Press the Arrows to move forward or
backward through the menu settings.
4. Press ENTER to choose your selection.
The following table lists all of the programs on the
Program menu as well as the settings and options
available with each Its a good idea to scan through the
THE PROGRAM MENU
menus a couple of times and familiarize yourself with
the options before you make any changes And
remember, its easy to restore the preset programs
USTOMIZING THE PROGRAMS
Below are the basic instructions for changing a preset program The following page explains the menus and options
and how to navigate through them
programmed settings for each To select a program, simply
press one of the program buttons then press Start
(1) The Normal cooling time is 20 minutes
(2) Model T760 is preset for Low dry temperature
NOTES:
WARNING! Some fabrics may not be able to withstand extremely hot temperatures. Please refer
to the Recommended Temperature Settings and Load Sizes chart on page 4.
Preset Dry Cooling Anti
Program Dry Cycle Temp Time Buzzer Crease
P1 Extra Dry Normal Normal (1) On 1 hr
P2 Dry Normal Normal On 1 hr
P3 Normal Dry Normal Normal On 1 hr
P4 Iron Dry Normal (2) Normal On 1 hr
Programs Available Options
Extra Dry Normal Cooling (20 min ) or Quick Cooling (10 min ); Buzzer On/Off;
03 hr Anti-crease; Normal or Low Temperature, 112 hr Delay Start
Dry Normal Cooling (20 min ) or Quick Cooling (10 min ); Buzzer On/Off;
03 hr Anti-crease; Normal or Low Temperature, 112 hr Delay Start
Normal Dry Normal Cooling (20 min ) or Quick Cooling (10 min ); Buzzer On/Off;
03 hr Anti-crease; Normal or Low Temperature, 112 hr Delay Start
Iron Dry Normal Cooling (20 min ) or Quick Cooling (10 min ); Buzzer On/Off;
03 hr Anti-crease; Normal or Low Temperature, 112 hr Delay Start
Air Fluff 590 min cycle time; Buzzer On/Off; 03 hr Anti-crease, 112 hr Delay Start
Timed Dry All drying programs; 590 min cycle time; Normal Cooling (20 min ) or
Quick Cooling (10 min ); Buzzer On/Off; 03 hr Anti-crease; Normal or
Low Temperature; 112 hr Delay Start
Start Stop
P1 P2 P3 P4
Menu Enter

Page 8
The Temperature Menu
This menu lets you set the dry temperature Only the
temperatures available for the dry program you selected
will display
Menu Enter
Select
temperature
T emper at ur e l ow
< Next >
P1
1 Use the Arrow buttons to toggle between the
Normal and Low temperature settings
2 When the setting you prefer displays, press ENTER
The LED will display the new temperature setting
Press MENU to advance to the next menu or press
START to begin the program
The Options Menu
This menu lets you set several options (such as, turning
the buzzer off and on, setting the anti-crease run time,
etc ) Only the options available with the program you
selected will display (See The Program Menu on page
7 )
Menu Enter
Select
options
Normal Cooling
< Next >
P1
1 On this menu, you press ENTER to advance through
the options, rather than pressing MENU
2 Press an Arrow button to toggle between Off and On
3 When your preference displays, press ENTER The
LED will display the new options
Press MENU to advance to the next menu or press
START to begin the program
NAVIGATING THE MENUS
The following paragraphs explain how to navigate
through the menus and change the preset programs
If you dont want to make changes in all of the menus,
continue to press MENU until the one you do want to
change displays
To restore a preset program to its original settings, simply
press the button for the preset program (P1P4) you
want to restore and hold it down while you press ENTER
The program will instantly revert to its original settings
We recommend that you make two or three trial changes
to understand how easy it is to customize these
program
Remember, the first step to customizing a preset
program is to press the button for the program you
want to customize (P1P4).
The Program Menu
The Program menu lets you set the dry program you
prefer You would also use this menu to set the machine
for a Timed Dry or Air Fluff program (See Timed Dry
and Air Fluff on this page )
Menu Enter
Select
Program
Extra dry
< Next >
P1
1 Use the Arrow buttons to move through the program
choices (Extra Dry, Dry, Normal Dry, etc )
2 When your preference displays, press ENTER The
LED will display the new program setting
Press MENU to advance to the next menu or press
START to begin the program
Timed Dry and Air Fluff
When you select Timed Dry or Air Fluff on the program
menu, the word Time and a number (of minutes) will
flash in the upper right corner of the LED window This
indicates you must select a program time (5 to 90
minutes)
Menu Enter
Select
time
< Next >
P1
Time
60
1 To change the number, simply press an Arrow button
until the length of time you want the program to run
displays
2 Press ENTER to program your change
Press MENU to advance to the next menu or press
START to begin the program When you press START,
the time remaining for the program to run displays in
the bottom right-hand corner of the LED window, as
illustrated below:
Menu Enter
Air fluff progr.
Ant i -Crease1h
Ai r fl uf f
30
Time
60
NOTE: The remaining time toggles between the
minutes remaining (e g , 23) and the hour(s)
remaining (e g , 1h)

Page 9
ENGLISH
HANGING THE LANGUAGE
ON THE LED DISPLAY
There are eleven languages available for the LED
window:
To change the language, follow the steps below:
1 Turn the machine off then on again
2 Press ENTER five times in succession then press
P1 five times (This must be done within 15 seconds )
3 When the Language menu displays, press an Arrow
button to advance through the menu to the desired
language
4 Once the correct language displays, press ENTER
to program the LED window to display the language
you selected
HILD-SAFE START
As a safety measure, you can program the T760 and
T780 not to start unless the Start button is held down
for three seconds To do this, follow the steps below:
1 Turn the machine off then on
2 Press ENTER five times, then press P3 five times
(This must be done within 15 seconds )
3 Delayed start displays with 0 flashing in the lower
right corner Press the right Arrow button to toggle
the display to 3
Child-Safe Menu Button
Please note that when you set the child-safe Start button,
the Menu button is automatically programmed to delay
for three seconds before it becomes active This
prevents a child from accidentally changing the program
settings
When you want to change a program, press the Menu
button for three seconds to activate the menus The
Menu button will work normally (without the 3-second
delay) until you have completed your changes If it is not
pressed for two minutes, it will automatically revert back
to the child-safe mode
¨English
¨French
¨Spanish
¨Portuguese
¨Italian
¨German
¨Swedish
¨Danish
¨Norwegian
¨Netherlands
¨Finnish
The Delayed Start Program
This program lets you delay starting the dryer for up to
12 hours This feature is useful in areas where utility
companies offer discount rates during certain hours
When you select Delayed Start on the program menu,
you must select a delay time (1 to 12 hours)
Menu Enter
Select time
for delayed start
< Next >
P1 0
1 In the bottom right corner of the LED window, a
clockface and a zero will flash To change the zero,
simply press an Arrow button until the number of
hours you want to delay starting the program displays
(112 hours)
2 Press ENTER to program your change
Press MENU to advance to the next menu or press
START to begin the program When you press START,
the clockface and the hours you set for the delay will
display, as illustrated below:
Menu Enter
Extra dry
Ant i -Crease1h
T emper at ur e nor mal
P1 9
RESTORING A PRESET
PROGRAM
To restore a preset program to its original settings,
simply press the button for the preset program you want
to restore and hold it down while your press ENTER
The program will revert to its original settings
ERROR MESSAGES T760/T780
Error messages will display in the LED window if a
fault occurs while a program is in progress The table
below defines each possible error message If the
message still displays after you have checked the
possible solutions, call a service technician
ERROR MESSAGE SOLUTION
Three hours
Overflow (T780)
Sensor
Thermistor
Make sure both fuses are intact
Clean the lint filter
Make sure exhaust hose is clear (T760)
Clear message by turning the power off then on
Make sure the condensed water container is empty If draining into a drain pipe,
make sure the black rubber hose is not kinked or blocked The drain should not be
higher than 40 inches from the floor
Make sure the condensation pump is not blocked
This can appear if there are dry clothes in the drum when the unit is started Cancel
the error message by opening the door or turning the power off then on
Call a service technician

Page 10
Height 33-1/234-1/2 (850876 mm)
Width 23-7/16 (595 mm)
Plus exhaust hose connection
Depth T760/T780: 23-7/16" (595 mm)
T700/T720: 24-7/16 (620 mm)
Weight 86 lbs (39 kg)
Drum material Stainless Steel
Read these instructions carefully and completely before
you install the machine The installation should be
carried out by a qualified person who is familiar with all
local codes and ordinances for electrical and plumbing
connections
The exhaust hose can be connected at the rear or on
either side of the dryer When the machine is delivered,
the exhaust outlet at the rear is open
SPE IFI ATIONS
ONNE TING AIR EXHAUST (T700 AND T760)
INSTALLATION INSTRUCTIONS
NOTE:
Outer casing Stove-enamelled hot-dipped
galvanized steel
Power requirement 2800 watts
For connection Single-phase, 230 V, 30 Amp
Internal fuse 15 amp
Heating element 2500 watts
Cosmetic damage must be reported to your
dealer within five days from the date of
purchase After unpacking the dryer, thoroughly
check the unit for cosmetic damage
WARNING!
To reduce the risk of fire, this appliance must be
exhausted OUTDOORS or the equivalent.
The dryer is shipped with a stub pipe already installed
on the rear exhaust outlet The consumer or installer
must purchase a UL-CSA-approved exhaust hose
Rear Outlet Hose Connection
To connect the exhaust hose to the rear outlet, follow
the steps below:
1 Push the hose onto the stub pipe and secure it with
a clamp
2 With the hose attached, insert the stub pipe into the
hole It should snap into place
The exhaust hose
can be connected at
the rear or on either
side of the dryer.
Side Exhaust Outlet
Rear Exhaust Outlet
Stub Clamp Hose
(not supplied)
Connecting the Vent Hose to the
Left or Right Side Outlet
To connect the exhaust hose to the left or right side
outlet, follow the steps below:
1 Using a flathead screw-
driver, turn the exhaust
outlet cover to align the tabs
holding the cover in place
Remove the cover
2 Remove the stub pipe from
the rear exhaust outlet
3 Place the stub pipe in the
outlet you plan to use
4 Follow the instructions for the rear outlet hose
connection
5 Use the exhaust outlet cover you removed from the
side to cover the rear exhaust outlet
ONDENSATION DRAIN ONNE TION (T720 AND T780)
If possible, you should install the dryer so the
condensed water will continuously flow into a drain or
sink To do this, follow the instructions below:
1 Disconnect the short hose (1) from the blue
connection (Its okay to let the hose hang down )
2 Connect the rubber hose supplied with the dryer to
the blue nipple (2)
3 Run the hose to a drain or sink, as illustrated
Back of dryer
NOTE: The drain hose must not be more
than 40 above the floor.
NOTE: After you push the dryer into place, check for
kinks in the hose. (Be careful not to use too
much hose.)
Never cover the end of the dryer stub or vent hose
with anything to catch lint, except for UL approved
vent basket.
Vent
T-Tube

Page 11
ENGLISH
1 Connect the exhaust hose to a ventilation exhaust
fitting or to a discharge through the wall
2 Secure the hose joint to the outlet stub on the
machine
3 Run the hose with as few bends as possible to the
point of discharge If necessary, it can be extended
to a maximum of 22 feet (660 cm) of 4 (10 cm)
diameter ridged pipe
Make any bends as gentle as possible A maximum of
four 90° bends may be fitted in the hose The more
bends and the longer the hose, the less air will circulate
through the machine, which will impede drying
performance Subtract 4 feet (120 cm) for every 90°
elbow
ONNE TING TO A VENTILATION DU T (T700/T760)
WARNING!
This appliance should not be exhausted into a
chimney, a wall, a ceiling, or a concealed space of a
building. Only a metal ventilation grill should be used.
Subtract 4 feet
(120 cm) for
every 90° elbow.
Ventilation grill
FREESTANDING INSTALLATION
The dryer can be placed next to the washing machine
It is essential that the machine is leveled and the
locknuts are tight to eliminate vibration
There should be at least 1/2 (12 5 mm) of space
between the washer and dryer
MODELS T700/T760
These models can be installed beneath a cabinet or
worktop with a minimum height of 34 (864 mm) There
must be a gap of about 1/4 ( 64 mm) all around the
machine, including between the rear edge of the
machine top panel and the back wall The opening width
must be at least 24 (600 mm)
Space must also be available for the exhaust hose on
the left, right or rear of the machine See the diagram for
hole sizes and positions Note that the hole
measurements are to the center of the hole
BUILT-IN INSTALLATION
NOTE: The height adjustment for the dryer is
33-1/2 to 34-1/2 (850 mm to 876 mm)
Do not raise it higher than 34-1/2
NOTE: All hole measurements are
to the center of the holes.
NOTE:
MODELS T720/T780
The condensing models work best when they have
good air circulation Therefore, we dont recommend
that they be installed beneath a cabinet If it is necessary,
however, be sure to leave a gap of at least 1/2 on all
sides
Installation Examples
If more than 22 feet of hose is needed, the diameter
must be increased to 6 or 8 (152 mm or 203 mm)
Vent spacer
If the hose is taken to a wall outlet, a ventilation grill
should be fitted to prevent reverse flow of cold air Fit the
ventilation grill to the outside or inside of the wall
Make sure nothing is
blocking the ventilation grill.
If there is only one vent duct from the room, a vent spacer
must be fitted
NOTE: When installing in warm climates (77°F and
above) with high humidity levels, do not
route the air exhaust hose upwards.

Page 12
Connecting a Four-wire Power Cord
Connecting a Three-wire Power Cord
ELE TRI AL ONNE TIONS
The power supply cord must be grounded If the
machine is to be used in a wet area, the supply must
be protected by a residual current device
CAUTION:
The receptacle on the rear of the machine is designed
to accommodate ASKO washers ONLY (rated 208
240 V ) To use this receptacle, you must use the ready-
fitted plug supplied with the washing machine or an
equivalent The supply connection must be 208240 V,
20 A
ASKO washers rated 208240 V have two internal
fuses of 15 A each
Remove cover to
access terminal box.
(Requires a 20-Torx
screwdriver.)
WARNING! Before starting this procedure, be sure
the power is turned off at the breaker/fuse box.
WARNING! Before starting this procedure, be sure
the power is turned off at the breaker/fuse box.
1 Turn the power off at the breaker/fuse box
2 Remove terminal block cover
3 Use the strain relief attached below the terminal
block opening
4 Loosen or remove center terminal block screw
5 Connect neutral wire
(white ) of power
supply cord to the
center, silver-colored
terminal screw
Tighten screw
6 Connect the other
wires to outer screws
7 Tighten the strain
relief screws
8 Replace terminal box
cover on back of dryer
9 Plug dryer into wall
receptacle
10 Turn power on at
breaker/fuse box
Power Supply Cord
You will need a three-wire power supply cord with three
No 10 copper wires and a matching three-wire
receptacle of NEMA Type 10-30R, as illustrated below:
1 Turn the power off at the breaker/fuse box
2 Remove terminal block cover
3 Use the strain relief attached below the terminal
block opening
4 Remove center terminal block screw
5 Remove ground wire
(green with yellow stripes)
from external ground
connector screw Fasten
under center, silver-
colored terminal block
screw
6 Connect ground wire
(green) of cord to external
ground conductor screw
7 Connect neutral wire (white)
of cord under center screw
of terminal block
8 Connect the other wires
to outer screws
9 Tighten the strain relief screws
10 Replace terminal box cover on back of dryer
11 Plug dryer into wall receptacle
12 Turn power on at breaker/fuse box
Spade terminals
with upturned
ends
FOUR-WIRE CORD
Neutral
Ground
prong
Ring
terminals
Neutral
(white)
Ground
(green)
3/4 UL-listed
strain relief
Power Supply Cord
You will need a four-wire power supply cord with four
No 10 copper wires and a matching four-wire
receptacle of NEMA Type 14-30R, as illustrated below
The fourth wire must be identified with a green cover
and the neutral conductor by a white cover
NOTE: In Canada, the dryer is delivered ready-fitted with
a four-prong plug intended for connection to a single-
phase supply
Connection to a permanently wired supply point must
be made only by a qualified electrician
As supplied: Single-phase, 230 V, 60 Hz,
2500 Watt heater rating
30 A fuse required
THREE-WIRE CORD Spade terminals
with upturned
ends
Ring
terminals
This blade connects
to this conductor.
Neutral
3/4 UL-listed
strain relief
Neutral
(white)
4
5
7
6
8
5
7
6
9
4

Page 13
ENGLISH
STA KED INSTALLATION
ASKO dryers can be mounted on top of any matching
ASKO washer Mounts are supplied with the machine
Two metal brackets for
securing the dryer to
the washer Two plastic cups to
secure the dryer legs.
To install the dryer on top of the washer, follow the steps
below:
1 Remove the two outside screws (20 torx) from the
back of the washer and use them to secure the metal
brackets, as illustrated
2 To ensure the dryer is correctly positioned on top of
the washer, align the plastic cups with the front top
edge of the washer
3 Remove the protective
paper from the self-
adhesive surface
beneath the cups Being
careful not to press the
adhesive surface against
the top of the washing
machine, use the tabs to
position the cups (as illustrated) then press them
firmly into place
4 Once the cups are in place, break off the remaining
plastic tabs
5 Lift the dryer into
position Raising the
front edge, push the
dryer backwards until it
engages with the
brackets on the back of
the washer
To position the plastic cups, break off the left tab (A)
on the cup to be placed on the right side of the washer
and break off the right tab (B) on the cup to be placed
on the left side of the washer
Washer
back
Tumble dryer
Washer
Metal brackets
6 Carefully lower the front
of the dryer, making sure
the feet fit into the plastic
cups
Stacked Installation
WARNING!
Never stack a washer on top of a dryer!
Total height 67.
Ad ustable to 69.
Plastic cups

Page 14
The door hinges on ASKO dryers are reversible The
dryers are shipped left-hinged To reverse them, follow
the steps below:
REVERSING THE DOOR HINGES
WARNING! Switch off the main power supply
before you start this procedure.
3 Supporting the door from the bottom,
pull it out and to the left as you turn
the hinge counter clockwise
4 Remove the top hinge pin
then turn the hinge
upside down and put the
hinge pin into the top
hole
5 Repeat steps 14 for the bottom hinge
6 Loosen the two screws on both sides of the door
so you can remove the magnetic door latch and the
cover plate
12 Remove the screw in the top right
corner of the front panel, as
indicated in the illustration (If you
have a condenser dryer, you will
need to open the condenser
container door )
8 Remove the cover
plate by pushing it
down then lifting it out
from the top
7 Remove the door
latch by pushing it up
then lifting it out from
the bottom
9 Reverse steps 6 and 7 to place the door latch and
cover plate into their new positions
10 Tighten the screws on the sides of the doors to
hold the latch and cover plate in place
13 Now you are ready to mount the door on the right
side Holding the door at an angle (as illustrated),
fit the hinge pin into the top hole
11 Using a flathead screwdriver,
remove the plastic plugs in the
upper and lower edge of the door
and place them in the empty
holes on the opposite side
14 Tighten the screws in the order
illustrated at right (a, b, c)
15 Replace the screw you removed
in step 12 (d)
16 Close the condenser container door and replace
the front panel
17 Turn back on the main power
1 Remove the two 20 torx
screws on the bottom of
the front panel then
grasp the bottom of the
panel and pull it forward
and down
2 Remove the three
screws holding the
hinge
2

Page 15
ENGLISH
ASKO PRODUCT WARRANTY
MODELS T700, T720, T760, T780
FOR RESIDENTIAL INSTALLATIONS ONLY
ASKO WILL NOT PAY FOR:
A Service calls to:
1 Correct the installation of the appliance
2 Repair damage due to shipment, delivery, installation, misuse or abuse
3 Instruct how to use the appliance
4 Replace house fuses or correct house wiring
5 Correct house plumbing, including drain problems related to improper installation
6 Clean or service air device in drain line
B Repair and/or replacement parts for failure of product if appliance is used for other than home/residential use
C Damage resulting from accident, fire, floods, acts of God, alteration, misuse, abuse, improper installation, or
installation not in accordance with local electrical or plumbing codes
D Any shipping costs for parts during the limited warranty period
E Replacement parts or repair labor costs for units operated outside the Continental United States
F Pickup and delivery ASKO washers are designed to be repaired in the home
Some states will not allow the exclusion or limitation of incidental or consequential damages, so this exclusion or
limitation may not apply to you This warranty gives you specific legal rights and you may also have other rights which
vary from state to state
For warranty service, contact the dealer from whom you purchased the unit or an authorized ASKO service agent
Service will be provided during normal business hours Should you have a service problem that can not be resolved
locally, write:
ASKO USA Inc
P O Box 851805
Richardson, Texas 75085-1805
or call our
Customer Service Center at
800-898-1879 or 972-238-0794
IN NO EVENT SHALL ASKO USA INC. BE RESPONSIBLE
FOR ANY INCIDENTAL OR CONSEQUENTIAL DAMAGES.
Three-Year Full Warranty
From date of purchase
ASKO WILL PAY FOR:LENGTH OF WARRANTY
Fourth & Fifth Year Limited Warranty
Three year full plus fourth and fifth year limited
from date of purchase
Lifetime Warranty
ASKO replacement parts for any defective solid-state
controls, timers, motors, or pumps
ASKO will replace the stainless steel inner or outer
drum if it rusts or fails to hold water
ASKO replacement parts and/or repair labor to correct
defect in materials or workmanship Service must be
provided by an authorized ASKO service agent
Be sure to complete the Warranty Registration Card you received with your appliance and mail it to ASKO to
validate your appliance warranty.

Page 16
A
Advisory Center phone number 15
Air exhaust, connecting 10
Air fluff, programming 8
Automatic door switch 2
B
uilt-in installation 11
Care and cleaning 4
Care label instructions 3
Changing the LED readouts 9
Child-safe start (T760/T780) 2, 9
Child-safe temperature knob 2
Condensation container, emptying 4
Condensation drain connection 10
Condenser, cleaning 5
Control panel, cleaning 4
Cosmetic damage 10
Customizing the preset programs 7
D
Delayed start, programming 9
Door, cleaning 4
Door hinges, reversing 14
Door switch 2
Dryer features 3
Drying problems 3, 6
Drying times 3
E
Electrical connections 12
Error messages (T760/T780) 9
Exhaust hose, cleaning 4
F
Fabric softener sheets 3
Fabric types 4
Fan, cleaning 5
Freestanding installation 11
H
Hazardous materials 2
I
Installation instructions 1014
L
Languages, changing the LED 9
Lint filter 4
Load sizes, recommended 4
M
Maintenance instructions 4
Magnetic door lock 2
Menus, programming 8
O
Options menu 8
Overflow error message 9
Overheat protection 2, 6
P
Power cord connection 12
Preset programs 7
restoring 9
Problems, solving 6
Program menu 7, 8
Program options 7
R
Restoring a preset program 9
S
Safety features 2
Safety instructions 2
Sensidry 3
Sensor error message 9
Service 15
Solutions to problems 6
Sorting the laundry 3
Specifications 10
T
Temperature menu 8
Temperature settings 4
Thermostat Control 3
Thermistor error message 9
Three hours error message 9
Timed dry, programming 8
Timer control 3
Troubleshooting 6
V
Ventilation duct connection 11
W
Warranty information 15
Wash programs 7
Water container, emptying 4
INDEX

Page 1
FRANÇAIS
MANUEL DUTILISATION ET
DENTRETIEN DE LA SÉCHEUSE
IMPORTANT!
Pour obtenir les meilleurs
résultats de votre sécheuse,
veuillez lire toutes les
instructions de fonctionnement
avant de lutiliser our la
remière fois.
ASKO
TABLE DES MATIÈRES
Conseils importants de sécurité 2
Dispositifs de sécurité 2
Caractéristiques de la sécheuse ASKO 3
Instructions dentretien et nettoyage
Protection contre la surchauffe 6
Dépistage 6
Conseils déconomie dénergie 6
Adaptation des programmes préétablis T760/T780 7
Messages derreurT760/T780 9
Instructions dinstallation 10
Garantie ASKO 15
Index 16
CONSERVEZ CES INSTRUCTIONS POUR RÉFÉRENCE FUTURE

Page 2
Pour réduire tout risque de feu, de choc électrique ou
de blessure lors de lutilisation de votre sécheuse,
suivez les précautions de base, y compris les suivantes:
¨Linstallation électrique doit tre faite par un
électricien diplômé.
¨Lisez toutes les instructions avant dutiliser la
sécheuse.
¨Ne permettez pas aux enfants de jouer dans ou
sur lappareil. Ne laissez jamais des enfants sans
surveillance près de la machine quand celle-ci
est en marche.
¨Avant de vous débarrasser de la machine ou de la
mettre hors-service, enlevez les portes des
compartiments de séchage.
¨Ne mettez pas la main dans le tambour de la
machine si celui-ci est en mouvement.
¨Ninstallez pas cet appareil dans un endroit où il
pourrait tre exposé aux conditions climatiques.
¨Ne modifiez pas les commandes de la machine.
¨Nemployez pas dassouplissant ou de produits
pour éliminer lélectricité statique, à moins que le
fabricant ne vous donne une garantie par écrit que
le produit nendommagera pas la sécheuse.
¨Ne soumettez pas à la chaleur des articles
contenant:
vinyle, plastique, mousse caoutchoutée ou
matériel de m me texture
fibre de verre
laine, à moins que létiquette du v tement
spécifie lavable
¨Ne faites pas sécher à la chaleur des articles qui
ont été nettoyés à sec.
¨Nettoyez le filtre à charpie avant ou après chaque
séchage. Le service doit tre effectué par une
agence de service autorisée ASKO.
¨Gardez lendroit autour de louverture dévacuation
libre de toute accumulation de poussière, charpie,
saletés.
¨Nettoyez régulièrement lintérieur de la machine
et le conduit déchappement.
¨Ne réparez ni ne remplacez aucune pièce de
Verrou de porte magnétique
Les sécheuses ASKO ont un verrou de porte
magnétique qui permet douvrir la porte de lintérieur.
Interrupteur de porte automatique
Un interrupteur installé dans la porte arr te
automatiquement la sécheuses dès quon ouvre la
porte. La sécheuse ne repartira pas avant que vous
ayez fermé la porte et appuyé sur le bouton de mise en
marche Start.
Protection contre la surchauffe
Les sécheuses ASKO sont munies dun interrupteur
de protection contre la surchauffe qui éteint
automatiquement la machine si la température devient
trop élevée. Référez-vous à la page 4 pour plus
dinformations.
CONSEILS DE SÉCURITÉ IMPORTANTS
DISPOSITIFS DE SÉCURITÉ
NOTE: Ce manuel ne couvre pas tous les cas et
situations qui pourraient survenir. Soyez
prudent et faites preuve de bon sens lors de
linstallation, la mise en marche et lentretien
de tout appareil ménager.
lappareil à moins que ce ne soit spécifiquement
mentionné dans les instructions destinées à
lutilisateur.
¨La sécheuse a été conçue pour tre recyclée. Si
vous devez la changer, appelez votre service
municipal de collecte des appareils ménagers et
demandez comment vous pouvez recycler votre
machine.
Dispositif de sécurité installé sur
le bouton de mise en marche
Vous pouvez programmer les Modèles T760 et T780
afin quils ne se mettent pas en marche à moins que le
bouton Start ne soit maintenu enfoncé pendant trois
secondes. Cela permet demp cher que les enfants
fassent partir la machine par accident. Référez-vous à
la page 9 pour savoir comment programmer de
dispositif de sécurité.
Ne lavez ni ne séchez aucun article qui ait été
précédemment trempé, lavé ou nettoyé à laide
dessence, de produits de nettoyage à sec ou
dautres substances inflammables ou explosives,
car celles-ci dégagent des vapeurs qui pourraient
prendre feu ou exploser.
MISE EN GARDE!
MISE EN GARDE!
ette sécheuse doit être mise à la terre. Le
branchement incorrect de léquipement de mise à
la terre peut résulter en un choc électrique. Si
vous avez le moindre doute, faites vérifier par un
électricien qualifié que lappareil est bien mis à la
terre.
La prise doit être branchée dans un réceptacle
correctement installé et mis à terre selon les codes
et règlements locaux en vigueur.
Afin de réduire tout risque de feu, lair de la
sécheuse doit être évacué à lextérieur. Ne placez
pas le conduit dévacuation dans une cheminée,
un mur, le plafond ou autre espace fermé dun
édifice.

Page 3
FRANÇAIS
Votre nouvelle sécheuse ASKO est conçue pour vous
donner un excellent séchage tout en utilisant moins
dénergie. Afin de profiter pleinement des fonctions et
caractéristiques de votre sécheuse, nous vous
recommandons de lire attentivement ce manuel avant
de mettre la sécheuse en marche pour la première
fois. Pour les instructions de fonctionnement, référez-
vous au Guide rapide de mise en marche ci-joint.
Ci-dessous, voici une illustration des pièces et
caractéristiques de votre sécheuse ASKO:
INSTRUCTIONS SUR LES
ÉTIQUETTES DE VÊTEMENTS
La plupart des v tements ont une étiquette indiquant
comment les sécher. Lisez attentivement ces étiquettes
et suivez les instructions dentretien. Sil est indiqué
Sécher à lair libre, Sécher sur la corde linge ou
sécher à plat, ne mettez pas cet article dans la
sécheuse. Certains tissus peuvent fondre ou
senflammer sous leffet de la chaleur, tandis que
dautres perdront leur forme.
NOTE: Référez-vous aux Conseils de sécurité
importants à la page précédente où vous trouverez la
liste des tissus spéciaux à ne jamais placer dans une
sécheuse.
TRIAGE DE LA LESSIVE
Pour obtenir de meilleurs résultats, triez correctement les
v tements à faire sécher. Voici quelques conseils sur la
façon de trier vos v tements:
¨Les articles à appr t permanent doivent tre séchés
ensemble et de préférence dans une machine à
moitié pleine. Sortez-les promptement de la
sécheuse et accrochez-les ou pliez-les.
¨Séchez séparément les tissus lourds et les tissus légers.
¨Séchez séparément les tissus qui lâchent de la
charpie (serviettes, coton ouaté, etc.) et ceux qui attirent
la charpie (synthétiques, velours, corduroy, etc.).
¨Séparez les tissus en couleurs non grand-teint
des tissus clairs.
¨Si létiquette du v tement indique Lavez
séparément, il y a de fortes chances que le
v tement déteindra au cours des premiers
lavages (excès de teinture). Pour éviter que la
teinture ne se transfère aux articles de couleur
claire, séchez les v tements de couleur vive avec
des articles en couleurs ou seuls. Les cotons
rouges et oranges sont ceux qui déteignent le plus.
LES FEUILLES
ASSOUPLISSANTES
Nous vous recommandons de ne pas utiliser ces
feuilles dans la sécheuse, car les produits chimiques
contenus dans ces feuilles tendent à saccumuler à
lintérieur de la filtre à charpie et à encombrer les trous
qui font circuler lair.
PROGRAMMES DE SÉCHAGE
Référez-vous au Guide de mise en marche rapide qui
accompagnait votre sécheuse. Vous y trouverez les
programmes du modèle que vous avez acheté.
Modèles T760 et T780: Référez-vous à la section
Adaptation des programmes préétablis à la page 7
de ce manuel pour savoir comment changer les
programmes préétablis.
DURÉE DU SÉCHAGE
La durée du séchage varie avec la grosseur de la
lessive, lhumidité retenue par les articles, le type de
tissus, la température et lhumidité de lair ambiant.
CARACTÉRISTIQUES DE LA LAVEUSE ASKO
Les sécheuse ASKO sont offertes avec trois systèmes
de séchage différents:
Sensidry
Les Modèles T760 et T780 sont munis du système
sophistiqué Sensidry. Il sagit dun détecteur dhumidité
qui permet un séchage adéquat des différents tissus.
Les réglages Extra Dry (Très sec), Dry (sec) et Damp
Dry (sec/humide) se servent du détecteur pour arr ter
la chaleur quand la lessive a atteint le degré de
sécheresse désiré. Ce capteur arr te la chaleur
lorsque les v tements sont secs.
Contrôle par thermostat
Le Modèle T700 a un thermostat qui contrôle la
température en allumant et en éteignant lélément
chauffant afin de maintenir la température sélectionnée
(Normale ou Basse) à +/-5° F.
Contrôle par minuteur
Le Modèle T720 ne permet que les cycles de séchage
minutés. Vous pouvez régler la minuterie pour que la
sécheuse fonctionne entre 30 et 190 minutes.
Le Modèle T700 est équipé dun programme contrôlé
par minuteur et de deux programmes automatiques
(contrôlés par thermostat).
Si vous optez pour le séchage au minuteur, il est plus
prudent de programmer un temps plus court que
nécessaire pour ne pas sursécher vos v tements. Si
jamais ils étaient encore humides, vous nauriez quà
remettre le minuteur en marche pour quelques minutes.
Panneau
avant
ontenant deau
condensée
(Modèles T720 & T780)
Panneau de
commande
ouvercle du
Filtre à charpie
Interrupteur de
mise en circuit
Filtre à
charpie
Ventilateur
nettoyable
(derrière le
panneau)
ondenseur
(derrière le
panneau)

Page 4
Les tissus différents requièrent des grosseurs de
brassée et des températures de séchage différentes.
* Vérifiez toujours ce que létiquette du v tement indique. Certains articles en soie ou laine lavables ne
doivent pas tre séchées à la machine. Lorsque vous les sortirez de la laveuse, pressez-les dans une
serviette-éponge pour retirer autant deau que possible et faites les sécher à plat ou accrochez-les.
TEMPÉRATURES RECOMMANDÉES ET GROSSEUR DES BRASSÉES
Le tableau ci-dessous donne les températures
recommandées selon les tissus.
INSTRUCTIONS DENTRETIEN ET NETTOYAGE
NETTOYAGE DU FILTRE À
CHARPIE
Lusure des tissus causée par la sécheuse est
insignifiante. La charpie quon trouve dans le filtre
provient de la poussière et des résidus de fibre qui
se sont formés lorsque le v tement a été porté.
Nettoyez le filtre à charpie après chaque séchage,
autrement il ny aura pas assez dair qui passera au
travers du tambour et le séchage sen ressentira.
La sécheuse peut aussi surchauffer après un
certain temps, elle sarr tera alors
automatiquement.
Pour nettoyer le filtre à charpie, suivez les étapes
suivantes:
1. Saisissez la poignée et tirez-
la vers vous.
2. Retirez le filtre de son étui.
3. Ouvrez le filtre et brossez
toute la charpie qui sy est
accumulée.
4. Repliez le filtre et remettez-
le dans son étui sur la
porte.
5. Poussez létui jusquà ce
quil sencastre en
position.
NETTOYAGE DU BOYAU
DÉVACUATION
Une fois par an, vous devriez démonter le tuyau
dévacuation et le nettoyer. Par la m me occasion,
nettoyez le raccordement à la sécheuse et le conduit
de ventilation.
Vérifiez également louverture à lextérieur par où
séchappe lair chaud et assurez-vous que rien ne
bloque lévent dévacuation.
T720 AND T780 VIDER LE
CONTENANT DEAU
Sil ny a pas dinstallation qui pompe leau condensée
dans un évier ou un drain, cette eau sera recueillie dans
le contenant deau qui se trouve sur la gauche du
panneau de commande. Videz ce contenant après deux
ou trois brassées, selon la vitesse dessorage que vous
aurez utilisée lors du lavage. Par exemple, des v tements
essorés à 800 rpm contiendront plus deau quand vous
les sortirez de la laveuse que si vous les aviez essorés
à 1400 rpm, et la sécheuse aura plus deau à évacuer.
NETTOYAGE DU PANNEAU DE
COMMANDE
Pour nettoyer le tableau de commande, utilisez un
chiffon doux, chaud et humide (pas mouillé). Pour
emp cher toute pénétration deau dans le verrou de la
porte ou les pièces électriques, nutilisez aucun produit
nettoyant pulvérisable. Nutilisez jamais non plus de
nettoyants abrasifs ou de tampons récurants car ils
rayeront la surface et le fini de la laveuse et peuvent
effacer les caractères inscrits sur le panneau de
commande. Certaines serviettes en papier peuvent
aussi rayer le fini.
1. Retirez le contenant.
2. Videz-le de son eau.
3. Replacez. le contenant.
Vous devriez entendre le
déclic du contenant qui
se met en place.
Si le contenant deau est trop plein, la sécheuse
sarr tera. Pour redémarrer le programme, videz le
contenant et appuyez sur Start. Il faudra quelques
minutes à la machine pour redémarrer car elle doit
vidanger lexcès deau du puisard avant de se remettre
en marche.
NOTE: Ne retirez jamais le contenant pendant que
la machine est en marche.
Grosseur
Type de tissus Temp. des brassées
Coton avec/sans élastique et/ou bordure décorativ Normal Pleine brassée
Lin blanc et grand teint Normal Demi-brassée
Mélanges Coton/polyester Basse Demi-brassée
Mélanges Polyester/acrylique Basse Demi-brassée
Rayonne et acétate Basse Demi-brassée
Soie et Nylon lavables * Basse Tiers de brassée
Laine et mélanges de laine lavables * Basse Tiers de brassée
Laine et soie lavables à la main * Basse Tiers de brassée
Leau condensée est une eau douce et peut
servir à arroser les plantes.
NOTE:
Other manuals for T700 Series
6
This manual suits for next models
2
Table of contents
Languages:
Other Asko Dryer manuals
Popular Dryer manuals by other brands

Whirlpool
Whirlpool Duet WED9600T Product dimensions

Alliance Laundry Systems
Alliance Laundry Systems LWS01M series operating instructions

Siemens
Siemens WTH83F80CH Installation and operating instructions

Electrolux
Electrolux 27" Dryers Service manual

White Knight
White Knight 44AW Service manual

Alliance Laundry Systems
Alliance Laundry Systems SDE807 Installation & operation