ASO Safety Solutions ELMON Inductive 71-242 User manual

ELMON induc ve 71-242 + ELMON induc ve 71-942
Betriebsanleitung (Original, Gül gkeit siehe letzte Seite)
ELMON induc ve 71-242 + ELMON induc ve 71-942 Sicherheitsschaltgerät Seite 3-12
Manuel d’u lisa on (Validité voir la dernière page)
ELMON induc ve 71-242 + ELMON induc ve 71-942 Relais de sécurité
Opera ng Manual (see last page for validity)
ELMON induc ve 71-242 + ELMON induc ve 71-942 Safety Relay Page 13-22
Page 23-32
EnglishFrançais Deutsch
Induk ves Signalübertragungssystem / Induc ve signal transmission system / Système de transmission de signal induc f

2
Übergabedokumentaon / Documentaon / Documentaon de dataon
/ Documentazione di consegna / Documentae
Anlagenbeschreibung / Descripon / Descripon du système / Descrizione impianto / Beschrijving van de
installae
Anlagenart / Type of plant / Sorte du système / Tipo d’impianto / Type installae
Hersteller / Manufacturer / Fabricant / Produore / Fabrikant
Seriennummer / Serial number / Numéro de série / Numero di serie / Seriennummer
Datum der Inbetriebnahme / Commissioning date / Date de mise en marche / Data della messa in funzione
/ Datum van de ingebruikname
Aufstellort / Site of installaon / Lieu de montage / Luogo d’installazione / Opstellingsplaats
Verwendete Steuerung / Control unit / Commande ulisée / Centralina di comando adoata / Gebruikte
besturing
Zusatzkomponenten / Addional components / Composants supplémentaires / Componen ausiliari /
Bijkomende componenten
Funkonsprüfung / Funconal test / Contrôle de foncon / Controllo funzionale / Funcecontrole
Sicherheitssensoren reagieren auf Betätigung / Safety sensor response to actuation /
Le senseur de sécurité réagit à l’aconnement / Il sensore di sicurezza reagisce all’azionamento /
Veiligheidssensor reageert op acvering
Sicherheitssensoren reagieren auf Zuleitungsunterbrechung / Safety sensor response to supply
line interrupon / Le senseur de sécurité réagit à l’interrupon de l’alimentaon / Il sensore di
sicurezza reagisce all’interruzione di collegamento Veiligheidssensor reageert op onderbreking van
de toevoerleiding
ok
Name der ausführenden Firma / Owner / Nom de la société exécutrice / Nome della dia esecutrice /
Naam van de uitvoerende rma
Name des Installateurs / Installer / Nom de l’installateur / Nome dell’installatore / Naam van de installateur
Datum / Date / Date / Data / Datum Unterschri / Signature / Signature / Firma /
Handtekening
ok

2 3
ELMON inducve 71-242 + ELMON inducve 71-942
Indukves Signalübertragungssystem
Technische und betriebsrelevante Änderungen zu den in dieser Dokumentaon
aufgeführten Produkten und Geräten sind jederzeit auch ohne Vorankündigung vor-
behalten.
1. Inhaltsverzeichnis
1. Inhaltsverzeichnis . . . . . . . . . . . . . . . . . . . . . . . . . . 3
2. Allgemeine Sicherheitsbesmmungen und Schutzmaßnahmen 4
3. Allgemeines und Funkonsbeschreibung . . . . . . . . . . . . . 5
4. Besmmungsgemäße Verwendung . . . . . . . . . . . . . . . . 5
5. Systemkomponenten am Tor . . . . . . . . . . . . . . . . . . . . 6
6. Geräteübersicht . . . . . . . . . . . . . . . . . . . . . . . . . . . 6
6.1 Signalanzeigen. . . . . . . . . . . . . . . . . . . . . . . . . . . . . . . . . . . 6
6.2 Anschlussklemmen . . . . . . . . . . . . . . . . . . . . . . . . . . . . . . . . 7
7. Anschluss des Gerätes . . . . . . . . . . . . . . . . . . . . . . . 7
7.1 Voraussetzungen . . . . . . . . . . . . . . . . . . . . . . . . . . . . . . . . . 7
7.2 Versorgungsspannung . . . . . . . . . . . . . . . . . . . . . . . . . . . . . . 8
7.3 Anschluss feststehender Spulenkern . . . . . . . . . . . . . . . . . . . . . . 8
7.4 Anschluss feststehende Sicherheitskontaktleisten . . . . . . . . . . . . . . . 8
7.5 Anschluss Steuerstromkreise. . . . . . . . . . . . . . . . . . . . . . . . . . . 8
7.6 Anschluss der Sicherheitskontaktleisten am Spulenkern SPK 54 . . . . . . . 8
7.7
Anschluss von mehreren
Sicherheitskontaktleisten
pro Signalgeberkreis
. . . 8
8.
Inbetriebnahme und Funkonsprüfung
. . . . . . . . . . . . . . 9
9. Fehlerdiagnose . . . . . . . . . . . . . . . . . . . . . . . . . . 10
10. Außerbetriebnahme und Entsorgung . . . . . . . . . . . . . . 11
11. Technische Daten . . . . . . . . . . . . . . . . . . . . . . . . . 11
12. EG Konformitätserklärung . . . . . . . . . . . . . . . . . . . . 12
Deutsch

4
Das Schaltgerät ist nach ISO 13849-1 „Sicherheitsbezogene Teile von Steuerungen“ für Kat. 3
ausgelegt. Zur Einhaltung der Kat. 3 ist das Schaltgerät redundant, mit zwei sich gegenseig
abfragenden, zwangsgeführten Sicherheitsrelais pro Kanal aufgebaut.
Die Anforderungen der Tornormen EN 12978 „Schutzeinrichtungen für krabetägte Türen und Tore“ und
EN 12453 „Nutzungssicherheit krabetägter Tore“ werden ebenfalls erfüllt.
Bei Nichtbeachtung oder vorsätzlichem Missbrauch enällt die Haung des Herstellers.
2. Allgemeine Sicherheitsbesmmungen und Schutzmaßnahmen
• Hersteller oder Benutzer der Anlage / Maschine, an der die Schutzeinrichtung verwendet wird, sind
dafür verantwortlich, alle geltenden Sicherheitsvorschrien und -regeln in eigener Verantwortung
abzusmmen und einzuhalten.
• Die Schutzeinrichtung garanert in Verbindung mit der übergeordneten Steuerung eine funkonale
Sicherheit, nicht aber die Sicherheit der gesamten Anlage / Maschine. Vor dem Einsatz des Gerätes ist
deshalb eine Sicherheitsbetrachtung der gesamten Anlage / Maschine nach der Maschinenrichtlinie
2006/42/EG EG oder nach entsprechender Produktnorm notwendig.
• Die Betriebsanleitung muss ständig am Einsatzort der Schutzeinrichtung verfügbar sein.
Sie ist von jeder Person, die mit der Bedienung, Wartung oder Instandhaltung der Schutzeinrichtung
beauragt wird, gründlich zu lesen und anzuwenden.
• Die Installaon und Inbetriebnahme der Schutzeinrichtung darf nur durch Fachpersonal erfolgen, die mit
dieser Betriebsanleitung und den geltenden Vorschrien über Arbeitssicherheit und Unfallverhütung
vertraut sind. Die Hinweise in dieser Anleitung sind unbedingt zu beachten und einzuhalten.
Elektrische Arbeiten dürfen nur von Elektrofachkräen durchgeführt werden.
• Sicherheitsvorschrien der Elektrotechnik und der Berufsgenossenscha sind zu beachten.
• Bei Arbeiten am Schaltgerät ist dieses spannungsfrei zu schalten, auf Spannungsfreiheit zu prüfen und
gegen Wiedereinschalten zu sichern.
• Werden die potenalfreien Anschlüsse der Sicherheitsschaltkontakte mit einer gefährlichen Spannung
fremdgespeist, ist sicherzustellen, dass diese bei Arbeiten an dem Schaltgerät ebenfalls abgeschaltet
werden.
• Das Schaltgerät enthält keine vom Anwender zu wartende Bauteile. Durch eigenmächge Umbauten
bzw. Reparaturen am Schaltgerät erlischt jegliche Gewährleistung und Haung des Herstellers.
• Das Schutzsystem ist in geeigneten Zeitabständen von Sachkundigen zu prüfen und in jederzeit nach-
vollziehbarer Weise zu dokumeneren.
Sicherheitshinweise
• Das Schaltgerät ermöglicht den Betrieb an 24 V AC/DC. Der Anschluss der Betriebsspannung an die falschen
Klemmen kann das Schaltgerät zerstören.
• Das Schaltgerät ist in einem Schaltschrank zu moneren.
• Nicht in unmielbarer Nähe von starken Wärmequellen moneren.
• Bei kapaziven und indukven Verbrauchern ist für eine ausreichende Schutzbeschaltung zu sorgen.
Deutsch
Indukves Signalübertragungssystem

45
ELMON inducve 71-242 + ELMON inducve 71-942
Indukves Signalübertragungssystem
3. Allgemeines und Funkonsbeschreibung
Das
indukve Signalübertragungssystem
löst die Problemak, bewegliche
Sicherheitskontaktleisten
mit einer
feststehenden
Auswertung ohne mechanische Belastung zu verbinden. Die Kommunikaon zwischen den
beweglichen Sicherheitskontaktleisten und der Auswertelektronik beruht hierbei auf indukver Basis. Die
Überwachungselektronik induziert hierfür eine Frequenz auf einen Spulenkern, der in eine geschlossene
Leiterschleife eingebunden ist.
Der zweite Spulenkern, an dem die beweglichen Sicherheitskontaktleisten angeschlossen sind, empfängt
diese Frequenz und gibt bei Kabelbruch oder bei Betägung eines Signalgebers eine entsprechende Rück-
meldung an die Auswertelektronik.
Das kompakte und montagefreundliche Sicherheitsschaltgerät ist für den Einsatz im Schaltschrank ausgelegt,
wo eine 24 V Versorgungsspannung zur Verfügung steht.
An das Schaltgerät können bis zu vier Sicherheitskontaktleistenkreise angeschlossen werden. Für die Sicher-
heitskontaktleisten am Torbla stehen zwei Kanäle (Kontaktleiste Auf-Bewegung und Kontaktleiste Zu-Bewe-
gung) und für die Sicherheitskontaktleisten am Führungspfosten ebenfalls zwei Kanäle zur Verfügung. Die be-
weglichen, am Torbla miahrenden Sicherheitskontaktleisten, werden durch das Seilübertragungssystem
berührungslos und verschleißfrei überwacht. Die feststehenden Sicherheitskontaktleisten werden direkt an
das Schaltgerät angeschlossen.
Das Schaltgerät überwacht diese vier Sicherheitskontaktleistenkreise permanent auf Betägung oder Unter-
brechung (Kabelbruch). Bei einer Störung wird dem entsprechenden Sicherheitskontaktleistenkreis einer
der zwei Stop-Befehle zugeordnet (Stop in Auf-Richtung oder Stop in Zu-Richtung). Um eine Ruhestrom-
überwachung des gesamten Systems zu ermöglichen, ist in die Endleiste des jeweiligen Sicherheitskontakt-
leistenkreises ein Abschlusswiderstand integriert. Fließt der Soll-Ruhestrom, so sind die Ausgangsrelais ange-
steuert und die Schaltkontakte geschlossen. Wird das Schaltelement betägt oder der Signalgeberstromkreis
unterbrochen, önen die Relais-Schaltkontakte.
Die Schaltzustände der Relaise und die angelegte Betriebsspannung werden durch LED‘s angezeigt.
Wenn eine Fehlermeldung vorliegt, sind alle Sicherheitsausgänge inakv.
4. Besmmungsgemäße Verwendung
Das Schaltgerät
ELMON inducve
71-242 (
ELMON inducve
71-942) kann seine sicherheitsrelevante Aufgabe
nur erfüllen, wenn es besmmungsgemäß eingesetzt wird.
Das Sicherheitsübertragungssystem
ELMON inducve
71-242 (
ELMON inducve
71-942) ist ausgelegt für die
Auswertung von feststehenden und miahrenden Sicherheitskontaktleisten mit konstantem 8,2KΩ Widerstand.
Ein anderer oder darüber hinausgehender Einsatz ist nicht besmmungsgemäß. Für Schäden, die aus nicht
besmmungsgemäßen Verwendungen entstehen, übernimmt der Hersteller keine Haung.
Der Einsatz bei Sonderanwendungen bedarf einer Freigabe vom Hersteller.
Deutsch

6
5. Systemkomponenten am Tor
1 Steuergerät
ELMON induc ve
71-242
(
ELMON induc ve
71-942)
2 Feststehender Spulenkern
3 Mi ahrender Spulenkern
4 Stahlseil als Übertragungsmedium
- mit 2 zusätzlichen Adern
Applika onsbeispiel
Die Anordnung der einzelnen Komponenten ist
abhängig von der jeweiligen Torkonstruk on und
von baulichen Gegebenheiten.
6. Geräteübersicht
6.1 Signalanzeigen
LED Power (grün)
Betriebszustand (an)
Fehlermeldung (Pulsausgabe)
LED Transmit Opening (rot)
Mi ahrende Sicherheitskontaktleisten für Auf-Bewegung
betä gt / unterbrochen (an)
LED Sta onary Opening (rot)
Feststehende Sicherheitskontaktleisten für Auf-Bewegung
betä gt (an) - unterbrochen (blinkt)
LED Transmit Closing (rot)
Mi ahrende Sicherheitskontaktleisten für Zu-Bewegung
betä gt / unterbrochen (an)
LED Sta onary Closing (rot)
Feststehende Sicherheitskontaktleisten für Zu-Bewegung
betä gt (an) - unterbrochen (blinkt)
V1.0: Liegt keine Fehlermeldung vor, so wird über die LED Power die Funk onskontrolle angezeigt (kurz aus).
V4.0 oder später: Liegt keine Fehlermeldung vor, so wird über die LED Power der Betriebszustand angezeigt (an).
V5.6 oder später: Wird während des Betriebes ein interner Fehlerzustand festgestellt, so wird die Fehlermeldung
gesichert. Die vorhandenen gesicherten Fehlermeldungen werden nacheinander durch die grüne LED (Power)
über die Anzahl Pulse ausgegeben. Nach einem Einschaltvorgang sind alle intern gesicherten Fehlermeldungen
gelöscht. Liegt aktuell ein interner Fehlerzustand vor, so sind alle roten LED dauernd leuchtend eingeschaltet.
Liegt aktuell kein interner Fehlerzustand vor, so werden über die roten LEDs die Zustände der angeschlossenen
Sicherheitskontaktleisten angezeigt. Der Fehlerzustand bei Testung Signaleingang (Fehlermeldung 6) wird
inak v, wenn bei der Testung kein Fehler mehr festgestellt wird.
Bei Ausgabe einer Fehlermeldung gibt die Anzahl der ausgegebenen Pulse den Fehler an:
Deutsch
Induk ves Signalübertragungssystem
ELMON
induc ve
71-242
ELMON
induc ve
71-942
33 11 10 1 2
22 2
243
Tor öff net Tor schließt
Sicherheitskontaktleiste AUF Bewegung
Sicherheitskontaktleiste ZU Bewegung
1

6
7
7. Anschluss des Gerätes
7.1 Voraussetzungen
•
Verlegung der Signalleitung darf nicht parallel zur Motorleitung oder anderen Leistungsleitungen erfolgen.
• Die Versorgungsspannung der
ELMON induc ve
71-242 und der
ELMON induc ve
71-942 muss den
Anforderungen für Schutzkleinspannung (SELV) entsprechen.
• Leitungen, die im Freien oder außerhalb vom Schaltschrank verlegt werden, müssen entsprechend
geschützt werden.
• Die für das Gerät angegebene Schutzart ist nur dann sichergestellt, wenn die Zuleitungen ordnungsgemäß
in die Verschraubungen geklemmt sind.
ELMON induc ve 71-942
Transmit
Sta onary Op.
Sta onary Cl.
Pin 4, 5
Pin 6, 7
Pin 8, 9
ELMON induc ve 71-242
Pin 1, 2 feststehender Spulenkern
Pin 3, 11 Sicherheitskontaktleiste Führungspfosten Ö nen
Pin 3, 10
Sicherheitskontaktleiste Führungspfosten Schließen
Pin 4, 5 Relais-Ausgang zur Steuerung Stop Ö nen
Pin 6, 7 Relais-Ausgang zur Steuerung Stop Schließen
Pin 8, 9 Versorgungsspannung 24 V
6.2 Anschlussklemmen
Pulse Fehlermeldung
1 Spannungsversorgung außerhalb des gül gen Wertbereiches
2 Übertragungsfehler induk ves Signalübertragungssystem
3 Ausgangssteuerung Open gestört
4 Ausgangssteuerung Close gestört
5Datenübertragung zwischen Mikrocontroller gestört
6Fehler bei Testung Signaleingang feststehende Kontaktleisten (Open/Close)
Deutsch
ELMON induc ve 71-242 + ELMON induc ve 71-942
Induk ves Signalübertragungssystem
Unterseite
ELMON induc ve 71-242 ELMON induc ve 71-942
12
3
4
5
6
7
8
9
10 11

8
7.5 Anschluss Steuerstromkreise
An das Klemmenpaar 4, 5 ist der zu überwachende Steuerstromkreis
für die Auf-Bewegung (Stop-Auf-Bewegung) und an das Klemmenpaar
6, 7 der entsprechende Steuerstromkreis für die Zu-Bewegung (Stop-
Zu-Bewegung) anzuschließen. Die Steuerstromkreise sind abhängig vom
Nennstrom mit einer entsprechenden Sicherung zu schützen, oder der
Nennstrom auf den Steuerstromkreisen muss durch andere Maßnahmen
auf den maximalen Wert begrenzt werden.
4
5
76
4
5
76
Deutsch
Induk ves Signalübertragungssystem
7.4 Anschluss feststehende Sicherheitskontaktleisten
ELMON induc ve
71-242: Die
feststehende
(n) Sicherheitskontaktleiste(n)
am Führungspfosten für die Auf-Bewegung wird (werden) an
das Klem-
menpaar 3, 11 angeschlossen.
ELMON induc ve
71-942: Die
feststehende
(n)
Sicherheitskontaktleiste(n)
für die Auf-Bewegung wird
(werden) mit dem Steckplatz Sta onary
Opening verbunden
.
Bei mehreren
Sicherheitskontaktleiste
n
werden diese in Reihe geschaltet
und die
Endleiste mit 8,2 kΩ abgeschlossen.
ELMON induc ve
71-242:
Die
feststehende
(n)
Sicherheitskontaktleiste(n)
für die Zu-Bewegung wird (werden) an das Klemmenpaar 3, 10 ange-
schlossen.
ELMON induc ve
71-942: Die
feststehende
(n)
Sicherheitskontaktleiste(n)
für die Zu-Bewegung wird (werden
) mit dem Steckplatz Sta onary Closing
verbunden.
Sollte ein Kanal für die
feststehenden
Sicherheitskontaktleisten oder
eventuell beide Kanäle nicht genutzt werden, sind die Kanäle mit den
mitgelieferten 8,2 kΩ Widerständen zu belegen.
10 3
11
24V AC/DC 24V AC/DC
ELMON induc ve
71-242
ELMON induc ve
71-942
7.2 Versorgungsspannung
Als Spannungsversorgung ist bei der ELMON induc ve 71-242 und
der ELMON induc ve 71-942
an dem Klemmenpaar 8, 9 24V AC/DC
anzuschließen. Die Versorgungsleitung zum Schaltgerät ist mit einer
passenden Sicherung zu schützen.
7.3 Anschluss feststehender Spulenkern
ELMON induc ve 71-242: An das Klemmenpaar 1, 2 ist der feststehende
Spulenkern
anzuschließen,
wobei die Polarität beliebig ist.
ELMON induc ve
71-942: Der
feststehende
Spulenkern ist mit dem Steck-
platz Transmit zu verbinden.
-+
8
9
-+
8
9
12

8
9
ASO-Sicherheitskontaktleisten dürfen nicht parallel geschaltet werden.
8. Inbetriebnahme / Funk onsprüfung
Nach entsprechendem Anschluss aller elektrischen Verbindungen und Einschalten der Versorgungsspannung,
muss die Toranlage auf korrekte Funk on überprü werden. Hierzu sind alle Sicherheitskontaktleisten der
Reihe nach zu betä gen und die entsprechenden Reak onen des Schaltgerätes zu kontrollieren.
7.6 Anschluss der Sicherheitskontaktleisten am Spulenkern SPK 54 (Bild 1)
7.7 Anschluss von mehreren Sicherheitskontaktleisten pro Signalgeberkreis (Bild 2)
An dem Signalgebereingang O bzw. C können ein oder mehrere Sicherheitskontaktleisten angeschlossen werden.
Hierfür werden die einzelnen Sicherheitskontaktleisten entsprechend Bild 2 in Serie geschaltet.
Maximal können 5 Sicherheitskontaktleisten mit einer Gesamtkabellänge von max. 25 m in Serie geschaltet
werden.
Die Länge eines Sicherheitskontaktleisten kann bis zu 25 m betragen.
Vor dem Anschließen der in Serie geschalteten Sicherheitskontaktleisten ist es empfehlenswert, den Wider-
standswert der Verschaltung auszumessen.
Bei unbetä gter Sicherheitskontaktleiste muss der Widerstand 8,2 kΩ ± 500 Ω betragen. Ist die Sicherheits-
kontaktleiste betä gt, darf der Widerstand 500 Ω nicht überschreiten.
Sollte ein Kanal nicht genutzt werden, muss dieser mit einem 8,2 k
Ω
Widerstand
belegt
werden.
Die mi ahrenden Sicherheitskontaktleisten werden mit dem
mi ahrenden Spulenkern verbunden.
Hierzu wird die mi ahrende
Sicherheitskontaktleiste
ZU-
Bewegung mit dem Anschluss C des mi ahrenden Spulen-
kerns verbunden
und die op onale
Sicherheitskontakt-
leiste
AUF-
Bewegung
mit dem Anschluss O
.
Sicherheitskontaktleiste
1
Sicherheitskontaktleiste
2
Sicherheitskontaktleiste
„n“
O
C
Bild 2: Verschaltung mehrerer Sicherheitskontaktleisten
Deutsch
ELMON induc ve 71-242 + ELMON induc ve 71-942
Induk ves Signalübertragungssystem
Sicherheitskontaktleiste
ZU-Bewegung
Sicherheitskontaktleiste
AUF-Bewegung
O
C
Bild 1: Verschaltung am Spulenkern
2
222

10
Deutsch
Indukves Signalübertragungssystem
9. Fehlerdiagnose
Bei korrekter Verdrahtung und Anlegen der Versorgungsspannung darf nur die grüne LED leuchten. Bei Auf-
leuchten einer der roten LED‘s ist ein Fehler im System vorhanden, der sich mit Hilfe der LED eingrenzen lässt.
LED Fehler Fehlerbeseigung
LED‘s
leuchten nicht
Versorgungsspannung fehlt,
zu gering
oder falsch angeschlossen
Anschlüsse und Versorgungsspannung überprüfen:
- 24 V AC/DC an Klemmen 8 9
Toleranzbereich: ±10%
einzelne rote
LED leuchtet
Sicherheitskontaktleiste(n)
nicht angeschlossen,
fehlerha angeschlossen
oder defekt
- Anschlüsse der entsprechenden Sicherheitskontakt-
leiste überprüfen (abgequetschte Zuleitungen,
brüchige Zuleitungen etc.)
- Sicherheitskontaktleiste(n) überprüfen*
Ein Sicherheitskontaktleisten-
Anschluss wird nicht benutzt
Nicht benutzte Sicherheitskontaktleisten-Anschlüsse
dauerha mit einem der mitgelieferten 8,2 kΩ-Wider-
stände überbrücken
beide roten
Transmit LED‘s
leuchten
Übertragungsstrecke ist gestört
oder fehlerha monert
- mech. Montageanleitung beachten (ELMON inducve
Sicherheitsübertragungsystem)
- Übertragungskerne auf Verschleiß überprüfen.
- Seilkreis überprüfen; hier ist darauf zu achten, dass
beide Übertragungskerne sich innerhalb des Seilkreis
benden
- Kontaktstellen Seil / Torkörper überprüfen.
- Versorgungsspannung überprüfen**
Sicherheitskontaktleiste(n)
nicht angeschlossen,
fehlerha angeschlossen
oder defekt
- Anschlüsse der entsprechenden Sicherheitskontakt-
leiste überprüfen (abgequetschte Zuleitungen,
brüchige Zuleitungen etc.)
- Sicherheitskontaktleiste(n) überprüfen*
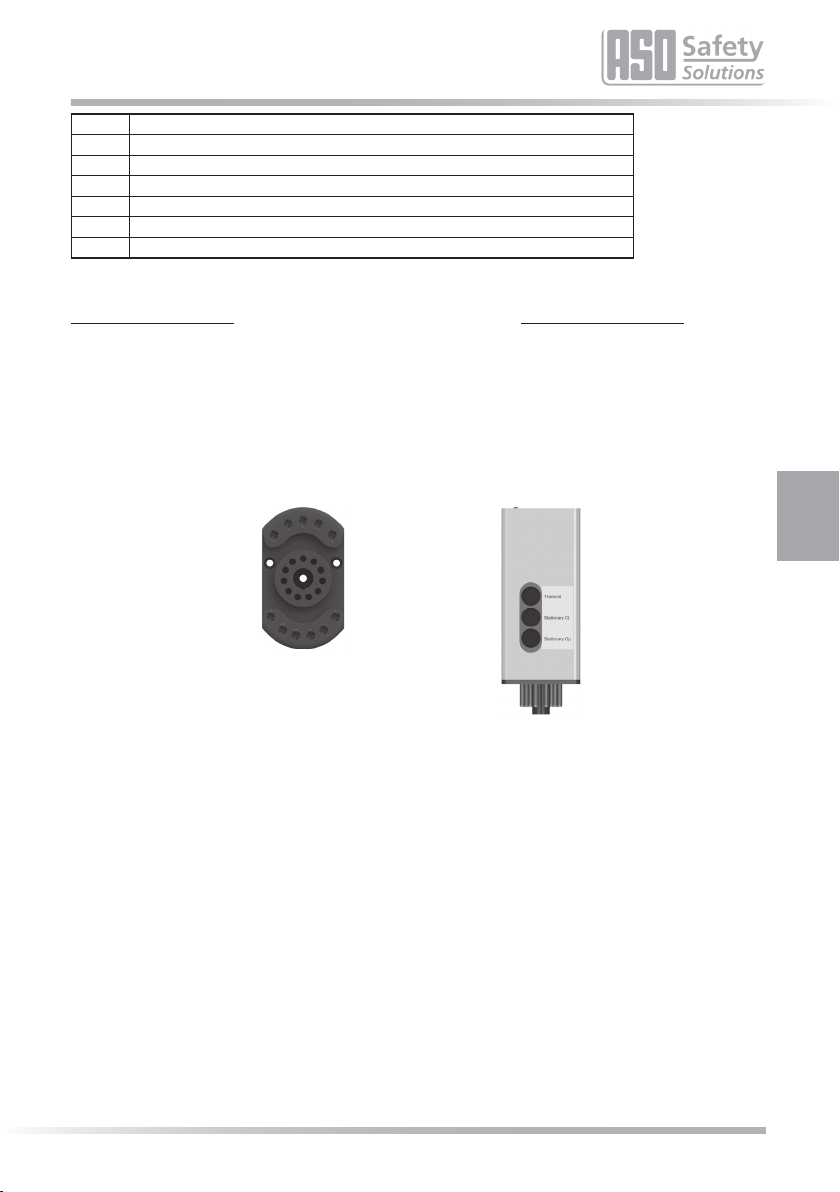
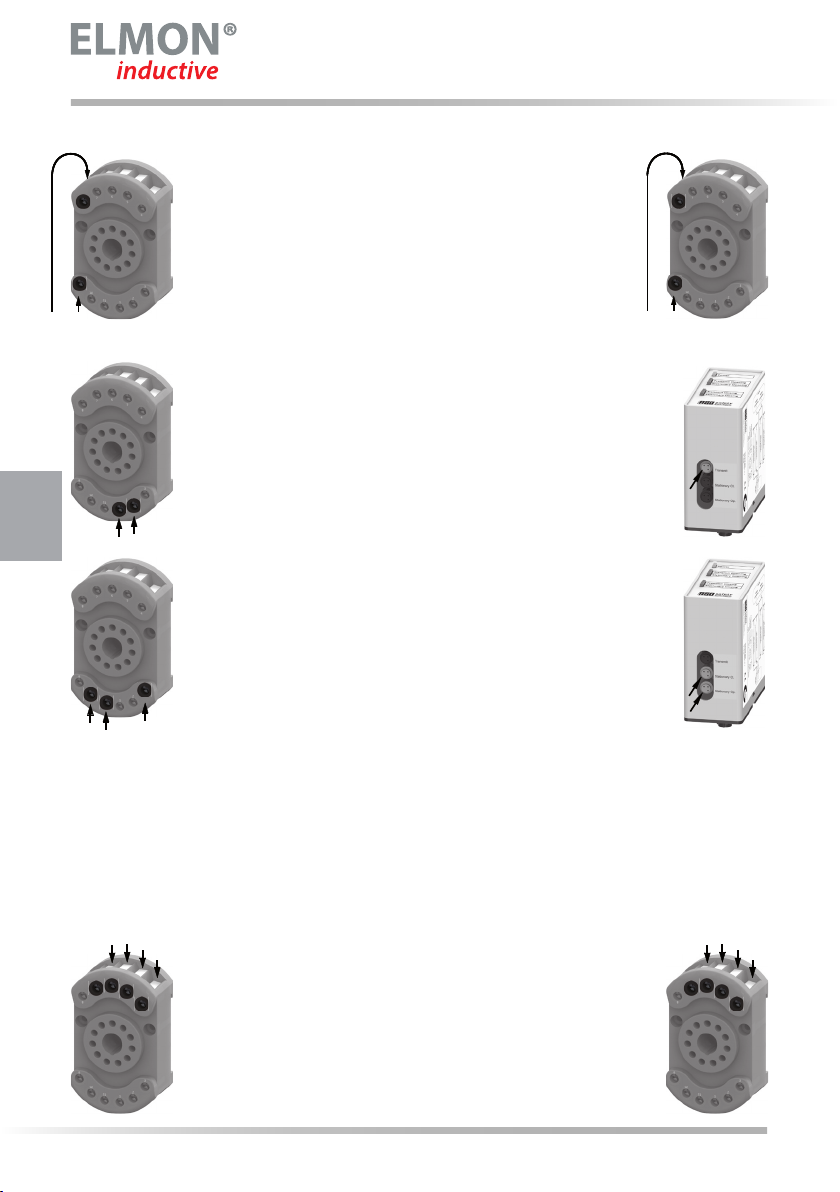
* Liegt der Fehler nicht in der Verdrahtung, kann die Funkon der Elektronik durch Belegung aller Sicher-
heitskontaktleisten-Eingänge an der ELMON inducve 71-242 (ELMON inducve 71-942) Auswertelek-
tronik (Klemmen 3, 10 und Klemmen 3, 11) und am miahrenden Spulenkern (Anschlüsse Ound C) mit
jeweils einem 8,2 kΩ Widerstand überprü werden.
Arbeitet danach die Elektronik einwandfrei, müssen die Sicherheitskontaktleisten mit einem Wider-
standsmessgerät überprü werden. Hierfür muss die jeweilige Verbindung der Sicherheitskontaktleiste
zur Auswertelektronik oder zum miahrenden Spulenkern aufgetrennt und mit einem Widerstands-
messgerät verbunden werden.
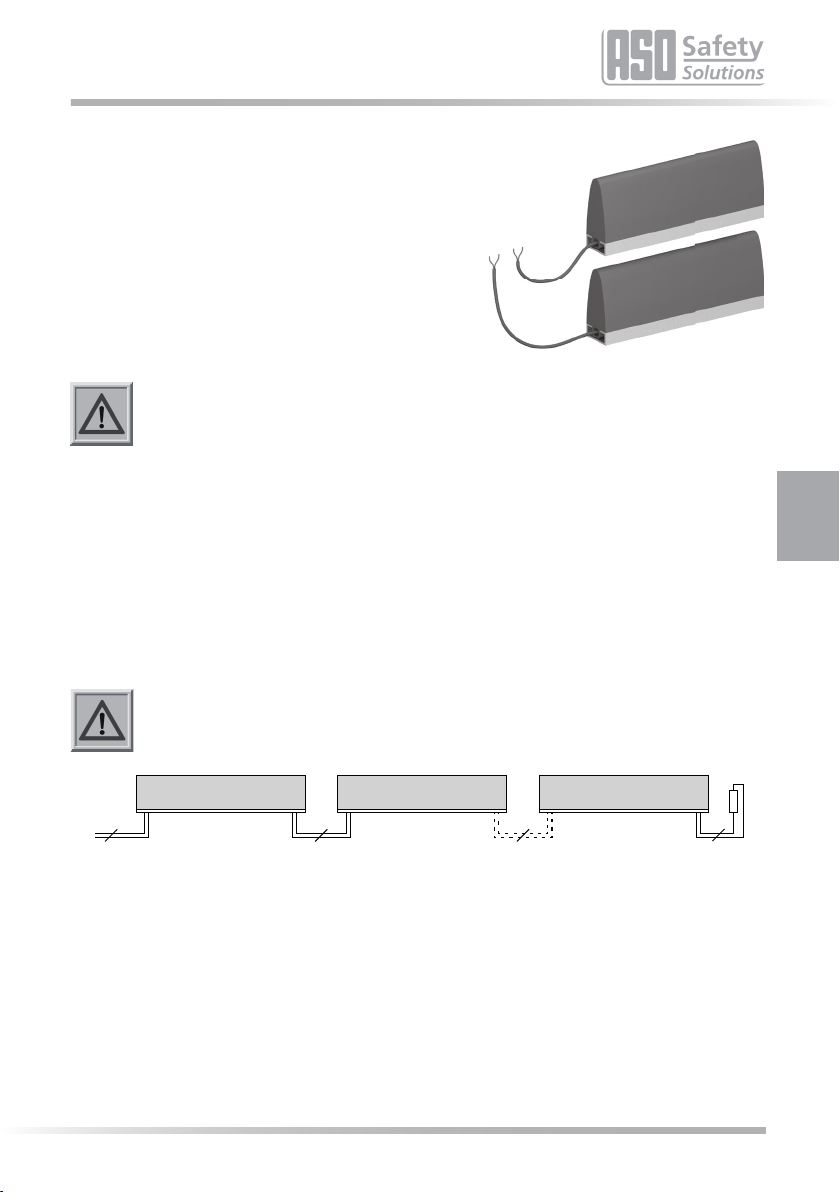
Bei unbetägter Sicherheitskontaktleiste muss der Widerstand 8,2 kΩ ±500 Ω betragen. Ist die Sicher-
heitskontaktleiste betägt, darf der Widerstand 500 Ω nicht überschreiten.
** Sollten die beiden LED’s für die miahrenden Sicherheitskontaktleisten (Transmit Opening und Transmit
Closing) leuchten, ist ein Fehler im indukven Übertragungssystem vorhanden. Die häugsten Fehler-
quellen hierfür sind schlechte Verbindungen an den Spulenkernen, nicht ordnungsgemäß installierte
Seilsystemkomponenten (siehe Montageanleitung ELMON inducve-Sicherheitsübertragungssystem) oder
eine unzulässig niedrige Versorgungsspannung.
Die Seilschleife darf einen maximalen Widerstandswert von 3 Ω haben. Der Widerstandswert kann durch
Lösen des Stahlseiles von der Erdungsklemme und anschließendem Messen zwischen Stahlseilende und
Erdungsklemme ermielt werden.

10
11
10. Außerbetriebnahme und Entsorgung
Die von ASO hergestellten Produkte sind ausschließlich für den gewerblichen Gebrauch (B2B) vorgesehen.
Nach Nutzungsbeendigung sind die Produkte gemäß allen örtlichen, regionalen und na onalen Vorschri en
zu entsorgen. ASO nimmt die Produkte auch gern zurück und entsorgt diese ordnungsgemäß.
11. Technische Daten
Versorgungsspannung UE 24 V AC/DC ±10%
IE = 85 mA; Imax = 180mA (100ms)
Montage
Stecksockel zur 35 mm DIN-Schnappschienenmontage
Gehäuse 11 pol. DIN Stecksockelgehäuse
mit Stecksockel für 35 mm
Montageschiene
Abmessungen: (HxBxT)
Gehäuse 82 x 38 x 84 mm
Gehäuse incl. Stecksockel 82 x 38 x 110 mm
Schutzart IP20
Gewicht 225 g
Temperaturbereich -25°C bis +55°C
Querschni Anschlussleitungen
ein-, oder feindräh ge Leitung 0,75-1,5 mm2
Zulassungen
Sicherheitseinrichtung nach DIN EN 12978
Alle an das Schaltgerät angeschlossenen Spannungen
müssen sicher getrennte Spannungen sein!
Prü� ericht Nr.:
3525 3024
EG Baumuster Nr.:
44 205 13 031832
ELMON induc ve 71-242
ELMON induc ve 71-942
feststehend mi ahrend
Nominalwert Rnom = 8,2 kΩ = 8,2 kΩ
Oberer Schaltwert RAO > 12 kΩ > 20 kΩ
Unterer Schaltwert RAU < 5 kΩ < 2,5 kΩ
Anschlusswiderstand Sicherheitskontaktleisten
Nennstrom DC 3 A 30 V DC
Nennstrom AC 3 A 30 V AC
Mech. Lebensdauer >106 Betä gungen
Relais Stufen
Leiste
feststehend
Leiste
mi ahrend
Ausschaltverzögerung (Reak onszeit) < 10 ms < 30 ms
Einschaltverzögerung 500 ms (Power on 700 ms)
Schaltzeiten Sicherheitsrelais
Deutsch
ELMON induc ve 71-242 + ELMON induc ve 71-942
Induk ves Signalübertragungssystem
82
38
84
110
82
38
84
110
ELMON induc ve 71-242
ELMON induc ve 71-942
EN ISO 13849-1:2015 Kategorie 3 PL d
MTTFD 83 Jahre, DC 95 %, PFHD 5,79E-08 1/h
Elektronik MTTFD 685 Jahre, DC 99 %
Elektromechanik
Ausgabeeinheit (Relais)
MTTFD 380 Jahre, DC 99%
(B10D 2000000, Nop 52560)
Signalgeber
(Beispiel SENTIR mat)
MTTFD 380 Jahre, DC 90%
(B10D 2000000, Nop 52560)

12
Deutsch
EG -Konformitätserklärung
EC Declaration of conformity
Déclaration de conformité CE
DIN EN ISO 9001 Stand: 30.09.202020 Rev.:01 Seite 1von 1
Hiermit erklären wir, dass die
nachfolgend bezeichneten Produkte der
Baureihe
ELMON inductive 71-242
ELMON inductive 71-942
ELMON inductive 71-752(W)
Sicherheitsschaltgerät zur Kombination
mit Schaltleisten, Schaltmatten und
Schaltpuffern zur Vermeidung von
Gefahren an Quetsch-und Scherstellen
aufgrund ihrer Konzipierung und Bauart
sowie in der von uns in Verkehr
gebrachten Ausführung, den
einschlägigen grundlegenden
Sicherheits-und
Gesundheitsanforderungen der
nachfolgenden EG-Richtlinien und
Normen entspricht:
2006/42/EG
EN ISO 13849-1:2015
EN 60947-5-1:2017
2011/65/EU (RoHS)
Diese Konformitätserklärung entbindet
den Konstrukteur/ Hersteller der
Maschine nicht von seiner Pflicht, die
Konformität der gesamten Maschine, an
der dieses Produkt angebracht wird,
entsprechend der EG-Maschinen-
richtlinie sicherzustellen.
We hereby declare that the following
products of the model range:
ELMON inductive 71-242
ELMON inductive 71-942
ELMON inductive 71-752(W)
Safety relay to be used in combination
with safety contact edges, safety
contact mats and safety contact
bumpers for preventing dangers at
locations where there is a risk of
crushing and cutting
satisfies the relevant essential health
and safety requirements of the EC
directives and standards listed below on
account of its design and construction,
as does the version brought to market
by us:
2006/42/EC
EN ISO 13849-1:2015
EN 60947-5-1:2017
2011/65/EU (RoHS)
This declaration of conformity does not
relieve the designer / manufacturer of
the machine from his obligation to
ensure that the conformity of the entire
machine to which this product is
attached satisfies the corresponding EC
directive.
Par la présente nous déclarons que les
produits suivants de la série
ELMON inductive 71-242
ELMON inductive 71-942
ELMON inductive 71-752(W)
Relais de sécurité pour la combinaison
de barres palpeuses, tapis de sécurité et
bumpers dans le but d'éviter les risques
d'écrasement et de cisaillement,
de par sa conception et sa construction,
ainsi que dans les modèles mis en
circulation par nos soins, répondent aux
exigences de base pour la sécurité et la
santé des directives et normes CE
suivantes :
2006/42/CE
EN ISO 13849-1:2015
EN 60947-5-1:2017
2011/65/EU (RoHS)
Cette déclaration de conformité ne
délie pas le constructeur / fabricant de
la machine de son obligation d'assurer
la conformité de l'ensemble de la
machine à laquelle ce produit est
apposé selon la directive CE.
Hersteller und
Dokumentationsbevollmächtigter
Manufacturer and attorney of
documents
Fabricant et agent de documentation
ASO GmbH
Hansastr. 52
D-59557 Lippstadt
Lippstadt, 30.09.2020
H. Friedrich
-Geschäftsführer -CEO -Gérant -

12 13
ELMON inducve 71-242 + ELMON inducve 71-942
Inducve signal transmission system
We reserve the right to make technical and operaonally relevant changes to the
products and devices described in this documentaon at any me and without prior
noce.
English
1. Contents
1. Contents . . . . . . . . . . . . . . . . . . . . . . . . . . . . . . 13
2. General safety regulaons and protecve measures . . . . . 14
3. General and Funcon . . . . . . . . . . . . . . . . . . . . . . . 15
4. Proper use . . . . . . . . . . . . . . . . . . . . . . . . . . . . . 15
5. System components ed to the gate. . . . . . . . . . . . . . 16
6. Device overview. . . . . . . . . . . . . . . . . . . . . . . . . . 16
6.1 Signal Indicators . . . . . . . . . . . . . . . . . . . . . . . . . . . . . . . . . 16
6.2 Connecon terminals . . . . . . . . . . . . . . . . . . . . . . . . . . . . . . 17
7. Connecng the device . . . . . . . . . . . . . . . . . . . . . . 17
7.1 Prerequisites. . . . . . . . . . . . . . . . . . . . . . . . . . . . . . . . . . . 17
7.2 Supply voltage. . . . . . . . . . . . . . . . . . . . . . . . . . . . . . . . . . 18
7.3 Connecng the staonary coil core . . . . . . . . . . . . . . . . . . . . . . 18
7.4 Connecng the staonary safety contact edges . . . . . . . . . . . . . . . 18
7.5 Connecng the control circuits. . . . . . . . . . . . . . . . . . . . . . . . . 18
7.6 Connecng the safety contact edge to the coil core SPK 54 . . . . . . . . . 19
7.7 Connecng mulple safety contact edges per sensor circuit . . . . . . . . 19
8.
Commissioning and funconal test
. . . . . . . . . . . . . . . . 19
9. Error diagnosis. . . . . . . . . . . . . . . . . . . . . . . . . . . 20
10. Taking out of service and disposal . . . . . . . . . . . . . . . . 21
11. Technical specicaons . . . . . . . . . . . . . . . . . . . . . . 21
12. EC declaraon of conformity . . . . . . . . . . . . . . . . . . . 22

14
The switching unit complies with EN ISO 13849-1 "Safety-related parts of control systems", Cat. 3.
To meet Cat. 3 requirements, the switching unit has a redundant structure with two, two-way
polling, forcibly actuated safety relays per channel.
The requirements of EN 12978 "Safety devices for power operated doors and gates" and EN 12453 "Safety
in use of power operated gates" are also fullled.
The manufacturer assumes no liability in the event of non-observance or intenonal abuse.
2. General safety regulaons and protecve measures
• The manufacturer and users of the plant / machine on which the protecon is being used are responsible
for implemenng and following all applicable safety regulaons and rules.
• When used in conjuncon with the higher-order controller, the protecon guarantees funconal safety,
but not the safety of the enre plant / machine. The safety of the enre plant / machine must, therefore,
be assessed in accordance with machinery direcve 2006/42/EG or appropriate product norm before
using the device.
• The operang instrucons must always be available at the place of installaon of the protecon.
They must be read thoroughly and observed by all persons involved in the operaon, maintenance and
servicing of the protecon.
• The protecon must only be installed and commissioned by professionals familiar with these opera-
ng instrucons and the applicable operaonal safety and accident prevenon regulaons. All of the
instrucons provided in these operang instrucons must be observed and followed.
All electrical work must only be performed by skilled electricians.
• All relevant electrical engineering and Employer's Liability Insurance Associaon safety regulaons must
be observed.
• During work on the switching unit, it is to be switched to zero potenal, checked to ensure that it is at
zero potenal and protected against being restarted.
• If the potenal-free contacts of the relay outputs are supplied externally with a dangerous voltage, make
certain that these outputs are also switched o during work on the switching unit.
• The switching unit does not contain any components that require servicing by the user. Unauthorised
conversions and repairs made to the switching unit will void all guarantees and the manufacturer’s
liability.
• The protecon system is to be professionally inspected at appropriate intervals and be documented in
such a way that it is comprehensible at all mes.
Safety advice
• The switching unit enables operaon at 230 V as well as with 24 V AC/DC. Connecng the operang voltage
to the wrong terminals can destroy the switching unit.
• The switching unit is to be installed in a switching cabinet.
• Do not install in the immediate vicinity of strong sources of heat.
• For capacive and inducve loads, ensure adequate protecve circuits.
English
Inducve signal transmission system

14 15
3. General and Funcon
The inducve signal transmission system solves the problem of connecng moveable
safety contact edges
to
a staonary
evaluaon system without mechanical stress. Communicaon between the moveable safety
contact edges and the electronic evaluaon system is based on inducon. To achieve this, the monitoring
electronics induce a frequency on a coil core, which is integrated in a closed conductor loop.
The second coil core, to which the moveable safety contact edges are connected, receives this frequency and
sends corresponding feedback to the electronic evaluaon system in the event of cable break or actuaon of
a safety contact edge.
The compact and easy-to-install safety relay is designed for outdoor use and can be operated with 24 V AC/DC
mains voltage
.
Up to four safety contact edge circuits can be connected to the switching unit. Two channels (safety contact
edges opening movement and safety contact edges closing movement) are available for the safety contact
edges on the gate leaf; two channels are also available for the safety contact edges on the leading pillar.
The signal transmission system monitors the travelling safety contact edges on the gate leaf without
contact and without abrasion. The staonary safety contact edges are connected directly to the switching
unit.
The switching unit connuously monitors these four safety contact edge circuits for actuaon or interrupon
(cable break). In the event of a fault, one of the two stop commands (stop in the opening direcon or stop in
the closing direcon) is issued to the respecve safety contact edge circuit. A terminang resistor is integra-
ted into the end edge of the relevant safety contact edge circuit in order to enable the standby current of the
enre system to be monitored. If the specied standby current is owing, the output relays are acvated and
the switching contacts are closed. If the switching element is actuated or the sensor circuit is interrupted,
the relay switching contacts open.
The switching states of the relays and the applied operang voltage are indicated by LEDs.
If an error is present, all the safety outputs are not acve.
4. Proper use
The ELMON inducve 71-242 (ELMON inducve 71-942) switching unit can only full its safety-related task if
used properly.
The
ELMON inducve
71-242 (
ELMON inducve
71-942) safety transmission system is designed for evaluang
staonary and travelling safety contact edges with constant 8.2 kΩ resistance.
Any uses above and beyond these uses constute improper use. The manufacturer assumes no liability for
damages arising from improper use.
The device may only be used in special applicaons with the manufacturer’s express consent.
ELMON inducve 71-242 + ELMON inducve 71-942
Inducve signal transmission system
English

16
6. Device overview
6.1 Signal Indicators
V1.0: If no error is present, then LED Power shows the func on control (brie y o ).
V4.0 and later: If no error is present, then LED Power shows the opera ng state (on).
V5.6 or later: If an internal error condi on is detected during opera on, the error message is saved. The exi-
s ng saved error messages are output one a er the other by the green LED (Power) via the number of pulses.
A er a switch-on procedure, all internally saved error messages are deleted. If an internal error condi on is
currently present, all red LEDs are permanently lit. If there is currently no internal fault state, the red LEDs
indicate the states of the connected safety contact edges. The error state during tes ng of the signal input
(error message 6) becomes inac ve if no error is detected during tes ng.
During the output of an error message, the number of output pulses indicates the error:
5. System components ed to the gate
1
ELMON induc ve
71-242 control device
(
ELMON induc ve
71-942)
2 Sta onary coil core
3 Travelling coil core
4 Steel cable ac ng as transmission medium
- with 2 addi onal wires
Example of use
The actual arrangement of the individual components
depends on the design of the gate in ques on and the
condi ons at the installa on site.
ELMON
induc ve
71-242
ELMON
induc ve
71-942
English
Induc ve signal transmission system
LED Power (green)
Opera ng state (on)
Error message (pulse output)
LED Transmit Opening (red)
travelling edge(s) for opening movement
actuated / interrupted (on)
LED Sta onary Opening (red)
sta onary edge(s) for opening movement
actuated (on) - interrupted ( ashes)
LED Transmit Closing (red)
travelling edge(s) for closing movement
actuated / interrupted (on)
LED Sta onary Closing (red)
sta onary edge(s) for closing movement
actuated (on) - interrupted ( ashes)
33 11 10 1 2
22 2
243
Gate opens Gate closes
safety contact edge OPEN movement
safety contact edge CLOSE movement
1

16
17
7. Connec ng the device
7.1 Prerequisites
• The signal cable must not be placed parallel to the motor cable or other power cables.
• The supply voltage used for the
ELMON induc ve
71-242 and the
ELMON induc ve
71-942 must comply
with the requirements for safety low voltage (SELV).
• Cables installed outdoors or outside of the switching cabinet must be protected appropriately.
•
The protec on class speci ed for this device is only ensured if the supply lines have been properly clamped
to the screw connec ons.
Pulse Error message
1 Voltage supply outside of the valid value range
2
Induc ve signal transmission system
error
3 Output control Open faulty
4 Output control Close faulty
5Data transmission with microcontroller faulty
6Tes ng sensor input faulty (sta onary safety contact edges) (Open/Close)
Bo om
ELMON induc ve 71-942
Transmit
Sta onary Op.
Sta onary Cl.
Pin 4, 5
Pin 6, 7
Pin 8, 9
ELMON induc ve 71-242
Pin 1, 2 sta onary coil core
Pin 3, 11 SCE - leading pillar opening
Pin 3, 10 SCE - leading pillar closing
Pin 4, 5 relay output for controller - stop opening
Pin 6, 7 relay output for controller - stop closing
Pin 8, 9 supply voltage 24 V
6.2 Connec on terminals
ELMON induc ve 71-242 + ELMON induc ve 71-942
Induc ve signal transmission system
ELMON induc ve 71-242 ELMON induc ve 71-942
12
3
4
5
6
7
8
9
10 11
English

18
7.5 Connec ng the control circuits
The control circuit to be monitored for the opening movement (stop-
opening movement) is to be connected to terminal pair 4, 5 ; for the
closing movement (stop-closing movement), the appropriate control
circuit is to be connected to terminal pair 6, 7. The control circuits are
dependent on the rated current to protect with an appropriate fuse or the
rated current to the control circuits must be limited by other measures
to the maximum value.
4
5
76
4
5
76
English
Induc ve signal transmission system
7.2 Supply voltage
With the ELMON induc ve 71-242 and ELMON induc ve 71-942,
24 V AC/DC is to be connected to terminal pair 8, 9 as voltage sup-
ply. The supply line to the switching unit must be protected with an
appropriate fuse.
7.3 Connec ng the sta onary coil core
ELMON induc ve
71-242: Connect the sta onary coil core to terminal
pair 1, 2
;
no special a en on is required for polarity.
ELMON induc ve
71-942: The sta onary coil core is to be connected to
the
Transmit slot.
7.4 Connec ng the sta onary safety contact edges
ELMON induc ve
71-242: The sta onary safety contact edge(s)
on the
leading pillar for the opening movement is (are) connected to terminal
pair
3, 11.
ELMON induc ve
71-942: The sta onary
safety contact edge(s)
for the
opening movement is
(are) connected to the Sta onary Opening slot
.
If several
safety contact edge
s are being used, they must be connected
in series and the
end edge must be terminated using an 8.2 kΩ resistor.
ELMON induc ve
71-242:
The sta onary
safety contact edge(s)
for the
closing movement is (are) connected to terminal pair 3, 10.
ELMON induc ve
71-942: The sta onary
safety contact edge(s)
for the
closing movement is (are
) connected to the Sta onary Closing slot.
If one or both channels for the sta onary
safety contact edge
are not
used, the supplied 8.2 kΩ resistors are to be connected to the respec-
ve channels.
ELMON induc ve
71-242
ELMON induc ve
71-942
-+
8
9
-+
8
9
12
10 3
11

18
19
ASO
safety contact edges
must not be connected in parallel.
7.6 Connec ng the safety contact edges to the coil core SPK 54 ( gure 1)
7.7 Connec ng mul ple
safety contact edges
per sensor circuit ( gure 2)
One or more
safety contact edges
can be connected to sensor input O or C. For this purpose, the individual
safety contact edges
are connected in series according to gure 2.
Up to ve
safety contact edges
may be connected in series, whereby the total cable length must not exceed 25 m.
The length of one
safety contact edges
may be up to 25 m.
Before connec ng the
safety contact edges
that are connected in series, it is recommended that the resistance
value of the arrangement be measured.
The resistance must be 8.2 kΩ ± 500 Ω when the
safety contact edge
is inac ve and must not exceed 500 Ω
when it is ac ve.
If a channel is not used, it must be connected to an 8,2 k
Ω
resistor.
The travelling
safety contact edges
are connected to the
travelling coil core.
For this purpose, the travelling
safety contact edge
CLOSING
movement is connected to connec on C of the travelling
coil core
and the op onal
safety contact edge
OPENING
movement
is connected to connec on O
.
8. Commissioning / func onal test
The gate system must be tested for proper func on a er all of the electrical connec ons have been established
and the supply voltage has been turned on. To do this, ac vate each of the safety contact edges one a er
another and check the corresponding reac ons of the switching unit.
Figure 2: Wiring of mul ple safety contact edges
English
ELMON induc ve 71-242 + ELMON induc ve 71-942
Induc ve signal transmission system
safety contact edge
CLOSING
movement
safety contact edge
OPENING
movement
O
C
Figure 1: Connec on at the coil core
safety contact edges
1
safety contact edges
2
safety contact edges
„n“
O
C
2
222

20
English
Inducve signal transmission system
9. Error diagnosis
Only the green LED may illuminate if the supply voltage has been correctly connected. If one of the red LEDs
illuminate, there is an error in the system which can be pinpointed with the aid of the LED.
LED Error Error correcon
LEDs are not
illuminated
The supply voltage is missing, too low
or has been connected incorrectly
Check connecons and supply voltage:
- 24 V AC/DC at terminals 8 9
Tolerance range: ±10%
A single red LED
is illuminated
safety contact edge(s) not connected,
connected incorrectly or faulty
-
Check the connecons of the corresponding
safety contact
edge (squeezed or brile
supply lines, etc.)
- Check safety contact edge(s)*
One of the safety contact edge
connecons is not being used
Any safety contact edge connecons that are
not being used must be permanently bridged
using one of the supplied 8.2 kΩ resistors
Both of the red
Transmit LEDs
are illuminated
The transmission line is faulty or has
been installed incorrectly
- Observe the mech. assembly instrucons
(ELMON inducve safety transmission sys-
tem)
- Check transmission coil cores for abrasion.
- Check cable loop; make certain that both
transmission coil cores are in the cable loop
- Check cable / gate leaf contact points.
- Check supply voltage**
safety contact edge(s) not connected,
connected incorrectly or faulty
-
Check the connecons of the corresponding
safety contact
edge (squeezed or brile
supply lines, etc.)
- Check safety contact edge(s)*
* If the error is not in the wiring, the funcon of the electronics can be tested by connecng an 8.2 kΩ
resistor to all safety contact edge inputs on the ELMON inducve 71-242 (ELMON inducve 71-942) electronic
evaluaon system (terminals 3, 10 and terminals 3, 11) and to the
travelling
coil core (connecons O
and C). If the electronics work perfectly aer performing the test, the safety contact edges must be
checked using an ohmmeter. To do this, the respecve connecon on the safety contact edge for the
electronic evaluaon system or for the
travelling
coil core must be disconnected and connected to an
ohmmeter.
The resistance must be 8.2 kΩ ±500 Ω when the safety contact edge is inacve and must not exceed 500 Ω
when it is acve.
** If both of the LEDs for the travelling safety contact edges (Transmit Opening and Transmit Closing)
illuminate, there is an error in the inducve signal transmission system. The most frequent causes of
these errors are bad coil core connecons, incorrectly installed cable system components (see ELMON
inducve safety transmission system assembly instrucons) or an impermissibly low supply voltage.
The maximum resistance value of the cable loop must not exceed 3 Ω . The resistance value can be
measured by disconnecng the steel cable from the ground terminal and then measuring the resistance
between the end of the steel cable and ground terminal.
This manual suits for next models
1
Table of contents
Languages:
Other ASO Safety Solutions Microphone System manuals