Asus RECO Smart Cam User manual

Quick Start Guide
RECO Smart Cam
E11074 / Revised Edition V2 / November 2015
¨

2
English
NOTE:
• The screenshots in this Quick Start Guide are for reference
only.

3
English
Hardware
MicroSD card
slot
Micro USB port
GPS port
Emergency
button
Record
button
Power/Wi-Fi
button
Lens
Speaker
Battery LED
Recording/
Snapshot LED
NFC sensor

4
English
Installing / removing the microSD card
To install the microSD card:
1. Insert the microSD card into the
card slot with its gold-plated
contacts facing towards the front of
your RECO Smart Cam.
2. Push the microSD card into the slot
until it clicks in place.
To remove the microSD card:
Press the microSD card to eject, then pull
it out.
IMPORTANT!
• ForfirsttimeuseofyourRECOSmartCamandto
ensure the best video saving quality, format a Class 10
microSD card to FAT32.
• DonotremovethemicroSDcardduringrecording.Doingso
may damage your RECO Smart Cam.

5
English
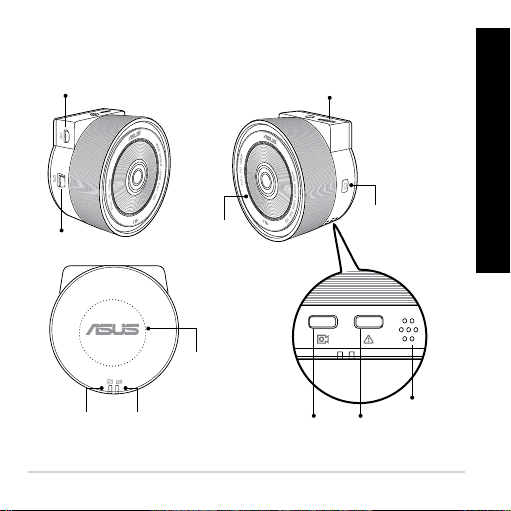
Turning your RECO Smart Cam on/off
• TomanuallyturnyourRECOSmart
Cam on, press the Power/Wi-Fi
button and the Wi-Fi function gets
activated automatically when your
RECO Smart Cam turns on.
• TomanuallyturnyourRECOSmart
Cam off, press the Power/Wi-Fi
button for about three (3) seconds,
then release it when you hear a
beeping sound.
IMPORTANT!
• TheWi-Fifunctiongetsactivatedinabout40secondsafter
turning your RECO Smart Cam on.
• BeforeconnectingyourRECOSmartCamandmobiledevice,
ensure that the Wi-Fi LED is solid blue indicating that Wi-Fi is
on.

6
English
NOTES:
• WhentheAutoRecordfunctionisenabled,yourRECOSmart
Cam starts recording automatically in about five (5) seconds
after turning it on.
• FordetailsonAutoRecordandotherfunctions,refertothe
section Settings.
• Tosavepower,pressthePower/Wi-FibuttontodisabletheWi-
Fi function.
• Incarmode,yourRECOSmartCamoverwritestheoldest
recorded files when your microSD card is full.
• Inportablemode,yourRECOSmartCamstopsrecording
when your microSD card is full.

7
English
• DownloadASUSRECOfromAppStoreorGooglePlayStore
and install it on your mobile device.
Installing ASUS RECO app on your mobile device
Do any of these three methods to download and install ASUS RECO app:
•
Place your NFC-enabled Android mobile
device on the NFC sensor of your RECO
Smart Cam to download ASUS RECO
and install it on your mobile device.
•
Scan the QR code for your
Android or iOS mobile
device to download and
install ASUS RECO.
iOS Android
NFC sensor

8
English
Connecting your mobile device
1
. Turn on your RECO Smart Cam. The Wi-Fi
function starts in 40 seconds after turning
it on.
2
. Turn on the Wi-Fi function of your mobile
device.
3. From the list of networks, tap ASUS RECO
(default SSID).
4. Enter the default password (1234567890)
and tap Join (for iOS device) or Connect
(Android device).
NOTE: You can change the network name (SSID) and password
from the Settings screen of your mobile device.

9
English
Connecting your RECO Smart Cam
1. Connect your USB cable
to the micro USB port of
your RECO Smart Cam.
2. Plug the other end of
your USB cable to the
dual USB car charger 1A
port.
3. Place the power cord
along the windshield
ceiling and front pillar of your vehicle, then secure it in place
with the self-adhesive clips.
NOTES:
• YourRECOSmartCamcomeswithadualcarchargerwith
1A and 2.1A output, which makes it easier to power on and
charge other electronic devices at the same time.
• Disconnectyourcarchargerwhentheengineisoff.
• UseonlythepoweradapterthatcamewithyourRECOSmart
Cam. Using a different car charger may damage your RECO
Smart Cam.
1
2
3

10
English
Registering for your free 500GB ASUS WebStorage
Register your RECO Smart Cam on ASUS WebStorage to get a free
500GB cloud storage for a year.
1
. Locate the Serial number
and Check number on the
packaging box of your RECO
Smart Cam.
2. Go to http://asuswebstorage.com/
navigate/car.
3. Enter the Serial number and Check
number, then click Next.
4. Follow the succeeding instructions
to complete the registration.
15060-673200000000000
Serial No: F9YUFK000001
15060-673200000000000000
Part No: 90YU00J2-B01CA0
90006270046200
UPC
01
07166550046220
EAN
41
15060-673200000000
RECO_SMART B/CN/AS
000001833000000
Check Number

11
English
Using ASUS RECO
ASUS RECO is an app that lets you to enjoy live streaming, play videos,
or download media files for sharing to your mobile device.
Live streaming
1. From your mobile device, launch ASUS RECO.
2. Tap the Preview tab for live streaming.
car
portable
Disconnect

12
English
Using One Shot
1. From your mobile device, launch ASUS RECO.
2. Tap the Preview tab, then tap One Shot.
3. Tap to capture the photo.
4. Tap the Playback tab check the photos.
Capturing continuous photos
1. From your mobile device, launch ASUS RECO.
2. Tap the Preview tab, then tap Photo Burst.
3. Tap to continuously capture photos.
4. Tap the Playback tab check the photos.
NOTE: You can change the photo burst frequency in the
Settings tab.

13
English
Capturing time-lapse photos
1. From your mobile device, launch ASUS RECO.
2. Tap the Preview tab, then tap Time Lapse.
3. Tap to capture photos. Tap to stop time-lapse.
4. Tap the Playback tab check the photos.
NOTE: You can change the time lapse frequency in the
Settings tab.
Recording videos
1. From your mobile device, launch ASUS RECO.
2. Tap the Preview tab, then tap Record Video. Tap to start
recording. Tap to stop recording.

14
English
Playing videos or viewing photos
1. From your mobile device, launch ASUS RECO.
2. Tap the Playback tab, then tap Video or Photo. You can get
the file list from the RECO Smart Cam microSD card.
3. Select the video or photo that you want to play or view.
4. Tap the screen to pause the video playback. Tap the screen
again to resume the video playback.
Sharing files to social media
1. From your mobile device, launch ASUS RECO.
2. Tap the Playback tab, then tap Video or Photo.
3 Select the video or photo that you want to share.
4. Tap to download the file to your mobile device.
5. Tap Low Resolution (Quick) or High Resolution. Tap Cancel
to go back to your playlist.
6. Tap the Mobile tab, then tap to share your files to social
media.

15
English
Deleting files
1. From your mobile device, launch ASUS RECO.
2. Tap the Playback tab, then tap Video or Photo.
3. Tap on the file you want to delete.
4. Tap Delete on the confirmation message.

16
English
Settings
FUNCTION DESCRIPTION
Video Resolution Sets the video resolution.
Available options: 1920x1080@30f ; 1280x720@30f
NOTE: Default resolution for One Photo, Time
Lapse, and Photo Burst is 1920x1080.
Ultra Wide Angle
Mode
•Whenenabled,thisfunctioncanrecordvideos
at 150 degrees.
•Whendisabled,thisfunctioncanrecordvideos
without distortion.
Photo Burst
Frequency
Specifies the number of continuous shots per
second. Available options: 5p/1s ; 10p/1s ; 30p/1s
Time Lapse Frequency Selects the interval options when capturing
photos using Lapse mode.
Available options: 1p/5s ; 1p/30s ; 1p/m
Emergency Contacts Sends an emergency message* to your
emergency contact listed.
NOTE: * Your mobile device will be charged for
this message.
(continued on the next page)

17
English
FUNCTION DESCRIPTION
Text Message Lets you edit the emergency message.
Auto Backup Activates the Auto Backup function. The recorded
emergency file is downloaded to your mobile
device and uploaded to the cloud automatically.
NOTES:
•Ensurethatyourmobilephoneisconnectedto
3G, 4G, or Wi-Fi network.
•OnanAndroidmobiledevice,therecorded
emergency file is downloaded to the device first,
then uploaded to the cloud once connected to
the Internet.
•YoumustbesignedintoASUSWebStorage.
The Serial number and Check number are on
the packaging box of your RECO Smart Cam. For
details, refer to the section Registering for your
free 500GB ASUS WebStorage.
15060-673200000000000
Serial No: F9YUFK000001
15060-673200000000000000
Part No: 90YU00J2-B01CA0
90006270046200
UPC
01
07166550046220
EAN
41
15060-673200000000
RECO_SMART B/CN/AS
000001833000000
Check Number
(continued on the next page)

18
English
FUNCTION DESCRIPTION
Wi-Fi Setting Allows you to configure the network name (SSID)
and password settings.
Default SSID: ASUS RECO
Default Password: 1234567890
Mode Car mode: Loop recording, emergency
recording, and monitor mode functions are
available.
Portable mode: Time lapse, One photo,
Photo burst functions are available. In
this mode, your RECO Smart Cam stops
recording when your microSD card is full.
Image Rotate Auto: The image direction will be adjusted
automatically by G-sensor.
Normal: The image direction is fixed
at 0 degree.(mount is at upside)
Reverse: The image direction is
fixed at 180 degree. (mount is at
downside)
(continued on the next page)

19
English
FUNCTION DESCRIPTION
Auto Record Automatically starts recording when you start
your vehicle.
NOTE: Only works in Car mode
Voice Record Turns the microphone on/off.
G-Sensor Sensitivity Sensitivity High/Mid/Low/Off: This function
allows you to set the collision intensity level
that triggers an emergency recording. Once the
specified intensity level is reached, your RECO
Smart Cam automatically records the emergency
event. You can save up to ten (10) emergency
recording files that normal recording cannot
overwrite.
Date Stamp Select ON to include a date and time on a video
stream.
Available options: ON / OFF
Volume Adjusts the volume level
Monitor Mode When this function is enabled and the scene does
not change in 60 seconds, your RECO Smart Cam
stops recording and enters the standby mode.
Once any movement is detected, your RECO
Smart Cam automatically starts recording.
(continued on the next page)

20
English
FUNCTION DESCRIPTION
EV Adjusts the exposure level
Format SD card Select OK to format the memory card installed on
the device.
CAUTION! Before formatting the SD card, ensure
that you have backed up your files from your SD
card.
Battery Status Shows battery status
Factory Default Select OK to reset all settings to factory default
settings.
Version
Information
Shows the firmware version.
Other manuals for RECO Smart Cam
1
Table of contents