Asus ESC1000 G2 User manual

ESC1000 G2
Conguration Guide

II
Copyright © 2012 ASUSTeK COMPUTER INC. All Rights Reserved.
No part of this manual, including the products and software described in it, may be reproduced, transmitted,
transcribed, stored in a retrieval system, or translated into any language in any form or by any means,
except documentation kept by the purchaser for backup purposes, without the express written permission
of ASUSTeK COMPUTER INC. (“ASUS”).
ASUS provides this manual “as is” without warranty of any kind, either express or implied, including but not
limited to the implied warranties or conditions of merchantability or tness for a particular purpose. In no
event shall ASUS, its directors, ofcers, employees, or agents be liable for any indirect, special, incidental,
or consequential damages (including damages for loss of prots, loss of business, loss of use or data,
interruption of business and the like), even if ASUS has been advised of the possibility of such damages
arising from any defect or error in this manual or product.
Specications and information contained in this manual ae furnished for informational use only, and are
subject to change at any time without notice, and should not be construed as a commitment by ASUS.
ASUS assumes no responsibility or liability for any errors or inaccuracies that may appear in this manual,
including the products and software described in it.
Product warranty or service will not be extended if: (1) the product is repaired, modied or altered, unless
such repair, modication of alteration is authorized in writing by ASUS; or (2) the serial number of the
product is defaced or missing.
Products and corporate names appearing in this manual may or may not be registered trademarks or
copyrights of their respective companies, and are used only for identication or explanation and to the
owners’ benet, without intent to infringe.
E7582
First Edition
July 2012

III
Contents
Revision history
Revision Revision history Date
V1 First release of ESC1000 G2 conguration guide July 2012
Revision history.......................................................................................... III
Safety information ...................................................................................... IV
Chapter 1: Product introduction
1.1 Key features.................................................................................. 1-2
1.2 System overview.......................................................................... 1-4
1.3 Front panel features..................................................................... 1-5
1.4 Rear panel features...................................................................... 1-6
1.5 Systemspecications ................................................................. 1-7
Chapter 2: Components
2.1 Upgrading CPU and CPU heatsink............................................. 2-2
2.2 Upgrading system memory......................................................... 2-3
2.3 Upgrading hard disk drives......................................................... 2-4
2.4 Replacing hard disk drive cage .................................................. 2-5
2.5 Upgrading 5.25-in drives ............................................................. 2-6
2.6 Upgrading expansion card.......................................................... 2-7
2.7 Upgrading front system fan ........................................................ 2-8
2.8 Rackmount rail kit........................................................................ 2-9
2.9 OS support list ........................................................................... 2-10

IV
Safety information
Electrical Safety
• Before installing or removing signal cables, ensure that the power cables for
the system unit and all attached devices are unplugged.
• To prevent electrical shock hazard, disconnect the power cable from the
electrical outlet before relocating the system.
• When adding or removing any additional devices to or from the system, contact
a qualied service technician or your dealer. Ensure that the power cables for
the devices are unplugged before the signal cables are connected. If possible,
disconnect all power cables from the existing system before you service.
• If the power supply is broken, do not try to x it by yourself. Contact a qualied
service technician or your dealer.
Operation Safety
• Servicing of this product or units is to be performed by trained service
personnel only.
• Before operating the server, carefully read all the manuals included with the
server package.
• Before using the server, make sure all cables are correctly connected and the
power cables are not damaged. If any damage is detected, contact your dealer
as soon as possible.
• To avoid short circuits, keep paper clips, screws, and staples away from
connectors, slots, sockets and circuitry.
• Avoid dust, humidity, and temperature extremes. Place the server on a stable
surface.
Lithium-Ion Battery Warning
CAUTION! Danger of explosion if battery is incorrectly replaced.
Replace only with the same or equivalent type recommended by the
manufacturer. Dispose of used batteries according to the manufacturer’s
instructions.
CD-ROM Drive Safety Warning
CLASS 1 LASER PRODUCT
Heavy System
CAUTION! This server system is heavy. Ask for assistance when moving or
carrying the system.
This product is equipped with a three-wire power cable and plug for the user’s
safety. Use the power cable with a properly grounded electrical outlet to avoid
electrical shock.

1-
This chapter describes the key features
of ESC1000 G2. It includes the product
overview and general specications.
Chapter 1
Product introduction

Chapter 1: Product introduction1-2
1.1 Key features
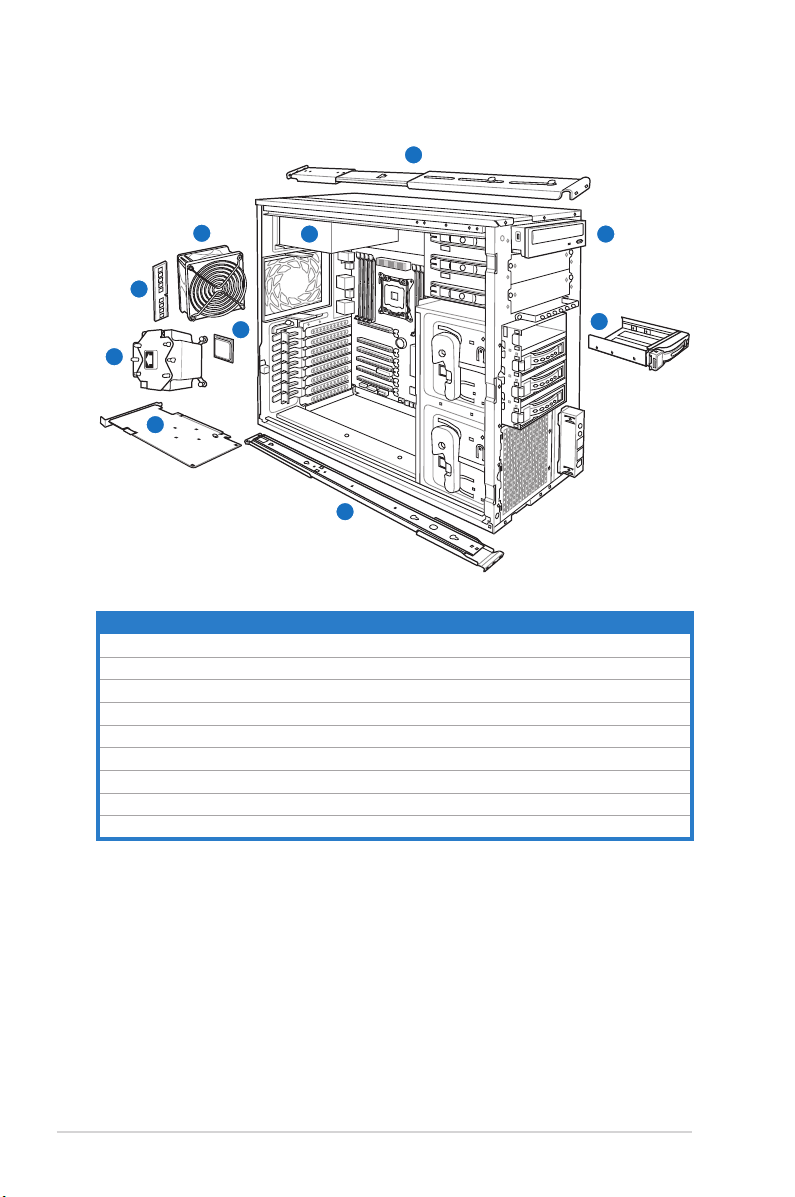
The ASUS ESC1000 G2 is a second generation professional workstation based on
the Intel®Xeon® E5-1600 processor platform, featuring three 5.25” media bays, four
hot-swap 3.5” SATA hard drive cages, 80PLUS Gold 1350W power supply, and six
PCI Express 3.0 x16 expansion slots. It is designed for professional applications
in uid dynamics, medical research, engineering, the sciences, nancial modeling,
real-time graphics, rendering, and heavy-duty ray tracing.
Quad-GPU support unleashes more computing power
Six PCI Express 3.0 x16 slots enable up to four double-deck GPUs, using new
Gen 3 links to provide double the bandwidth of PCI Express 2.0. Fully compatible
with NVIDIA® Quadro™ and Tesla™ GPUs, the ESC1000 G2 is ideal for SOHO
workplaces with its ability to handle massive computing tasks.
Dual Intel®Ethernet for fast networking
Twin Ethernet controllers support doubled network bandwidth, alongside teaming
and fault tolerance functions to offer extra-reliable and fast network connections.
ASUS SSD Caching
Unique design boosts system performance by using an installed SSD as a cache
for frequently accessed data. This allows you to access data easily and quickly
without wasting time waiting for data to transfer.
USB 3.0 Boost
The ESC1000 G2 detects and optimizes connected device protocols automatically
for faster USB speeds in all usage scenarios.
Maximum power supply with DIGI+ for demanding workloads
The 1350W 80PLUS Gold power supply unit cuts down system power loss and
improves energy efciency, saving users money on operating costs. With exclusive
ASUS DIGI+ Power, the ESC1000 G2 utilizes precise power adjustments on both
the processor and memory modules, providing higher system stability.
DTS®Ultra PC II
A brand-new friendly interface brings more functions, including symmetry, audio
restoration, and enhancement. DTS®symmetry monitors and balances level
differences between all digital audio formats, while audio restoration reconstructs
percussion and transient sounds from compressed sources to restore lost punch
and clarity.
AI Suite II
The ESC1000 G2 is bundled with ASUS AI Suite II, which provides one-stop utility
management and a user-friendly interface for system tuning.

ASUS ESC1000 G2 1-3
Cutting-edge architecture
The ESC1000 G2 supports new Intel®Sandy Bridge-E processors. With eight
DIMM slots and DDR3 1600, it accommodates up to 64GB in memory capacity,
providing high computing capabilities. Extra PCI Express 3.0 lanes are perfect for
systems that require high I/O connectivity and bandwidth, with support for more
compatible devices.

Chapter 1: Product introduction1-4
1.2 System overview
Items
1. Central processing unit (CPU)
2. CPU heatsink and fan
3. System memory
4. System fan
5. Graphics card
6. Hard disk drives
7. Optical drive (optional)
8. Single power supply
9. Rackmount rail kit (optional)
AIR FLOW
1
2
3
48
9
9
7
5
6

ASUS ESC1000 G2 1-5
1.3 Front panel features
USB 3.0 ports
USB 2.0 ports
4-bay HDD cage
Power LED
HDD access LED
Optical drive
Empty 5.25-inch
bays
Reset button
Power button
Security lock
Headphone
output jack
Microphone
jack

Chapter 1: Product introduction1-6
1.4 Rear panel features
The PS/2 keyboard / mouse combo port, USB ports, ESATA ports, Audio ports,
S/PDIF Out ports, and Gigabit LAN ports do not appear on the rear panel if
motherboard is not present.
1350W 80+Single
power supply
Power connector
Expansion slots
Chassis intrusion
switch
Chassis lock
120mm x 38mm
system fan
PS/2 mouse port
USB 2.0 ports
Optical S/PDIF Out port
8-channel audio ports
USB 2.0 ports
USB 3.0 ports LAN2 (RJ-45) port
LAN1 (RJ-45) port
PS/2 keyboard port
USB BIOS Flashback
button
Power switch
IEEE 1394a port

ASUS ESC1000 G2 1-7
1.5 Systemspecications
ASUS ESC1000 G2 is a workstation that features the ASUS P9X79 WS
motherboard, supports Intel® LGA2011 Xeon® E5-1600/Core™ i7-3900/3800 series
processors, and the latest technologies through the onboard chipsets..
Model Name ESC1000 G2
Processor / System Bus
1 x Socket LGA2011
Intel®Xeon® processor E5-1600/Core™ i7-3900/3800
processor family
(TDP=130W)
Core Logic Intel®X79 Express Chipset
Memory
Total Slots 8 (4-channel per CPU, 8 DIMM per CPU)
Capacity Maximum up to 64GB (UDIMM)
Memory Type
DDR3 1066/1333/1866(O.C.)/2000(O.C.)/ 2133
(O.C.)/2400(O.C.) non-ECC/ECC UDIMM
*Refer to www.asus.com for detailed memory AVL CPU
support list.
Memory Size 1GB, 2GB, 4GB and 8GB (UDIMM)
Expansion Slots
Total PCI/PCI-X/
PCI-E Slots 6
Slot Type
4 x PCI-E 3.0 x16 slots
(dual at x16/x16, quad at x8/x8/x8/x8)
2 x PCI-E 3.0 x16 slots (at x4 mode)
Storage SATA Controller
Intel®X79:
- 2 x SATA 6.0Gb/s ports (gray)
- 4 x SATA 3.0Gb/s ports (blue)
Intel Rapid Storage Technology enterprise (for
Windows only) supporting software RAID 0, 1, 5 & 10
Marvell 88SE9128 SATA controller:
- 2 x SATA 6.0Gb/s ports supporting RAID 0 & 1
Networking LAN 1 x Intel® 82579V Gigabit LAN (PHY)
1 x Intel® 82574L Gigabit LAN controller
HDD Bays 4 x Hot-swap 3.5” HDD Bays
Auxiliary Storage FDD / CD / DVD 3 x 5.25” media bays (Optional: DVD-RW)*
*DVD-RW default for North America
Front Panel I/O
2 x USB 3.0 ports
2 x USB 2.0 ports
1 x Line In
1 x Line Out
(continued on the next page)

Chapter 1: Product introduction1-8
*Specicationsaresubjecttochangewithoutnotice.
Rear Panel I/O
1 x PS/2 Keyboard port
1 x PS/2 Mouse port
1 x S/PDIF Out (Optical)
1 x USB BIOS Flashback button
2 x USB 3.0/2.0 ports (blue)
8 x USB 2.0/1.1 ports (white port can be switched to
USB BIOS Flashback)
1 x IEEE 1394a port
2 x RJ45 ports
8-channel Audio I/O
OS Support
Windows® XP Service Pack 2 64-bit
Windows® XP Service Pack 3 32-bit
Windows® Vista Sevice Pack 2 32/64-bit
Windows® 7 Ultimate Service Pack 1 32/64-bit
RedHat® Enterprise Linux Desktop WS 6.2
Open SuSE® 12.1
Ubuntu Desktop 11.1
Fedora 16
Anti-virus Software Optional anti-virus CD Pack
Dimension (HH x WW x DD) 445mm x 217.5mm x 545mm
Net Weight Kg (CPU, DRAM &
HDD not included) 17 Kg
Power Supply 1350W (80+) Gold Single Power Supply
Power Rating Input: 115-240Vac, 14.5-6.5A, 50-60Hz, Class I
Environment
Operating temperature: 10°C–35°C
Non operating temperature: -40°C–70°C
Non operating humidity: 20%–90% (Non-condensing)

1-
This chapter lists the key components
and optional accessories for the server
system.
Chapter 2
Components

Chapter 2: Components2-2
2.1 Upgrading CPU and CPU heatsink
The motherboard comes with a surface mount LGA2011 socket designed for the
Intel®Xeon® E5-1600/Core™ i7-3900/3800 series processors.
Order P/N Description
N/A E5-1660 3.3G(6C/15M/130W/DDR3 1600/HT)
N/A E5-1650 3.2G(6C/12M/130W/DDR3 1600/HT)
N/A E5-1620 3.6G(4C/10M/130W/DDR3 1600/HT)
N/A CORE I7-3820 3.6G (4C/10M/130W/DDR3 1600/HT)
Please note the order in opening/ closing the double latch. Follow the
instructions printed on the metal sealing hatch or the illustrations shown below
in this manual. The plastic cap will pop up automatically once the CPU is in
place and the hatch properly sealed down.

ASUS ESC1000 G2 2-3
2.2 Upgrading system memory
The motherboard comes with eight Double Data Rate 3 (DDR3) Dual Inline
Memory Modules (DIMM) slots.
You may install 1GB, 2GB, 4GB, 8GB unbuffered ECC or non-ECC DDR3 DIMMs
into the DIMM sockets depending on the installed CPU.
Always install DIMMs with the same CAS latency. For optimum compatibility, it
is recommended that you obtain memory modules from the same vendor.
Order P/N Description
90-S000I0630T DDR3 1600 ECC UNB 2G 240P SINGLE PACK
90-S000I0640T DDR3 1600 ECC UNB 4G 240P SINGLE PACK
90-S000I0650T DDR3 1600 ECC UNB 8G 240P SINGLE PACK

Chapter 2: Components2-4
2.3 Upgrading hard disk drives
The system supports four hot-swap SATAII/SAS hard disk drives.
We recommend that you install identical drives of the same model and capacity
for RAID conguration.
1
2
2
Order P/N Description
90-S000H64R0T 300GB 6G SAS15Krpm with HDD Tray (Single Pack)
90-S000H64S0T 450GB 6G SAS15Krpm with HDD Tray (Single Pack)
90-S000H64T0T 600GB 6G SAS15Krpm with HDD Tray (Single Pack)
90-S000H65D1T 500GB SATA3 6Gb 7200 rpm with HDD Tray (Single Pack)
90-S000H65B1T 1TB SATA3 6Gb 7200 rpm with HDD Tray (Single Pack)
90-S000H65V0T 500GB SATA3 7200 rpm with HDD Tray (Single Pack)
90-S000H65U0T 1TB SATA3 7200 rpm with HDD Tray (Single Pack)
90-S000H65T0T 2TB SATA3 7200 rpm with HDD Tray (Single Pack)
90-S000H65E2T 3TB SATA3 7200 rpm with HDD Tray (Single Pack)
90-S000H65D0T 500GB SATA3 6Gb 7200 rpm (Single Pack)
90-S000H65B0T 1TB SATA3 6Gb 7200 rpm (Single Pack)
90-S000H65V1T 500GB SATA3 7200 rpm (Single Pack)
90-S000H65U1T 1TB SATA3 7200 rpm (Single Pack)
90-S000H65T1T 2TB SATA3 7200 rpm (Single Pack)
90-S000H65E3T 3TB SATA3 7200 rpm (Single Pack)

ASUS ESC1000 G2 2-5
2.4 Replacing hard disk drive cage

Chapter 2: Components2-6
2.5 Upgrading 5.25-in drives
1
2
13
2

ASUS ESC1000 G2 2-7
2.6 Upgrading expansion card
1. Locate the slot that you want to install expansion card on the motherboard.
2. Align the golden ngers of the expansion card with the slot you decided to
use.
3. Insert the expansion card into the slot. Ensure that it is completely seated on
the slot.
4. Reinstall the expansion card shield.
Order P/N Description
90-S000R1M00T TESLA C2075 6GB GPU CARD
90-S000R0080T GRAPHIC CARD QUADRO 400
90-S000R0070T GRAPHIC CARD QUADRO 600
90-S000R0090T GRAPHIC CARD QUADRO 2000
90-S000R00A0T GRAPHIC CARD QUADRO 4000
90-S000R00B0T GRAPHIC CARD QUADRO 5000
90-S000R00C0T GRAPHIC CARD QUADRO 6000

Chapter 2: Components2-8
2.7 Upgrading front system fan
1
1
2
2
Other manuals for ESC1000 G2
2
Table of contents
Other Asus Desktop manuals

Asus
Asus Essentio CP6230 User manual

Asus
Asus BM6635 User manual

Asus
Asus V2-M2NC61S User manual

Asus
Asus V2-M2A690G User manual

Asus
Asus Essentio CG1330 User manual

Asus
Asus Barebone Vintage-PH1 User manual

Asus
Asus ROG CG8890 User manual

Asus
Asus CP Series User manual

Asus
Asus Pundit-PE3 User manual

Asus
Asus S1-AT5NM10E User manual
Popular Desktop manuals by other brands

HP
HP -380467-003 - COMPAQ PRESARIO C300 C500 C700 F500 F700 LAPTOP... Important information

Advantech
Advantech MIC-1810 Startup manual

HP
HP 280 Pro G3 Disassembly instructions

Lenovo
Lenovo ThinkCentre E50 Käyttöopas

Kessler-Ellis Products
Kessler-Ellis Products SUPERtrol-I MS-716 instructions

Lenovo
Lenovo ThinkCentre Hardware Maintenance Manual