Asus VW199TL User manual

VW199(x)L Series
LCD Monitor
User Guide

ii
Copyright © 2012 ASUSTeK COMPUTER INC. All Rights Reserved.
No part of this manual, including the products and software described in it, may be reproduced,
transmitted, transcribed, stored in a retrieval system, or translated into any language in any form or by any
means, except documentation kept by the purchaser for backup purposes, without the express written
permission of ASUSTeK COMPUTER INC. (“ASUS”).
Product warranty or service will not be extended if: (1) the product is repaired, modied or altered, unless
such repair, modication of alteration is authorized in writing by ASUS; or (2) the serial number of the
product is defaced or missing.
ASUS PROVIDES THIS MANUAL “AS IS” WITHOUT WARRANTY OF ANY KIND, EITHER EXPRESS
OR IMPLIED, INCLUDING BUT NOT LIMITED TO THE IMPLIED WARRANTIES OR CONDITIONS OF
MERCHANTABILITY OR FITNESS FOR A PARTICULAR PURPOSE. IN NO EVENT SHALL ASUS, ITS
DIRECTORS, OFFICERS, EMPLOYEES OR AGENTS BE LIABLE FOR ANY INDIRECT, SPECIAL,
INCIDENTAL, OR CONSEQUENTIAL DAMAGES (INCLUDING DAMAGES FOR LOSS OF PROFITS,
LOSS OF BUSINESS, LOSS OF USE OR DATA, INTERRUPTION OF BUSINESS AND THE LIKE),
EVEN IF ASUS HAS BEEN ADVISED OF THE POSSIBILITY OF SUCH DAMAGES ARISING FROM ANY
DEFECT OR ERROR IN THIS MANUAL OR PRODUCT.
SPECIFICATIONS AND INFORMATION CONTAINED IN THIS MANUAL ARE FURNISHED FOR
INFORMATIONAL USE ONLY, AND ARE SUBJECT TO CHANGE AT ANY TIME WITHOUT NOTICE,
AND SHOULD NOT BE CONSTRUED AS A COMMITMENT BY ASUS. ASUS ASSUMES NO
RESPONSIBILITY OR LIABILITY FOR ANY ERRORS OR INACCURACIES THAT MAY APPEAR IN THIS
MANUAL, INCLUDING THE PRODUCTS AND SOFTWARE DESCRIBED IN IT.
Products and corporate names appearing in this manual may or may not be registered trademarks or
copyrights of their respective companies, and are used only for identication or explanation and to the
owners’ benet, without intent to infringe.
Table of contents
Notices......................................................................................................... iii
Safety information ...................................................................................... iv
Care & Cleaning........................................................................................... v
1.1 Welcome! ...................................................................................... 1-1
1.2 Package contents......................................................................... 1-1
1.3 Assembling the monitor ............................................................. 1-2
1.4 Monitor introduction .................................................................... 1-2
1.4.1 Front of the LCD monitor ................................................ 1-2
1.4.2 Rear of the LCD monitor ................................................. 1-5
2.1 Detaching the arm/stand
(for VESA wall mount) ................................................................. 2-1
2.2 Adjusting the monitor.................................................................. 2-2
3.1 OSD (On-Screen Display) menu ................................................. 3-1
3.1.1 How to reconfigure.......................................................... 3-1
3.1.2 OSD Function Introduction.............................................. 3-1
3.2 Specications............................................................................... 3-5
3.3 Troubleshooting (FAQ)................................................................ 3-6
3.4
Supported timing list ..........................................................................3-7

iii
Notices
Federal Communications Commission Statement
This device complies with Part 15 of the FCC Rules. Operation is subject
to the following two conditions:
• Thisdevicemaynotcauseharmfulinterference,and
• Thisdevicemustacceptanyinterferencereceivedincluding
interferencethatmaycauseundesiredoperation.
Thisequipmenthasbeentestedandfoundtocomplywiththelimitsfora
ClassBdigitaldevice,pursuanttoPart15oftheFCCRules.Theselimits
are designed to provide reasonable protection against harmful interference
inaresidentialinstallation.Thisequipmentgenerates,usesandcan
radiateradiofrequencyenergyand,ifnotinstalledandusedinaccordance
withmanufacturer’sinstructions,maycauseharmfulinterferencetoradio
communications.However,thereisnoguaranteethatinterferencewill
not occur in a particular installation. If this equipment does cause harmful
interferencetoradioortelevisionreception,whichcanbedeterminedby
turningtheequipmentoffandon,theuserisencouragedtotrytocorrect
theinterferencebyoneormoreofthefollowingmeasures:
• Reorientorrelocatethereceivingantenna.
• Increasetheseparationbetweentheequipmentandreceiver.
• Connecttheequipmenttoanoutletonacircuitdifferentfromthatto
which the receiver is connected.
• Consultthedealeroranexperiencedradio/TVtechnicianforhelp.
AsanEnergyStar® Partner,ourcompanyhasdetermined
thatthisproductmeetstheEnergyStar® guidelines for
energyefficiency.
Canadian Department of Communications Statement
ThisdigitalapparatusdoesnotexceedtheClassBlimitsforradio
noise emissions from digital apparatus set out in the Radio Interference
Regulations of the Canadian Department of Communications.
This class B digital apparatus complies with Canadian ICES-003.

iv
Safety information
• Beforesettingupthemonitor,carefullyreadallthedocumentationthat
came with the package.
• Topreventfireorshockhazard,neverexposethemonitortorainor
moisture.
• Nevertrytoopenthemonitorcabinet.Thedangeroushighvoltages
insidethemonitormayresultinseriousphysicalinjury.
• Ifthepowersupplyisbroken,donottrytofixitbyyourself.Contacta
qualifiedservicetechnicianoryourretailer.
• Beforeusingtheproduct,makesureallcablesarecorrectlyconnected
andthepowercablesarenotdamaged.Ifyoudetectanydamage,
contactyourdealerimmediately.
• Slotsandopeningsonthebackortopofthecabinetareprovidedfor
ventilation.Donotblocktheseslots.Neverplacethisproductnearor
over a radiator or heat source unless proper ventilation is provided.
• Themonitorshouldbeoperatedonlyfromthetypeofpowersource
indicatedonthelabel.Ifyouarenotsureofthetypeofpowersupplyto
yourhome,consultyourdealerorlocalpowercompany.
• Usetheappropriatepowerplugwhichcomplieswithyourlocalpower
standard.
• Donotoverloadpowerstripsandextentioncords.Overloadingcan
result in fire or electric shock.
• Avoiddust,humidity,andtemperatureextremes.Donotplacethe
monitorinanyareawhereitmaybecomewet.Placethemonitorona
stable surface.
• Unplugtheunitduringalightningstormorifitwillnotbeusedfora
long period of time. This will protect the monitor from damage due to
power surges.
• Neverpushobjectsorspillliquidofanykindintotheslotsonthe
monitor cabinet.
• Toensuresatisfactoryoperation,incaseuseataPCthenitshould
usethemonitoronlywithcomputerswhichhaveappropriate
configuredreceptaclesmarkedbetween100-240VAC.
• Ifyouencountertechnicalproblemswiththemonitor,contacta
qualifiedservicetechnicianoryourretailer.
• Thewallsocketshallbeinstalledneartheequipmentandshallbe
easilyaccessible.

v
Care & Cleaning
• Beforeyouliftorrepositionyourmonitor,itisbettertodisconnectthecables
and power cord. Follow the correct lifting techniques when positioning the
monitor.Whenliftingorcarryingthemonitor,grasptheedgesofthemonitor.
Donotliftthedisplaybythestandorthecord.
• Cleaning.Turnyourmonitoroffandunplugthepowercord.Cleanthemonitor
surfacewithalint-free,non-abrasivecloth.Stubbornstainsmayberemoved
with a cloth dampened with mild cleaner.
• Avoidusingacleanercontainingalcoholoracetone.Useacleanerintended
forusewiththeLCD.Neverspraycleanerdirectlyonthescreen,asitmaydrip
inside the monitor and cause an electric shock.
The following symptoms are normal with the monitor:
• Thescreenmayflickerduringtheinitialuseduetothenatureofthefluorescent
light. Turn off the Power Switch and turn it on again to make sure that the
flicker disappears.
• Youmayfindslightlyunevenbrightnessonthescreendependingonthe
desktoppatternyouuse.
• Whenthesameimageisdisplayedforhours,anafterimageoftheprevious
screenmayremainafterswitchingtheimage.Thescreenwillrecoverslowlyor
youcanturnoffthePowerSwitchforhours.
• Whenthescreenbecomesblackorflashes,orcannotworkanymore,contact
yourdealerorservicecentertofixit.Donotrepairthescreenbyyourself!
Conventions used in this guide
WARNING:Informationtopreventinjurytoyourselfwhentryingto
complete a task.
CAUTION:Informationtopreventdamagetothecomponentswhen
tryingtocompleteatask.
IMPORTANT:InformationthatyouMUSTfollowtocompleteatask.
NOTE:Tipsandadditionalinformationtoaidincompletingatask.

vi
Wheretondmoreinformation
Refer to the following sources for additional information and for product and
software updates.
1. ASUS websites
TheASUSwebsitesworldwideprovideupdatedinformationonASUS
hardware and software products. Refer to http://www.asus.com
2. Optional documentation
Yourproductpackagemayincludeoptionaldocumentationthatmayhave
beenaddedbyyourdealer.Thesedocumentsarenotpartofthestandard
package.

1-1ASUSLCDMonitorVW199(x)LSeries
1.1 Welcome!
ThankyouforpurchasingtheASUS®VW199(x)LSeriesLCDmonitor!
ThelatestwidescreenLCDmonitorfromASUSprovidesacrisper,broader,and
brighterdisplay,plusahostoffeaturesthatenhanceyourviewingexperience.
Withthesefeatures,youcanenjoytheconvenienceanddelightfulvisual
experiencethattheVW199(x)LSeriesbringsyou!
1.2 Package contents
CheckyourVW199(x)LSeriesLCDMonitorpackageforthefollowingitems:
LCD monitor
Monitor stand and base
UsermanualCD
Quick start guide
Warrantycard
Power cord
VGAcable
Audiocable(VW199TL/SL)
DVIcable(VW199TL/NL)
• Ifanyoftheaboveitemsisdamagedormissing,contactyourretailer
immediately.
1-2 Chapter 1: Product Introduction
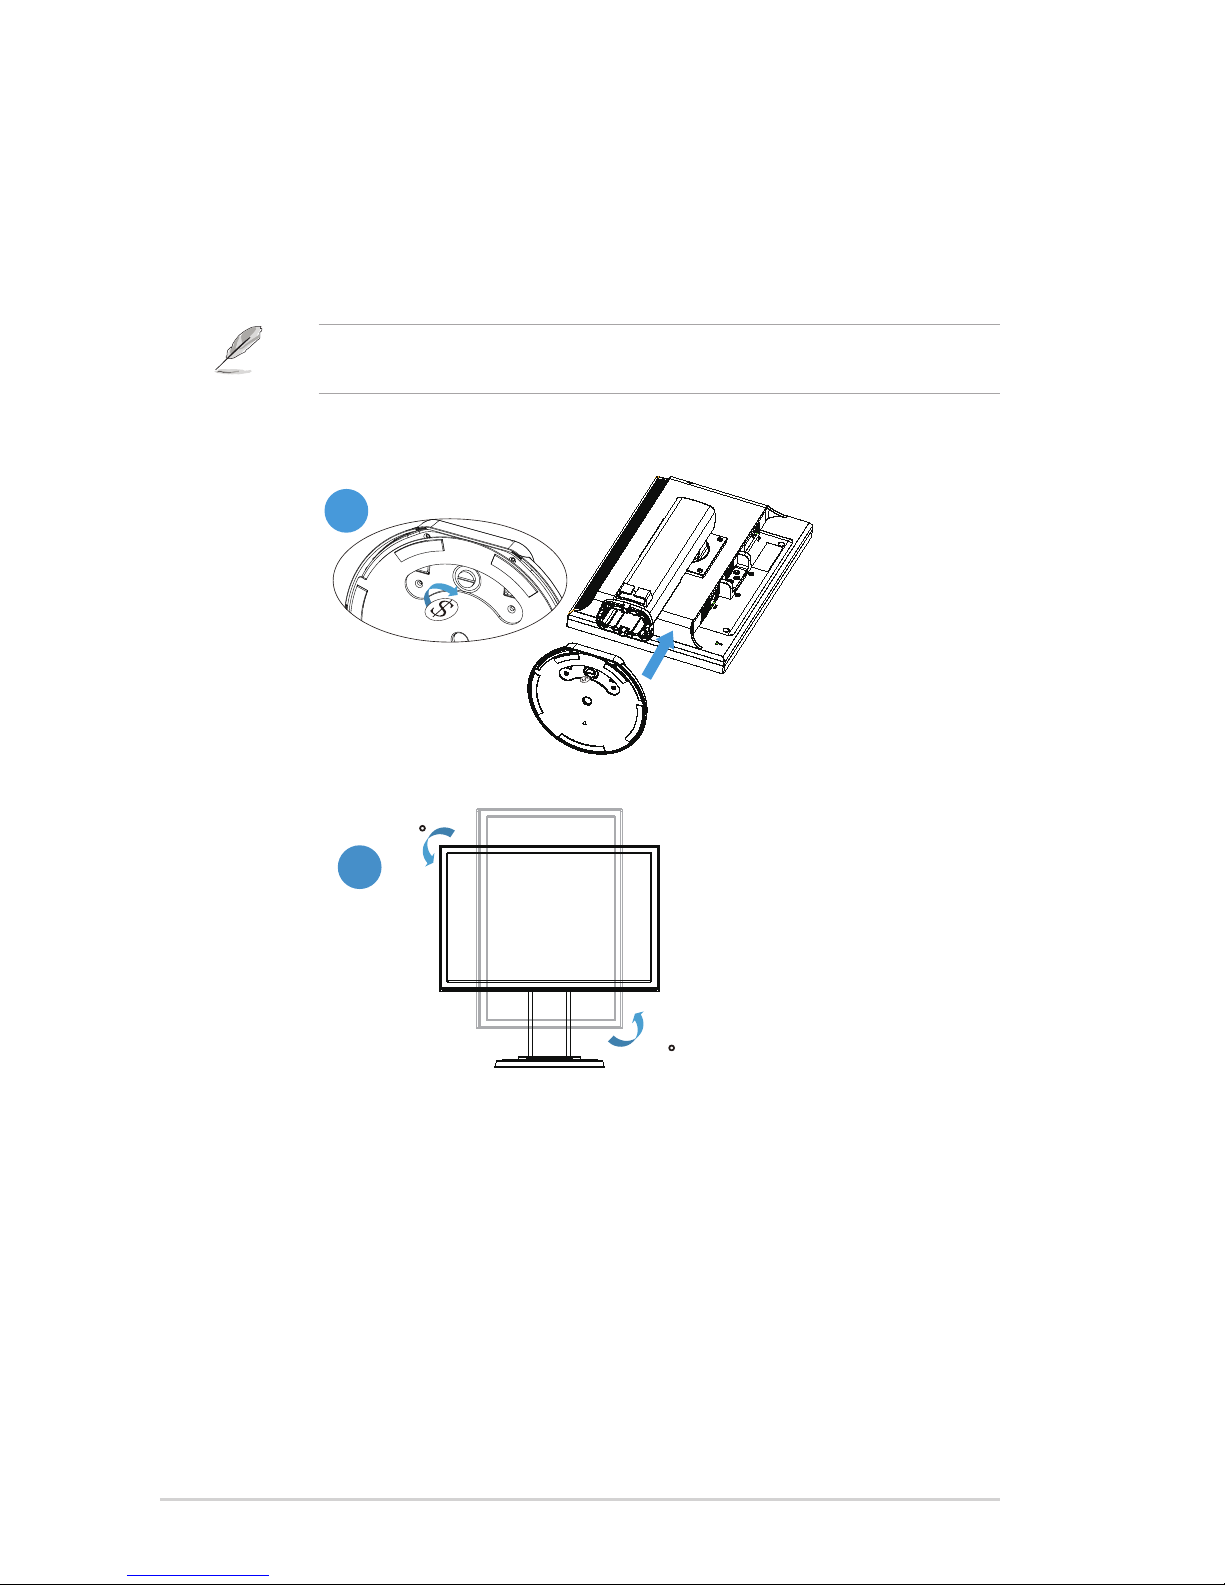
1.3 Assembling the monitor
To assemble the monitor:
1. Placethedisplayflatonaclothonthetable,assemblethebaseaccordingto
the drawing and use a coin to turn the screw tight.
2. Adjust the monitor to the angle that is most comfortable.
• Werecommendthatyoucoverthetablesurfacewithsoftclothtoprevent
damage to the monitor.
1
2
90
90

1-3ASUSLCDMonitorVW199(x)LSeries
1.4 Monitor introduction
1.4.1 Front of the LCD monitor
1.4.1.1 VW199TL/SL
21 3 4 5 6
1. Button:
• Automaticallyadjusttheimagetoitsoptimizedposition,clock,and
phasebylongpressingthisbuttonfor2-4seconds(forVGAmodeonly).
• Usethishotkeytoswitchfromsixvideopresetmodes(SceneryMode,
StandardMode,TheaterMode,GameMode,NightViewMode,and
sRGBMode)withSPLENDID™VideoIntelligenceTechnology.
• ExittheOSDmenuorgobacktothepreviousmenuastheOSDmenu
is active.
2. Button:
• Press this button to decrease the value of the function selected or move
tothenextfuction.
• ThisisalsoahotkeyforVolumeadjustment.
3. MENUButton:
• Press this button to enter the OSD menu.
• Pressthisbuttontoenter/selecttheicon(function)highlightedwhilethe
OSD is activated.
4. Button:
• Press this button to increase the value of the function selected or move
right/uptothenextfunction.
• ThisisalsoahotkeyforBrightnessadjustment.

1-4 Chapter 1: Product Introduction
5. Power Button:
• Pressthisbuttontoturnthemonitoron/off.
6. Power Indicator
• The color definition of the power indicator is as the below table.
Status Description
Blue ON
Amber Standbymode
OFF OFF
1.4.1.2 VW199NL/DL
21 3 4 5 6
1. Button:
• Automaticallyadjusttheimagetoitsoptimizedposition,clock,and
phasebylongpressingthisbuttonfor2-4seconds(forVGAmodeonly).
• Usethishotkeytoswitchfromsixvideopresetmodes(SceneryMode,
StandardMode,TheaterMode,GameMode,NightViewMode,and
sRGBMode)withSPLENDID™VideoIntelligenceTechnology.
• ExittheOSDmenuorgobacktothepreviousmenuastheOSDmenu
is active.
2.
Button:
• Press this button to decrease the value of the function selected or move
tothenextfuction.
• ThisisalsoahotkeyforContrastadjustment.
3. MENUButton:
• Press this button to enter the OSD menu.
This manual suits for next models
3
Table of contents
Other Asus Monitor manuals

Asus
Asus VS208 Series User manual

Asus
Asus VG34VQL3A Series User manual

Asus
Asus VP299CL Series User manual

Asus
Asus VN289QL Series User manual

Asus
Asus VG34V Series User manual

Asus
Asus BE27ACSBK Series User manual

Asus
Asus VW199 Series User manual

Asus
Asus ABF01 User manual

Asus
Asus VK278Q Series User manual

Asus
Asus VG2491R Series User manual

Asus
Asus VS208 Series User manual

Asus
Asus VH208 Series User manual

Asus
Asus TUF Gaming VG24V Series User manual

Asus
Asus VG27AQM1A Series User manual

Asus
Asus PA32UC-G User manual

Asus
Asus VS239H User manual

Asus
Asus VW242 Series User manual

Asus
Asus MB165B User manual

Asus
Asus VA249 series User manual

Asus
Asus VS247H-P User manual


