ATC ATC-1200 User manual

1
TCP/IP to RS232/422/485 Converter
User’s Manual
Model ATC-1200
1.0 Introduction
The ATC-1200 is a cost effective and highly integrated
Serial-to-Ethernet Converter. Embedding a 8-bit pipelined RISC,
single cycle per instruction with maximum operating frequency
of 100Mhz (100 MIPS),Embed 512KB Flash memory and 32KB
SRAM for data memory.10/100Mbps Ethernet and serial port
support handshake RTS, CTS. ATC-1200 Can control 1 x
RS232/422/485 devices located virtually anywhere (via
Ethernet or Internet). Automatically finds devices in the network
Configuration over Driver Panels, serial Port,Telnet,WEB
Browser,SNMP Automatic mode switching between Driver and
RAW mode Support TCP/IP, UDP, DHCP, Support TCP, UDP,
ICMP, IPv4, DHCP, BOOTP, ARP, DNS, SMTP, SNTP, uPNP,
and HTTP in software
2.0 Features:
3-in-1 RS-232/422/485 interface Max.921.6Kbps Serial
interface and 10/100 Mbps Ethernet
Supports 4- and 2-wire RS-422 and built-in terminator
Supports industrial 12-24 VDC power input
Terminal block accessories for easy RS-422/485 serial wiring
Supports IP configuration by web browser
Supports configuration store and copy for easy deployment
Supports Driver, TCP Server/Client, UDP Server/Client, Pair
Connection operation modes
Easy and powerful configuration program
Approval CE, FCC,RoHS
3.0 . Hardware Installation & Initial Setup
3.1 RS-232 Pinout:(DB9 Male)
3.2 RS-422/485 Pinout:(Six Terminal from left)
Terminal
No
1
2
3
4
5
6
RS-422
R+
R-
T+
T-
VIN
GND
RS-485
485+
485-
-
-
VIN
GND
3.3 Connect to 10/100M Ethernet:
ATC-1200 10/100M Port can connect to switcher or Hub use
straight-Through Cable as following diagram.
3.4 Power Supply:
ATC-1200 TCP/IP converter can adopt the product’s 9V power
adapter for power supply or adopt power from other DC power or
device.(+9~24VDC@500-100mA)。
3.5 ATC-1200 LED indication:
LINK Indication Ethernet Link,Green on Ethernet Link
established。
TXD Data Sending from Ethernet to Serial port
RXD Receiving data from Serial port to Ethernet
PWR Indication Power on
3.6 Connection Diagram
RS-232 Connection
RS-422 Connection
RS-485 Connection
(DB9Male)
Signal
I/O
PIN2
RXD
IN
PIN3
TXD
OUT
PIN5
GND
-
PIN7
RTS
OUT
PIN8
CTS
IN
+9~24VDC
GND
ATC-1200
ATC-1200
ATC-1200
2
4.0 Configuration and Operation
Use this section to set up your computer to assign it a static IP
address in the 192.168.2.2 to 192.168.2.254 range with a
subnet mask of 255.255.255.0. This is necessary to ensure that
your computer can communicate with your ATC-1200. Your
computer must have an Ethernet card and TCP/IP installed.
TCP/IP should already be installed on computer using Windows
98/2000/XP/win7/windows 10 and later operating systems.
Step 1:Open your web browser and type http://192.168.2.125
in the browser’s address box. This address is the factory set IP
Address of your ATC-1200. Press “Enter”.
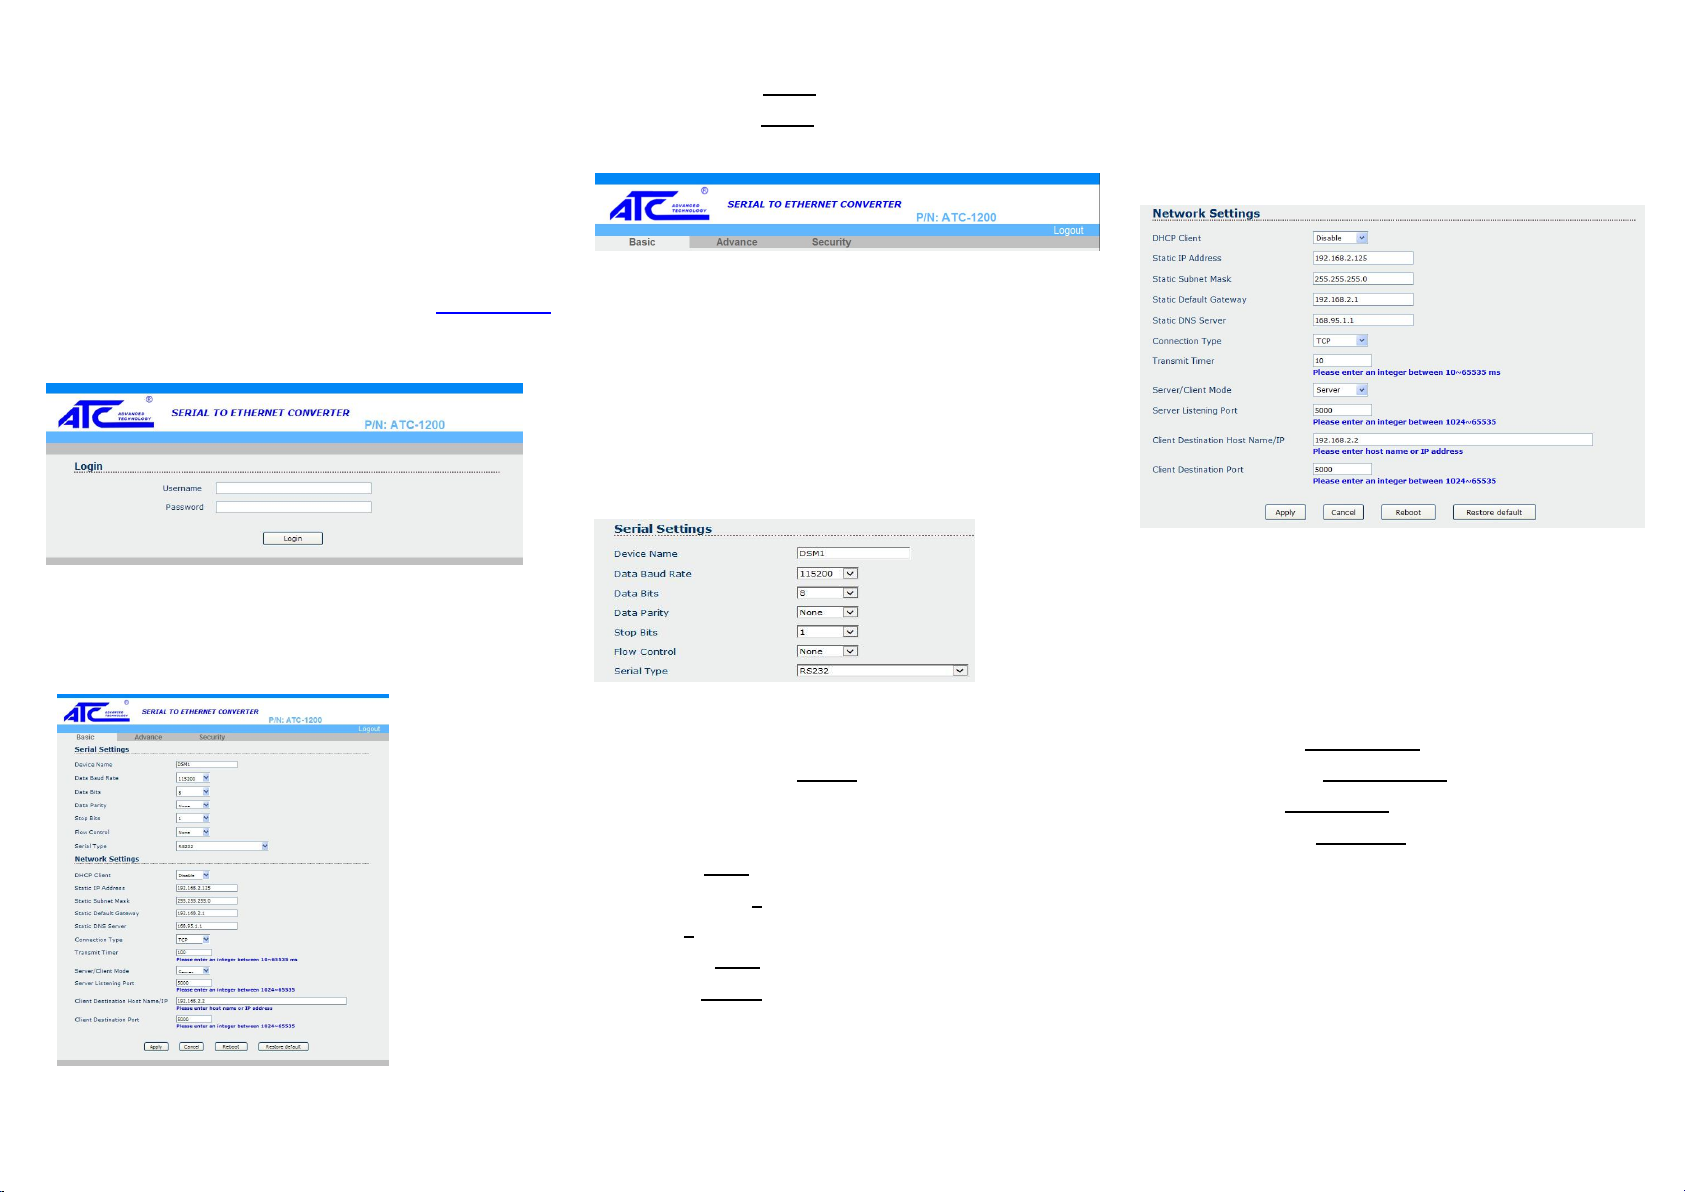
Step 2:The “Username and Password required” prompt box
will appear. Typing “admin”(default username) in the
Username field and typing “admin” (default password) in the
Password field. Click “OK”. The setup screen will then appear.
User login to enter Username and password.
Default Username : admin
Default Password : admin
4.1 The menu features as below:
All above the functions explain as below.
4.2 Basic Setup
Manager of the relevant setting page have two main
configuration options.Serial setting and Network setting.
4.3 Serial Setting
The ATC-1200 support three serial types: RS232, RS422 and
RS485, The user can reference hardware diagram to directly .
select RS232, RS422, RS485 by software.
Device Name:DMS1(default).User’s can modify the device
name as you expectantly.But the character not more than 15
Data Baud Rate: default 115200, RS-232 range 1200 to
115200 bps
RS-422/485 range 1200 to 921600bps
Data Parity : None (default), even, odd
Data Bits:5, 6, 7, 8(default)
Stop Bits: 1 (default), 1.5 or 2
Flow Control: None (default), CTS/RTS (or Hardware)
Serial Type: RS-232 (default),RS485,RS422(Master),
RS422 (Slave)
4.4 Network Setting
The ATC-1200 support two IP connection types: Static IP,
DHCP. These types are listed in the Web page for the
Networking Setting. Each setup screen and available features
will differ depending on what kind of IP connection types you
select. Default is Static IP
DHCP Client :Disable(default) or Enable
If there is a DHCP Server existing in your network environment
or you subscribe a CABLE service from your ISP, you can set
IP configuration to DHCP to get a dynamic IP address.
If you choose disable means ATC-1200 will submit static IP
mode.You should dispatch one IP address to it.
IP Address: default 192.168.2.125
Subnet mask: default 255.255.255.0
Gateway: default 192.168.2.1
Primary DNS: default 168.95.1.1
If you are connecting through a static or fixed IP from your
network environment, perform these steps:
Step 1: Disable DHCP Client
Step 2: Enter IP address
Step 3: Enter Subnet mask
Step 4: Enter Gateway IP address
Step 5: Enter Primary DNS IP address

3
Step 6: Click Apply and then Reboot button
Connection Type: default TCP/UDP
Transmit Timer:10-65535ms Default 10ms
User’s should enter an integer between 10~65535 ms
Server/Client Mode:Server/Client.default Server
Server Listening Port:default 5000
User’s should enter an integer between 1024~65535
Client Destination Host Name/IP:
192.168.2.2 default
User’s should be enter host name or IP address
5.0 Advance Setting
6.0 Advance Setting
ATC-1200 advance setting offer some useful function for
customer.
Temperature: function allow customer monitor the AT-1200 or
device environment.(Notes:This function not effective on
standard product.Customer need specific order)
Firmware Upgrade Settings:
This function allow customer to upgrade the firmware by
themselves
E-mail Setting&Auto Warning Report Settings
This function allow user setting some warning message when
Someone change ATC-1200 parameter or reach some value.
5.0 Security Setting
This function allow change access ATC-1200 username and
password from default setting as user exception.
6.0 Save and restore ATC-1200 default Setting
User need to click Apply button save parameter If you make
some configuration of ATC-1200. And then click Reboot button
to make it effect.
We offer two way to restore ATC-1200 to default setting.
You can though ATC-1200 basic webpage at bottom to see
there have one Restore Default button.Then click it. And
ATC-1200 will be show message from webpage ask you
confirm to restore ATC-1200 to factory default.
If choose OK.The ATC-1200 will be automatic to restart within
15 seconds.We also offer another hardware button to Restore
ATC-1200.To find restore button as following photo.
To use tweezers press the button at 5 seconds. And see the
LINK LED will went out and then on. It’s mean the restore is
success.
Restore Button
Restore Button

4
7.0 How to make ATC-1200 connect with your device.
The ATC-1200 support four operation mode: TCP Server, TCP
Client, UDP Server and UDP Client. These modes are listed in
the Web page for the Operation Mode setting. Each setup
screen and available features will differ depending on what kind
of operation mode you select. Default is TCP Server.
7.1 TCP Server
Server Listening Port Number: default 5000, range 0to
65535
If your device is acted as passive to accept commands from
remote and the data be guaranteed to be received by peer is
your concern, then you can set ATC-1200 as TCP Server. Be
sure the value of item Server Listening Port Number is same
as your remote control application using.
7.2 TCP Client
Client Destination Host name/IP: default 192.168.2.2
Client Destination Port: default 5000, range 0to 65535
If your device is acted as active to report real-time status to
remote and the data be guaranteed to be received by peer is
your concern, then you can set ATC-1200 as TCP Client. Be
sure the value of item Client Destination Port is same as your
remote control application using and set the correct value of
Client Destination Host name/IP.
7.3 UDP Server
Server Listening Port Number: default 5000, range 0to
65535
If your device is acted as passive to accept commands from
remote and the data be guaranteed to be received by peer is
not your concern, then you can set ATC-1200 as UDP Server.
Be sure the value of item Server Listening Port Number is
same as your remote control application using.
7.4 UDP Client
Client Destination Port Number: default 5000, range 0to
65535
Client Destination Host name/IP: default 192.168.2.2
If your device is acted as active to report real-time status to
remote and the data be guaranteed to be received by peer is
not your concern, then you can set ATC-1200 as TCP Client.
Be sure the value of item Client Destination Port Number is
same as your remote control application using and set the
correct value of Client Destination Host name/IP.
7.5 Peer to Peer mode
If you want to use peer to peer mode. You should configuration
One ATC-1200 as TCP Server Mode and another one as TCP
Client Mode.
For Example. Setting as following step.
Step 1: Setting one ATC-1200 TCP Server Mode
IP Address:192.168.2.125
Server Listening Port number: 5000
Step 2: Setting another one ATC-1200 TCP Client Mode:
IP Address: 192.168.2.126
(TCP Server and TCP Client should be use different IP
address)
Client Destination Host name/IP: 192.168.2.125(It’s
TCP Server IP Address)
Client Destination Port: 5000(It’s TCP Server Server
Listening Port)
Step 3: Apply and reboot.
Other ATC Media Converter manuals


