ATD AIR ATD-6810 User manual

ATD6810_rev_0919Made in China to ATD Tools, Inc. Specifications
Visit us at www.atdtools.com
ATD-6810
1.8mm Suction Style Spray Gun
Owner’s Manual
Features:
$OOSXUSRVHVSUD\SDLQWJXQ
(DV\WRFOHDQGHVLJQ
SLHFHFRQVWUXFWLRQIHDWXULQJH[FOXVLYHDLUYDOYHGHVLJQ
)XOO\DGMXVWDEOHZLGHIDQSDWWHUQFRQWURO
TWFDSDFLW\GULSOHVVFXS
$7'FRPSOHWHOLGDVVHPEO\
$7'FXSDQGOLGDVVHPEO\
Specifications:
1R]]OH6L]HPP
2SHUDWLQJ3UHVVXUHSVL
$YHUDJH$LU&RQVXPSWLRQ&)0
$LU,QOHW7KUHDG137
5HTXLUHG&RPSUHVVRU+S
0D[LPXP3DWWHUQ#'LVWDQFH
6KLSSLQJ:HLJKWOEV

Read this Instruction Manual carefully and understand it completely, basic precaution
should be followed to prevent the damage to the paint gun and injury to the operator.
Retain this manual for future reference.
Description
This KLJK pressure spra\JXQ is ideal for reILQLVKLQJ a classic car or for a wide YDULHW\ of home improvement
SURMHFts. This hiJK pressure paint spra\HU features air, fluid and fan controls to offer a wide variet\of patterns.
It is supplied with a 1000cc suction feed aluminum cup.
Technical Data
7\pe of )HHG Suction
$LU ,QOHW ”
6tandard DiDPHWHURI1R]]OH 0mm
2SWLRQDODiDPHWHURI1R]]OH 1.~.PP
5HFommended air pressurH .0~ .0 EDU (60psi)
0D[3ressure RIDLUEDU(psi)
3DLQWCapaFLW\00cc
$vJ. Air ConsumptLRQ 170OPLQ (6FIP
3DWWHrn :Ldth1800mm (7.19.1”)
:HLJKW 1.NJV OEV)
$ZeiJKWHGVound pressure OHYHO 77.1dB(A)
6RXQG power OHYHO 88.1dB(A)

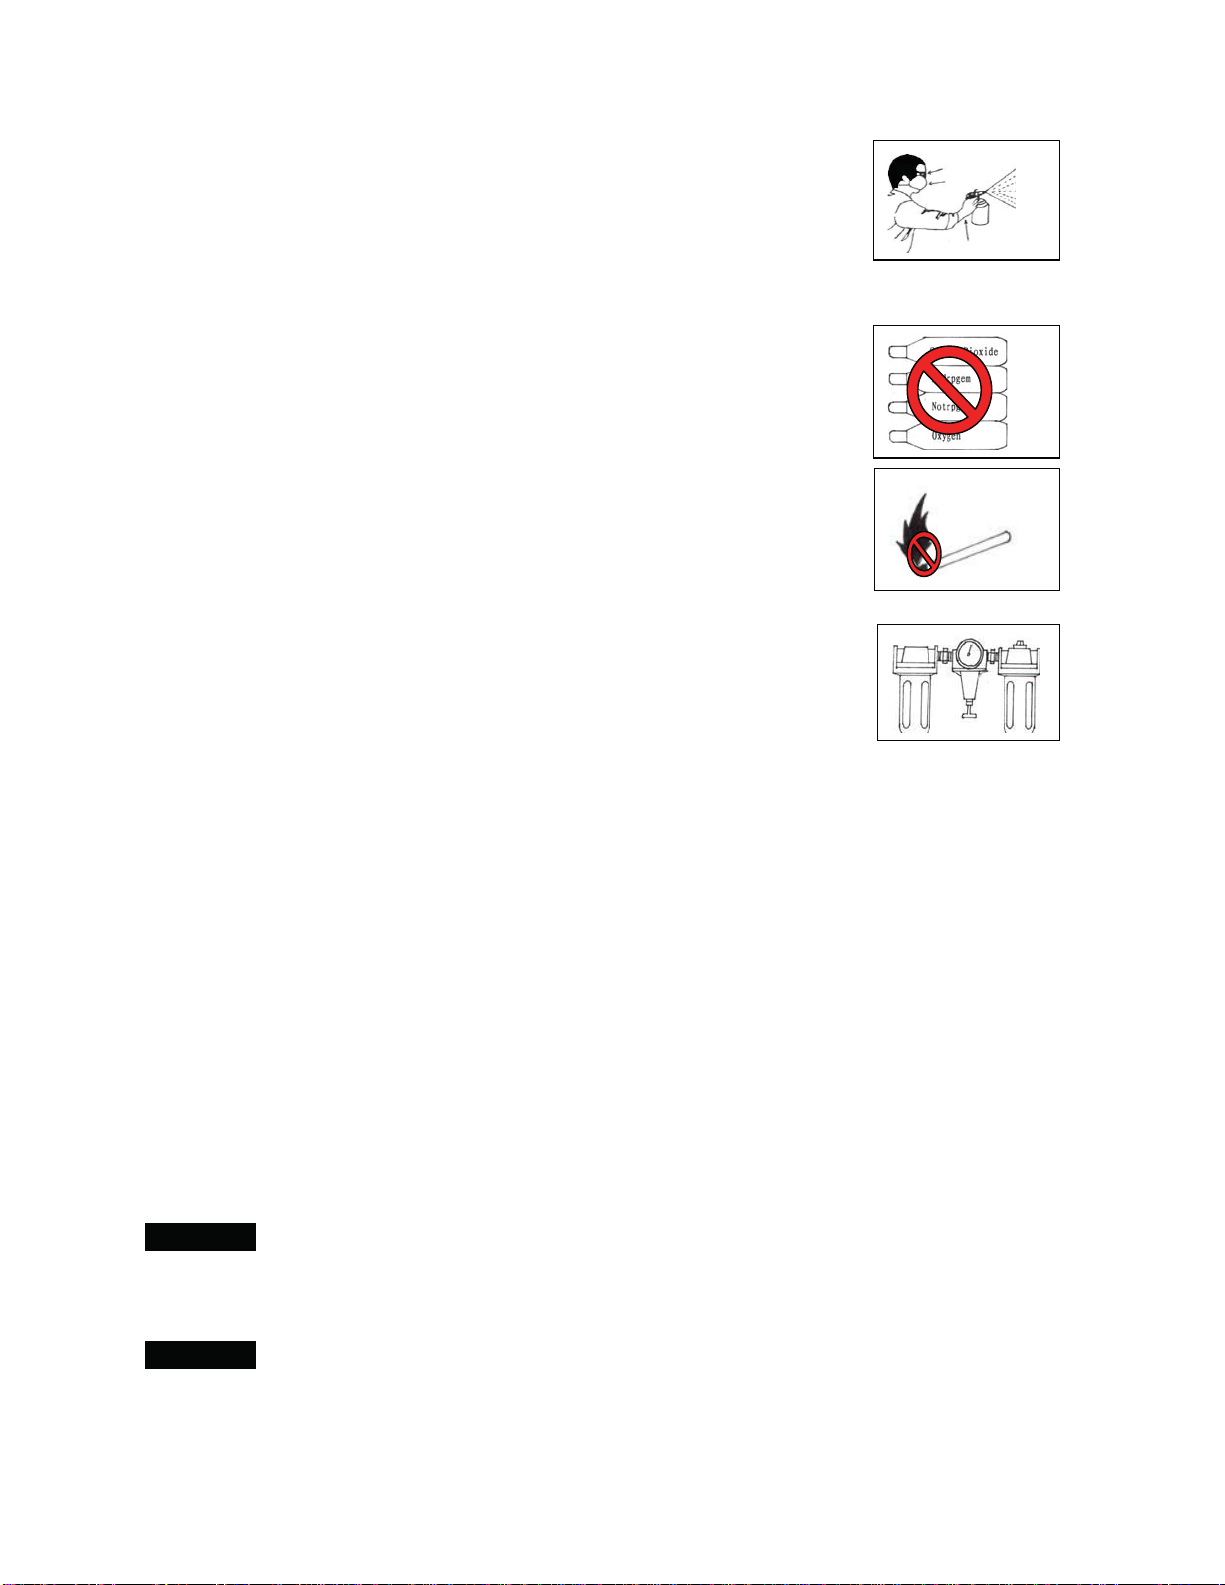
Important Safety Instructions
1. )or tR[LF vapors produced E\ sprD\iQJ certain materials can create intR[ication
and serious damDJe to health. Alwa\s wear saIHW\ Jlasses, Jloves and
respirator to prevent the to[ic vapor ha]ard, solvent and pointinJpaint cominJ
into contact wiWK\our H\HVRU skin.
1ever use o[\JHQ, comEustLEle or aQ\ other Eottle Jas as a power source or
would cause e[plosion and serious personal inMur\.
)Ouid and solvent can EH hiJKO\ flammaEle or FRPEustiEle. Use the paintJXQ
RQO\ in wellventilated area, and avoid an\LJQLWLRQ sources, such as VPRNLQJ
or open flames.
Disconnect paint JXn from air suppl\hose Eefore doinJtool maintenance and
durinJnonoperation. )or emerJHQc\stop and prevention of unintended
operation, a Eall valve near the Jun to air suppl\LV recommend.
Use clean, GU\ and rHJulated compressed air rated at .0~.0EDr, never H[FHed
PD[LPum operatinJpressure 8.EDU(1psi).
6. 1ever use homRJenate h\drocarERQ solvent, which can chemicDOO\ react with
aluminum and ]inc parts and chemicall\compatLEle with aluminum and ]Lnc
parts.
7. 1ever point Jun at\ourself or others at an\time.
8. Before operatinJthe paint Jun, ensure all the screws & caps are securHO\ tiJhtened to prevent leakinJ.
9. Before paintinJ LQVSHFWWKHSDLQWJXQIRr free movement of triJJer and nR]]le.
10. 1ever modiI\ this paint JXn for an\reason. 2QO\ use parts, no]]les and accessories recommended
E\the manufacturer.
Instructions for Operation
Preparation
1. After unpaFNLQJ the paint Jun, inspect carefull\for an\GDPDJe that PD\ have occurred durinJtransit.
Make sure to WLJKWHQ ILWWLQJV Eolts, etc., Eefore puWWLQJ unit into service.
ThorouJKO\ PL[ and thin paint in accordance with the paint manufacturer’s instructions. Most materials
will VSUD\ readLO\ if thinned properl\.
. Strain material throXJh filter, cheese cloth or a paint strainer.
. )ill the canister aERut ¾ full and start the air compressor.
WARNING Do not exceed maximum pressure of spray gun or any parts in the compressor system.
After connectiQJ the Jun to the air suppl\, please make sure that the fluid cap, container and air hose
have Eeen connected WLJhWO\ to the VSUD\ JXQ
6. Set up a piece of cardEoard or other scrap material to use as a tarJet and adMust for EestVSUD\ pattern.
WARNING Never aim or spray at yourself or anybody else as it could cause serious injury.
7. Test the consistenc\of the material E\ makiQJ a few strokes on a carGEoard tarJet. If material still
appears too thick, add a small amount of thinner. THIN WITH CARE! Do not e[ceed paint
manufacturer’s thinniQJrecommendations.

Adjustment
The desired pattern, volume of fluid output and fine atomi]ation can easil\EH oEtained E\ reJXlatiQJ the
3attern AdMXstinJKQRE, )luid (3A,1T) AdMustinJKnoEand Air AdMustinJKnoE.
Adjusting pattern: TurninJthe 3attern AdMustiQJ KnRE to the rLJht until tLJKt will make VSUD\ pattern round
and turninJit to the left will make spra\pattern ellipse.
Adjusting volume of fluid output: TurniQJ the )luid (3AI1T) AdMustiQJ KnoEclockwise will reduce the
volume of fluid output and turninJit counterclockwise will increase fluid output.
Adjusting air volume: TurninJthe Air AdMustinJvalve clockwise will reduce the air volume and turninJit
counterclockwise will increase the air volume.
Operation
1. BeJLQ VSUD\inJ. Alwa\V keep the JXQ at ULJht DQJOHV to the work.
. Keep the no]]le DEout 6 to 1inches from the work surface. Grip the Jun keepinJit perpendicular with
sprD\inJarea then move it parallel for several times. StoppinJJXn movement in midstroke will cause a
Euildup of paint and result in runs. Do not fan the JXQ from side to side while paintinJ This will cause a
Euildup of paint in the center of the stroke and an insufficient coatinJat each end.
TriJJHr the Jun properl\. Start the Jun moviQJ at the EeJinninJof the stroke BEFORE SQUEEZING
THE TRIGGER and release the WULJJHr BEFORE STOPPING GUN MOVEMENT at the end of the stroke.
This procedure will Elend each stroke with the ne[t without showLQJ overlap or unevenness.
. The amount of paint EHinJapplied can Ee varied E\ the speed of the stroke, distance from the surface
and adMustment of the fluid control knRE.
2YHUlap strokes Must enouJh to REtain an even coat.
NOTE: Two thin coats of paint will yield better results and have less chance of runs than one heavy layer.
6. Use a piece of cardERDrd as a shield to catch overspra\at the eGJes of the work to protect other
surfaces.
Maintenance
Incomplete cleaning could cause function failures and degradation of the fan form.
1. 5HPove an\remaininJpaint E\pouriQJ it into another container.
2. DisassemEOe the sprD\ JXn makinJsure to remove the needle Eefore disassePEOiQJ the nR]]le to avoid
damaJe to the housinJof the no]]le closure.
3. Clean all the paint passaJHs and the nR]]le. Clean the other components usiQJ a EUush soaked in
solvent.
4. 5HDVVHPEOe the spra\JXn and spra\a small TXantiW\ of solvent to eliminate all the residues in the paint
paVVDJes.
WARNING:
NEVER USE METAL OR OTHER OBJECTS THAT COULD DAMAGE THE HOLES IN THE NOZZLE AND CAP. NEVER
IMMERSE THE SPRAY GUN COMPLETELY IN SOLVENT. NEVER USE COMPONENTS OR PARTS THAT ARE NOT
MANUFACTURER ORIGINALS.
&RDWLQJZLOO
EHOLJKW
at this point
&RDWLQJZLOO
EHKHDY\
at this point
WRONG RIGHT
WRLQFKHV
Start
Stroke 3XOO
7ULJJHU
5HOHDVH
7ULJJHU
(QGRI
stroke
&RDWLQJVKRXOGEHHYHQ
DQGZHWZKHQVSUD\LQJ
TRAVEL OF GUN

Storing
:hen not usiQJ spra\Jun, turn the fluid adMustment knRE counterclockwise to open to reduceVSULQJ
tension on needle fluid tip.
Spra\JXQMUST BE well cleaned and OLJKWO\ OXEULFated.
Troubleshooting
Symptom Problems Solution
Fluttering or
spitting
1. Material level too low
. Container tipped too far
Loose fluid inlet connection
. Loose or damaJHd fluid tipseat
Dr\or loose fluid needle packinJnut
6. Air vent cloJJed
1. Add material into container
. +ROd more upriJht
. TiJhten
. AdMust or replace
. LuEUicate and or tiJKWen
6. Clear vent hole
Pattern is arched. 1. :orn or loose)luid no]]le
. Material EXildup on Air cap
1. TiJhten or replace )luid no]]le
. 5emove REstructions from holes,
Eut don’t use metal REMects to clean it
Pattern is not
evenly spread. 1. Material EXildup on Air cap
. )luid no]]le dirt\or worn
1. Clean or replace Air cap
. Clean or replace )luid no]]le
The center of pattern is
too narrow. 1. Material too thin
Atomi]ation air pressure too hLJh
1. 5HJulate material viscosit\
. 5Hduce air pressure
Pattern width of fan
shape is too narrow
1. Material too thick
Atomi]ation air pressure too low
1. 5HJulate material viscosit\
. Increase air pressure
Air leaking from air cap
without pulling trigger
1. StickinJair valve stem
. Contaminate on air valve or seat
. :orn or damaJHd air valve or seat
Broken air valve spriQJ
. Bent valve stem
1. LuEricate
. Clean
. 5HSlace
. 5HSlace
. 5HSlace
Fluid leaking from
packing nut
1. 3ackinJnut loose
3DckinJworn or dr\
1. TLJhten, EXt do not restrict needle
. 5HSlace or lXEricate (use nonsilicone
oil)
Excessive overspray 1. Too hiJh atomi]ation pressure
. Too far from work surface
Improper strokinJ(arcinJ, Jun motion
too fast)
1. 5Hduce pressure
. AdMXst to proper distance
. Move at moderate pace, parallel to
surface.
Will not spray 1. 1o pressure at Jun
. )luid control not open enouJh
. )luid too heav\
1. Check air lines
. 2pen fluid control
. Thin fluid or chanJe to pressure feed
s\stem.

ITEM# ORDERING PART# PART DESCRIPTION ITEM# ORDERING PART# PART DESCRIPTION
(LZZ21DIUL)0186T53GUL3T(L1I5IA100186T5310
5(+SA:(LZZ210186T53TL2BX(+00186T530
3AC5
IA60186T536YD2B1UG00186T530
035T68100DI5(CTI21AL B2DY 735T681076($L
07 35T68100)LUID ADJ. 1((DL(ASSY 835T68108DI5(CTI21AL SC5(:
0811 35T681008 )LUID ADJUSTM(1TASSY 35T68109AI5VAL9( ASSY
18 35T68101)A1ADJUSTM(1TASSY 35T68106CU3LID ASSYC2M3L(T(
T(KSAG
DIL3UC0186T53YSSA5(GGI5T910186T53191
35T6810 G81 B2DYC211(CT25 835T68106CU321LY
35T6810 G81 +($D B2DY 935T68109CU3A1D LID ASSY
6
1
2
3
4
5 6 7
8 9 10 11
121314151617
18
1920
21
2223242526
27 28
2930
31
323334
35
36
37
38
39
40
41
42
43
44
45
46 47 48
49
42
357
357
357
357
357
357
357
REPLACEMENT PARTS
1RW all components of the SDLQWJXQ are replacement items, EXW are illustrated as a convenient reference for position
in the DVVHPEO\ VHTXHQFH :KHQ RUGHULQJ parts, JLYH model QXPEHU part QXPEHU and description. &DOO\RXUGLVWULEXWRU
IRUFXUUHQWSULFLQJ

7
1RWHs

WARRANTY
1 YEAR LIMITED WARRANTY
THIS WARRANTY AND CONFIRMED RECEIPT(S) SHOULD BE RETAINED BY THE CUSTOMER AT ALL TIMES
385&+$6(')520 _______________________________________
'$7(385&+$6(' ________________________________________
,192,&(5(&(,37180%(5BBBBBBBBBBBBBBBBBBBBBBBBBBBBBBBBBBBBBBBBB
<RXU$7'LVZDUUDQWHGIRUDSHULRGRIPRQWKVIURPWKHRULJLQDOSXUFKDVHGDWH
)RUDSHULRGRIRQH\HDUIURP\RXUSXUFKDVHGDWH$7'7RROV,QFZLOOUHSDLURUUHSODFHDWLWVRSWLRQZLWKRXWFKDUJH\RXU
$7'SURGXFWLILWZDVSXUFKDVHGQHZDQGWKHSURGXFWKDVIDLOHGGXHWRDGHIHFWLQPDWHULDORUZRUNPDQVKLSZKLFK\RXH[SHULHQFHG
GXULQJQRUPDOXVHRIWKHSURGXFW7KLVOLPLWHGZDUUDQW\LV\RXUH[FOXVLYHUHPHG\
7RDFFHVVWKHEHQHILWVRIWKLVZDUUDQW\FRQWDFW\RXUVXSSOLHURUSRLQWRIVDOHGLUHFWO\<RXPD\EHDGYLVHGWRUHWXUQWKHSURGXFW
XQGHUZDUUDQW\IUHLJKWSUHSDLGWR\RXUVXSSOLHUIRUZDUUDQW\GHWHUPLQDWLRQ
,IWKLV$7'SURGXFWLVDOWHUHGDEXVHGPLVXVHGPRGLILHGRUXQGHUJRHVVHUYLFHE\DQXQDXWKRUL]HGWHFKQLFLDQ\RXUZDUUDQW\ZLOO
EHYRLG:HDUHQRWUHVSRQVLEOHIRUGDPDJHWRRUQDPHQWDOGHVLJQV\RXSODFHRQWKLV$7'SURGXFWDQGVXFKRUQDPHQWDWLRQVKRXOG
QRWFRYHUDQ\ZDUQLQJVRULQVWUXFWLRQVRUWKH\PD\YRLGWKHZDUUDQW\7KLVZDUUDQW\GRHVQRWFRYHUVFUDWFKHVVXSHUILFLDOGHQWVDQG
RWKHUDEUDVLRQVWRWKHSDLQWILQLVKWKDWRFFXUXQGHUQRUPDOXVH,WDOVRGRHVQRWFRYHUQRUPDOZHDULWHPVVXFKDVEXWQRWOLPLWHGWR
EUXVKHVEDWWHULHVGULOOELWVGULOOFKXFNVSDGVRUEODGHV
6XEMHFWWRWKHODZLQ\RXUVWDWH
<RXUVROHDQGH[FOXVLYHUHPHG\LVUHSDLURUUHSODFHPHQWRIWKHGHIHFWLYHSURGXFWDVGHVFULEHGDERYH
$7'LVQRWOLDEOHIRUDQ\LQFLGHQWDOGDPDJHVLQFOXGLQJEXWQRWOLPLWHGWRORVWSURILWVDQGXQIRUHVHHDEOHFRQVHTXHQFHV
7KHUHSDLUDQGUHSODFHPHQWRIWKLVSURGXFWXQGHUWKHH[SUHVVOLPLWHGZDUUDQW\GHVFULEHGDERYHLV\RXUH[FOXVLYHUHPHG\DQGLV
SURYLGHGLQOLHXRIDOORWKHUZDUUDQWLHVH[SUHVVRULPSOLHG$OORWKHUZDUUDQWLHVLQFOXGLQJLPSOLHGZDUUDQWLHVDQGZDUUDQWLHVRI
PHUFKDQWDELOLW\RUILWQHVVIRUDSDUWLFXODUSXUSRVHDUHGLVFODLPHGDQGLIGLVFODLPHULVSURKLELWHGWKHVHZDUUDQWLHVDUHOLPLWHGWR
RQH\HDUIURP\RXUGDWHRISXUFKDVHRIWKLVSURGXFW
Some states’ laws do not allow limited durations on certain implied warranties and some states’ laws do not allow limitations on
LQFLGHQWDORUFRQVHTXHQWLDOGDPDJHV<RXVKRXOGFRQVXOWWKHODZLQ\RXUVWDWHWRGHWHUPLQHKRZ\RXUULJKWVPD\YDU\
>$IIL[UHFHLSWRULQYRLFHKHUHIRUVDIHNHHSLQJ@
Table of contents
Other ATD AIR Paint Sprayer manuals
Popular Paint Sprayer manuals by other brands

Graco
Graco PRO Delta Spray 240-385 Instructions-parts list

Campbell Hausfeld
Campbell Hausfeld AL2150 - BLACK Operating instructions and replacement parts list

john deer
john deer LP19478 Operator's manual

Smith
Smith SR-25 Sulky Driver Operation and repair manual

WALTHER PILOT
WALTHER PILOT wa200 operating instructions

Nordson
Nordson Trilogy Customer product manual