ATON CL101 User manual

3
User Guide Aton CL101
The Aton CL101 Phone doesn’t have the menu in English language, for this raison the
reference is based to the French language.
Inhaltsverzeichnis
1INTRODUCTION/CHECKS PRIOR TO USE....................................................................... 5
1.1 Safety rules ................................................................................................................ 5
1.2 Unpacking your phone ............................................................................................. 6
2SETTING YOUR PHONE................................................................................................... 6
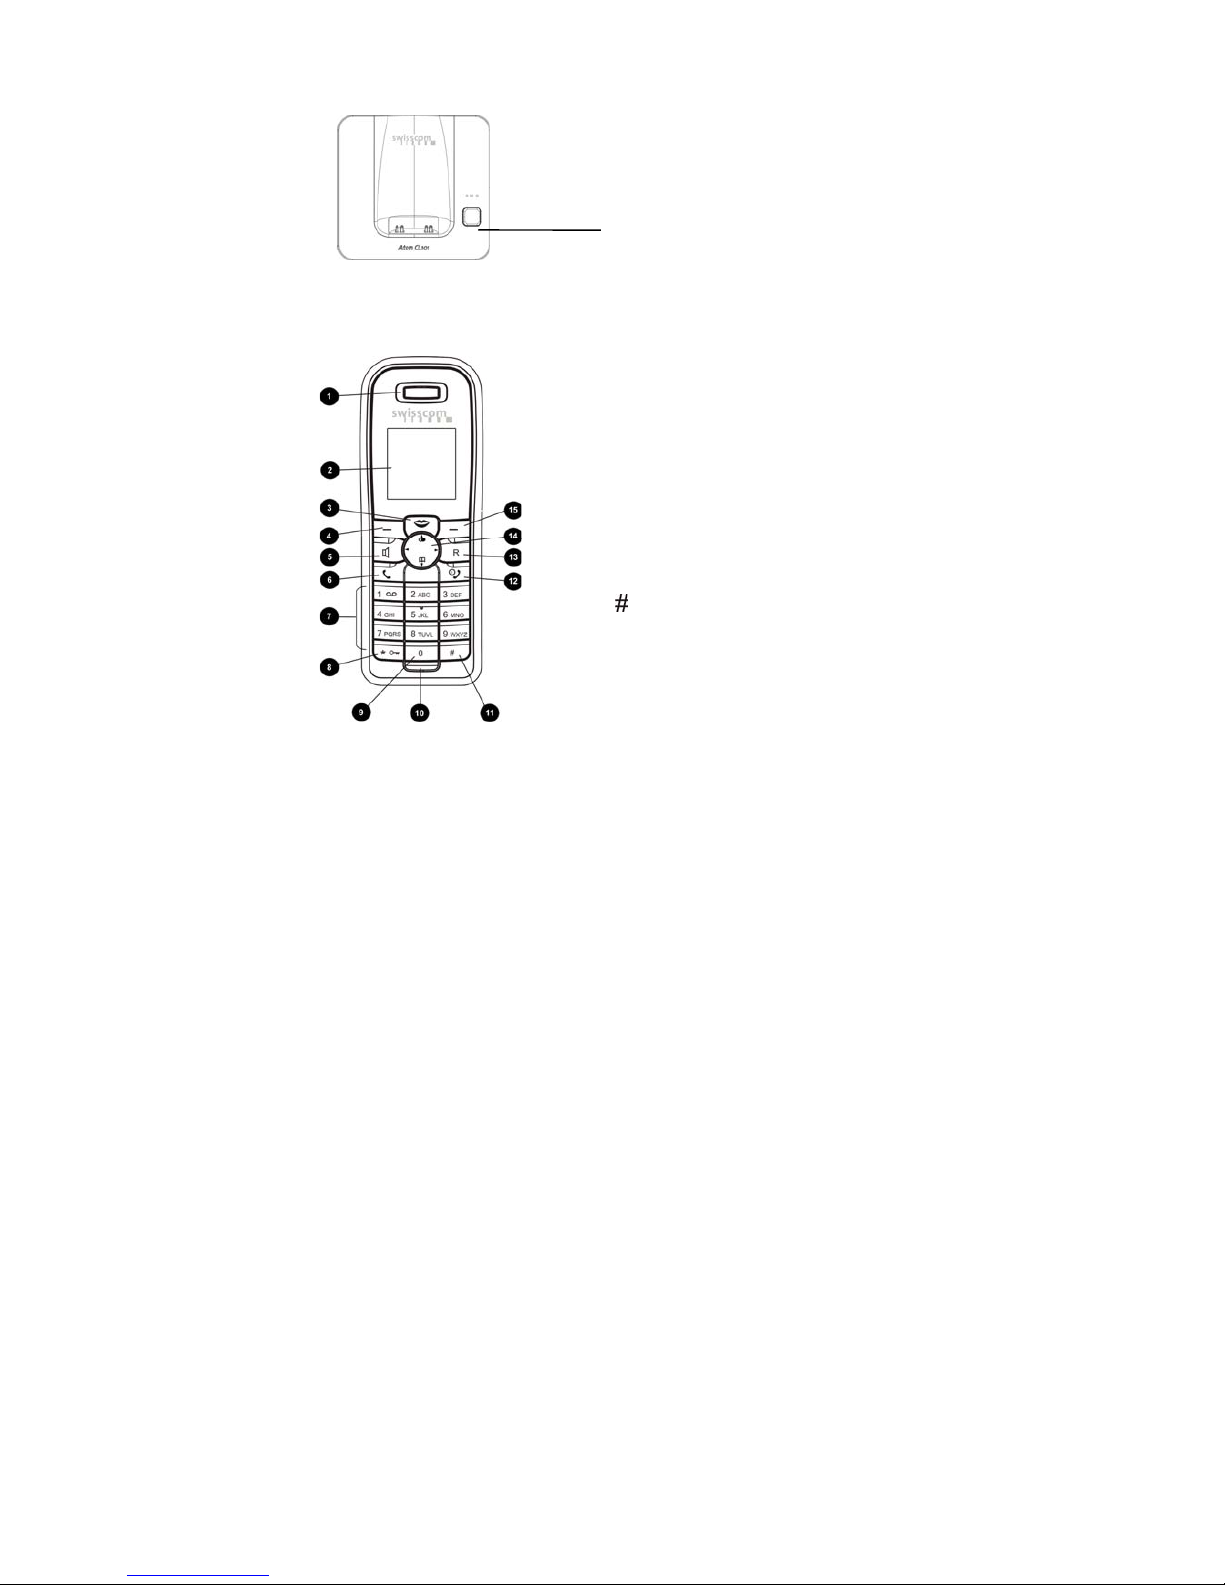
3THE BASE STATION OF YOUR ATON CL101.................................................................. 7
4HANDSET ........................................................................................................................ 7
5SCREEN............................................................................................................................ 8
6MENU SYMBOLS AND PROGRAMME KEYS.................................................................. 8
7MENU AND FUNCTIONS................................................................................................. 9
7.1 Meaning symbols and selection of submenus ........................................................ 9
7.2 Programme keys...................................................................................................... 16
8USE OF THE PHONE ...................................................................................................... 16
8.1 Making calls ............................................................................................................. 16
8.2 Predialling ................................................................................................................ 16
8.3 Ending calls .............................................................................................................. 16
8.4 Receiving calls.......................................................................................................... 17
8.5 Hands-free ............................................................................................................... 17
8.6 Adjusting volume .................................................................................................... 17
8.7 Secret key, microphone off .................................................................................... 17
8.8 Redialling and extended redial facility.................................................................. 17
8.9 Displaying caller’s number ..................................................................................... 17
8.10 Missed calls .............................................................................................................. 18
8.11 Using the address book .......................................................................................... 18
8.12 Dialling a contact’s number.................................................................................... 19
8.13 Fast call example ..................................................................................................... 19
9INTERNAL CALLS........................................................................................................... 19
9.1 Registrating a handset............................................................................................ 19
9.2 To call another handset .......................................................................................... 20
9.3 To transfer a call or consult internally................................................................... 20
9.4 Three-way conference call (2 internal callers + 1 external caller) ....................... 20

4
9.5 Making and ending a call ....................................................................................... 20
9.6 Duration of call........................................................................................................ 20
9.7 R-key (Flash)............................................................................................................. 20
10 SMS TEXT MESSAGES.............................................................................................. 21
10.1 Writing a message................................................................................................... 21
10.2 Messages received .................................................................................................. 22
10.3 Reusing and sending of received messages.......................................................... 22
10.4 Exit, sent messages ................................................................................................. 22
11 VOICE PORTAL ......................................................................................................... 22
12 HELP AND TROUBLESHOOTING.............................................................................. 23
13 WARRANTY / REPAIRS / MAINTENANCE ............................................................... 24

5
1Introduction/Checks prior to use
1.1 Safety rules
•Please read this user guide carefully and keep it close at hand. If you have any
questions, ask an expert. If any repairs are needed, these must be performed by a
specialist. Never open the phone unit yourself.
•Never touch the connectors with any pointed, metal, wet or damp objects.
•Keep the phone on a non-slip surface. Varnish and other synthetic finishes can attack
and soften the plastic feet on the phone. If the feet become damaged this way, they
can leave marks on surfaces. The manufacturer declines all responsibility for such
damage.
•Do not expose the phone to sunlight or place near heat source.
•Protect the phone from humidity, dust and harsh fluids or fumes.
•Do not expose the phone to strong magnetic fields (e.g. from electric motors,
televisions, cassette decks, video recorders, hi-fi equipment or domestic appliances), as
these may cause interference, reduce the range or cause malfunction of the phone.
•Only connect the phone’s mains cable to a suitable electric socket. Do not change the
plug on the mains cable.
•Never lift the phone up by the mains cable.
•Do not use the phone in a humid environment (such as bathroom).
•Use only soft cloth (these may be damp or antistatic) to clean the phone. Do not use
any detergents or chemicals.
Certificate
The CE mark means that the product complies with the essential requirements of Directive
1999/5/CE of the European Parliament and of the Council on radio equipment and
telecommunications terminal equipment as regards the health and safety of users and
electromagnetic disturbance.
The product also makes efficient use of the frequency spectrum allocated to terrestrial/space
radiocommunication, preventing harmful interference.
The declaration of conformity can be viewed at
www.swisscom.com/onlineshop under “Phones”, “Declaration of conformity” or upon
request.
Please address all such requests to:
Swisscom Fixnet SA
Residential - Voice
Customer Premises Equipment (CPE)
3050 Berne

6
1.2 Unpacking your phone
In this package, you will find:
Aton CL101 Aton CL101 Duo Aton CL101 Trio
1 base station
1 handset
1 230 V adopter
1 phone cable
3 NiMH AAA
1.2V, 550 mAh batteries
1 trilingual user guide
1 base station
2 handsets
1 230 V adopter for the base
station
1 power supply unit 230 V
for your additional battery
charger
1 phone cable
6 NiMH AAA
1.2V, 550 mAh batteries
1 trilingual user guide
1 base station
3 handsets
1 230 V adopter for the base
station
2 power supply units 230 V
for your additional battery
charger
1 phone cable
9 NiMH AAA
1.2V, 550 mAh batteries
1 trilingual user guide
2Setting your phone
Sitting the phone
The phone must be sited at least one metre away from all other electrical appliances.
Operating distances
Your Aton CL101 base station and handset both transmit and receive radio signals. The
propagation distance depends on the location of the base station. Placing the base station high
up will ensure an optimal operating distance.
Inserting the batteries
1. Insert the standard rechargeable batteries into the designated compartment. Take care to
ensure that the polarity is correct. Therefore the corresponding symbols are engraved.
2. Unpack the compartment cover of the casing and close it by sliding it upwards.
Please note: When the battery is low, you will hear an alarm tone every 30 seconds and the
battery symbol will flash. When you place the handset on the base to charge it, the battery
symbol will be animated:
When the battery is fully charged, the battery symbol will have three completely full filled stripes.
If the battery is empty you will see none of the tree strips.
We recommended that you completely discharge the battery once a week. This will increase the
lifetime of the battery.
A fully-charged battery will give you 10 hours of call time or 100 hours on standby.
Il is completely normal for the battery to become warm while charging. You should only use
replacement batteries that are identical to the one supplied with your Aton CL101. The use of
unsuitable batteries will invalidate your phone’s warranty and may cause irreversible damage.
Plug in the mains cable
Insert the plug of the power supply into the socket on the rear of the base station (The socket
has the symbol of a phone on it) and connect the other end with the telephone jacket.
1. Insert the mains cable (the round cable) with the round socket on the rear of the base
station. Connect the plug of the power supply unit with a rear providing 230V.
Before using the phone intensively, the batteries have to be charged at least 12 hours.
Please note:
Your Aton CL101 does not function if you do not charge it with a power supply unit providing
230V.

7
3The base station of your Aton CL101
4Handset
1 Built-in speaker
2 Colour screen
3 Voice Portal
Direct access to SMS menu (2 sec.)
Shows unanswered calls.
4 left navigation key
5 Hands free
6 Communication
7 Numerical keypad
8
* key
9 0 key
10 Microphones
11 key
12 End call/ connect/ disconnect
13 R key (Flashtime) (used for some telephone net
services or when using home exchange)
14 Navigation and lock key
15 right navigation key
Page
Button to register another
handset.

8
5Display
1. Signal volume
2. Displayed when ring tone off.
(Menu handset vol:
sonnerie=0)
3. Displayed if alarm is activated
4. Displayed when you are
connected or when you receive
a call
5. Displayed when you have an
internal call (long pressing on
key)
6. Displayed when keyboard
disabling on (long pressing on
* key)
7. Displayed when hands free activated.
8. Displays loading capacity and actual capacity of the batteries while charging (Symbol
displayed when handset on base station)
9. Number of the handset which is registered on base station
10. Displays time in 24 hours format.
11. Corresponding to the right navigation key (on this graphic: access to menu).
12. Corresponding to the left navigation key (on standby modus: access to extended redial
facility).
13. Displays date in (JJ: MM) format.
14. Name of your handset.
6Menu symbols and Programme keys
When you press the navigation key, the following symbols are displayed:
1. If you want to activate
a symbol you can use
either the navigation
key or the numerical
keypad (blue box)
3. If you like to leave a
menu, please push
« Retour ».
2. Use the
corresponding key to
press ok.

9
7Menu and functions
7.1 Meaning symbols and selection of submenus
SMS
Writing
(écrire)
In this menu you can write SMS. When you have finished your
text message, please press OK.
You can dial the number you wish or by using the phone book
on your handset.
Messages
received
(Entrée)
In this menu you can read messages you received.
Drafts
(Brouillon)
This menu allows you to store drafts.
Entry
(Boîte de sortie)
This menu allows you to store the messages you send.
SMS-C Service In this menu the number of the SMS-centre is backuped.
The number of the Swisscom Servicecentre is factory-set
programmed:
0622100000
Call list
(Liste d’appels)
If you chose this symbol a list with all received calls is
displayed.

10
Address book
(Registre)
Please note:
When you press OK all numbers you saved in your address
book are displayed.
To access this menu please press options.
Nouv entrée.
(Add entry)
On your screen the following instructions are displayed to help
you saving a new number. First you are requested to enter the
name of your contact:
Intro nom. (Enter name) Use the numbers 1-0 to enter
__________ the name. Maximally 12 characters.
Same choice of characters as for writing
text messages. Please press OK.
Entrer num
____________ (Enter number) Enter the number of your
contact. Maximally 24 numbers.
Please press OK.
Son d’alarme (Ring tone) You can allocate a special
VIP
ring tone to your contact.
Mélodie-VIP (Melody VIP) Maximally 10 possibilities to
choose. Please press OK.
Your contact has been saved in your address book now.
Voir entrée
(Show details)
Shows details of a saved contact.
Mod entrée
(Modifying
entry)
Allows you to change name or number of a contact.
Effacer entrée
(Delete entry)
Allows you to delete a contact.
Tout effacer
(Delete all
entries)
Allows you to delete the whole address book.
Please note: You can not restore the address book once it has
been deleted.

11
Numéro. rapide
(FastCall)
•Allows you to allocate a contact to a direct access key (2-
9). The contact you assign must be already stored in your
address book. Proceed as follows. Enter the number of
your direct access key (2-9).
•To use your direct access key press long(2 seconds) on the
corresponding number (2 - 9). Name and number of your
contact are displayed now.
Press to dial this number.
Date/ l’heure
(Date/Time)
Please take note of the following information:
•It is not usually necessary to set date and time. Your Aton
CL101 does this automatically when you receive your first
call.
•If you are connected to an incompatible net, you can set
date and time manually. The procedure is described in this
submenu.
Please note:
•Only one alarm at the time can be set.
Mettre l’heure
et la date (set
time and date)
You can set date and time in DD/MM and HH/MM format.
Alarme (Alarm)
Activer alarme
(activate alarm)
Heure (Time)
In this submenu you can set the time for your alarm.
Alarme (Alarm)
This submenu allows you to activate and deactivate an alarm.
Press ON to activate an alarm and OFF to deactivate an alarm.
Son alarme (Alarmetone)
You can select an alarm tone.

12
Services
Combox Please note:
Before using the combox it has to be installated and set as
you wish.
More information under http://www.swisscom-fixnet.ch or in
your Swisscom Shop
Combox ON
This menu allows you to divert your calls to your Swisscom
Combox.
- Direct (direct divert)
Calls are directly diverted to your combox.
- Si occupé (When busy)
If you are already having a conversation a second call is
diverted to your combox.
- Non réponse (missed calls)
If a call is not answered he will be diverted after the fifth
ringtone (ca. 25 seconds).
Your Aton CL101 will asked for your phone number after you
have chosen one of the three possibilities above. Dial your
phone number and press OK.
Combox OFF
Allows you to turn off your combox.
If you are not sure how you have set your combox (Direct –
when busy- missed calls), repeat the procedure three times.
Interrogation
Allows you to listen the messages on your combox.
Your Aton CL101 is factory-set programmed, so you can listen
to your messages by pressing 1 for a long time.
Please note:
The PIN of your combox has to be entered manually.
Dérivation ON
(Diversion ON)
Allows you to divert incoming calls.
Directe (Direct)
The incoming call is directly diverted to the corresponding
number.

13
Si occupé (When busy)
If you are already having a conversation a second call is
directly diverted to the corresponding number.
Non réponse (Missed calls)
If a call is not answered it will be diverted after the fifth
ring tone. (about 25 seconds)
Your Aton CL101 will asked for your phone number after you
have chosen one of the three possibilities above. Dial your
phone number and press OK.
Déviation OFF
(Diversion OFF)
Allows you to cancel a diversion you have set.
Direct (Direct)
A direct diversion can be cancelled.
Si occupé (When busy)
Cancels a diversion in case the connection is busy.
Non réponse (missed calls)
A diversion can be cancelled in case there is no answer.
2eme appel
(call waiting)
2eme appel Connects the second call.
(call waiting) A second call can be answered when you
you are already having a conversation.
2eme appel OFF A second call is not connected.
Interrogation The net is interrogated about the
connections.
Use:
Refuse second Press R and wait for the signal sound.
call Press then number 0.
Accept second Press R and wait for the signal sound.
all and inter- Press then number 1.
rupt the
first call.
Accept second Press R and wait for the signal sound.
call and Press then number 2.
keep first To switch from one call to the other
call in the press R first, then number 2.
waiting line

14
Configuration
Allows you to programme the configurations on your
phone.
Under Menu 1 Under Menu 2 Under Menu 3 Special features
Display Fond d’écran 5 backgrounds to
choose
(Screen) (background)
Contraste 3 intenities to choose
(contrast)
Réglage sons. Vol du combiné Écouteur (earpice) 3 volumes to choose
(Volume setting) Volume handset hautparleur 3 volumes to choose
(speaker)
Son. combine (externe) Mélodie (Melody) 10 melodies to choose
(Ringtone external) Volume 5 volumes to choose
Son. Combine (interne) Mélodie (Melody) 10 melodies to choose
(Ringtone internal) Volume 5 volumes to choose
Son. base Mélodie (Melody) 10 melodies to choose
(Ringtone base station) Volume 3 volumes to choose+0
Under Menu 1 Under Menu 2 Under Menu 3 special features
Son d’alarme Bip de touche on or off
(Alarm tone) (Key beep)
Bip charge on or off
(charging Bip)
Alarme d’accus on or off
(Battery alarm)
Out of range on or off
Ton fin de liste on or off
(end of list sound)
Confi Réponse auto on / off
Handset (automatic answering)
Configurations on
your handset
Annonce combi (Register handset) enter PIN
Register handset on base station and press OK
Mode Eco on / off
Energy saving mode: (if the handset’s screen isn’t used more than some seconds,
the screen will go into energy saving mode).

15
Nom combiné Enter/Change name
(Name handset) of your handset
Langue 3 languages to choose
(language) from: DE/FR/I
Reset combiné Allows you to make a
(reset handset) reset of your handset
Caution: all memories
will be deleted.
Config base Modifier PIN The PIN of the base station can be changed.
Modify PIN The PIN is factory-set on 0000.
Retirer combi A handset can be disconnected from the base
(disconnect handset) station
Temps Flash Is factory-set on 100ms.
(R Flash period) All other possibilities to programme the R Flash
Period should only be used in special occasions.
Pause The clock is factory-set on 0 sec.
If you have programmed a pause, this time
will be set between the first and the second
number.
Liste d’appels Tous apell If you select this mode
(Calls lists) (All calls) all calls will be
displayed on a list.
Sans réponse If you select this mode
(missed calls) all missed calls will be
displayed on a list.
Efface auto activer Calls lists will be
(delete automatically) (activate) deleted automatically.
déactiver Deactivates the automatic
(deactivate) deleting of the calls lists
The proceeding in all submenus stays the same: select a submenu and then the function you
wish.

16
7.2 Programme keys
Menu access key
Back key to the preceding menu OK-Taste
Confirms entry
Correction key (for letters and
numbers) Option key
Allows you to access the
options
Secret key on
The microphone will be turned
off
Secret key off
The microphone will be turned
on
Activates a function Deactivates a function.
Is displayed when incoming call.
If you press this key, the ring
tone will be turned off.
When you receive the next call,
you will hear the ring tone as
usual.
8Use of the phone
8.1 Making calls
Press the key. Appeler (call in progress) will appear on the display.
Dial the number. After some seconds the call duration will be displayed.
8.2 Predialling
You can dial before you pick up.
Dial the number. Corrections can be made using the key.
Press the key to make the call.
Please note: The maximum number of digits you can predial is 24. To introduce a pause into the
number, press the R key. A “P” will appear in the number dialled.
8.3 Ending calls
Press to end the call. During some seconds the call duration will be displayed.

17
8.4 Receiving calls
When your phone rings, open it or press the key and you will be connected with the caller.
8.5 Hands-free
To switch to hands-free mode, press the key.
If you press this key a second time, the function is interrupted and you can continue the call with
your handset.
8.6 Adjusting volume
To adjust the volume during normal mode, press the haut (up) and bas (down) navigation key.
To adjust the volume during hands-free mode, press the haut (up) and
bas (down) navigation key.
You can choose between 3 volumes.
8.7 Secret key, microphone off
Press the key to switch off the microphone.
The caller will no longer be able to hear you, but you will still hear them.
Mute On (Secret activated) will appear on the screen.
To switch the microphone back on, press the secret key again.
8.8 Redialling and extended redial facility
Your phone has an extended redial facility which covers the last 20 calls made (24 digits). If the
number called features in your contacts, the contact’s name will be displayed as well as the
number.
Press the key and the redial list appears on the screen.
Press the Haut (up) and Bas (down) navigation key to select the number you want.
Press the key to dial the number.
Please note: Before making the call, you can press the Option key and then select one of the
following options:
-Voir entrée (Details), press OK, name and number will appear on the screen.
- Sauver regist. (add to contacts) press OK. Allows you to store a new contact.
-Effacer(Delete), press OK. The record will be deleted.
- Tout effacer (delete all), press OK, the whole redial list will be deleted.
8.9 Displaying caller’s number
Your Aton CL101 has a function which allows to display the name and the number of a caller (if
this contact is stored in your address book).
20 numbers can maximally been stored in the call lists (received calls, missed calls, dialled calls).
The oldest entry will be deleted automatically after that.

18
8.10 Missed calls
Your phone keeps a list of the 20 last calls you missed or the ones you actually received.
If one or more calls are unanswered, this will be displayed as follows:
- A new message or a new call will be displayed.
- The light under the Voice Portal key will start to blink.
To see the list of missed calls press Menu and then OK.
The missed calls will be displayed as follows:
To see the next entry on the list, press the Haut (up) and Bas (down) navigation key.
When you press Option, you can add a contact to your address book, delete a record from
your list or delete the whole list.
If you want to choose a number from the list, press the key and the number is automatically
dialled.
8.11 Using the address book
Each AtonCL101 handset has an address book with space for 200 names and numbers. The
names can be up to 12 characters long and the numbers can contain up to 24 characters. You
can allocate a particular ring tone to each contact.
Add a contact
Press the menu key, choose the registre (address book) and press OK. Press Option, Nouv. entrée
(add to contacts) and press OK.
Use the numerical keypad to enter the name and press OK.
(You will find a list containing all characters in the chapter SMS)
Enter the number and press OK.
Choose a ring tone by using the haut (up) and bas (down) navigation key and press OK.
The procedure of the following options stays the same: voir entrée (details), effacer (delete), tout
effacer (delete all).
Please note: When the memory is full this will be announced on the screen with “register plein”.
#02 (03)
Nom
031223344
21 :47 31.01
Number on the
Contact’s name
number
Time of the last
Number of calls this
contact made
Date and time of the

19
8.12 Dialling a contact’s number
Press the bas (down) navigation key.
Press then the haut (up) or bas (down) navigation key to select the contact or perform an
alphanumeric search using the keypad. You simply have to enter the first letter of your contact’s
name.
Press the key to begin the call.
When you press the option key you can choose between the following menus:
Nouv entrée (New entry), Voir entrée (Details), Mod entrée (Modifying entry). Effacer entrée
(delete entry), effacer tout (delete all), numéro. Rapide (fast call)
8.13 Fast call example
To assign TOM to the FastCall key 2, proceed as follows (the contact you assigns must already be
stored in your address book)
–Press the bas (down) navigation key
– Using haut (up) and bas (down) navigation keys, or by performing an alphanumeric search, you
can find the contact TOM.
– Press the option key.
– To call TOM using the shortcut key, press the FastCall number you assigned to Tom and press
then OK.
– Enter number 2 if 2 is the number you assigned this number to the contact and press OK.
Press the key, to return back to standby. Press the 2 key and hold it during two seconds.
TOM’s number will be displayed on the screen. Press the key to dial.
9Internal calls
If you have more than one Aton CL101 handset registered on the base station, you may make
internal calls. A maximum of two handsets may be connected internally. One handset may also
be connected to an outside line at the same time.
GAP compatible phones other than the Aton CL101 may be associated with the Aton CL101
base station, but full functionality cannot be guaranteed.
9.1 Registrating a handset
To announce a handset of Aton CL101 / CLT101 proceed as follows:
Choose the menu configuration, chose then Configuration combine (Configuration handset)
and press OK. Select Annoncer (register) and press OK. You are now requested to enter the PIN
of the base station (4 numbers, factory-set at 0000), press then OK.
Press the key of the base station until you hear bip bip bip … The registration now is in
process. The handset suggests a number that can be used as one of the internal numbers.
Choose now the number you want to associate. (To choose the number 2, press the 2 key)
To register a handset other than Aton CL101, follow the instructions given by this handset’s
using guide.

20
9.2 To call another handset
To call another handset press and hold the key during two seconds and enter the number of
the handset you wish to call.
Press the key to end the call.
9.3 To transfer a call or consult internally
During a call, press and hold the key during 2 seconds. The caller will be placed on hold.
Dial the number (1-5) of the internal handset you want to consult.
If you wish to transfer the call, press and the call will be transferred to the other handset.
If you want to retrieve the call you placed on hold, press and hold the key during 2 seconds.
9.4 Three-way conference call (2 internal callers + 1 external
caller)
The Aton CL101 allows you to set up three-way conference calls (between two Aton CL301
handsets and one outside line).
During the call, press and hold the key during 2 seconds. The caller will be placed on hold.
Dial the number (1 –5) of the internal handset you want to consult.
When the person you wish to consult has answered, press Option and select Conférence
(Conference). Press then OK. The three-way conference call is now connected.
Press the key to end your part in the three-way conference call.
9.5 Making and ending a call
Press the key to make a call.
Press the key to end a call.
9.6 Duration of call
10 seconds after beginning of conversation the display shows the call duration. This remains
indicated during 3 seconds after end of conversation.
The call duration is represented in minutes and seconds (mm.ss).
9.7 R-key (Flash)
The R key is used to activate certain telephone network services or when the phone is connected
to a home exchange. Consult the Swisscom brochures concerning network services they offer or
concerning home exchanges.

21
10 SMS text messages
Swisscom Fixnet offers its customers the possibility of sending and receiving text messages via
SMS. Your Aton CL101 is factory-set to use the Swisscom Fixnet SMS server.
More information is available at: http://www.swisscomfixnet.ch
Your Aton CL101 is factory-set for a configuration with the Swisscom sevice centre.
The number of the Swisscom SMS text messages centre is 062 210 000.
You can download this number in the menu SMS / Sevice SMS-C.
Please note:
To be able to receive a SMS, you must have sent before at least SMS.
10.1 Writing a message
Press the Menu key, select the menu SMS and press OK. Choose écrire (write) and press OK.
Write your message using the keypad. The table bellow may be of use:
The first letter is automatically a capital lette, the following letters are small letters. To choose the
mode capital letters (1letter only) press .
Press to correct mistakes.
When you have finished your text message press OK.
Your phone asks now whether you want to send the message. Dial the number or choose the
addresse’s name in your phone book (registre) and press OK. Press OK again.

22
You are requested to confirm that you want to send the text message and you are asked wether
you want to save the message as a draft (brouillon) or not. Choose send (envoyer) to send your
message and press OK.
10.2 Messages received
When you receive a message this will be displayed on your screen.
Press the Voice Portal key (lips) during 2 seconds, choose entry (entrée) and press OK.
A list with all new messages appears now on the screen. Choose the message you want to read
and press OK.
10.3 Reusing and sending of received messages
You can reuse, modify and send a text message you stored. Select brouillon (drafts) in the menu
SMS and press OK.
A list with all drafts will be displayed. Select the draft you wish to send or you wish to send after
having it modified. Press lire (read) and the text message will be displayed.
Press Option. The following options are now available: éditer SMS (write), envoyer SMS (send),
effacer SMS (delete), tout effacer (delete all).
Select Envoi SMS (send) and press OK, to send a text message. Press OK again.
10.4 Exit, sent messages
Under sortie (exit) the 10 last messages you sent are stored. You can use these text messages the
same way as the text messages you stored under brouillon (drafts): reuse (reprendre), modify
(modifier), send (envoyer).
If more than 10 text messages are stored in the exit, the oldest one will be deleted.
11 Voice Portal
This key offers three different functions.
Pressing one time: The number of Swisscom Voice Portal is displayed.
This service allows you to handle your connections by language control.
Only possible to use if you have an abonnement.
For further information contact: www.swisscom.com
You can test the service language control using the temporary number
0800 800 170.
Long pressing: Direct access to the SMS menu.
Blinking light: Signals missed calls and new text messages.
The light will stop blinking when you have checked your missed calls list or your entry.
More information about the use of this key is available at the shop you bought your phone or in
the using guide about home exchanges.
Your Aton CL101 is factory-set on 100ms. If you need other progammations please contact an
expert.
Table of contents
Other ATON Telephone manuals