Audioprobe SPARTAN CUE User manual

Mac OS X
OS X(10.6.1 or later) supports natively USB Audio Class 2.0 device with very low
latency. Connect CUE to your Mac via USB cable. You can control the CUE on
'Audio/MIDI Control Panel' on your Mac system.
Quick Start Guide
Additional Information and Support
We recommend checking AUDIOPROBE website regularly for driver updates and additional
Warranty / Product Registration
AUDIOPROBE warrants products to be free from defects in materials and workmanship, under normal use
and provided that the product is owned by the original purchaser, registered user. Visit our website for
terms and limitations applying to your specific product.
Registering your new product entitles you to full warranty coverage. Register online at
www.audio-probe.com/register to receive free product updates and more.
P/N : AP-CUE-QSG_EN_R01 Printed in Korea
Legal Notices
This guide is copyrighted ©2013 by AUDIOPROBE Inc., with all rights reserved.
AUDIOPROBE™ and AUDIOPROBE logo are trademarks of AUDIOPROBE Inc. All other trademarks contained herein are the
property of their respective owners.
Microsoft Windows
➊ Download the latest driver software from www.
audio-probe.com if you have Internet access. If
you don't have Internet access, use the setup file on
CD-ROM.
➋Connect CUE to your computer via USB cable prior
to launching software installation.
➌Wait until Windows report 'Device driver software
was not succesfully installed'.
➍Now double-click the file to start the installation
process.
➎Follow the driver installer's on-screen instructions.
➏During the process, you may be notified that the
driver being installed has not passed Windows Logo
Testing, or asked whether the program you wish to
run is a trusted application.
Click 'Continue Anyway'(Windows XP) or 'Install
'(Windows Vista/7/8) to proceed with the
installation.
➐Once the installer has completed, click 'Finish'.
➑You may see a green light on the top panel of
CUE, which means that CUE is connecting to the
computer.
➒Click icon on system tray and make sure that
‘DEVICE CONNECTION’ light on the control panel.
➓CUE is now ready to use.
•Products features, specifications, system requirements, and availability are subject to change without prior notice.
•Latest information regarding device drivers and others can be found at www.audio-probe.com.
PRIOR NOTICE
INSTALLING SPARTAN CUESETUP EXAMPLE
➋
➏
Windows Vista, 7,8 Windows XP
ENGLISH
➌
Wait and confirm the report.
➍
Launch the setup file.
Synthesizer, MIDI Keyboard,
Sound Module
High Impedance Instrument
Computer
Powered Monitors
Power Amplifiers
Headphones
Microphone
Line Level Sources
USB Connect.
USB
USB
AUDIOPROBE
SPARTAN CUE
If re-running the setup file, the driver will be
removed.
FRONT VIEW REAR VIEW
1XLR Microphone input connector Connect
a microphone. When using condenser
microphones, turn on +48V switch on the rear
panel.
21/4” Hi-Z Input connector This Hi-Z circuit
that has been designed especially for
connecting a passive pickup system directly.
3Input Source This switch makes you select
input source between FRONT panel(MIC and
Hi-Z) or REAR panel(Balanced Line inputs). If
the switch at ‘OFF’ position, no signal input is
routed to ADC.
4Monitor This is a direct monitoring
functionality which allows you may monitor
properly according to mono or stereo sources.
L+R : The switch is set on this position when
you use mono source.
(e.g. MIC, Hi-Z).
L<>R : The switch is set on this position when
you use stereo source.(e.g. Line
inputs)
Off : Monitoring is off.
5Headphones – LINE OUT MUTE When you
connect a HP to this jack, Line output on the
rear panel will be muted.
6Headphones – LINE OUT UNMUTE When
you connect a HP to this jack, output signal
is still passed to the Line output on the rear
panel.
1Line Outputs (Balanced) Connect balanced
or unbalanced connectors on this jack.
A compensation circuit shifts output level
automatically according to connector type.
In case of 1/4” TRS jack, output works as full
balanced outputs. If 1/4” TS jack is connected,
output works as unbalanced and the level goes
to double, which allows you to get same level
as though balanced connection.
2Line Inputs (Balanced) Connect line level
sources to this jack. Before use, Calibrate
signals level properly with gain knobs on each
channels from smallest gain.
3MIDI Input and Output Standard MIDI In/
Out jacks.
4External Power Use it only in case of lack of
USB power.
5~6VDC/1A (SMPS) can be used.
2.0mm inner, 5.5mm outer jack should be
used.
5USB High Speed Connector Connect to USB
2.0 or USB3.0 port properly according to
Installation Guide above.
6+48V Phantom power switch When this
switch is On, the XLR jack features +48V
phantom power. Phantom power is used to
power condenser microphones. Check your
microphones specification.
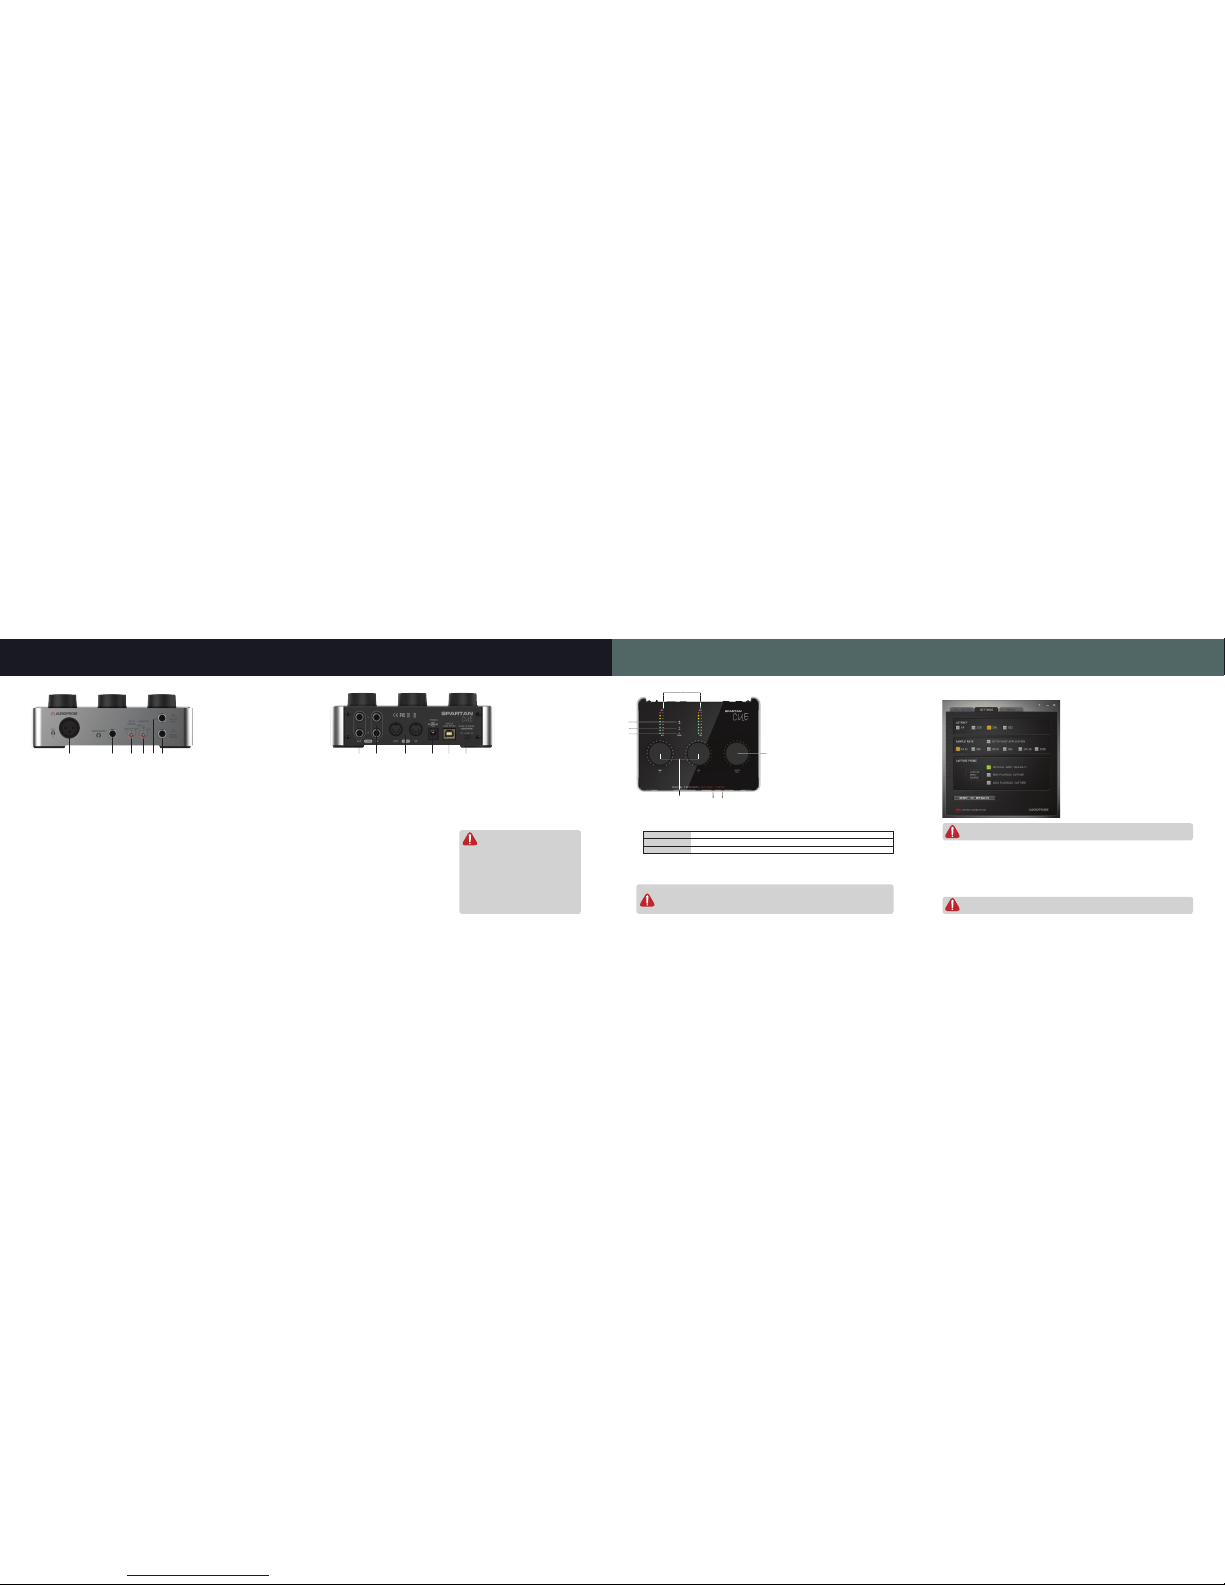
TOP VIEW
1Level meters for Left and Right channels
This precise level meters allows you to
check input status. More than 0dBFS signal
will be distorted when recording to your
software.
Make sure than input level should not
excess to 0dBFS in digital recording field.
2LED Indicator - USB If CUE is connected
to a computer properly via USB cable,
the USB LED lights up.
3LED Indicator - +48V If +48V is supplied
by turning on the switch on the rear panel
of CUE, the +48 LED lights up.
4LED Indicator - STREAM STREAM LED lights up while establishing audio communication between
CUE and a computer.Do not unplug off the CUE from the computer while this indicator is on.
5Input Gain Controls
6Master Level
This knob is for controlling output level of Headphone and Line outputs simultaneously. You must
reduce the volume prior to change of settings to be free of unwanted noise.(e.g. USB attachment
and release,Phantom Power on and off, Sample Rate changing)
Gain 1
Gain 2
Gain for XLR Microphone input
Gain for Hi-Z input
Front Panel input
Gain for Left channel Line input
Gain for Right channel Line input
Rear Panel Input
LATENCY
LATENCY is a small time delay which is needed
on your computer to work with the audio signals
that come in and go out. By reconfiguring this,
you may record with more shorter time delay.
But, shorter latency needs more processing
of your computer. If you experience problems
with click and pops, use more larger latency for
stable operation.
SAMPLE RATE
SET BY HOST APPLICATION – If this is checked,
Sample Rate of CUE is set automatically by host
application.(e.g. Pro Tools, Cubase, Studio
One)
If unchecked, Sample Rate may be set manually.
SOFTWARE PANEL SETTINGS
CAPTURE PROBE[Windows only]
‘CAPTURE PROBE’ is unique tool for capturing internal audio signals without signal loss.
Default is PHYSICAL INPUT only goes to Input of computer.
WDM PLAYBACK CAPTURE If you check this, all WDM (e.g. Windows Media Player, iTunes)
output stream is copied to input stream.
ASIO PLAYBACK CAPTURE If you check this, all AISO (e.g. Pro Tools, Cubase, Studio One)
output stream is copied to input stream.
1 2 3 4 5 6 1 2 3 4 5 6
1
5
2
3
4
6
WARNING
When turning on and off +48V switch, large
noises may be occurred. It may damage
connected speakers or headphones as well
as especially your valuable ears.
Before you operate the +48V switch,
Set both switches of [INPUT SOURCE] and
[MONITOR] to [OFF].
Also decrease the gain by rotating the
knob.
A noise may be occurred when changing the Sample Rate, due to internal clock transition.
You must reduce Master Level to minimum before the change.
A logical input is mixed enabled audio resources. You can select all of them. In this case,
you should care that input level should not excess to 0dBFS in the recording application.
90 dBSPL
8 hours
95 dBSPL
4 hours
100 dBSPL
2 hours
105 dBSPL
1 hours
110 dBSPL
30 minutes
115 dBSPL
15minutes
Maximum time exposure to
Sound pressure levels(per day)
Over exposure to excessive sound levels can damage your ears.
Please use the following guidelines established by OSHA.


