AudioSonic TXCD-1536 User manual

EN Instruction Manual
NL Gebruiksaanwijzing
fr Mode d’emploi
dE Bedienungsanleitung
Es Manual de instrucciones
pt Manual de Instruções
pL Instrukcje użytkowania
it Istruzioni per l’uso
sV Bruksanvisning
cs Návod k použití
sk Návod k použitiu
Hi-Fi Stereoset
MP3 / ID3 - USB / SD MMC tXcd-1536
EN Instruction Manual
NL Gebruiksaanwijzing
fr Mode d’emploi
dE Bedienungsanleitung
Es Manual de instrucciones
pt Manual de Instruções
pL Instrukcje użytkowania
it Istruzioni per l’uso
sV Bruksanvisning
cs Návod na použití
sk Návod na použitie

2

3
BASIC SAFETY PRECAUTIONS
Follow these safety precautions for safe operation:
• Before use, check the device for visible damage. Do not use a damaged device or if
it has been dropped.
• Mains cable and connections must be serviced or replaced by an authorized
service center.
• This device is not intended for use by persons with reduced physical, sensory
or mental capabilities, or lack of experience and knowledge, unless they have
been given supervision or instruction concerning use of the device by a person
responsible for their safety.
• Children should be supervised to ensure that they do not play with the device.
• Repairs only by an authorized service center. Improper repairs can cause danger
for the user. Improper repairs void the warranty.
• Repair during warranty period only by service center authorized by the
manufacturer, otherwise the warranty is voided.
• Defective components must be replaced with genuine spare parts. Only these
spare parts guarantee conformity with the safety requirements.
• Protect the device from moisture and liquids.
• Always take hold of the plug when disconnecting the mains cable from the wall
outlet, do not pull the cable.
• Do not use the mains cable as a carry handle.
• Do not let the mains cable hang down, danger of tripping and pulling the device
down.
• Avoid direct sunlight.
• Do not operate the device in close proximity to open flames.
• Disconnect from mains power supply in case of malfunctions and during a
thunderstorm.
CAUTION
RISK OF ELECTRIC SHOCK DO
NOT OPEN
The lightning flash
and arrowhead within
the triangle is a
warning sign alerting
you of "dangerous
voltage" inside the
product.
WARNING: To reduce the risk of
electric shock, do not remove
cover (or back). No user-
serviceable parts inside. Refer
servicing to qualified service
personnel.
The exclamation
point within the
triangle is a warning
sign alerting you of
important instructions
accompanying the
product.
TO REDUCE THE RISK OF FIRE OR ELECTRIC SHOCK,
DO NOT EXPOSE THIS APPLIANCE TO DRIPPING OR
SPLASHING LIQUIDS.
GROUNDING OR POLARIZATION. THE PRECAUTIONS
SHOULD BE TAKEN SO THAT THE WIDER BLADE OF
THE AC PLUG MUST MATCH THE SLOT IN RECEPTACLE
"WALL SOCKET".
CAUTION: INVISIBLE LASER RAOIATION WHEN
OPEN AND INTERLOCKS DEFEATED. AVOID EXPOSURE
TO BEAM.
NOTE: CAUTION SYMBOLS ARE PRINTED ON REAR OF
UNIT. PLEASE REFER TO INSTRUCTION MANUAL.
NOTE: YOU WILL FIND THE RATING LABEL FOR THIS
PRODUCT LOCATED ON THE REAR OF THE UNIT.
Instruction Manual EN

4
BATTERY USE INSTRUCTIONS
Warning! Danger through improper use!
Follow these safety precautions for safe battery use:
• Do not throw batteries into fire.
• Do not short-circuit batteries.
• Check the batteries regularly. Battery leakage can cause injuries (skin irritation) or
damage to the device. Be very careful when handling leaking batteries.
• Store batteries out of reach of children. Immediately see a physician when
batteries are swallowed.
• Remove the batteries from the remote control during longer periods of non-use.
INSTALLATION AND CONNECTION
Safety Precautions
Warning! There is a risk of injury and damage during start-up operation!
Follow these safety precautions to avoid dangers:
• Do not let children use packaging materials as toys. Danger of suffocation.
• To avoid injuries and damage, observe the requirements for location and
connection.
Scope of Delivery and Inspection for Transport Damage
The device is supplied with the following accessories and components:
• Music Center
• Speakers (2x)
• Remote control
• Drilling template
• Fasteners for wall mounting
• Stand for Music Center (2) with fastening screws
• Stand for speakers (2x) with fastening screws
• User manual
Note: Check the contents for completeness and visible damage.
In case of transport damage please contact your dealer directly.
Disposal of Packaging Materials
The packaging materials protect the device from transport damage. The packaging
materials are selected under environmentally friendly and disposal aspects and are
recyclable.
Recycling of packaging materials saves natural resources and reduces the waste.
Dispose of unwanted packaging materials according to local regulations.
Note: Keep the original packaging during the warranty period to package the device
properly in case of warranty claim.
Location Requirements
For safe and trouble-free operation the location of the device must meet the
following requirements:
• Place the device on a solid, level and flat surface or wall-mount the device.
• Keep sufficient space (min. 20cm) above the device to open the CD drive.
• Do not use the device in extremely hot, damp or humid locations or In close
proximity to inflammable materials.
• The wait outlet must be easily accessible at all times to disconnect the cable from
the mains power supply in case of emergency.
• Install the device in such way that no air vents are blocked
Instruction Manual

5
Wall Mounting
• Level the drilling template horizontally and mark the drill holes for wall mounting.
• Drill the holes with a 6mm drill bit.
• Insert the wall plugs to the drill holes.
• Screw in the fastening screws, but let them stand out approx. 4mm.
• Hang up device and speakers.
Mount Desk Stand
• Attach device and speakers to the corresponding desk stands and fasten with the
supplied screws.
Connect Speakers
• Connect the speakers to SPEAKERS R/L (27).
Connect Power
Follow these instructions for mains power connection for safe and trouble-free
operation:
• Ensure that the mains cable is undamaged; do not rout the cable over hot surfaces
or sharp edges.
• Do not tension the mains cable.
• Connect the device to a properly installed wall outlet. The standby LED lights up
and the time (0:00) is shown on the display.
REMOTE CONTROL
Insert Batteries
• Open the battery compartment at the rear of the remote control.
• Insert 2 batteries type R03 "AAA" 1.5V. Observe correct polarity as printed inside
the battery compartment!
Note: Do not mix different battery types or fresh and exhausted batteries.
Remote Control Use Instructions
• Point the remote control towards the IR sensor (8) on the front panel.
Connect Headphones
• For private listening use headphones with standard 3.5mm stereo jack and insert
in earphones jack (16). The speakers are automatically muted.
Instruction Manual EN

6
CONTROLS
1. CD drive
2. ALARM
3. DISPLAY/ID3
4. VOL-
5. l /
6. FUNCTION
7. Standby LED
8. IR sensor for remote control
9. PRESET EQ
10. V0L+
11. SNOOZE
12. Display
13. MEM/CLK-ADJ
14. FOLDER/PRE
15. TUNE+/
16. Earphones jack
17.
18. /ST/MO
19. Open/close CD drive
20. PLAY MODE
21. /TUNE-
22. SD/MMC card slot
23. USB port
24. FM ANT. wire antenna
25. DC JACK
26. AUX-IN
27. SPEAKERS R/L
28. Mains power cable
29. l /
30. MEM/CLK-ADJ
31. FUNCTION
32. TUNE+/
33. /ST/MO
34. FOLDER/PRE
35. +10
36. Open/close CD drive
37. VOL+
38. PLAY MODE
39. PRESET EG
40. MUTE
41. SNOOZE
42. ID3
43. ALARM
44. SLEEP
45. VOL-
46. -10
47. FOLDER/PRE
48. /TUNE-
49.
1 3
20
4
21
65
7
8
9
10
11
12
13
14
15
16
17
18
19
2
Instruction Manual

7
Instruction Manual EN
22
23
24
26
27
25
28
29 30 31
32
33
34
35
36
39
40
41
46
47
48
49
45
44
43 42
38
37

8
OPERATING INSTRUCTIONS
This chapter offers important instructions to operate the device.
Note: Most functions arc available via the buttons on the front panel as well as the
remote control. This manual describes operation via the buttons on the front panel.
Remote control buttons are expressly mentioned.
After 10 seconds idling the device returns to the previous mode.
On/Off
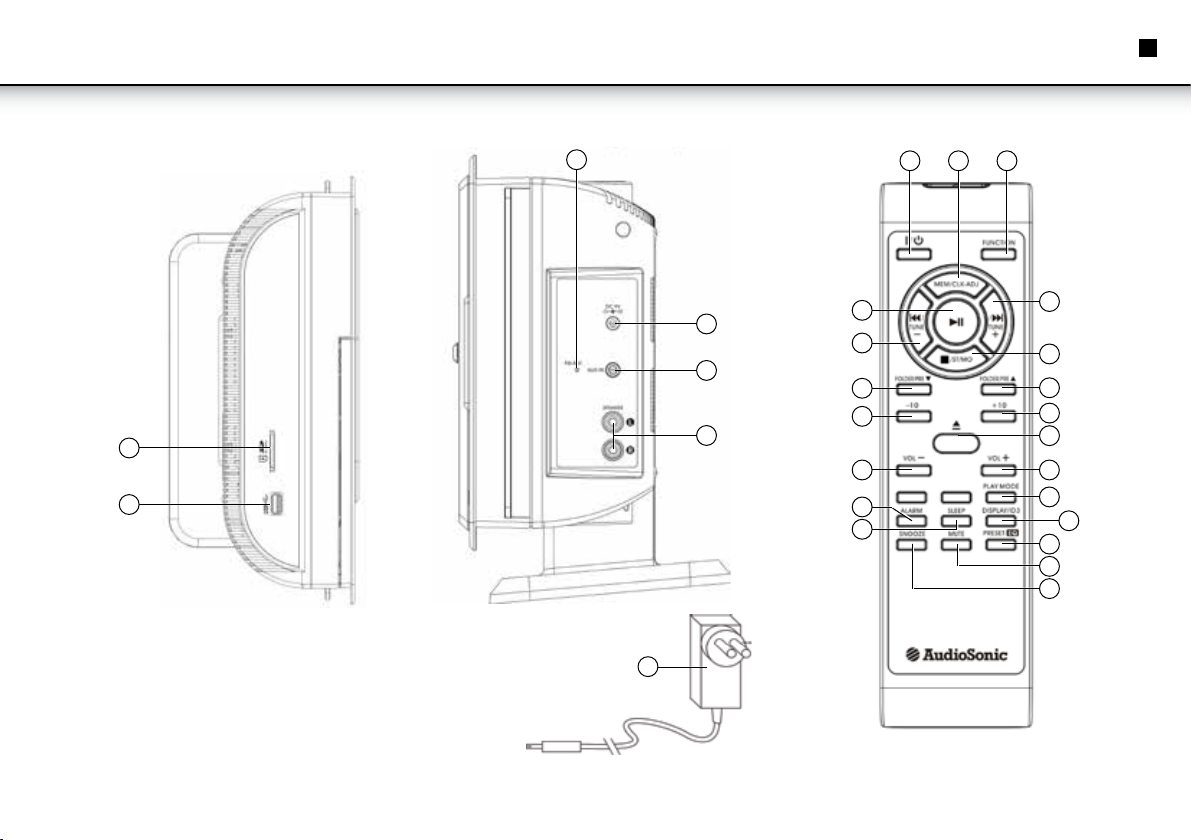
• Press l/ (5) to turn the unit on. The standby LED (7) turns off and the display (12)
is activated.
• Press l/ (5) to turn the unit off (standby mode). The standby LED (7) lights up
and the display (12) turns off. Only the current time is displayed.
SETTINGS
Set Current Time
• Turn the device off.
• Press and hold MEM/CLK-ADJ (13), until the display shows the time format (24H
or 12H).
• Press TUNE+/ (15) or /TUNE- (21) to toggle between 24-hour (24H)
and 12-hour display format (12H). Press MEM/CLK-ADJ (13), the hour display
flashes.
Note: For 12-hour display format the current time is displayed with AM or PM.
• Press TUNE+/ (15) or /TUNE- (21) to set the hours. Press MEM/CLK-
ADJ (13) to confirm; the minute display flashes.
• Press TUNE+/ (15) or /TUNE- (21) to set the minutes. Press MEM/
CLK-ADJ (13) to save the current time.
Note: Power failure or disconnecting the device from mains power supply resets the
current time to 00:00.
Set Volume
• Press VOL + (10) or VOL - (4) to set the desired volume.
Range: 0 (sound muted) to 30 (max. volume).
Set Alarm
Note: If you press no button for 10 seconds during alarm setting, then the alarm is
activated with the current settings and the device returns to the previous mode.
You can set 2 different alarm times;
• ALARM: At the set time the device turns on and starts playback of the selected
source at the selected volume level. If the corresponding souis not inserted or
connected the buzzer sounds.
• Press ALARM (2). The hour display flashes. For ALARM, playback source and
volume level are displayed in addition.
• Press TUNE+/ (15) or /TUNE- (21) to set the hours. Press ALARM the
minute display flashes.
• Press TUNE+/ (15) or /TUNE-(21) to set the minutes. Press ALARM
(2). the corresponding alarm icon is displayed.
Select Sound Scenario
• Press PRESET EQ (9) to select EQ presets between FLAT, CLASSIC, ROCK, POP and
JAZZ.
RADIO FUNCTIONS (TUNER)
Set TUNER mode
• Repeatedly press FUNCTION (6), until TUNER is displayed.
Auto Search
• Press and hold TUNE+/ (15) or /TUNE- (21) to start auto search. The
search is stopped after a station Is found.
Manual Search
• Press TUNE+/ (15) or /TUNE-(21) for 0.05 MHz (FM) or 9 kHz (AM)
frequency steps, until the desired frequency is set.
Toggle Between Stereo and Mono Reception (FM only)
• Press (17) to toggle between mono and stereo reception. During stereo
reception ( ) is displayed.
Instruction Manual

9
Save Radio Station to Memory
Note: The presets are deleted when disconnecting the device from mains power
supply. You have 10 presets each for FM and AM.
• Press MEM/CLK-ADJ (13), the preset number flashes.
• Press FOLDER/PRE (14) to select the desired preset number.
• Press MEM/CLK-ADJ (13) to save the radio station. The preset number is displayed.
Access Preset Radio Station
• Repeatedly press FOLDER/PRE (14) to select the desired station.
CD FUNCTIONS
Insert and Remove CD
Note: You can open the CD drive only in CD mode.
• Repeatedly press FUNCTION (6), until CD is displayed.
• Press (19) to open the CD drive.
• Insert a CD with the label to the front and slightly push down until it locks in place.
• Press (19) to close the CD drive. TOC READ flashes on the display, then the total
number of tracks and the playing time is displayed (Audio CD). For MP3/WMA CDs
the total number of albums and tracks is displayed.
Note: If no CD is loaded or the data cannot be read, then NO DISC is displayed.
• Press (19) to open the CD drive and remove the CD.
Start/Pause/Stop Playback
Note: MP3 or WMA is displayed during MP3 or WMA file playback.
• Press (17) to start playback. For Audio CDs the display shows track number
and playing time of the current track, for MP3/WMA CDs the numbers of the
current album and track are displayed.
• In playback mode press (17) to pause playback. Press (17) again to
continue playback.
• Press /ST/MO (18) to stop playback.
Skip Track/Album
• Press TUNE+/ (15) to skip to the next track.
• Press /TUNE-(21) to skip to the beginning of the current track.
• Press /TUNE- (21) again to skip to the previous track.
• Press FOLDER/PRE (14) to skip to the next album.
Fast Forward/Reverse
• Press and hold TUNE+/ (15) or /TUNE- (21) for fast forward or
rewind mode.
Repeat/Random Playback
• Repeatedly press PLAY MODE (20) to select the desired playback mode between
the following settings:
No icon on display Normal playback.
(icon flashes) The current track is repeated continuously.
All tracks in the current album are repeated
continuously (MP3/ WMA CDs only).
The entire CD is repeated continuously.
RAN All tracks are played in random order.
For MP3/WMA CDs; Random playback
for all albums.
Instruction Manual EN

10
Play List
Note: Program the playlist in stop mode only. Program up to 20 tracks in your desired
order.
• Press MEM/CLK-ADJ (13), the display shows the following readouts:
MEM Program play list activated.
001 (flashes) Current track number in first album.
001 (flashes) +
is displayed Album number (MP3/WMA CDs only).
P01 Location on the play list.
• Repeatedly press FOLDER/PRE (14) to select the desired album, then press
TUNE+/ (15) or /TUNE- (21) to select the track.
• Press MEM/CLK-ADJ (13) to save, The next location on the play list is displayed.
• Repeat these steps until your play list is programmed.
• Press MEM/CLK-ADJ (13) to finish programming.
• Press MEM/CLK-ADJ (13) again to delete your program. MEM turns off on the
display.
ID3 Tags (MP3/WMA Files only)
Note: With activated ID3 tag function the ID3 information in the file is read and
displayed. If no ID3 tag information is included or the device does not support the
format, and then NO TAG Is displayed.
• Press and hold ID3 (42) on the remote control to activate the ID3 function, until
"FILE - is displayed.
• Press ID3 (42) on the remote control again to deactivate the 1D3 function.
IMPORTANT
Note: Although this CD player can read CD-R, CD-RW and MP3 discs - in addition to
normal CD's - the playability of CD-R, CD-RW and MP3 discs may be affected by the
type of software that was used to create the discs, as well as the quality and condition
of the blank media you are using. 100% playability cannot be guaranteed. This is not
an indication of a problem with the player.
USB AND SD/MMC FUNCTIONS
Connect Media
• Ensure that the device is turned off.
• Connect your USB device to the USB port (23).
• Insert your SD/MMC memory card with the label to the front into the SD/MMC
card slot (22) until it locks into place.
Disconnect Media
• Ensure that the device is turned off.
• Disconnect your USB device from the USB port.
• Carefully press down the SD/MMC memory card to unlock; then remove from the
SD/MMC card slot.
IMPORTANT
The USB port of this product is fully compatible with the USB 1.1 and 2.0 standard.
lf MP3 players connected to this port are not written in compliance with the official
USB 1.1 or 2.0 standard it may occur that those MP3 players do not work on this
port. This is not a defective of this product. The MP3 player does not comply with the
official USB 1.1 or 2.0 standard.
Playback
• Repeatedly press FUNCTION (6), until or is displayed.
TOC READ (read contents) flashes on the display, then the total number of albums
and tracks is displayed.
Instruction Manual

11
Note: If no media is connected or inserted or no playable files are contained on the
media, then NO USB or NO SD is displayed.
Playback operation is similar to MP3/WMA CD playback.
OTHER FUNCTIONS
Playback from External Audio Device
• Connect audio out on your external audio device via 3.5mm stereo jack to AUXIN (26).
• Repeatedly press FUNCTION (6). until AUX is displayed.
• Start playback of your external audio device.
Sleep Timer
Activate the sleep timer to automatically turn off the device after a preset period of time.
• Press SLEEP (44) to set the auto off time. Following settings are available: 90, 60, 30
and 15 minutes. During sleep timer activation the icon is displayed.
• To deactivate the sleep timer function repeatedly press SLEEP (44), until the
icon turns off.
Snooze Function
• Press SNOOZE (11) while the alarm is sounded. The alarm is interrupted for approx.
10 minutes.
Mute Function
• Press MUTE (40) on the remote control to mute the sound. Press MUTE again to
unmute the sound.
CLEANING
Safety Precautions
Caution: Possible Damage. Ensure that no moisture penetrates the device during
cleaning, as this can cause irreparable damage.
Cleaning
• Clean the casing only with a slightly damp cloth.
TROUBLESHOOTING
This chapter offers important information about possible malfunctions and
troubleshooting. Please note the warnings to avoid danger and damage.
Safety Precautions
Warning: Follow these safety precautions to avoid danger and damage:
• Repairs to electrical equipment are only to be conducted by specialists trained
by the manufacturer. Improper repairs can cause severe danger for the user and
damage to the device.
Instruction Manual EN

12
Troubleshooting
Please check with the following table if you can solve the problem yourself before
contacting the service center.
Problem Possible cause Solution
The device cannot be turned on. • Mains cable is not connected to wall outlet.
• Wall outlet has no power.
• Connect the mains cable to the wall outlet.
• Check your fuses.
No sound. • Volume level is set to minimum.
• The sound is muted.
• The speakers are not connected correctly.
• Increase the volume level.
• The sound is muted.
• The speakers are not connected correctly.
CD is not recognized. • CD is inserted the wrong way round.
• CD is dirty or defective.
• CD format not supported by the device.
• Error on burnt CD.
• CD is inserted the wrong way round.
• Clean CD or insert a different CD.
• Insert a different CD.
• Check your home-burnt CD on a different player.
Remote control does not work. • Distance between remote control and device too big.
• Batteries are exhausted.
• The remote control has a range of 5 meters.
• Change the remote control batteries.
DISPOSAL
Disposal of Device
Do not dispose of the device with the household waste. This product must
be disposed of according to EU directive 2002/96/EC-WEEE (Waste Electrical
and Electronic Equipment).
Return the device to a collection point, Observe the applicable regulations. Contact
your municipality, if in doubt.
Disposal of Batteries
Do not dispose of batteries with the household waste. Every user is bound by
law to return batteries to a collection point or a retailer. This obligation serves an
environmentally friendly disposal of batteries. Only return exhausted batteries.
Instruction Manual

13
ALGEMENE VEILIGHEIDSMAATREGELEN
Volg deze veiligheidsmaatregelen op voor veilig gebruik:
• Controleer voor het gebruik het apparaat op zichtbare schade. Gebruik het
apparaat niet als het is beschadigd of als het is gevallen.
• Netsnoer en aansluitingen dienen door een bevoegd reparatiecentrum
onderhouden of vervangen te worden.
• Dit apparaat is niet bestemd voor gebruik door personen met verminderde fysieke,
zintuiglijke of mentale vermogens, of een gebrek aan ervaring en kennis, tenzij zij
onder toezicht staan of onderwezen worden in het gebruik van het apparaat door
een persoon die verantwoordelijk is voor hun veiligheid.
• Kinderen dienen onder toezicht te staan om ervoor te zorgen dat zij niet met het
apparaat kunnen spelen.
• Reparaties uitsluitend door een bevoegd reparatiecentrum. Onjuiste reparaties
kunnen gevaar voor de gebruiker opleveren. Onjuiste reparaties maken de
garantie ongeldig.
• Reparaties tijdens garantieperiode uitsluitend door reparatiecentrum dat is
gemachtigd door de fabrikant, anders vervalt de garantie.
• Defecte componenten dienen vervangen te worden door originele reservedelen.
Alleen deze reservedelen staan borg voor het voldoen aan de veiligheidseisen.
• Bescherm het apparaat tegen vocht en vloeistoffen.
• Pak altijd de stekker vast, wanneer u hem uit het stopcontact haalt. Trek niet aan
de kabel.
• Gebruik het netsnoer niet als draaghandvat.
• Laat het netsnoer niet naar beneden hangen. Het gevaar bestaat dat iemand over
het snoer struikelt en het apparaat naar beneden trekt.
• Vermijd direct zonlicht.
• Gebruik het apparaat niet in de nabijheid van open vuur.
• Haal de stekker uit het stopcontact in het geval van storingen en tijdens onweer.
LET OP
RISICO VOOR ELEKTRISCHE
SCHOKKEN NIET OPENEN
De bliksemschicht
met pijlpunt in een
driehoekig vlak is een
waarschuwingssy-
mbool dat aangeeft
dat het apparaat werkt
met een gevaarlijke
hoge spanning.
WAARSCHUWING: Om het risico van
elektrische schokken te beperken,
mag dit deksel (of de achterzijde)
niet van het apparaat verwijderd
worden. Het apparaat bevat geen
onderdelen die zelf te repareren
zijn. Reparaties dienen uitgevoerd
te worden door vakbekwaam
servicepersoneel.
Het uitroepteken in een
driehoekig vlak is een
waarschuwings-
symbool dat verwijst
naar belangrijke
instructies in de
gebruiksaanwijzing die
bij het product geleverd
wordt.
OM BRANDGEVAAR EN BLOOTSTELLING AAN
ELEKTRISCHE SCHOKKEN TE BEPERKEN MAG DIT
APPARAAT NIET BLOOTGESTELD WORDEN AAN
INDRINGEND OF OPSPATTEND VOCHT.
AARDING EN POLARISATIE. ZORG ERVOOR DAT DE
STEKKER VAN HET APPARAAT OVEREENKOMT MET
HET STOPCONTACT.
ONZICHTBAAR LASERLICHT KOMT VRIJ
WANNEER HET APPARAAT GEOPEND WORDT EN
VEILIGHEIDSVERGRENDELING ONKLAAR GEMAAKT IS.
VOORKOM BLOOTSTELLING AAN LASERLICHT.
OPMERKING: WAARSCHUWINGSSYMBOLEN STAAN VERMELD OP DE ONDERZIJDE
VAN HET APPARAAT. VOLG DE INSTRUCTIES IN DE
GEBRUIKSAANWIJZING.
OPMERKING: DE LASERKLASSE VAN DIT PRODUCT
WORDT DOOR EEN STICKER OP DE ONDERZIJDE VAN
HET APPARAAT AANGEDUID.
Gebruiksaanwijzing NL

14
Gebruiksaanwijzing
INSTRUCTIES GEBRUIK BATTERIJEN
Waarschuwing! Gevaar door onjuist gebruik!
Volg deze veiligheidsmaatregelen op voor veilig gebruik van batterijen:
• Gooi batterijen niet in het vuur.
• Sluit batterijen niet kort.
• Controleer de batterijen regelmatig. Lekkende batterijen kunnen letsel
(huidirritatie) of schade aan het apparaat veroorzaken. Wees zeer voorzichtig bij
het omgaan met lekkende batterijen.
• Bewaar batterijen buiten het bereik van kinderen. Raadpleeg onmiddellijk een arts
wanneer batterijen worden ingeslikt.
• Verwijder de batterijen uit de afstandsbediening wanneer het apparaat gedurende
langere tijd niet wordt gebruikt.
INSTALLATIE EN AANSLUITING
Veiligheidsmaatregelen
Waarschuwing! Er bestaat risico op letsel en schade bij het eerste gebruik!
Volg deze veiligheidsmaatregelen op om risico's te vermijden:
• Laat kinderen niet spelen met verpakkingsmaterialen. Gevaar op verstikking.
• Neem om letsel en schade te vermijden, de eisen voor plaatsing en aansluiting in acht.
Omvang van de levering en controle op transportschade
Het apparaat wordt geleverd met de volgende accessoires en componenten:
• Muziekcentrum
• Luidsprekers (2x)
• Afstandsbediening
• Boormal
• Bevestigingsmaterialen voor wandmontage
• Standaard voor Muziekcentrum (2) met bevestigingsschroeven.
• Standaard voor luidsprekers (2x) met bevestigingsschroeven.
• Gebruiksaanwijzing
Opmerking: Controleer de inhoud op compleetheid en zichtbare schade. Neem in
geval van transportschade onmiddellijk contact op met uw dealer.
Afvoer van verpakkingsmaterialen
De verpakkingsmaterialen beschermen het apparaat tegen transportschade. De
verpakkingsmaterialen worden geselecteerd op basis van milieuvriendelijkheid en
kunnen worden hergebruikt.
Hergebruik van verpakkingsmaterialen spaart natuurlijke hulpbronnen en reduceert
afval. Voer ongewenste verpakkingsmaterialen af in overeenstemming met lokale
regelgeving.
Opmerking: Bewaar de originele verpakking tijdens de garantieperiode om het
apparaat op de juiste wijze te kunnen verpakken in het geval van een beroep op de
garantie.
Plaatsingseisen
Voor een veilige en probleemloze werking van het apparaat dient de locatie te
voldoen aan de volgende eisen:
• Plaats het apparaat op een stevige, horizontale en vlakke ondergrond, of bevestig
het apparaat aan de wand.
• Houd voldoende ruimte (min. 20 cm) boven het apparaat om de CD speler te
openen.
• Gebruik het apparaat niet in extreem warme of vochtige plaatsen of in de
nabijheid van brandbare materialen.
• Het stopcontact dient altijd goed toegankelijk te zijn om de stekker van het
netsnoer uit het stopcontact te kunnen halen in noodgevallen.
• Installeer het apparaat zodanig dat de ventilatieopeningen niet worden
geblokkeerd.

15
Gebruiksaanwijzing NL
Wandmontage
• Richt de boormal horizontaal en markeer de boorgaten voor wandmontage.
• Boor de gaten met een 6mm boor.
• Steek de wandpluggen in de boorgaten.
• Draai de bevestigingsschroeven vast, maar laat ze ongeveer 4mm uitsteken.
• Hang het apparaat en de luidsprekers op.
Tafelstandaard
• Bevestig het apparaat en de luidsprekers aan de overeenkomstige tafelstandaards
en zet ze vast met de meegeleverde schroeven.
Aansluiten luidsprekers
• Sluit de luidsprekers aan op de aansluiting SPEAKERS R/L (27).
Aansluiten netsnoer
Volg deze instructies op voor het aansluiten van het netsnoer voor veilige en
probleemloze werking:
• Zorg ervoor dat het netsnoer niet is beschadigd; laat de kabel niet over hete
oppervlakken of scherpe randen lopen.
• Trek niet aan het netsnoer.
• Sluit het apparaat aan op een correct geïnstalleerd stopcontact. De slaapstand LED
gaat aan en de tijd (0:00) wordt weergegeven op het scherm.
AFSTANDSBEDIENING
Plaatsen van de batterijen
• Open het batterijvak aan de achterzijde van de afstandsbediening.
• Plaats 2 batterijen van het type R03 "AAA" 1.5V. Let op de juiste polariteit, zoals
aangeven op de binnenzijde van het batterijvak!
Opmerking: Gebruik geen verschillende soorten batterijen of nieuwe en gebruikte
batterijen door elkaar.
Gebruiksinstructies afstandsbediening
• Richt de afstandsbediening op de IR-sensor (8) op het voorpaneel.
Aansluiten hoofdtelefoon
• Gebruik voor privé luisteren een hoofdtelefoon met een standaard 3.5mm stereo
stekker en steek deze in de hoofdtelefoonaansluiting (16). De luidsprekers worden
automatisch gedempt.

16
Gebruiksaanwijzing
BEDIENINGSORGANEN
1. CD speler
2. ALARM
3. DISPLAY/ID3
4. VOL-
5. l /
6. FUNCTION
7. Slaapstand LED
8. IR sensor voor afstandsbediening
9. PRESET EQ
10. V0L+
11. SNOOZE
12. Display
13. MEM/CLK-ADJ
14. FOLDER/PRE
15. TUNE+/
16. Hoofdtelefoonaansluiting
17.
18. /ST/MO
19. Openen/sluiten CD speler
20. PLAY MODE
21. /TUNE-
22. SD/MMC kaartsleuf
23. USB poort
24. FM ANT. draadantenne
25. DC JACK
26. AUX-IN
27. SPEAKERS R/L
28. Netsnoer
29. l /
30. MEM/CLK-ADJ
31. FUNCTION
32. TUNE+/
33. /ST/MO
34. FOLDER/PRE
35. +10
36. Openen/sluiten CD speler
37. VOL+
38. PLAY MODE
39. PRESET EG
40. MUTE
41. SNOOZE
42. ID3
43. ALARM
44. SLEEP
45. VOL-
46. -10
47. FOLDER/PRE
48. /TUNE-
49.
1 3
20
4
21
65
7
8
9
10
11
12
13
14
15
16
17
18
19
2

17
Gebruiksaanwijzing NL
22
23
24
26
27
25
28
29 30 31
32
33
34
35
36
39
40
41
46
47
48
49
45
44
43 42
38
37

18
Gebruiksaanwijzing
BEDIENINGSINSTRUCTIES
Dit hoofdstuk geeft belangrijke instructies voor de bediening van het apparaat.
Opmerking: De meeste functies zijn zowel beschikbaar via de toetsen op het
voorpaneel als op de afstandsbediening. Deze handleiding beschrijft de bediening via
de toetsen op het voorpaneel. Toetsen op de afstandsbediening worden expliciet vermeld.
Na 10 seconden waarin het apparaat niet wordt bediend, keert het terug naar de vorige
stand.
Aan/Uit
• Druk l/ (5) om het apparaat in te schakelen. De standby LED (7) gaat uit en het
scherm (12) wordt geactiveerd.
• Druk l/ (5) om het apparaat uit te schakelen (slaapstand). De standby LED (7)
gaat aan en het display (12) gaat uit. Alleen dc huidige tijd wordt weergegeven.
INSTELLINGEN
Instellen huidige tijd
• Schakel het apparaat uit.
• Druk MEM/CLK-ADJ (13) in en houd hem vast totdat het scherm het tijdformaat
weergeeft (24 u of 12 u).
• Druk TUNE+/ (15) of /TUNE- (21) om te wisselen tussen 24-
uurs (24H) en 12-uurs schermformaat (12H). Druk MEM/CLK-ADJ (13), de
urenaanduiding knippert.
Opmerking: Bij 12-uurs schermformaat wordt de huidige tijd weergegeven met AM
of PM.
• Druk TUNE+/ (15) of /TUNE- (21) om de uren in te stellen. Druk
MEM/CLK-ADJ (13) om te bevestigen; de minuten-aanduiding knippert.
• Druk TUNE+/ (15) of /TUNE- (21) om de minuten in te stellen. Druk
MEM/CLK-ADJ (13) om de huidige tijd op te slaan.
Opmerking: Wanneer zich stroom uitval voordoet of de stekker uit het stopcontact wordt
gehaald, zal het de huidige tijd van het apparaat opnieuw ingesteld worden op 00:00.
Instellen Volume
• Druk VOL + (10) of VOL - (4) ) om het gewenste volume in te stellen. Bereik: 0
(geluid gedempt) tot 30 (max. volume).
Instellen Alarm
Opmerking: Als u gedurende 10 seconden geen toets indrukt tijdens het instellen
van het alarm, dan word het alarm geactiveerd met de huidige instellingen en het
apparaat keert terug naar de vorige stand.
U kunt 2 verschillende alarmtijden instellen.
• ALARM: Op de ingestelde tijd schakelt het apparaat in en begint met het afspelen
van de gekozen bron op het gekozen volume. Als de overeenkomstige bron is niet
is geplaatst of aangesloten gaat de zoemer af.
• Druk ALARM (2). De urenaanduiding knippert, voor ALARM worden in aanvulling
daarop de afspeelbron en volume weergegeven.
• Druk TUNE+/ (15) of /TUNE- (21) om de uren in testellen. Druk
ALARM, de minutenaanduiding knippert.
• Druk TUNE+/ (15) of /TUNE- (21) om de minuten in te stellen. Druk
ALARM (2): het overeenkomstige alarmicoon wordt weergegeven.
Selecteren geluidsscenario
• Druk PRESET EQ (9) om de voor vooraf ingestelde standen van de equalizer te
wisselen tussen FLAT CLASSIC ROCK POP en JAZZ.
RADIOFUNCTIES (TUNER)
Instellen TUNER stand
• Druk herhaaldelijk FUNCTION (6), totdat TUNER wordt weergegeven.
Automatisch zoeken
• Druk TUNE+/ (15) of /TUNE- (21) in en houd hem vast om het
automatisch zoeken te starten. Het zoeken wordt gestopt nadat een station is gevonden.
Handmatig zoeken
• Druk TUNE+/ (15) of /TUNE- (21) voor stappen van 0.05MHz (FM) of
9kHz (AM) in de frequentie, totdat de gewenste frequentie is ingesteld.
Wisselen tussen Stereo en Mono ontvangst (uitsluitend FM)
• Druk (17) om te wisselen tussen mono en stereo ontvangst. Tijdens stereo
ontvangst wordt ( ) weergegeven.

19
Gebruiksaanwijzing NL
Opslaan Radiostation in het geheugen
Opmerking: De voorinstcllingen worden verwijderd wanneer de stekker van het apparaat
uit het stopcontact wordt gehaald. Er zijn 10 voorinstellingen voor zowel FM als AM.
• Druk MEM/CLK-ADJ (13), het nummer van de voorinstelling knippert.
• Druk FOLDER/PRE (14) om de gewenste voorinstelling te selecteren.
• Druk MEM/CLK-ADJ (13) om het radiostation op te slaan. Het nummer van de
voorinstelling wordt weergegeven.
Toegang vooraf ingesteld radiostation
• Druk herhaaldelijk FOLDER/PRE (14) om het gewenste station te selecteren.
CD FUNCTIES
Plaatsen en verwijderen van een CD
Opmerking: U kunt de CD speler uitsluitend openen in de CD stand.
• Druk herhaaldelijk FUNCTION (6), totdat CD wordt weergegeven.
• Druk (19) om de CD speler te openen.
• Plaats een CD met het label naar voren en druk hem lichtjes aan zodat hij op zijn
plaats klikt.
• Druk (19) om de CD speler te sluiten. TOC READ knippert op het scherm, waarna
het totaal aantal nummers en de speeltijd worden weergegeven (Audio CD). Voor
MP3/WMA CD's wordt het totale aantal albums cn nummers weergegeven.
Opmerking: Als er geen CD is geplaatst of de gegevens kunnen niet worden
gelezen, dan wordt NO DISC weergegeven.
• Druk (19) om de CD speler te openen en de CD te verwijderen.
Starten/ Pauzeren/Stoppen afspelen
Opmerking: MP3 of WMA wordt weergegeven tijdens het afspelen van MP3 of WMA
bestanden.
• Druk (17) om het afspelen te starten. Voor Audio CD's toont het scherm het
volgnummer van het nummer en speelduur van het huidige nummer, voor MP3/WMA
CD's worden de volg nummers van het huidige album en nummer weergegeven.
• Druk in de afspeelstand (17) om het afspelen te pauzeren. Druk nogmaals
(17) om het afspelen te hervatten.
• Druk /ST/MO(18) om het afspelen te stoppen.
Springen naar Nummer/Album
• Druk TUNE+/ (15) om naar het volgende nummer te springen.
• Druk /TUNE- (21) om naar het begin van het huidige nummer te springen.
• Druk nogmaals /TUNE- (21) om naar het vorige nummer te springen.
• Druk FOLDER/PRE (14) om naar het volgende album te springen.
Snel voorwaart/achterwaart
• Druk TUNE+/ (15) of /TUNE- (21) in en houd vast voor snel
voorwaarts of achterwaarts afspelen.
Herhalen/Willekeurig afspelen
• Druk herhaaldelijk PLAY MODE (20) om de gewenste afspeelstand te selecteren
van de de volgende instellingen:
Geen icoon op Normaal afspelen.
het scherm
(icoon knippert) Het huidige nummer wordt doorlopend herhaald.
Alle nummers in het huidige album worden.
doorlopend herhaald (uitsluitend MP3/WMA CD's)
De volledige CD wordt doorlopend herhaald.
RAN Alle nummers worden in willekeurig volgorde
afgespeeld. Voor MP3/WMA CD's: willekeurig
afspelen voor alle albums.

20
Gebruiksaanwijzing
Afspeellijst
Opmerking: Programmeer de afspeellijst uitsluitend in de stopstand. Programmeer
tot 20 nummers in de door u gewenste volgorde.
• Druk MEM/CLK-ADJ (13), het scherm toont de volgende uitlezingen:
MEM Programmeren afspeellijst geactiveerd.
001 (knippert) Volgnummer huidige nummer in eerste album.
001 (knippert) + Volgnummer album (Uitsluitend MP3/WMA CD's)
wordt
weergegeven
P01 Positie op de afspeellijst.
• Druk herhaaldelijk FOLDER/PRE (14) om het gewenste album te selecteren en
druk dan TUNE+/ (15) of /TUNE- (21) om het nummer selecteren.
• Druk MEM/CLK-ADJ (13) om dit op te slaan. De volgende positie op de afspeellijst
wordt weergegeven.
• Herhaal deze stappen totdat uw afspeellijst is geprogrammeerd.
• Druk MEM/CLK-ADJ (13) om het programmeren te beëindigen.
• Druk nogmaals MEM/CLK-ADJ (13) om het programma te verwijderen. MEM op
het scherm gaat uit.
ID3 Labels (Uitsluitend MP3/WMA bestanden)
Opmerking: Bij een geactiveerde ID3 labelfunctie wordt de ID3 informatie in het
bestand gelezen en weergegeven. Als er geen ID3 labelinformatie is opgenomen, of
het apparaat ondersteunt het formaat niet, dan wordt NO TAG weergegeven.
• Druk ID3 (42) op de afstandsbediening in om de ID3 functie te activeren, en houd
hem vast totdat "TITLE - ..." wordt weergegeven.
• Druk nogmaals ID3 (42) op de afstandsbediening om de ID3 functie uit te schakelen.
BELANGRIJK
Opmerking: Hoewel deze CD speler naast gewone CD's ook CD-R, CD-RW en MP3 schijven
kan lezen, kan het afspeelbaar zijn van CD-R, CD-RW en MP3 schijven worden beïnvloed
door het type software waarmee de discs zijn gemaakt. Ook de kwaliteit en de conditie van
de lege media die u gebruikt, spelen daarbij een rol. Een afspeelbaarheid van 100% kan niet
worden gegarandeerd. Dit is geen aanwijzing voor een probleem met de speler.
USB EN SD/MMC FUNCTIES
Aansluiten Media
• Zorg ervoor dat het apparaat is uitgeschakeld.
• Sluit uw USB apparaat aan op de USB poort (23).
• Steek uw SD/MMC geheugenkaart met het label naar voren in de SD/MMC
kaartsleuf (22) totdat hij op zijn plaats klikt.
Uitnemen/ontkoppelen Media
• Zorg ervoor dat het apparaat is uitgeschakeld.
• Haar het USB apparaat uit de USB poort.
• Druk de SD/MMC geheugenkaart voorzichtig naar beneden om hem te
ontgrendelen; verwijder hem daarna van de SD/MMC kaartsleuf.
BELANGRIJK
De USB poort van dit product is volledig compatibel met de USB 1.1 en 2.0 standaard.
Indien een aangesloten MP3 speler niet functioneert, bestaat de mogelijkheid dat de
speler niet aan de officiële USB 1.1 of 2.0 standaard voldoet.Dit is geen defect aan dit
product.De MP3 speler voldoet niet aan de officiële USB norm 1.1 of 2.0.
Afspelen
• Druk herhaaldelijk FUNCTION (6), totdat of wordt weergegeven. TOC
READ (lezen inhoud) knippert op het scherm, waarna het totale aantal albums en
nummers wordt weergegeven.
Other manuals for TXCD-1536
1
Table of contents
Languages:
Other AudioSonic Stereo System manuals

AudioSonic
AudioSonic TXCD-1530 User manual

AudioSonic
AudioSonic CD-1588 User manual

AudioSonic
AudioSonic CL-1563 User manual

AudioSonic
AudioSonic HF-1250 User manual

AudioSonic
AudioSonic HF-1253 User manual

AudioSonic
AudioSonic MHF-220BT User manual

AudioSonic
AudioSonic HF-1254 User manual

AudioSonic
AudioSonic HF-1265 User manual

AudioSonic
AudioSonic TXCD-1536 User manual