Opel 2010 Astra User manual

OPEL ASTRA
Infotainment System


CD 30 / CD 30 MP3 ....................... 5
Mobile phone portal ..................... 33
Contents


Introduction .................................... 6
Radio ........................................... 17
CD Player .................................... 24
AUX input ..................................... 28
Index ............................................ 30
CD 30 / CD 30 MP3

6 Introduction
Introduction
General information ....................... 6
Theft-deterrent feature ................... 7
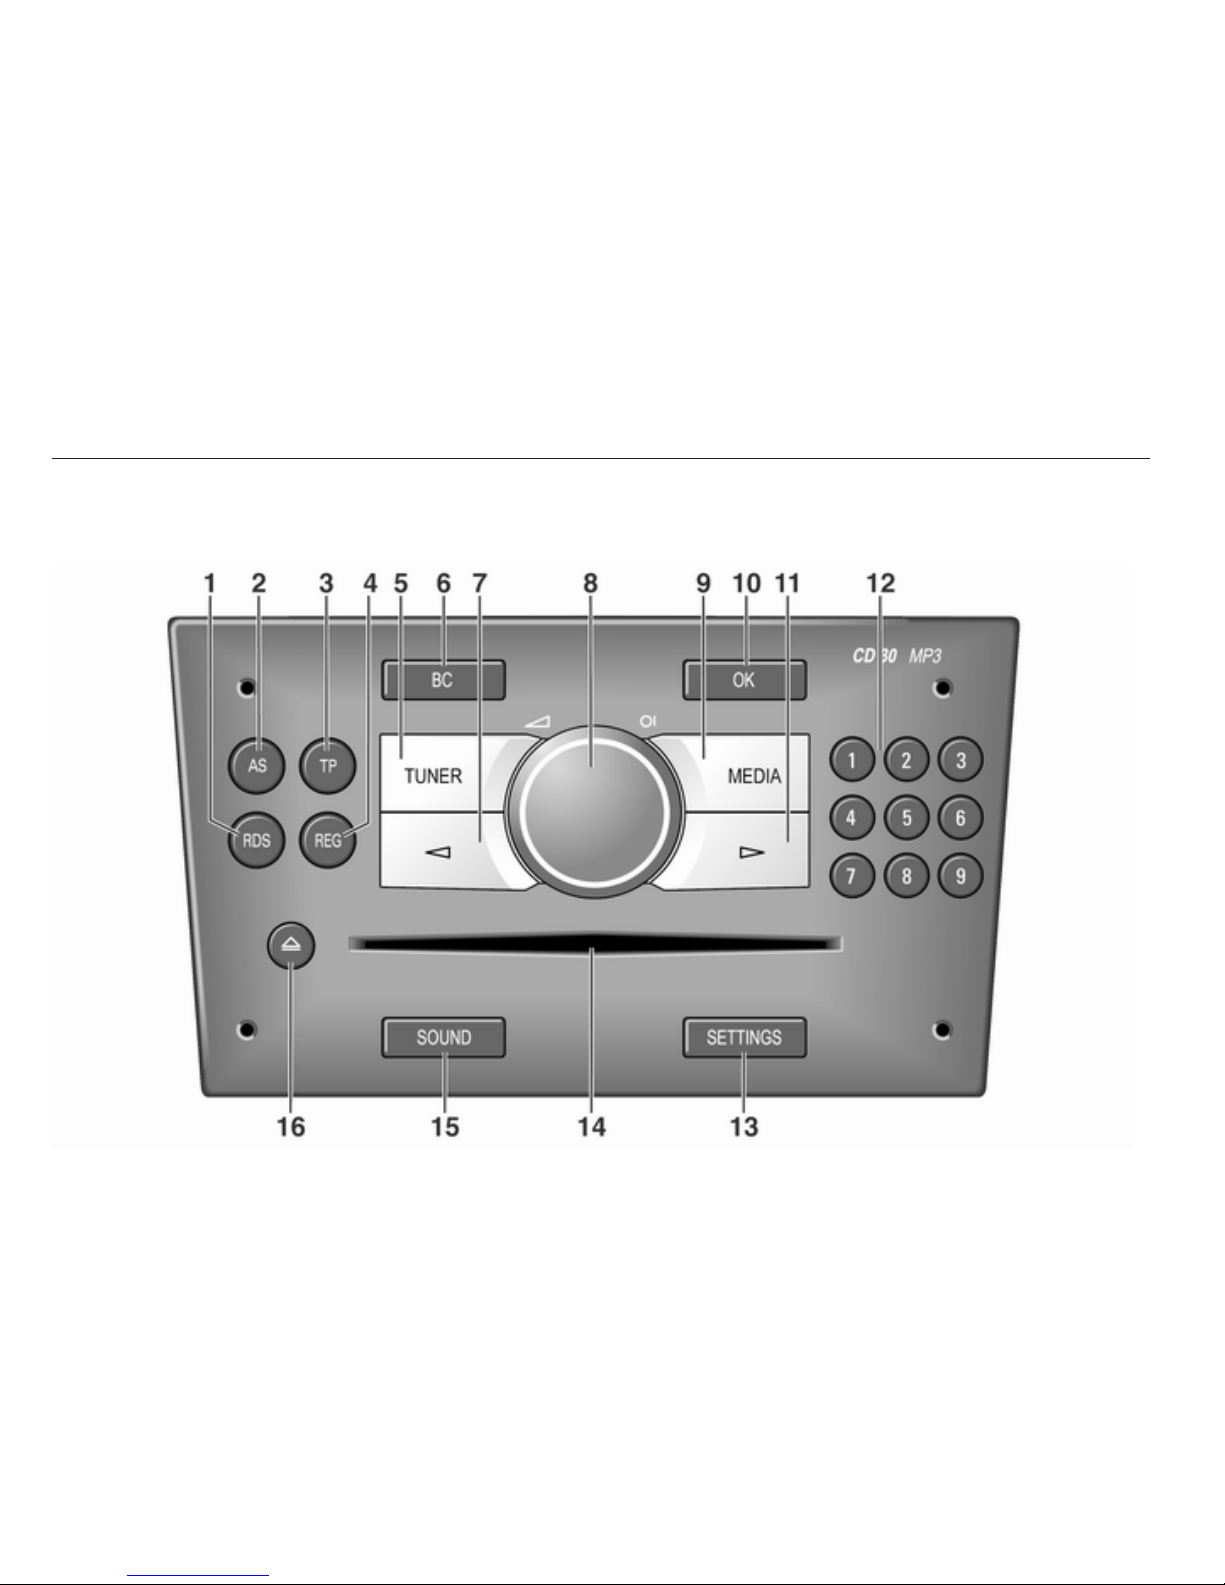
Overview ........................................ 8
Operation ..................................... 11
Tone settings ............................... 13
Volume settings ........................... 14
General information
The Infotainment system provides
you with state-of-the-art in-car
infotainment.
The radio has nine automatic station
memories for each waveband: FM,
AM and DAB (if available).
The digital sound processor provides
you with several preset equalizer
modes for sound optimisation.
The integrated CD player will
entertain you with audio CDs and
MP3 CDs.
The on-board computer can be
accessed from the Infotainment
System. For details please consult
the Owner’s Manual for your car.
Furthermore, you can connect an
external source, such as a mobile
phone to the Infotainment system.
An audio source connected to the
AUX input of your vehicle, e.g. a
portable CD player or an MP3 player
can be played back via the
loudspeakers in the Infotainment
system.
In addition the Infotainment system
can be equipped with a Mobile phone
portal.
Optionally, the Infotainment system
can be operated using controls on the
steering wheel.
The well-thought-out design of the
control elements and the clear
displays enable you to control the
system easily and intuitively.
Note
This manual describes all options
and features available for the
various Infotainment systems.
Certain descriptions, including those
for display and menu functions, may
not apply to your vehicle due to
model variant, country
specifications, special equipment or
accessories.

Introduction 7
Important information on
operation and traffic safety
9Warning
The Infotainment system has to be
used so that the vehicle can be
driven safely at all times. If in doubt
stop your vehicle and operate the
Infotainment system while the
vehicle is stationary.
Radio reception
Radio reception may be disrupted by
static, noise, distortion or loss of
reception due to
■ changes in distance from the
transmitter,
■ multi-path reception due to
reflection,
■ shadowing.
Theft-deterrent feature
The Infotainment system is equipped
with an electronic security system for
the purpose of theft deterrent.
The Infotainment system therefore
functions only in your vehicle and is
worthless for a thief.

8 Introduction
Overview
Control elements

Introduction 9
1RDS ...................................... 19
Display programme name
or transmission frequency
of the station ......................... 19
Update station list ................. 17
2AS ......................................... 18
Activate/deactivate AS
level ....................................... 18
Automatic station store ......... 18
3TP ......................................... 19
Traffic programme ................. 19
4REG ...................................... 19
Regional programme on/off ..19
5TUNER .................................. 17
Switch between FM, AM
and DAB (if available) ........... 17
6BC ........................................... 8
Trip computer .......................... 8
7m......................................... 13
Radio: Page back in
station memory, manual
and automatic station
search ................................... 17
CD/MP3: Previous track,
fast rewind ............................. 25
Change menu values ............ 11
8oe knob ......................... 11
Press: Switch on/off
Infotainment system .............. 11
Turn: Adjust volume .............. 11
9MEDIA ................................... 25
CD/MP3 mode ...................... 25
Display CD/MP3
information ............................ 25
Activate/deactivate
random playback ................... 25
AUX input: Switch audio
source to the external input ..17
10 OK ......................................... 11
Confirm selection or page
forward in settings menu ....... 11
11 n......................................... 17
Radio: Page forward in
station memory, manual
and automatic station
search ................................... 17
CD/MP3: Next track, fast
forward .................................. 25
Change menu values ............ 11
12 1...9 ....................................... 17
Station buttons ...................... 17
13 SETTINGS ............................ 14
Audio settings ....................... 14
System settings ..................... 11
14 Audio/MP3 CD slot ................ 25
15 SOUND ................................. 13
Enter sound settings ............. 13
16 j........................................... 25
Eject CD ................................ 25

10 Introduction
Steering wheel audio controls
1Thumbwheel ......................... 11
Turn: TID (Triple-Info-
Display): Manual station
search ................................... 11
Turn: GID (Graphic-Info-
Display): Previous/next
trip computer entry,
manual station search
(when combined with a trip
computer, turning the
thumbwheel has no radio
function) ................................ 11
Press: TID: no function ......... 11
Press: GID: call up/reset
trip computer, select a trip
computer entry ...................... 11
2q button ............................... 17
Radio: Next stored station .... 17
CD: Start CD playback .......... 25
MP3: Next album .................. 25
3p button .............................. 25
Switch between radio/CD/
MP3 and AUX mode ............. 25
4d button ................................. 17
Radio: search up, scroll
forwards through station
memory ................................. 17
CD: Short press: Skip one
track forwards ....................... 25
CD: Long press: fast
forward .................................. 25
5c button ................................. 17
Radio: search down, scroll
back through station
memory ................................. 17
CD: Short press: Skip one
track backwards .................... 25
CD: Long press: fast rewind . 25
6o..................................... 11
Turn: adjust volume .............. 11
Hold: adjust volume
continuously .......................... 11

Introduction 11
The steering wheel remote control
has other functions in conjunction
with the Mobile phone portal, see
chapter for Mobile phone portal.
Operation
Control elements
The Infotainment system is operated
optionally via:
■ the central control unit in the
instrument panel 3 8
■ controls on the steering wheel 3 8.
The operation of the Infotainment
system can vary with the information
display type. There are two different
information displays available: Triple-
Info-Display (TID) and Graphic-Info-
Display (GID). See "Information
displays" in the Owner's manual for
further information.
Switching the Infotainment
system on or off
Press the e knob.
The audio source last set is played.
Switching on and off with the ignition
key (automatic switch-on)
If the automatic switch-on is enabled,
the Infotainment system can also be
switched off and on again via the
ignition.
This link between the radio and
ignition is preset in the factory, but this
can be disabled.
■ If the automatic switch-on is
disabled, the Infotainment system
can only be switched on with the
e button or by inserting a CD and
off with the e button.
■ If the Infotainment system is
switched off when the ignition is
switched off, regardless of the
current setting of the automatic
switch-on it, can only be switched
on via the e button and by inserting
a CD.
■ The automatic start is always
enabled after the Infotainment
system has been disconnected
from the operating voltage and re-
connected.
Enable/Disable Ignition Logic
TID only:
1. Press SETTINGS button to
display Audio.
2. Press n button to display
System.
3. Press OK button repeatedly until
Ign.Logic ON or OFF (depending
on the current setting) is
displayed.
4. Select the desired status with the
m n buttons.
After a few seconds Audio is
displayed, followed by the relevant
audio source.
Or:
Press one of the function buttons
TUNER, MEDIA or BC to display the
relevant function.
GID only:
1. Press SETTINGS button to
display the Settings menu.
2. Press n button to select System.

12 Introduction
3. Press OK button and then
repeatedly n button to select
Ign. logic.
4. Press OK button to change the
current setting.
After changing the setting:
Press n button and then OK button
to leave the Settings menu.
Or:
Press one of the function buttons
TUNER, MEDIA or BC to display the
relevant function.
Automatic switch-off
The Infotainment system switches
itself off automatically after one hour
if you switch it on with the ignition off.
Setting the volume
Turn the o knob.
■ The Infotainment system plays at
the volume last set, provided the
volume was below the maximum
switch-on volume 3 14.
■ Traffic announcements and
external audio sources are inserted
at a preset minimum volume
3 14.
■ The volume of an audio source
connected via the AUX input can be
adjusted to suit the volumes of the
other audio sources (e.g. radio)
3 14.
■ If the respective source is enabled,
the volume of the traffic
announcements, the external audio
sources and the radio and CD can
be adjusted separately.
Speed dependent volume control
(SDVC)
When SDVC is activated 3 14, the
volume is adapted automatically to
make up for the road and wind noise
when driving.
External source
An external source, e.g. a mobile
phone or a navigation system, can be
connected to the Infotainment
system.
The external source is automatically
transferred through via a control
signal from the device connected,
even when the Infotainment system is
off. In this case External In is
displayed.
We recommend having appliances
installed by an Opel Partner.
AUX input
An external audio source, e.g. a
portable CD player, can be connected
via the AUX input of your vehicle.
Stereo sound from this source is
played back via the loudspeakers of
the Infotainment system.
The connector is located in the area
of the centre console.
Always ensure that the AUX input
remains clean and dry.
For the best possible audio quality,
the external audio source should be
set to maximum volume. On units with
line-out, the output signal is available
at a fixed audio level and cannot be
changed.

Introduction 13
To avoid overriding the AUX input, the
effective output voltage of the
external audio source must be lower
than 1.5 V.
Main display
The main menu is the display that
appears after the Infotainment
system is switched on.
The display varies depending on the
equipment level of the vehicle.
The following information can be
displayed:
Trip computer information
Display of on-board computer
information, which was selected with
the BC button. See your car owner’s
manual.
Mobile phone portal information
Display of the information provided if
a Mobile phone portal is fitted. See
operating instructions for Mobile
phone portal.
Audio Information
Display of the following audio
information:
■ Current waveband or AUX/CD.
■ Current station name or station
frequency or CD track number or
CD track name.
■ If the Regional function is enabled,
REG is displayed 3 19.
■ If the AS level is enabled, AS will be
displayed 3 18.
■ If the RDS function is enabled,
RDS is displayed 3 19.
■ If traffic announcements are
enabled, [TP] or [ ] will be displayed
3 19.
■ If a CD is inserted, either CD or CD
in will be displayed. If a CD with
MP3 music files is being played,
MP3 is also displayed 3 25.
■ If Random CD is enabled either
RDM or g is displayed 3 25.
Outside Temperature
Indication of the current outside
temperature. See your car owner’s
manual.
Time
Display of the current time. See your
car owner’s manual.
Information on the climate control
system
See car owner’s manual.
Tone settings
Press the SOUND button to make the
following settings:
■Fader
■Balance
■Bass

14 Introduction
■Treble
■Sound
Setting the volume distribution
between front - rear
1. Press the SOUND button.
Fader appears on the display.
2. Adjust the value with m or n.
After a few seconds the most
recent display reappears.
Or:
Press one of the function buttons
TUNER, MEDIA or BC to display the
relevant function.
Setting the volume distribution
between right - left
1. Press the SOUND button
repeatedly until Balance appears
on the display.
2. Adjust the value with m or n.
After a few seconds the most
recent display reappears.
Or:
Press one of the function buttons
TUNER, MEDIA or BC to display the
relevant function.
Setting Bass and Treble
Make sure that any sound
optimisations (see below "Sound")
are disabled.
1. Press the SOUND button
repeatedly until Bass or Treble
appear on the display.
2. Adjust the value with m or n.
After a few seconds the most
recent display reappears.
Or:
Press one of the function buttons
TUNER, MEDIA or BC to display the
relevant function.
Sound
1. Press the SOUND button
repeatedly until Sound and the
currently set tone colour or Off
appear on the display.
2. Select a tone colour, e.g. Rock or
Classic, or Off with m or n.
After a few seconds the most
recent display reappears.
Or:
Press one of the function buttons
TUNER, MEDIA or BC to display the
relevant function.
Tone settings in the Settings
menu
Alternatively, the settings for Fader,
Balance and Sound can be changed
in the Settings menu:
1. Press the SETTINGS button.
2. Press the OK button repeatedly
until the relevant function is
displayed.
3. Adjust the value or select a tone
colour (see above) with m or n.
After a few seconds the most
recent display reappears.
4. Press the SETTINGS button
again to return to the most recent
display.
Volume settings
Press SETTINGS button.

Introduction 15
The following menu items are
available:
■AUX Vol. AUX input volume, e.g. a
portable CD player
■TA Volume: Volume of traffic
announcements
■SDVC: Speed Dependent Volume
Control
■On Volume: Maximum volume
when the Infotainment system is
switched on
■Ext. In Vol.: Volume of an external
source (for example when
connecting a mobile telephone)
AUX Vol.
Use this function to adjust the AUX
input level in relation to other audio
sources (e.g. radio). This function is
only available when the AUX audio
source is enabled.
1. Set the external audio source to
maximum volume.
2. Press the SETTINGS button.
3. Press the OK button repeatedly
until the relevant function is
displayed.
4. Adjust the value with m or n.
After a few seconds the most
recent display reappears.
5. Press the SETTINGS button
again to return to the most recent
display.
TA Volume
If the TP function is switched on, the
system increases the volume for
traffic announcements by default.
This function allows setting a
minimum volume for traffic
announcements.
1. Press the SETTINGS button.
2. Press the OK button repeatedly
until the relevant function is
displayed.
3. Adjust the value with m or n.
After a few seconds the most
recent display reappears.
4. Press the SETTINGS button
again to return to the most recent
display.
The volume is only set to a minimum
for announcements if the current
volume setting is lower than the
minimum announcement volume
selected.
SDVC
To compensate for ambient and
rolling noise, the Infotainment
system’s volume is adjusted to the
speed of the vehicle. You can use the
SDVC function to adjust the speed-
dependent volume.
1. Press the SETTINGS button.
2. Press the OK button repeatedly
until the relevant function is
displayed.
3. Adjust the value with m or n.
After a few seconds the most
recent display reappears.
4. Press the SETTINGS button
again to return to the most recent
display.

16 Introduction
On Volume
1. Press the SETTINGS button.
2. Press the OK button repeatedly
until the relevant function is
displayed.
3. Adjust the value with m or n.
After a few seconds the most
recent display reappears.
4. Press the SETTINGS button
again to return to the most recent
display.
The maximum switch on volume
selected is used only if the volume
prior to switching off was higher than
the maximum switch on volume and
the Infotainment system has been off
for at least five minutes with the
ignition off.
Ext. In Vol.
Use this function to set a minimum
volume of external audio sources
such as a mobile phone.
1. Press the SETTINGS button.
2. Press the OK button repeatedly
until the relevant function is
displayed.
3. Adjust the value with m or n.
After a few seconds the most
recent display reappears.
4. Press the SETTINGS button
again to return to the most recent
display.

Radio 17
Radio
Usage .......................................... 17
Station search .............................. 17
Autostore lists .............................. 18
Radio data system (RDS) ............ 19
Digital audio broadcasting ........... 22
Usage
Radio mode
Switch from CD or AUX mode to radio
mode as shown below:
Press TUNER button.
You are listening to the station last
tuned in.
Selecting a waveband
The Infotainment system provides the
following wavebands: FM, AM or DAB
(if available). In addition, each of the
wavebands has an autostore memory
location (AS) where stations can be
automatically stored 3 18.
The radio is on.
Press TUNER button briefly.
The radio switches between FM, FM-
AS, AM, AM-AS, DAB and DAB-AS.
The station last selected on the
waveband is heard and displayed.
Station search
Station selection, automatic
search
FM waveband is selected and RDS
3 19 switched on.
Or:
DAB waveband is selected (if
available) and AS 3 18 switched on.
Press m or n to play the next
station in the station memory.
If no station can be found in the
station memory, Seek is displayed
and an automatic search for radio
stations is started.
The radio is muted until a station is
found.

18 Radio
If the radio cannot find a station, it
switches automatically to a more
sensitive search level (not DAB). If it
still cannot find a station, the last
active frequency (FM) or ensemble
(DAB) will be set.
Manual station search
The manual station search is used to
tune in to stations of known
frequencies (AM, FM) or ensembles
(DAB).
Keep m or n pressed until MAN is
displayed.
■ Coarse tuning:
Hold m or n down until the
desired frequency (AM, FM) or
ensemble (DAB) is almost reached.
■ Fine tuning:
Tap m or n until the exact
frequency/ensemble is reached.
If RDS 3 19 is deactivated in the FM
waveband or the AM waveband is
active, tapping m or n moves the
frequency by on increment.
Station memory
Separate memory slots are available
for each wavelength (FM, AM):
9 memory slots are available for each
of the following wavelength:
FM, FM-AS (automatically stored FM
stations), AM, AM-AS (automatically
stored AM stations), DAB, DAB-AS
(automatically stored DAB stations).
The memory slots can be selected
directly in the respective wavelength
via the station buttons.
Manual storing
Tune in to the desired station.
Keep the station button pressed on
which the tuned-in station is to be
stored.
The radio is muted for a short while
and displays the station previously
stored in the memory slot.
The station tuned-in is audible again
and is displayed.
The station is stored in the desired
memory slot.
RDS on or RDS off 3 19 are stored
together with the station.
FM station list
The Infotainment system stores all
receivable FM stations in the
background.
The list of receivable stations is
updated automatically if the radio
searches for a TP station 3 19 or an
automatic storage run is performed
using the Autostore (AS) function
3 18.
RDS stations 3 19 are sorted by
radio company in the station list (HR1,
HR2...)
Autostore lists
Activate/deactivate AS level
Tap the AS button.
When the AS level is active, the
display shows AS.

Radio 19
The AS level can also be activated
and deactivated using the FM/AM
button 3 17.
Autostore (AS)
Automatic storing (AS) of any
receivable station is possible in all
wavebands. These stations are
stored in a separate AS memory.
To automatically store stations,
proceed as follows:
1. Select the required waveband.
2. Enable/disable on standby for
traffic announcements if desired
3 19.
3. Hold down the AS button until you
hear the confirmation signal.
The radio changes over to the AS
level of the selected waveband (FM-
AS or AM-AS).
The automatic station storing is
started.
The 9 best receivable stations in the
selected waveband are stored to
memory slots 1 to 9.
After the stations have been stored,
the desired station can be selected by
pressing the appropriate station
button.
RDS is switched on automatically
when automatic storing is enabled.
First, all receivable RDS stations are
stored.
If on standby for traffic announcement
is switched on prior to or during
automatic storing, the radio will select
a memory slot with a traffic
announcement station on completion
of the automatic station search.
If on standby for traffic announcement
is switched on during automatic
storing, then the automatic station
search will remain active until at least
one traffic programme is found.
Storing new stations with AS
If you drive out of the reception area
of a stored station, new stations need
to be stored.
Calling up a station
The desired waveband and the
desired mode need to be active 3 17.
Press the AS button to activate the AS
level.
Select the storage location with the
storage buttons.
Radio data system (RDS)
RDS is a service of FM stations that
considerably facilitates the finding of
the desired station and its fault-free
reception.
Advantages of RDS
■ On the display the programme
name of the set station appears
instead of its frequency.
■ On station search the Infotainment
system tunes in to RDS stations
only.
■ The Infotainment system always
tunes into the best receivable
broadcasting frequency of the set
station by means of AF (Alternative
Frequency).
■ Depending on the station that is
received the Infotainment system
displays radio text that can contain,
for example, information about the
current programme.

20 Radio
RDS is only possible on the FM band.
Switching RDS on/off
If RDS is switched on, the RDS
functions are enabled and only RDS
stations are sought during the
automatic station search.
If you switch RDS off, the RDS
functions will be disabled and the
automatic station search will not only
look for RDS stations.
Press the RDS button to activate
RDS.
If the RDS function is switched on,
RDS and the programme name of an
RDS station is displayed.
If the station currently selected is not
an RDS station, the radio searches
automatically for the next receivable
RDS station.
To deactivate RDS, press the RDS
button again.
If the RDS function is not switched on,
the frequency of an RDS station is
displayed, RDS is not displayed.
Automatic RDS
Switch automatic RDS on (RDS Auto
On) to ensure that the RDS function
is enabled even when RDS is
disabled. However, the automatic
station search will also respond to
non-RDS stations.
This function is only applied if RDS is
switched off.
To switch automatic RDS on/off:
Press the RDS button until RDS Auto
On or Off are displayed, indicating the
current state of automatic RDS.
Release the RDS button to change
the current state.
Programme type (PTY)
Many RDS stations transmit a PTY
code describing the type of
programme broadcast (e.g. news).
The PTY code allows selection of
stations by programme type.
Programme type selection
1. Press the SETTINGS button.
2. Press OK until PTY is displayed.
3. Select one of the 29 programme
types e.g. News or
Entertainment with m or n.
4. Hold down the OK button until the
station search begins.
After station search starts the radio
display appears.
If the radio does not find an
appropriate station, it plays the
station to which the radio was most
recently tuned.
Regional programmes
Some RDS stations transmit different
regional programmes over different
frequencies at certain times.
Other manuals for 2010 Astra
11
Table of contents
Other Opel Car Video System manuals

Opel
Opel Astra Infotainment System User manual

Opel
Opel Mobile phone portal User manual

Opel
Opel 2014 Mokka User manual

Opel
Opel Zafira Tourer 2013 User manual

Opel
Opel MOKKA NAVI 950/CD 600 User manual

Opel
Opel 2010 Combo User manual

Opel
Opel OPEL ADAM User manual

Opel
Opel OPEL ADAM User manual

Opel
Opel R15 BT USB User manual

Opel
Opel CD 60 User manual