AURICAL SpeechLink 100 User manual
AURICAL SpeechLink 100
Reference Manual
Part No. 7-60-04800
Doc. No. 7-60-0480/01

Copyright notice
No part of this Online Help or program may be reproduced, stored in a retrieval system, or trans-
mitted, in any form or by any means, electronic, mechanical, photocopying, recording, or other-
wise, without the prior written consent of GN Otometrics A/S.
Copyright©2006, GN Otometrics A/S
Printed in Denmark by GN Otometrics A/S, Denmark
All information, illustrations, and specifications in this manual are based on the latest product in-
formation available at the time of publication. GN Otometrics A/S reserves the right to make
changes at any time without notice.
Technical support
Please contact your supplier.

GN Otometrics A/S iii
Contents
1 Introduction to AURICAL SpeechLink 100
1.1 AURICAL SpeechLink 100 ............................................................................................................ 7
1.1.1 Intended use................................................................................................................. 8
1.1.2 AURICAL SpeechLink 100 interfacing with OTOsuite Visible Speech Module ......... 8
1.1.3 Bluetooth...................................................................................................................... 8
1.2 About this manual....................................................................................................................... 8
1.2.1 Installation.................................................................................................................... 9
1.2.2 Safety ............................................................................................................................ 9
1.2.3 Training......................................................................................................................... 9
1.3 Typographical conventions......................................................................................................... 9
1.3.1 Navigation .................................................................................................................. 10
2 When you receive AURICAL SpeechLink 100
2.1 Unpacking.................................................................................................................................. 11
2.2 Storing SpeechLink 100............................................................................................................. 11
2.3 Views of SpeechLink 100 and charger ..................................................................................... 12
2.3.1 Front view................................................................................................................... 13
2.3.2 Reverse side view ....................................................................................................... 14
2.3.3 The charger................................................................................................................. 15
2.3.4 The probes .................................................................................................................. 16
2.4 Assembly and installation ......................................................................................................... 16
2.4.1 Location ...................................................................................................................... 17
2.4.2 Charger assembly ....................................................................................................... 17
2.4.3 Mounting the NOAHlink charger on the AURICAL SpeechLink 100 charger base
plate19
2.4.4 SpeechLink and probe assembly ............................................................................... 20
2.4.5 Fitting SpeechLink 100 with NOAHlink .................................................................... 23
2.4.6 Fitting SpeechLink 100 with counterweights ........................................................... 25
2.5 Powering.................................................................................................................................... 25
2.5.1 Powering AURICAL SpeechLink 100.......................................................................... 26
2.5.2 Powering the charger ................................................................................................ 26
2.5.3 Batteries...................................................................................................................... 27
2.5.4 Inserting the battery .................................................................................................. 27

Reference Manual OTOsuite
iv GN Otometrics A/S
2.5.5 Switching on SpeechLink 100 .................................................................................... 28
2.5.6 Switching off SpeechLink 100 ................................................................................... 29
2.5.7 Charging SpeechLink 100 .......................................................................................... 29
2.5.8 Powering status.......................................................................................................... 30
2.6 Communication with the OTOsuite Visible Speech Module via Bluetooth ........................... 31
3 Preparing AURICAL SpeechLink 100 for testing
3.1 Preparing AURICAL SpeechLink 100......................................................................................... 33
3.2 Preparing for tube calibration.................................................................................................. 33
4 Service and Maintenance - AURICAL SpeechLink 100
4.1 Equipment failure ..................................................................................................................... 35
4.2 Service and repair...................................................................................................................... 35
4.3 Maintenance.............................................................................................................................. 36
4.3.1 Calibration .................................................................................................................. 37
4.3.2 Replacing a probe ...................................................................................................... 37
4.3.3 Replacing an ear cord ................................................................................................ 37
4.4 Troubleshooting ........................................................................................................................ 38
4.4.1 Powering problems .................................................................................................... 38
5 AURICAL SpeechLink 100 Safety
5.1 Symbols used ............................................................................................................................. 39
5.1.1 AURICAL SpeechLink 100 symbols............................................................................. 39
5.1.2 Charger unit symbols ................................................................................................. 40
5.2 Warning notes ........................................................................................................................... 41
5.2.1 AURICAL SpeechLink 100 warning notes.................................................................. 41
5.2.2 Charger unit warning notes ...................................................................................... 43
5.3 Manufacturer............................................................................................................................. 43
5.3.1 Responsibility of the manufacturer .......................................................................... 43
6 Technical Specifications - AURICAL SpeechLink 100
6.1 AURICAL SpeechLink 100 .......................................................................................................... 45
6.1.1 Interface...................................................................................................................... 45
6.1.2 Type identification ..................................................................................................... 45
6.1.3 Power supply .............................................................................................................. 45

OTOsuite Reference Manual
GN Otometrics A/S v
6.2 Charger unit............................................................................................................................... 45
6.3 Power adaptor........................................................................................................................... 46
6.4 Operating environment ............................................................................................................ 46
6.5 Storing and handling ................................................................................................................ 46
6.6 Dimensions................................................................................................................................. 46
6.7 Weight ....................................................................................................................................... 47
6.8 Standards ................................................................................................................................... 47
7Index

Reference Manual OTOsuite
vi GN Otometrics A/S

AURICAL SpeechLink 100 Online help
GN Otometrics A/S 7
1 Introduction to AURICAL SpeechLink 100
•1.1 AURICAL SpeechLink 100, p. 7
•1.2 About this manual, p. 8
•1.3 Typographical conventions, p. 9
1.1 AURICAL SpeechLink 100
•1.1.1 Intended use, p. 8
•1.1.2 AURICAL SpeechLink 100 interfacing with OTOsuite
Visible Speech Module, p. 8
•1.1.3 Bluetooth, p. 8
Thank you for purchasing AURICAL SpeechLink 100.
SpeechLink 100 is a desktop or wall-mounted advanced 4-channel
frequency analyzer that wirelessly transfers measurement data to a
PC via Bluetooth. The four channels are used for measuring the
sound pressure level close to a client’s eardrum as well as outside
the ear by the pinna for both ears simultaneously. In this way,
SpeechLink 100 enables you to perform true binaural measurements
providing you with valuable information when you adjust Hearing
Instrument settings in the suppliers’ fitting software.
SpeechLink 100 cannot be used without the OTOsuite Visible Speech
Module PC application. When you have set up SpeechLink 100 for
testing, install the relevant software on your PC. When the PC appli-
cation has been installed, run the Configuration Wizard and you will
be able to connect to SpeechLink 100. For specific instructions on
how to use SpeechLink 100 with the OTOsuite Visible Speech Mod-
ule, please see the OTOsuite Visible Speech Module Online Help.
SpeechLink 100 integrates closely with the latest generation of GN
Otometrics test devices by offering real time presentation of test re-
sults and full test control directly from a PC with comprehensive
user interface.

8GN Otometrics A/S
Online help AURICAL SpeechLink 100
1.1.1 Intended use
SpeechLink 100 is intended for audiologists, hearing instrument dis-
pensers, ENTs, speech therapists and other health care professionals.
The intended use is that the user is able to visualize the amplified
signal recorded in the ear(s) of persons with a hearing loss in order
for the user to have an objective basis for adjusting the Hearing In-
strument settings. Note also that SpeechLink 100 is designed for use
in combination with NOAHlink - HIMSA’s wireless hearing instru-
ment programming device. See Section 2.4.5, ‘Fitting SpeechLink
100 with NOAHlink” on page 23.
1.1.2 AURICAL SpeechLink 100 interfacing with OTOsuite Visible Speech Module
OTOsuite Visible Speech Module is designed to operate with AURI-
CAL SpeechLink 100 as the test device (produced by GN Otometrics
A/S.
AURICAL SpeechLink 100 is a compact device, which offers a com-
plete range of test capabilities for Speech Mapping. AURICAL
SpeechLink 100 is controlled directly from the OTOsuite Visible
Speech Module software program.
1.1.3 Bluetooth
SpeechLink 100 connects with the OTOsuite Visible Speech Module
via BluetoothTM. Bluetooth is a wireless communication standard,
which allows devices such as computers, PDAs, mobile phones and
headsets to communicate and send data to each other in real-time,
without the need for wires or cables to link together the devices. De-
vices can typically communicate at ranges of up to 10 metres (ap-
prox. 33 ft).
1.2 About this manual
This Reference Manual is your guide to installing, calibrating and
using AURICAL SpeechLink 100. The key features of the device as
well as working scenarios for performing tests and viewing and
printing test results are described in detail in the OTOsuite Visible
Speech Module online help.
We strongly recommend that you read this Reference Manual care-
fully before using your SpeechLink 100 for the first time.

GN Otometrics A/S 9
AURICAL SpeechLink 100 Online help
The Reference Manual contains a description of the main functions
of SpeechLink 100. GN Otometrics recommends that you make
yourself familiar with the following issues:
•1.2.1 Installation, p. 9
•1.2.2 Safety, p. 9
•1.2.3 Training, p. 9
1.2.1 Installation
Section 2.1, ‘Unpacking” on page 11 and Section 2.4, ‘Assembly and
installation” on page 16 contain a full description of unpacking in-
structions, and how to install the software program.
1.2.2 Safety
This Reference Manual contains information which must be fol-
lowed to ensure the safe performance of SpeechLink 100. Local gov-
ernment rules and regulations, if applicable, should also be followed
at all times.
Safety information is stated where it is relevant, and general safety
aspects are described in Section 5, ‘AURICAL SpeechLink 100 Safe-
ty” on page 39.
1.2.3 Training
It is recommended that you read this Reference Manual and try out
test scenarios in the OTOsuite Visible Speech Module Reference
Manual before you start operating SpeechLink 100 so that you are
familiar with both the device and the software program before test-
ing a patient.
•1.3 Typographical conventions, p. 9
1.3 Typographical conventions
The use of WARNING, CAUTION and NOTE
For safety reasons and appropriate use of the SpeechLink 100, the
manual contains WARNINGS, CAUTIONS and NOTES, which you
should read carefully. The use of these headings is denoted as fol-
lows:
WARNING:
A warning indicates that there is a risk of danger to persons and da-
ta.

10 GN Otometrics A/S
Online help AURICAL SpeechLink 100
Caution:
Caution indicates that there is a risk of damage to data.
Note:
A note indicates that you should take special notice.
1.3.1 Navigation
When you navigate the software related to this test device, in the
.pdf version of the manual, menus, icons and functions to select are
shown in bold type, as for instance in:
•ClicktheMeasurement Settings icon on the toolbar or
select Measurements > Settings...
•Chapter 2, “When you receive AURICAL SpeechLink 100” on
page 11

AURICAL SpeechLink 100 Reference Manual
GN Otometrics A/S 11
2 When you receive AURICAL SpeechLink
100
•Section 2.1, ‘Unpacking” on page 11
•Section 2.2, ‘Storing SpeechLink 100” on page 11
•Section 2.3, ‘Views of SpeechLink 100 and charger” on page 12
•Section 2.4, ‘Assembly and installation” on page 16
•Section 2.5, ‘Powering” on page 25
•Section 2.6, ‘Communication with the OTOsuite Visible
Speech Module via Bluetooth” on page 31
2.1 Unpacking
1. Unpack your SpeechLink 100 carefully.
When you unpack SpeechLink 100, it is a good idea to keep
the packing material in which it was delivered. If you need to
send the SpeechLink 100 in for service, the original packing
material will protect against damage during transport, etc.
2. Inspect the equipment for possible visual damage.
If damage has occurred, do not put the SpeechLink 100 into
operation. Contact your supplier for assistance.
3. Check with the list accompanying the package to make sure
that you have received all necessary parts and accessories. If
your package is incomplete, contact your supplier.
•Section 2.2, ‘Storing SpeechLink 100” on page 11
2.2 Storing SpeechLink 100
If you need to store SpeechLink 100 before you put it into operation,
follow the guidelines below:

12 GN Otometrics A/S
Reference Manual AURICAL SpeechLink 100
• Store SpeechLink 100 and accessories in the box provided to
protect the equipment from damage.
• Store SpeechLink 100 as stated in the Technical Specifications,
Section 6.5, ‘Storing and handling” on page 46.
For views of SpeechLink 100 go to Section 2.3, ‘Views of SpeechLink
100 and charger” on page 12
2.3 Views of SpeechLink 100 and charger
•Section 2.4, ‘Assembly and installation” on page 16
This section provides you with views of SpeechLink 100 and its
charger from various angles
Section 2.3.1, ‘Front view” on page 13
Section 2.3.2, ‘Reverse side view” on page 14
Section 2.3.3, ‘The charger” on page 15
Section 2.3.4, ‘The probes” on page 16
SpeechLink 100 is designed to be placed around the shoulders of the
client. It consists of a main unit and two REM probes which are sup-
plied with the unit. When not in use, it should be placed either in its
desktop or wall-mounted charger.
SpeechLink 100 is supplied partly assembled. To complete the as-
sembly, see
Section 2.4.2, ‘Charger assembly” on page 17,

GN Otometrics A/S 13
AURICAL SpeechLink 100 Reference Manual
Section 2.4.3, ‘Mounting the NOAHlink charger on the AURI-
CAL SpeechLink 100 charger base plate” on page 19,
Section 2.4.4, ‘SpeechLink and probe assembly” on page 20,
and
Section 2.4.5, ‘Fitting SpeechLink 100 with NOAHlink” on
page 23.
Section 2.4.6, ‘Fitting SpeechLink 100 with counterweights” on
page 25.
2.3.1 Front view
Device
Probes
Charger
Charger base plate

14 GN Otometrics A/S
Reference Manual AURICAL SpeechLink 100
Section 2.3.2, ‘Reverse side view” on page 14
Section 2.3.3, ‘The charger” on page 15
Section 2.3.4, ‘The probes” on page 16
2.3.2 Reverse side view
Section 2.3.3, ‘The charger” on page 15
Section 2.3.4, ‘The probes” on page 16
Status indicator
Cord
Battery compartment
On/Off button
Probe
Label

16 GN Otometrics A/S
Reference Manual AURICAL SpeechLink 100
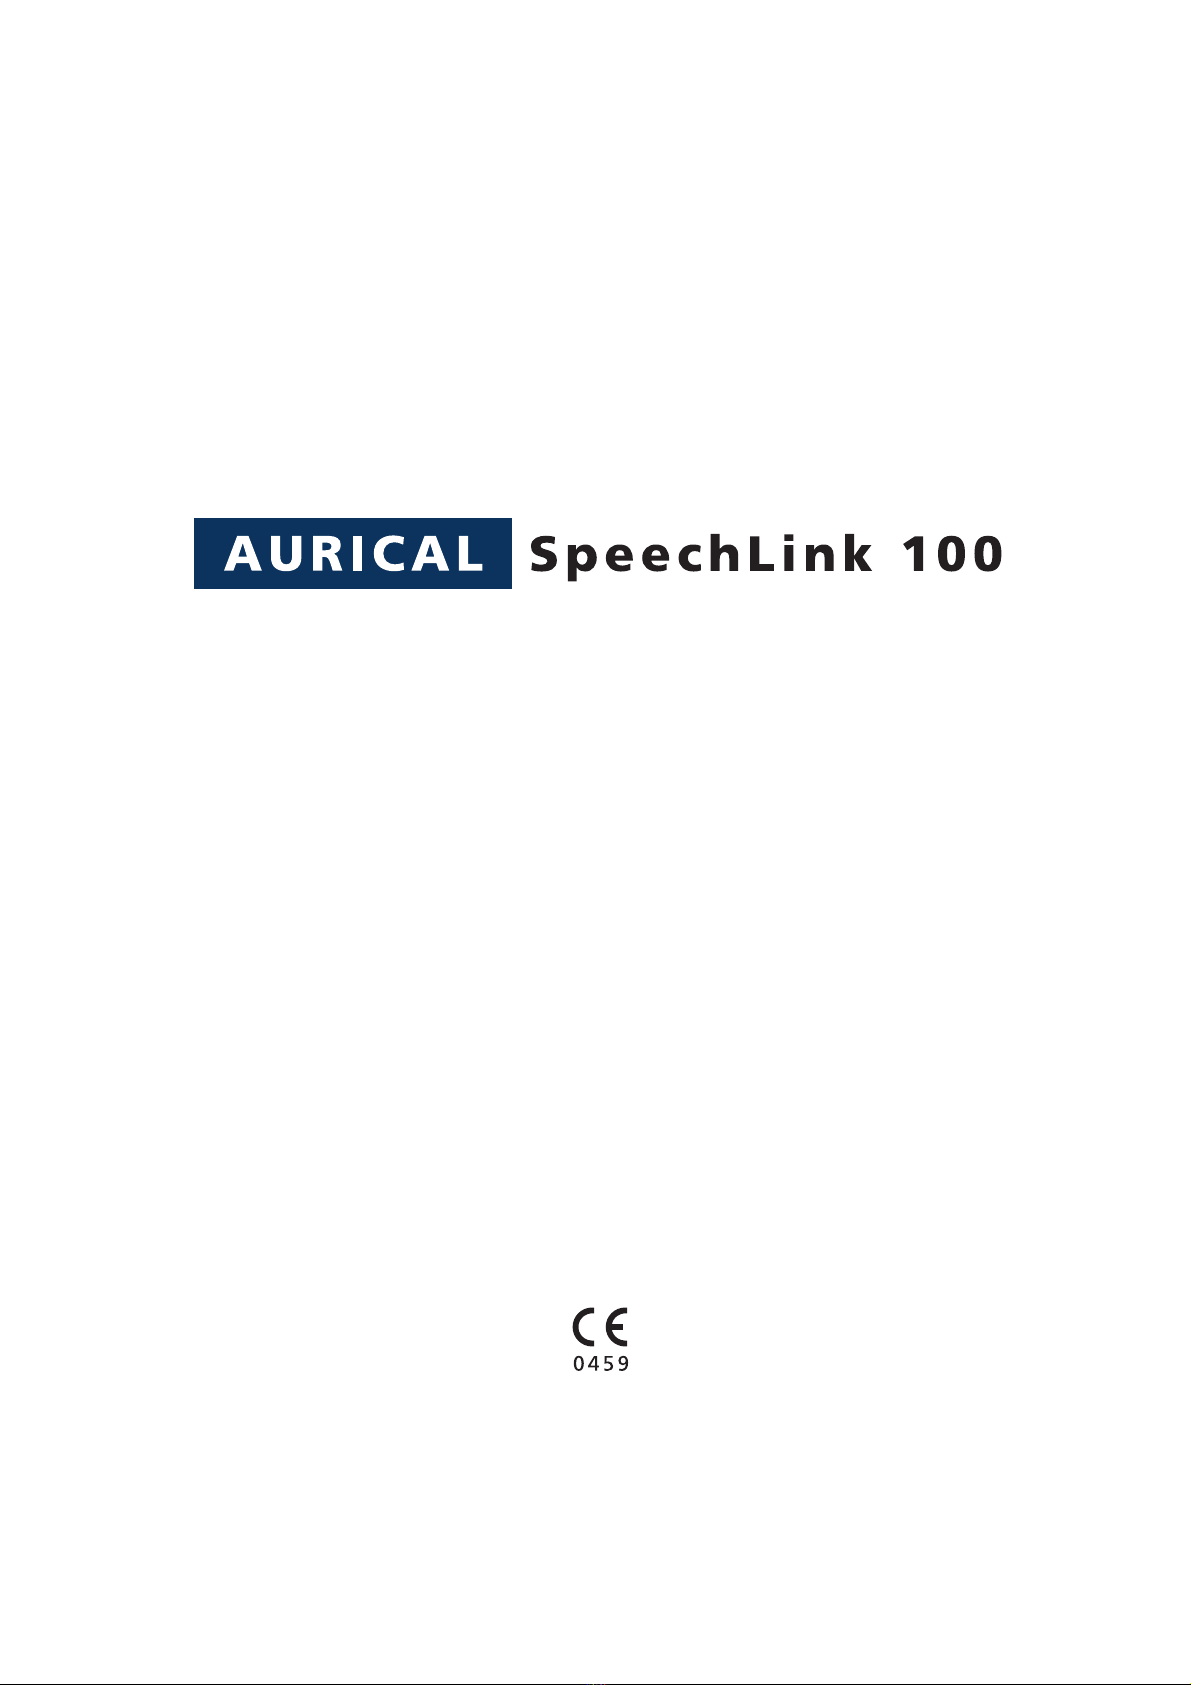
2.3.4 The probes
2.4 Assembly and installation
This section provides you with:
Instructions on how to assemble the charger
•Section 2.4.2, ‘Charger assembly” on page 17
•Section 2.4.3, ‘Mounting the NOAHlink charger on the AURI-
CAL SpeechLink 100 charger base plate” on page 19
Instructions on how to assemble the probe and tube
•Section 2.4.4, ‘SpeechLink and probe assembly” on page 20
•Section 2.4.5, ‘Fitting SpeechLink 100 with NOAHlink” on
page 23
•Section 2.4.6, ‘Fitting SpeechLink 100 with counterweights” on
page 25
Powering instructions
•Section 2.5, ‘Powering” on page 25
Probe body
Connector
Front view
Silicone tube
Back view
Cord
Silicone tube guide

GN Otometrics A/S 17
AURICAL SpeechLink 100 Reference Manual
2.4.1 Location
A sound cabin or sound treated room is not necessary, but it is rec-
ommended that you use a room where reverberation time is not too
long.
To ensure safe performance, the SpeechLink 100 must be correctly
installed and the requirements listed in Chapter 5, “AURICAL
SpeechLink 100 Safety” on page 39 and Chapter 6, “Technical Spec-
ifications - AURICAL SpeechLink 100” on page 45 must be complied
with.
WARNING:
Always keep the charger cradle away from the patient area.
Apart from the above warning, the SpeechLink 100 can be used with
no specific requirements to location. However, keep SpeechLink 100
away from all liquids and sources of heat (for detailed specifications,
see Section 6.4, ‘Operating environment” on page 46.
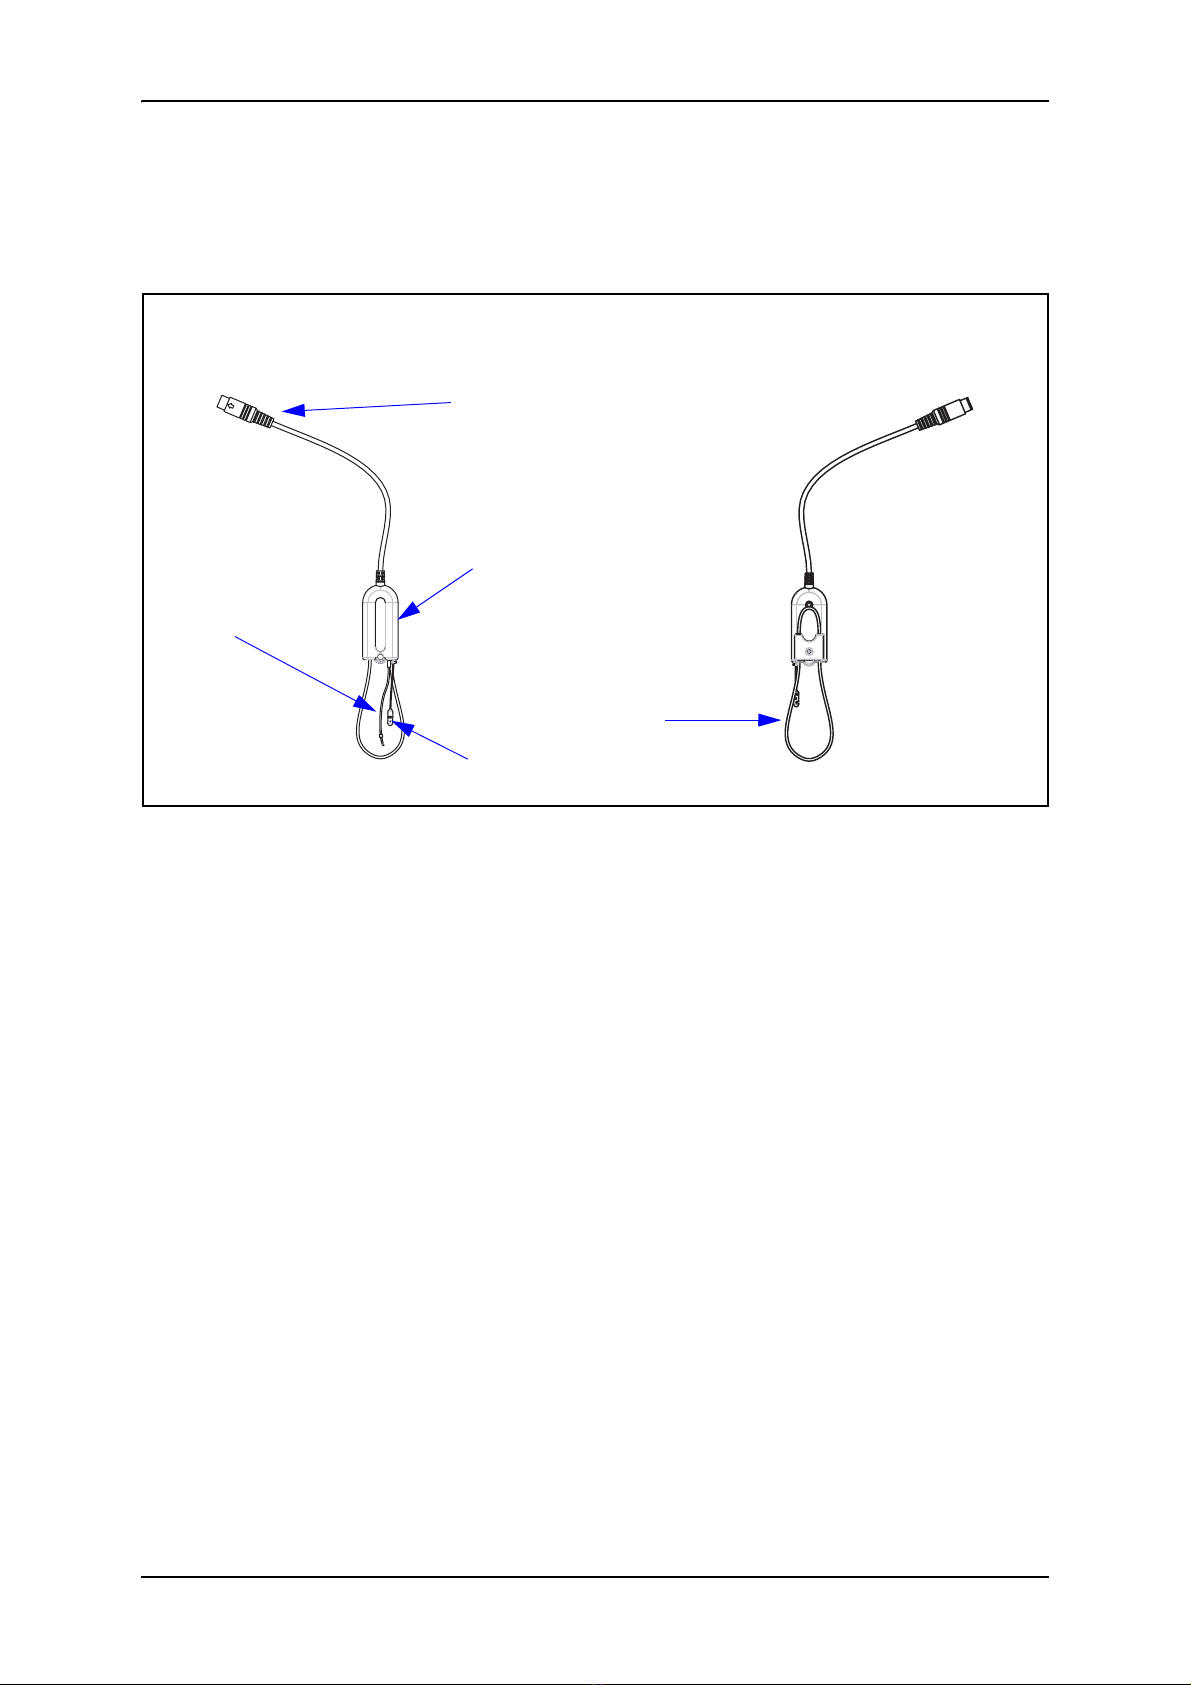
2.4.2 Charger assembly
Mount the charger on the base plate. You can choose between the
base plate for desktop use, or the base plate for wall-mounting. See
•‘‘Base plate assembly” on page 17
•‘‘Wall mount installation” on page 19
For use with NOAHlink, you can mount the NOAHlink charger on
the SpeechLink 100 base plate. See
•‘‘Mounting the NOAHlink charger on the AURICAL Speech-
Link 100 charger base plate” on page 19
Base plate assembly
Mount the charger on the charger base as shown below. This proce-
dure applies both to desktop and wall mounting solutions.
For wall mounting purposes, mount the wall mount base plate on
the wall mount back plate. See ‘‘Wall mount installation” on page
19.
1. Use the hexagonal key to screw the hexagonal screws into
place as shown below.
18 GN Otometrics A/S
Reference Manual AURICAL SpeechLink 100
2. Make sure that you tighten the screws well so that the charger
is stable when you place SpeechLink 100 in the charger.
Charger body
Base plate
Hexagonal screws
Hexagonal key
GN Otometrics A/S 19
AURICAL SpeechLink 100 Reference Manual
Wall mount installation
1. Drill 2 x 6 mm diameter holes 110 mm (4.33") apart.
2. Insert rawl plugs.
3. Fit the screws through the backplate of the wallmount.
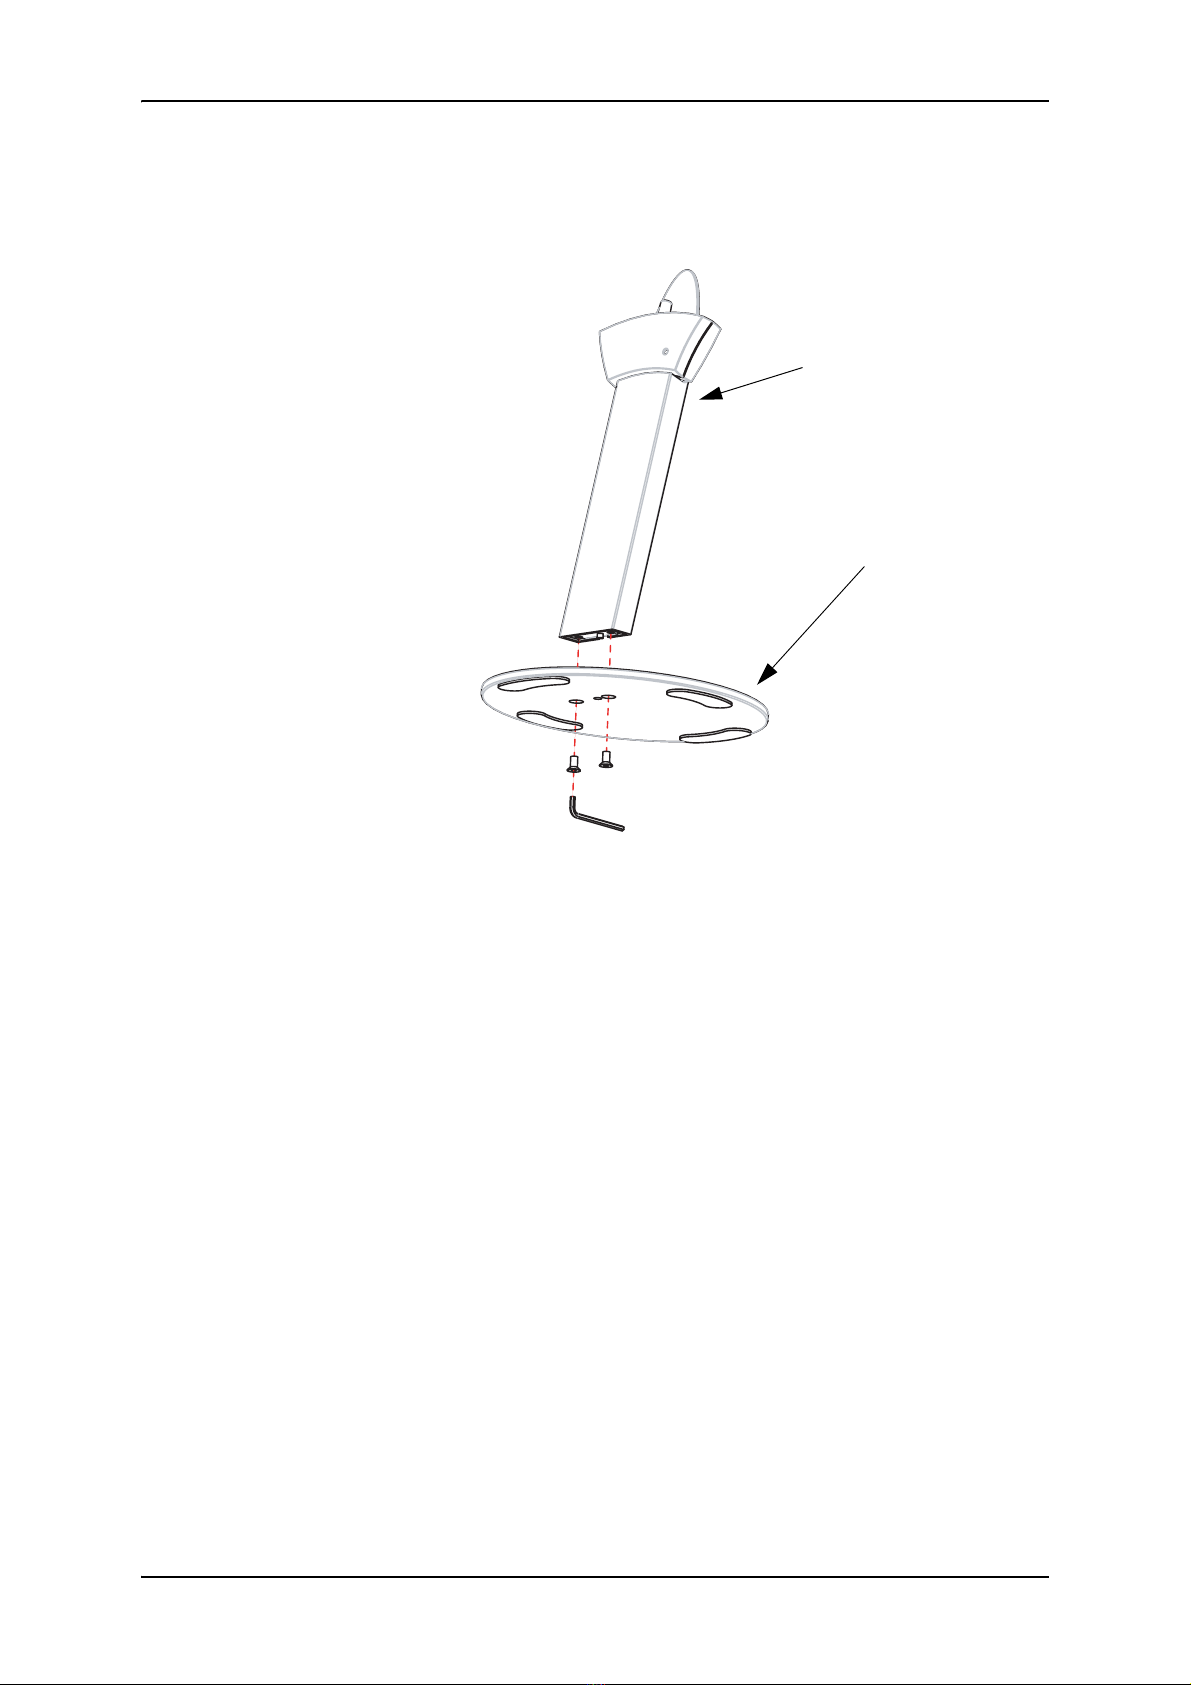
2.4.3 Mounting the NOAHlink charger on the AURICAL SpeechLink 100 charger
base plate
If you plan to use AURICAL SpeechLink 100 with NOAHlink (HIM-
SA’s product for hearing instrument fitting), you can attach NOAHl-
ink to AURICAL SpeechLink 100.
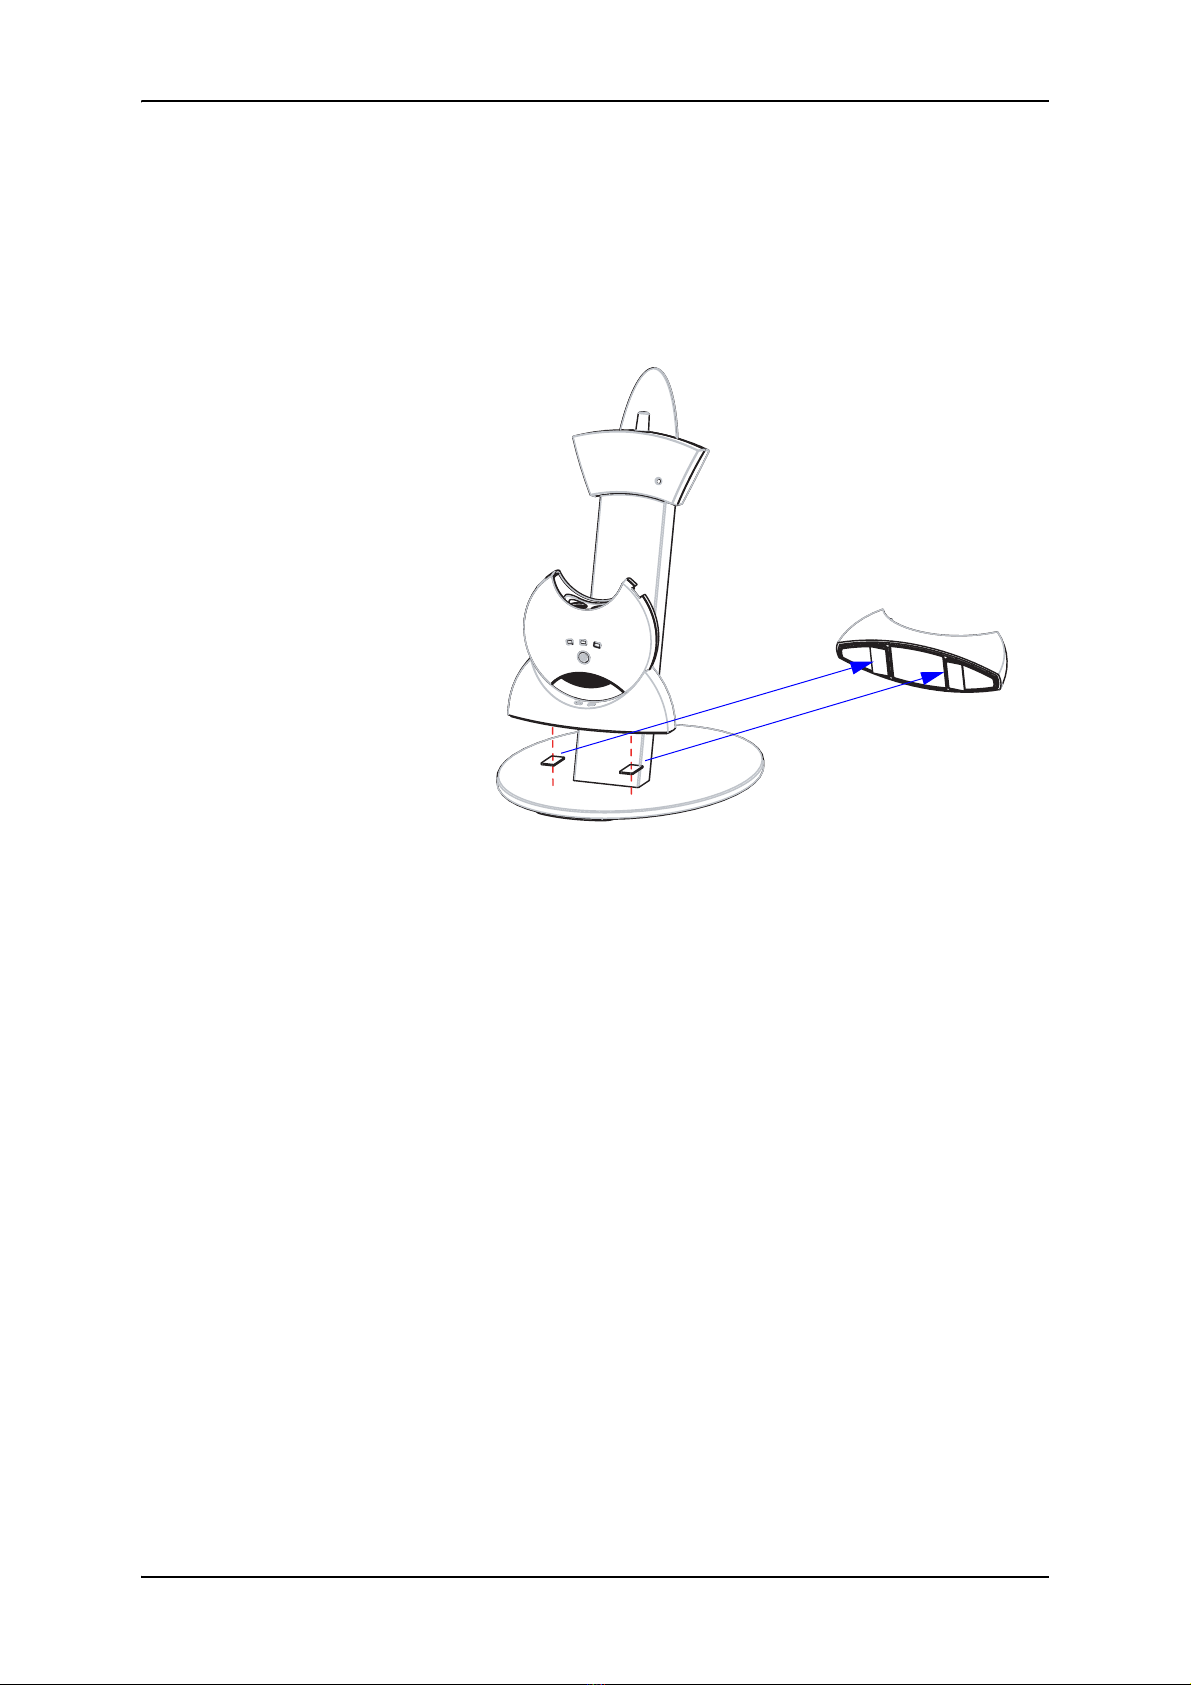
Start by mounting the NOAHlink charger on the base plate of the
AURICAL SpeechLink 100 charger. See the following description.
1. Fix the mounting pads supplied with AURICAL SpeechLink
100 on the bottom of the NOAHlink charger.
mounting
wallmount backplate
2 rawl plugs,110 mm (4.33”)
Locations for
20 GN Otometrics A/S
Reference Manual AURICAL SpeechLink 100
2. Remove the protective foil from the two adhesive pads and
carefully place the NOAHlink charger on the AURICAL
SpeechLink 100 base plate as shown below.
3. For testing purposes you can fit NOAHlink on the AURICAL
SpeechLink 100 shoulder strap. See Section 2.4.5, ‘Fitting
SpeechLink 100 with NOAHlink” on page 23.
2.4.4 SpeechLink and probe assembly
The SpeechLink 100 is designed for easy attachment of the probe(s)
used during the test.
Fitting silicone tubes on the probes
A bag of silicone tubes is supplied together with SpeechLink 100.
The silicone tube is used for probe microphone measurement, where
it is inserted into the ear canal together with the hearing instrument.
The silicone tube has a black marker ring for marking how far into
the ear canal the tube should be inserted.
Pads
NOAHlink charger
Table of contents
Popular Medical Equipment manuals by other brands


Getinge
Getinge Arjohuntleigh Nimbus 3 Professional Instructions for use

Mettler Electronics
Mettler Electronics Sonicator 730 Maintenance manual

Pressalit Care
Pressalit Care R1100 Mounting instruction

Denas MS
Denas MS DENAS-T operating manual

bort medical
bort medical ActiveColor quick guide

AccuVein
AccuVein AV400 user manual


