AUSTRIALPIN SKYSTEEP User manual

AUSTR IALPIN. AT
MADE IN AUSTRIA
1
g
c
d
f
e
b
a
h

2
3
4
5
6
7
8
9
10
11
12
13
14
15
16
17
18
19

20
21
22
23
24
Bedienungsanleitung
Steigeisen nach EN 893
Hersteller: AUSTRIALPIN GmbH
Industriezone C2a, 6166 Fulpmes, Austria
office@austrialpin.at, www.austrialpin.at
Dieses Produkt ist Teil einer persönlichen
Schutzausrüstung zum Schutz gegen Stürze
aus der Höhe (PSA) und sollte einer Person
zugeordnet sein. Das Produkt ist zum Einsatz
im Bereich Eisklettern (SKYSTEEP, SKYCLIMB,
TYROL), Bergsteigen (SKYWALK, TREKKING,
EASY) und Forstarbeit (FORST) bestimmt.
Dieses Produkt darf nicht über seine Grenzen
hinaus belastet werden. Es darf ausschließlich
für den Zweck verwendet werden, für den es
entworfen wurde.
Eisklettern, Bergsteigen und
weitere Aktivitäten in der Höhe, bei
denen diese Ausrüstung zum Einsatz kommt,
sind naturgemäß gefährlich. Fehler und
Unachtsamkeit können schwere Verletzungen
oder sogar den Tod zur Folge haben.
Für Ihre Handlungen und Entscheidungen
sind Sie selbst verantwortlich. Die folgenden
Anwendungshinweise müssen vollständig
durchgelesen, verstanden und beachtet werden.
Sie enthalten wichtige Informationen über
gewisse Gefahren dieses Produktes. Wir können
aber nicht alle möglichen Gefahren darstellen.
Diese Anleitung ist während der gesamten
Nutzungsdauer gemeinsam mit dem Produkt
aufzubewahren. Wiederverkäufer müssen Sie
in der Sprache des Bestimmungslandes zur
Verfügung stellen.
Dieses Produkt darf nur von kompetenten
und verantwortungsbewussten Personen
verwendet werden, sowie von Dritten, die
unter der direkten Aufsicht und Kontrolle einer
kompetenten und verantwortungsbewussten
Person stehen. Die richtige Wahl der
Ausrüstung erfordert Erfahrung. Es liegt
in Ihrer Verantwortung, eine angemessene
Ausbildung in der Anwendung der richtigen
Techniken und Sicherheitsvorkehrungen zu
erhalten. Der Hersteller lehnt im Fall von
Missbrauch und/oder Falschanwendung
jegliche Haftung ab. Der Anwender sollte sich
darüber bewusst sein, dass bei nicht geeigneter
körperlicher und/oder geistiger Verfassung
Beeinträchtigungen der Sicherheit im Normal-
und im Notfall auftreten können.
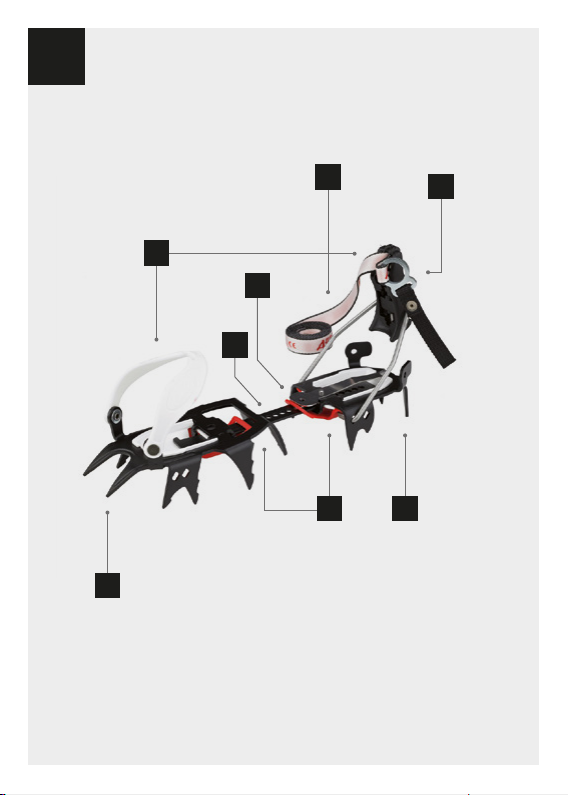
Benennung der Teile:
(a) Zehenteil, (b) Bindung, (c) Mittelsteg,
(d) Verstellfeder, (e) Gurt, (f) Gurtringe,
(g) Fersenteil, (h) Antistollplatte
siehe Abbildung 1
Markierung am Produkt
AUSTRIALPIN: Name des Herstellers
: Hinweis, die mitgelieferte
Bedienungsanleitung zu beachten
20..: 4-stellige Zahl = Herstellungsjahr
CE 0511: benannte Stelle für EG-
Baumusterprüfung
UIAA (falls vorhanden): entspricht
Norm UIAA 153
Kombination, Verwendung im System:
Bei Kombination dieses Produktes mit
anderen Bestandteilen besteht die Gefahr
der gegenseitigen Beeinträchtigung der
Gebrauchssicherheit. Stellen Sie sicher, dass
die Steigeisen nur mit passenden Schuhen
verwendet werden. Überprüfen Sie die
Kompatibilität Ihrer Schuhe mit den Steigeisen
vor der ersten Anwendung. Verwenden Sie
möglichst festes Schuhwerk.
Überprüfung, zu kontrollierende Punkte vor,
während und nach jedem Gebrauch:
Vergewissern Sie sich, dass das Produkt
keine Risse, Deformierungen oder
Korrosionserscheinungen aufweist und alle
Komponenten fest miteinander verbunden
sind. Stellen Sie sicher, dass bei Modellen
mit Wechsel- und/oder Verstellsystem alle
Schrauben gut angezogen sind.
Anpassung und Befestigung:
1. ALLGEMEIN:
DE

Die Gurtringe müssen immer an der Außenseite
der Schuhe liegen, damit sich der Gurt beim
Gehen nicht versehentlich lockert. Es gibt damit
immer ein linkes und ein rechtes Steigeisen.
ANWENDUNG GURTRINGE: führen sie den Gurt
von Innen durch beide Gurtringe und fädeln Sie
durch einen Gurtring wieder zurück (jenem mit
der angenieteten Lasche). Ziehen Sie kräftig an.
Das Lösen des Gurtes erfolgt durch Ziehen an
der Lasche. Hinweis: den Restgurt immer gut
verstauen, um ein Stolpern zu verhindern.
2. LÄNGENEINSTELLUNG:
(Hinweis: für manche Modelle gibt es
Mittelstege in Sonderlänge auf Anfrage)
Heben Sie die Verstellfeder an und lassen Sie
sie in der gewünschten Ausnehmung wieder
einrasten. siehe Abbildung 2
Wenn gewünscht, kann die Verstellfeder mit
Hilfe einer kleinen Schraube (Baumarkt;
nicht im Lieferumfang) über das vorhandene
Bohrloch mit dem Mittelsteg verbunden
werden. Damit bleibt die Länge fixiert und
es wird ein ungewolltes Aufbiegen der
Verstellfeder verhindert.
ACHTUNG: der Steg darf beim Gehen nicht
über das Fersenteil hinausragen. Kürzen Sie
wenn notwendig den Steg mit einer Eisensäge
per Hand, sodass er mindestens 1 cm vor der
Hinterkante des Fersenteils endet! Entfernen
Sie scharfe Grate am Steg mit einer Handfeile.
a) Optionale Längenverstellung
SKYCLIMB & SKYWALK:
Kippen Sie den Fersenteil des Steigeisens
um 90° nach unten und schieben Sie den Steg
durch den Tunnel nach oben. Bringen Sie den
Fersenteil dann wieder in die Ausgangsstellung
zurück. siehe Abbildung 3
Endposition Mittelsteg lang siehe Abbildung 4
Endposition Mittelsteg kurz siehe Abbildung 5
b) Optionale Verkürzung TREKKING / EASY:
Fixieren Sie eine der mitgelieferten Schrauben
in eines der drei dafür vorgesehenen Löcher im
vorderen Bereich des Mittelstegs.
3. BINDUNGSSYSTEME:
a) STEP-IN:
Mit Metallbügel vorne und
Metallbügel+Kunststoffkipphebel hinten.
Für voll steigeisentaugliche Berg- und
Skischuhe mit Sohlenrille vorne und hinten.
siehe Abbildung 6
Kipphebel hinten:
Stellen sie den Kipphebel mit der darin
integrierten Verstellschraube auf die optimale
Höhe ein. Achten Sie darauf, dass der Kipphebel
satt einrastet.
Metallbügel hinten & vorne:
Optimieren Sie die Passform, indem Sie den
Bügel versetzen. Dafür sind vorne und hinten
mehrere Ausnehmungen vorhanden. Achten Sie
darauf, dass Ihr Schuh zentral am Steigeisen
positioniert ist und vorne und insbesondere
hinten nicht übersteht.
Steigeisengurt:
Führen Sie den Gurt nach einrasten des
Kipphebels einmal über den Rist und fixieren
Sie ihn mit den Gurtringen.
b) KOMBI:
Mit Kunststoffkörbchen vorne und
Metallbügel+Kunststoffkipphebel hinten.
Für bedingt steigeisentaugliche Bergschuhe mit
Sohlenrille hinten. siehe Abbildung 7
Kipphebel und Metallbügel: siehe Punkt 3. a)
Steigeisengurt:
Führen Sie den Gurt durch die Öse bzw.
Einkerbung am vorderen Kunststoffkörbchen
und fixieren Sie ihn anschließend mit den
Gurtringen.
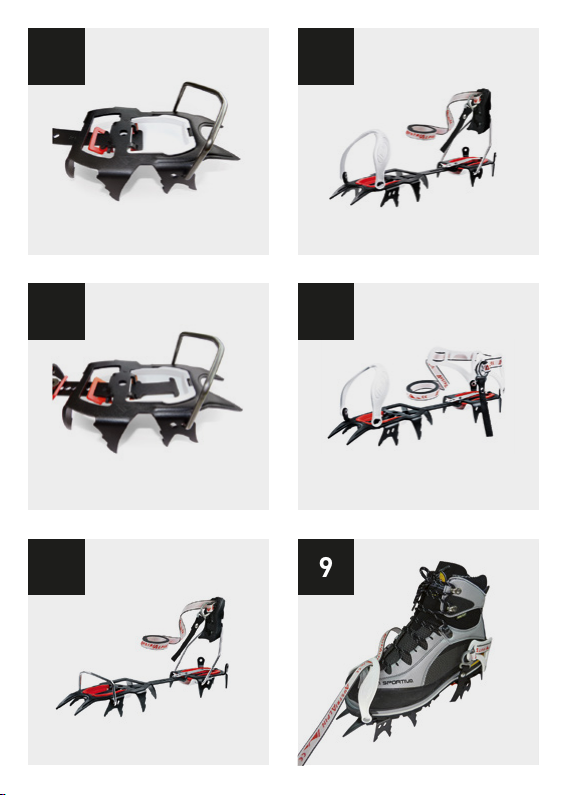
c) CONCEPT:
Mit Kunststoffkörbchen vorne und hinten.
Für Bergschuhe ohne Sohlenrille.
siehe Abbildung 8
Steigeisengurt:
Führen Sie den Gurt durch die Öse bzw.
Einkerbung am vorderen Kunststoffkörbchen.

siehe Abbildung 9
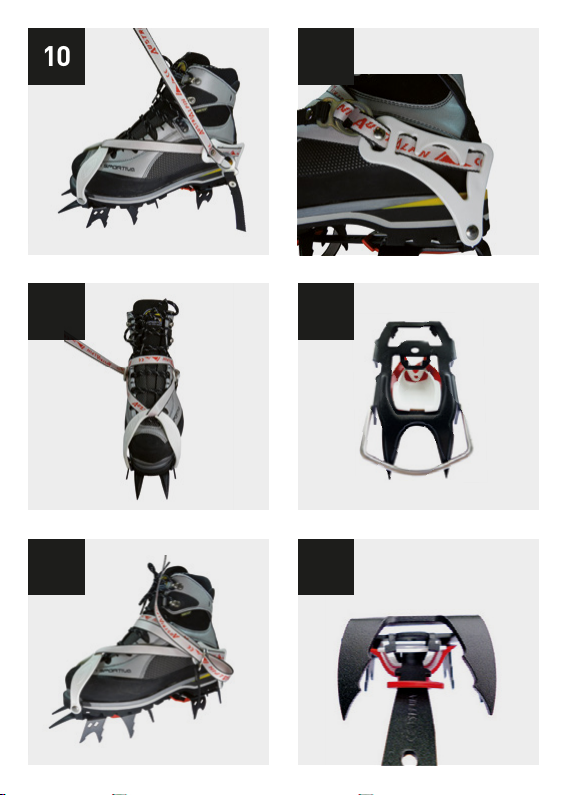
Anschließend gehen Sie weiter mit:
METHODE 1 (Vorteil: wenig Reibungsverlust):
Führen Sie den Gurt durch die Gurtringe und
ziehen Sie kräftig an.
oder
METHODE 2 (Vorteil: viele Kontaktpunkte):
I. Gurt von Innen durch die Öse
an die Außenseite des hinteren
Kunststoffkörbchens führen.
siehe Abbildung 10
II. Über den Rist des Schuhs wird der Gurt von
der Innenseite durch die gegenüberliegende
Öse gefädelt. siehe Abbildung 11
III. Gurt über den Rist zurückführen, durch die
Gurtringe fädeln und kräftig anziehen.
siehe Abbildung 12
Um SKY-Steigeisen noch besser auf den Schuh
zu fixieren, lassen Sie den Gurt beim hinteren
Körbchen innerhalb der beiden Zäpfchen
verlaufen. siehe Abbildung 13
HINWEIS: wenn Sie recht weiches Schuhwerk
verwenden, muss die Sohle beim Festziehen
der Gurte möglichst durchgebogen werden,
um ein späteres Verrutschen der Steigeisen zu
verhindern. Machen Sie dazu einen Schritt und
zurren sie den Gurt fest, wenn sich Schuh und
Steigeisen in Abrollposition befinden.
4. ANTISTOLLPLATTEN:
a) Antistollplatten für SKY:
Die SKY Steigeisen werden gebrauchsfertig mit
Antistollplatten ausgeliefert.
Montage neuer Antistollplatten (die Teile für
Zehenteil und Fersenteil sind ident):
I. entfernen Sie den Mittelsteg.
II. nehmen Sie einen Steigeisenteil und
drücken Sie die Antistollplatte zu einem
U zusammen. Schieben Sie die Platte
so auf das Steigeisenteil, dass eine
Kunststoffkomponente oberhalb und eine
unterhalb des Metalls einrastet.
siehe Abbildung 14
III. montieren Sie den Mittelsteg erst am
Zehenteil und dann am Fersenteil. Achten
Sie besonders darauf, den Steg erst durch
die Metalltunnel und anschließend durch
die Schlitze der Antistollplatten (bunte
Kunststoffkomponenten) zu führen. Der
weiße Kunststoffteil muss im Bereich der
Metalltunnel oberhalb des Mittelstegs
liegen. siehe Abbildung 15
b) Antistollplatten Vibram (für TYROL,
TREKKING, EASY, FORST):
bestehend aus einem Vorder- und einem
Hinterteil. siehe Abbildung 16
WICHTIG: die glatte Seite liegt UNTEN!
Montage:
I. entfernen Sie dem Mittelsteg.
II. hängen Sie Platte mit den Haken ein.
siehe Abbildung 17
III. legen Sie die Antistollplatte an das
Steigeisen an und schieben Sie den
Mittelsteg durch die Metalltunnel. Der Steg
muss immer unterhalb der Vibramplatte
liegen. siehe Abbildung 18
5. SKYSTEEP UMBAU:
a) Duozack/Monozack:
Das SKYSTEEP kann mit Duozack oder
Monozack verwendet werden.
I. lösen Sie die lange Schraube (5er Inbus &
Mutter) am Zehenteil und entfernen Sie die
schwarzen Distanzhülsen.
II. fädeln Sie die Schraube wieder ein und
positionieren Sie dabei die Distanzhülsen
sowie Zacke(n) an gewünschter Stelle.
Endposition je nach Anzahl der Zacken.
siehe Abbildung 19
III. ziehen Sie die Mutter fest an.
b) Bindung KOMBI:
Das SKYSTEEP wird mit STEP-IN-Bindung
ausgeliefert. Mit dem Umbausatz Art.
ST00K KOMBI-TUNING (bestehend aus
Kunststoffkörbchen und weißen Distanzhülsen)
kann es auf KOMBI-Bindung umgebaut werden.
I. lösen Sie die lange Schraube (5er Inbus
& Mutter) und entfernen Sie den STEP-IN

Metallbügel.
II. fädeln Sie die Schraube wieder
ein und positionieren Sie dabei die
Kunststoffkörbchen, die weißen
Distanzhülsen und die Zacke(n). Die
Kunststoffkörbchen müssen zwischen der
INNENSEITE der Außenzacken und den
weißen Hülsen platziert werden.
siehe Abbildung 20
III. ziehen Sie die Mutter fest an.
6. GRÖDEL (Art. SG…):
Hinweis: Nicht zertifiziert nach EN 893!
a) Breiteneinstellung:
Grödel an die Schuhsohle legen und auf
die optimale Breite einstellen, Mutter fest
anziehen (manche Modelle haben einen
Sechskantschlüssel im Zacken integriert). Die
Gurtringe sind immer an der Außenseite des
Schuhs. siehe Abbildung 21
b) Steigeisengurt:
METHODE Modell POWER GRIP:
I. Gurt über den Rist des Schuhs legen
und von Innen durch den diagonal
gegenüberliegenden, vorderen Metallring
führen. siehe Abbildung 22
II. Gurt von Innen durch den
gegenüberliegenden, vorderen Metallring
führen. siehe Abbildung 23
III. Gurt diagonal zu den Gurtringen zurück-
führen und fixieren. siehe Abbildung 24
METHODE Modell SG20A & SG30A:
Den Gurt über den Rist führen und mit den
Gurtringen fixieren.
Test:
Überzeugen Sie sich vom festen Sitz der
Steigeisen an den Schuhen. Schütteln Sie
die Beine und gehen Sie einige Schritte. Das
Steigeisen darf sich dabei nicht bewegen.
Ansonsten wiederholen Sie Punkt „Anpassung
und Befestigung“.
Gebrauchsklima:
Die Dauergebrauchstemperatur des Produktes
(im trockenen Zustand) reicht von ca. –30°C
bis +40°C.
Produktlebensdauer:
ACHTUNG: Außergewöhnliche Umstände
können die Lebensdauer des Produktes auf eine
einmalige Anwendung reduzieren (Kontakt mit
Chemikalien, extreme Temperaturen, salz-/
säurehaltige Atmosphäre, scharfe Kanten,
schwere Belastung). Die Lebensdauer des
Produktes ist im Wesentlichen abhängig
von der Anwendungsart und -häufigkeit
sowie von äußeren Einflüssen. Die maximale
Lebensdauer bei optimalen Lagerbedingungen
und ohne Benutzung beträgt 10 Jahre. Die
tatsächliche Lebensdauer eines Produktes
endet, wenn eines der nachfolgenden Kriterien
zum Aussondern zutreffen (siehe Punkt
„Aussonderung“) und hängt von einer Reihe von
Faktoren ab: Gebrauchsintensität, -häufigkeit
und -umgebung sowie Benutzerkompetenz,
Lagerungsbedingungen, Wartung, usw.
Aussonderung:
In folgenden Fällen sollten Sie die Ausrüstung
sofort aussondern:
- die Ausrüstung fällt bei der Überprüfung
durch (sowohl vor jedem Einsatz, während
des Gebrauchs als auch bei der regelmäßigen
Hauptüberprüfung)
- wenn eine beträchtliche Belastung
stattgefunden hat, es sei denn, die
einwandfreie und bedenkenlose Benutzung
wird von einer sachkundigen Person bestätigt
- die Gebrauchsgeschichte der Ausrüstung ist
nicht bekannt bzw. unvollständig
- Beschädigungen, Deformation oder starke
Abrieberscheinungen der Metallteile und/oder
Nähte sind zu beobachten
- Gurtbandkanten sind beschädigt oder Garne
sind aus dem Gurtband gezogen
- Kontakt mit Chemikalien oder elektrische
Einflüsse
- Sie haben irgendwelche Zweifel an der
Zuverlässigkeit der Ausrüstung.
- Das Produkt ist veraltet (Änderung der
gesetzlichen Bestimmungen, der Normen und
der technischen Vorschriften, Inkompatibilität
mit anderen Ausrüstungsgegenständen, usw.).
Zerstören und entsorgen Sie ausgesonderte
Ausrüstungsgegenstände sofort, um ihren
weiteren Gebrauch zu verhindern.
Änderungen und Reparaturen:
Wenn Originalbestandteile des Produktes
verändert oder entfernt werden, können
die Sicherheitseigenschaften dadurch
eingeschränkt werden. Die Ausrüstung darf in
keiner Weise, die nicht vom Hersteller schriftlich
empfohlen wird, verändert oder für das
Anbringen von Zusatzteilen angepasst werden.
Die Zacken können nachgeschärft werden.
Dafür nur eine Handfeile verwenden. Die
Materialdicke muss dabei unverändert
bleiben. Nicht seitlich abfeilen. Zackenlänge
um max. 0,5 cm verringern. Der Mittelsteg
kann gekürzt werden – siehe Punkt 2.
LÄNGENEINSTELLUNG. Das Metall darf auf
keinen Fall erwärmt werden!
Aufbewahrung, Transport und Pflege:
Lagern Sie Ihre Ausrüstung trocken und
vor Tageslicht geschützt in normaler
Umgebungstemperatur (-10°C bis +30 °C),
ohne mechanische Quetsch-, Druck- oder
Zugbelastung. Bewahren Sie Ausrüstung
vor Chemikalien und salz-/säurehaltiger
Atmosphäre geschützt auf. Vermeiden
Sie ständige Vibrationen. Verwenden Sie
Schutzbeutel oder spezielle Lager- und
Transportbehälter mit nichtmetallischem
Untergrund (Kontaktkorrosion).
Reinigung:
Verschmutzte Produkte in handwarmem
Wasser (wenn nötig mit neutraler Seife)
reinigen. Gut ausspülen. Bei Raumtemperatur,
niemals in Wäschetrocknern oder in der Nähe
von Heizkörpern trocknen! Handelsübliche,
nicht halogenhaltige Desinfektionsmittel
sind bei Bedarf anwendbar. Die Gelenke von
Metallteilen sind regelmäßig und vor allem nach
der Reinigung mit einem Trockenschmierstoff
zu schmieren (schmiert, wenn er aufgetrocknet
ist, dadurch bleibt kein Staub und Schmutz
kleben).
Garantie:
Für dieses Produkt wird gegen alle Material-
und Fabrikationsfehler eine Garantie von 2
Jahren gewährt. Ausgeschlossen von der
Garantie sind normale Abnutzung, Oxidation,
Veränderungen, unsachgemäße Lagerung
und Wartung sowie Schäden, die auf Unfälle,
Nachlässigkeiten oder Verwendungszwecke
zurückzuführen sind, für die das Produkt
nicht bestimmt ist. AUSTRIALPIN ist nicht
verantwortlich für jegliche Konsequenzen,
direkt, indirekt oder unfallbedingt, sowie
jegliche andere Art von Schäden, die aus der
Verwendung des Produktes entstehen. Stellen
Sie sicher, dass die Produktmarkierungen
während der gesamten Lebensdauer des
Produktes lesbar bleiben.
ACHTUNG: Bei Nichtbeachtung dieser
Gebrauchsanleitung besteht
Lebensgefahr! Druckfehler und technische
Änderungen vorbehalten.
EG-Baumusterprüfung durchgeführt von AUVA
Wien, Adalbert-Stifter-Straße 65, A-1201 WIEN,
benannte Stelle Nr. 0511 oder TÜV Product
Service GmbH, Ridlerstraße 31, D-80339
München, benannte Stelle Nr. 0123.
Konformitätserklärung
Aktuelle Konformitätserklärung unter
http://downloads.austrialpin.at/declaration of
conformity.pdf
EN Operating instructions
Crampons according to EN 893
Manufacturer: AUSTRIALPIN GmbH
Industriezone C2a, 6166 Fulpmes, Austria
office@austrialpin.at, www.austrialpin.at
This product is part of personal protective
equipment (PPE) for protection against a fall
from heights; it is designed for use by one
person. The product is intended for use in ice
climbing (SKYSTEEP, SKYCLIMB, TYROL),
mountain climbing (SKYWALK, TREKKING,
EASY) and forestry work (FORST). This product
must not be used beyond its specified limits,
and must be used only for the purpose for which
it was designed.

Ice climbing, mountain climbing
and other activities at heights, for
which this equipment was designed, are by
nature dangerous. Errors, recklessness or
inattentiveness can lead to life-threatening
injuries or death.
You yourself are responsible for your
own actions and decisions. The following
instructions for use must be read carefully
and thoroughly, understood and followed. They
contain important information about certain
dangers and risks associated with the use
of this product. However, it is not possible to
outline and describe all potential dangers and
risks. These instructions must be kept safe
and easily accessible for the entire life and use
of this product. Re-sellers must provide these
instructions to the buyer in the appropriate
language.
This product must be used only by competent
and responsible persons, or by others who
are under the immediate supervision of such
competent persons. The proper selection of
equipment requires experience and it is the
responsibility of the user to obtain the proper
education in the correct techniques for its use.
In case of misuse or improper application, the
manufacturer rejects and rules out any and all
liability. The user must be clearly aware that
poor physical or mental health can jeopardise
safety in both normal and emergency use.
Names of parts:
(a) front, (b) binding, (c) central bridge,
(d) adjustment tab, (e) strap, (f) strap rings,
(g) rear, (h) antibott system see illustration 1
Product markings
AUSTRIALPIN: manufacturer
: Please note: manufacturer information
must be heeded.
20..: 4-digit number = year of manufacture
CE 0511: notified body which carried out
CE-type examination
UIAA (if present): corresponds to Norm UIAA 153
Combination, using tools as a system:
By combining this product with other
components, the safety features of each product
can interfere with each other. Make sure that
the crampons are used only with suitable boots.
Test the compatibility of your boots with the
crampons before using them for the first time.
Use the sturdiest possible footwear.
Things to check during and following each use
of the tool:
Please ensure that the product has no cracks or
fractures, deformations or signs of corrosion;
and that all components are tightly attached
to each other. For models with adjustable
components, ensure that all screws are firmly
tightened.
Fitting and Securing:
1. GENERAL:
The strap rings must always be on the outer
side of the boots so that the strap cannot loosen
while walking. Thus, there is always a left and a
right crampon.
USE OF STRAP RINGS: Feed the strap from
inside through both strap rings; thread the strap
back through one ring (the one with riveted lug)
and pull on it. Loosen the strap by pulling on the
lug. Note: always stash the remaining part of
the strap carefully to prevent stumbling.
2. ADJUSTING THE LENGTH:
(Note: for some models central bridges are
available in special lengths on request)
Lift the adjustment tab and slip it into the
desired slot until it clicks. see illustration 2
If desired, the adjustment tab can be connected
to the central bridge at the pre-drilled hole with
the help of a small screw (available at supply
store, not in product package). That way, the
length remains permanently fixed, preventing
undesirable bending of the adjustment tab.
ATTENTION: the bridge should not extend
beyond the rear part while walking. Shorten the
bridge with a metal saw by hand if necessary,
so that it ends at least 1 cm before the rear tip.

Remove sharp edges from the central bridge
with a hand file.
a) Optional length adjustment of
SKYCLIMB & SKYWALK:
Tilt the rear of the crampon downward 90° and
slide the bridge upwards through the slot. Then
place the rear part back in its original position.
see illustration 3
End position central bridge long
see illustration 4
End position central bridge short
see illustration 5
b) Optional shortening for TREKKING / EASY:
Secure one of the screws (supplied in product
package) in one of the holes for that purpose in
the front zone of the central bridge.
3. BINDING SYSTEMS:
a) STEP-IN:
With metal bracket at front and metal
bracket+synthetic tilt-lever at rear.
see illustration 6
For 100% crampons-friendly mountain boots
and ski boots with sole grooves front and back.
Tilt-lever rear:
Adjust the tilt-lever to optimum height with the
integrated adjustment screw.
Be sure that the tilt-lever clicks securely into
place.
Metal bracket front & rear:
Optimize the fitted form by adjusting the metal
bracket. For this purpose, several slots are
provided front and rear. Be sure that your boot
is positioned centrally on the crampon and
does not extend beyond it either at front or
(particularly important) at rear.
Crampon strap:
After the tilt-lever has clicked into place, feed
the strap over the instep once and secure it with
the strap rings.
b) KOMBI
With synthetic catch-loop at front and metal
bracket+synthetic tilt-lever at rear.
For not 100% crampons-friendly mountain
boots with sole groove at rear. see illustration 7
Tilt-lever and metal bracket: see 3. a)
Crampon strap:
Feed the strap through the grommet or groove
on the front synthetic catch-loop and then
secure it with the strap rings.
c) CONCEPT:
With synthetic catch-loop at front and at rear.
For mountain boots without sole groove.
see illustration 8
Crampon strap:
Feed the strap through the grommet or groove
on the front synthetic catch-loop.
see illustration 9
Then proceed further by:
METHOD 1 (advantage: less frictional wear):
Feed the strap through the strap rings and pull
it tight.
or
METHOD 2 (advantage: many points of contact):
I. Feed the strap from inside through the
grommet to the outer side of the rear
synthetic catch-loop. see illustration 10
II. The strap is fed over the instep of the boot
from the inner side through the opposite
grommet. see illustration 11
III. Feed the strap back over the instep through
the strap rings and pull it tight.
see illustration 12
To better secure SKY crampons to the boot, feed
the strap inside the two lips at the rear catch-
loop. see illustration 13
PLEASE NOTE: If your mountain boots are soft
and malleable, the sole should be flexed as
far as possible when you pull the strap tight
in order to prevent the crampon from slipping
later. Take a step and lash the strap tight when
boot and crampon are in ‘rolling’ position.

4. ANTIBOTT PLATE:
a) Antibott plates for SKY:
SKY crampons are delivered ready-to-use with
antibott plates to prevent balling up.
Installation of new antibott plates (front and
rear parts are identical):
I. Remove the central bridge.
II. Take one crampon part and press the
antibott plate into a U-shape.
Slide the plate onto the crampon part so that
one synthetic component clicks above the
metal and one below the metal.
see illustration 14
III. Install the central bridge first to the front
part, then to the rear part. Make especially
sure to feed the bridge first through the
metal slot and only then through the slit
of the antibott plate (colored synthetic
components). The white synthetic part in the
area of the metal tunnel should lie above the
central bridge. see illustration 15
b) Vibram Antibott plates (for TYROL,
TREKKING, EASY, FORST):
including a front and a rear part.
see illustration 16
IMPORTANT: the smooth side should
face DOWN!
Installation:
I. Remove the central bridge.
II. Clip in the plate with the hooks.
see illustration 17
III. Place the antibott plate on the crampon and
slide the central bridge through the metal
tunnel. The bridge should always lie beneath
the Vibram plate. see illustration 18
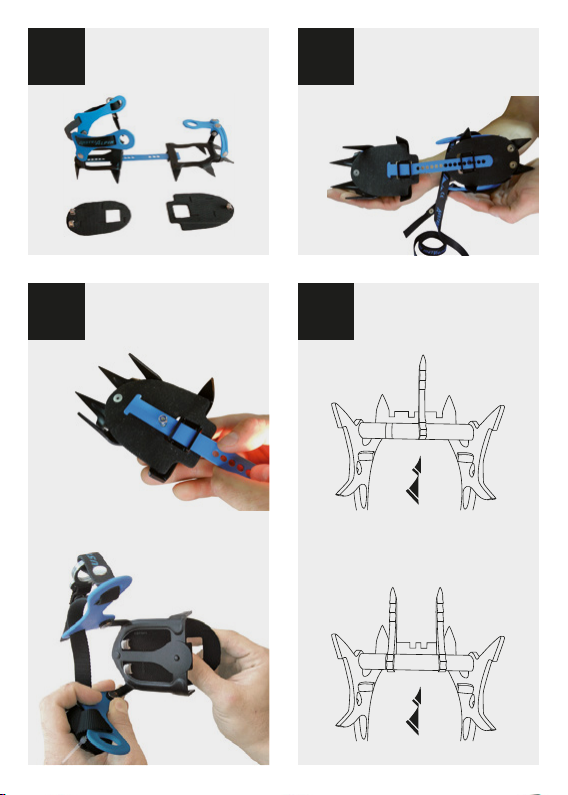
5. SKYSTEEP CONVERSION:
a) Dual-point / Mono-point:
The SKYSTEEP can be used with either dual-
point or mono-point.
I. Loosen the long screw (no. 5 hexagonal allen
key & screw nut) of the front part and remove
the black distance sleeves.
II. Tighten the screw again and adjust the
distance sleeves and points to the desired
position. End position depends on the
number of points. see illustration 19
III. Tighten firmly the screw nut.
b) Binding KOMBI:
The SKYSTEEP is delivered with a STEP-IN
binding. With the conversion set Art. ST00K
KOMBI-TUNING (comprising synthetic catch-
loop and white distance sleeves) it can be
converted to a KOMBI-binding.
I. Loosen the long screw (no. 5 hexagonal allen
key & screw nut) and remove the STEP-IN
metal bracket.
II. Tighten the screw again and adjust the
synthetic catch-loop, the white distance
sleeves and the point(s). The synthetic
catch-loop should be placed between the
INNER SIDE of the outer points and the white
sleeves. see illustration 20
III. Tighten firmly the screw nut.
6. GROEDEL (Art. SG...):
Please note: not certified according to EN 893.
a) Adjusting the width:
Place the Groedel on the boot sole and adjust it
to the optimum width. Tighten firmly the screw
nut (some models have an allen key integrated
into the point). The strap rings should always be
on the outer side of the boot. see illustration 21
b) Crampon strap:
METHOD Model POWER GRIP:
I. Lay the strap over the instep of the boot and
feed it from the inside through the diagonally
opposite front metal ring. see illustration 22
II. Feed the strap from the inside through the
opposite front metal ring. see illustration 23
III. Feed the strap diagonally back to the strap
rings and secure it. see illustration 24
METHOD Model SG20A & SG30A:
Feed the strap over the instep and secure it with
the strap rings.
Test:
Make very sure that the crampons sit securely
on the boot. Shake your legs and take a few
steps. The crampon should not move in the
slightest. If it does, repeat step “Fitting and

Securing”.
Climate for use:
The permanent use temperature of the product
(dry) is from about -30 °C to +40 °C.
Product life:
ATTENTION: unusual conditions can limit
the product life of this tool to one usage, e.g.
contact with chemicals, extreme temperatures,
saline/acid atmosphere, sharp edges, severe
fall, extreme burden. The product life depends
in large part on the manner and frequency
of its use, together with external influences.
Maximum product life in optimum storage
conditions and without use is 10 years. The
actual product life of the tool terminates when
at least one of the following criteria are met
(see point “End of Use” below) and depends on
a series of different factors: intensity of use,
frequency of use, environmental conditions
during use, competence of user, storage
conditions, maintenance, etc.
End of Use
In the following cases, the equipment should
immediately be removed from active use:
- the equipment fails to pass the check-test
(both before each usage, during use and in
regularly conducted test examinations)
- if the tool has been subject to strong, high
burdens (unless perfect and assured use can
be verified by a professional person)
- the history of its use is unknown or incomplete
- in case of damages, deformation or stark
abrasion of the metal parts and/or stitched
seams are observed
- if edges of straps are damaged or stitching is
pulled out of the strap
- it has come into contact with chemicals or
electricity.
- you have doubts about the reliability of the
equipment.
- the product is too old (or legal requirements
have changed, norms and technical standards
have been altered, new rules are introduced,
incompatibility with other products is
determined, etc.)
Dispose and destroy the discarded parts
immediately in order to prevent any further use
by others.
Alterations and Repairs:
If original parts of the product are altered
or removed, the safety features can be
compromised. The equipment must not be
altered or fitted with additional parts in any way
which is not expressly recommended by the
manufacturer.
The points can be sharpened later on. Use a
hand file for this purpose. The thickness of the
material should remain unchanged. Do not file
them laterally. The length of the points should
be reduced by maximum 0.5 cm. The central
bridge can be shortened – See point 2 above:
ADJUSTING THE LENGTH. The metal should
never be heated!
Storage, Transport and Maintenance:
Store your equipment in a dry state in a dry
place protected from daylight at normal
environmental temperatures (-10° to +30°C)
where it is free of any mechanical compression,
pressure or tensile load. Store the equipment
away from chemicals, and away from an acidic
or saline atmosphere. Avoid ongoing vibrations.
Use the protective bag or special storage and
transport containers with non-metallic bottoms
(to prevent contact corrosion).
Cleaning:
Clean dirty products in lukewarm water (if
necessary using neutral soap). Rinse them
well. Dry at room temperature, never in an
electric dryer or near electric radiators. Use
only approved household disinfection liquids not
any containing halogen as needed. The joints
of all metal parts must be relubricated with a
dry lubricant regularly, particularly following
cleaning (also when it is dried out, so that no
dust or dirt can cling to it).
Guarantee:
For this product, a guarantee warrants against
any and all material or manufacturing defects
for a period of 2 years. Excluded from this
guarantee are the effects of normal wear-and-
tear, oxidation, alterations, improper usage or
storage or maintenance, as well as damages
resulting from accidents, neglect or incorrect
employment, i.e. uses for which the product
was not designed. AUSTRIALPIN is not liable
for consequences, either directly, indirectly or
applicable to a specific accident, or any other
type of damage which results from the use of
the product. Please make sure that the product
markings remain legible for the entire life of
the product.
ATTENTION: If the instructions for use
are not heeded, life-threatening dangers
can result. Printing errors and omissions, as
well as technical changes, excluded.
CE-type examination carried out by AUVA Wien,
Adalbert-Stifter-Strasse 65, A-1201 VIENNA,
notified body no. 0511 or TÜV Product Service
GmbH, Ridlerstrasse 31, D-80339 Munich,
notified body no. 0123.
Declaration of conformity
For current information regarding declaration
of conformity, please see:
http://downloads.austrialpin.at/declaration of
conformity.pdf
FR Notice de fonctionnement
Crampons conformément à EN 893
Fabricant: AUSTRIALPIN GmbH
Industriezone C2a, 6166 Fulpmes, Austria
office@austrialpin.at, www.austrialpin.at
Ce produit est une partie d‘un équipement de
protection individuelle pour la protection contre
les chutes de hauteur (EPI) et doit être assigné
à une personne. Ce produit est destiné à être
utilisé pour l’escalade de glace (SKYSTEEP,
SKYCLIMB, TYROL), l’alpinisme (SKYWALK,
TREKKING, EASY), les travaux forestiers
(FORST). Ce produit ne doit pas être contraint
au-delà de ses limites. Il ne doit être utilisé
que conformément à l‘usage pour lequel il a
été conçu.
Les activités en hauteur pour lesquelles
cet équipement est utilisé sont par
nature dangereuses. Les erreurs et manques
d‘attention peuvent entraîner des blessures
graves, voire la mort.
Vous êtes seul(e) responsable de vos actions
et décisions. Vous devez lire, comprendre et
respecter l‘intégralité des conseils d‘utilisation
suivants. Ils contiennent des informations
importantes sur certains risques liés au
produit. Nous ne pouvons cependant pas
représenter tous les dangers possibles.
Conservez cette notice avec le produit pendant
toute sa durée d‘utilisation. Les revendeurs
doivent la mettre à disposition dans la langue du
pays de destination.
Ce produit doit être utilisé exclusivement par
des personnes compétentes et responsables
ainsi que par des tiers sous surveillance et
contrôle direct d‘une personne compétente
et responsable. Le choix du bon équipement
demande de l‘expérience. Il est de votre
responsabilité d‘obtenir une formation adaptée
à l‘utilisation des bonnes techniques et
mesures de sécurité. Le fabricant décline toute
responsabilité en cas de mauvaise manipulation
et/ou de mauvaise utilisation. L‘utilisateur doit
être conscient que la sécurité peut être remise
en cause en cas de capacité physique et/ou
mentale non adaptée, ce lors de l‘utilisation
normale et en cas d‘urgence.
Désignation des pièces:
(a) avant, (b) attache, (c) barrette centrale,
(d) attache de réglage, (e) sangle, (f) anneaux de
sangle, (g) arrière, (h) système antibott
voir illustration 1
Marquage sur le produit:
AUSTRIALPIN: Nom du fabricant
: Veuillez noter : les informations du
fabricant doivent être respectées
20..: nombre à 4 chiffres = année de fabrication
CE 0511: organisme notifié qui a effectué les
essais de type CE.
Le contrôle de type CE du produit est effectué
par AUVA.
UIAA (si fournie): correspond à la

norme UIAA 153
Combinaison, utilisation dans le système:
En cas de combinaison de ce produit avec
d‘autres composants, il y a risque imminent
d’une influence négative réciproque en termes
de sécurité d‘utilisation. Assurez-vous que
les crampons ne sont utilisés qu’avec des
chaussures adaptées. Essayez la compatibilité
de vos chaussures avec les crampons avant
d’utiliser ceux-ci pour la première fois. Utilisez
des chaussures les plus solides possibles.
Vérification, points à contrôler avant, pendant
et après chaque utilisation:
Assurez-vous que le produit ne présente aucune
fissure, déformation, ni trace de corrosion et
que tous les composants sont solidement fixés
entre eux. Assurez-vous que toutes les vis des
modèles avec système de changement et/ou de
réglage sont bien serrées.
Pose et fixation:
1. EN GÉNÉRAL:
Les anneaux de sangle doivent toujours être
du côté extérieur de la chaussure, afin que la
sangle ne puisse pas se desserrer en marchant.
Aussi, il y a toujours un crampon droit et un
crampon gauche.
UTILISATION D’ANNEAUX DE SANGLE:
Faites passer la sangle à partir de l’intérieur,
par les deux anneaux de sangle ; enfilez la
sangle à nouveau par un anneau (celui avec
l’ergot riveté) et tirez dessus. Desserrez la
sangle en tirant sur le double anneau.
2. RÉGLAGE DE LA LONGUEUR:
(Remarque : sur certains modèles, des
barrettes centrales sont disponibles dans une
certaine longueur, sur demande)
Levez l’attache de réglage et faites-la glisser
dans l’encoche souhaitée, jusqu’à obtenir un
clic.
voir illustration 2
Le cas échéant, l’attache de réglage peut être
accrochée à la barrette centrale, par le trou
pré-percé, à l’aide d’une petite vis (pouvant être
achetée dans une quincaillerie, non fournie avec
le produit). Ainsi, la longueur reste toujours la
même et une pliure non voulue de l’attache de
réglage est évitée.
ATTENTION: en marchant, la barrette centrale
ne doit pas dépasser la partie arrière.
Raccourcissez la barrette centrale par une
pièce de métal, cousue à la main, le cas échéant
; afin qu’elle s’arrête au moins 1 cm avant
l’arrière. Supprimez les bords tranchants de la
barrette centrale avec une lime à main.
a) Réglage optionnel de la longueur pour
SKYCLIMB & SKYWALK:
Dirigez l’arrière du crampon vers le bas, à 90°
et faites glisser la barrette centrale vers le
haut, par le tunnel. Replacez ensuite la partie
arrière dans sa position d‘origine.
voir illustration 3
Position finale de la barrette centrale longue
voir illustration 4
Position finale de la barrette centrale courte
voir illustration 5
b) Raccourcissement optionnel pour
TREKKING / EASY (FACILE):
Vissez l’une des vis (fournie avec le produit)
dans l’un des trous à cet effet, dans la zone
avant de la barrette centrale.
3. SYSTÈMES D’ATTACHE:
a) STEP-IN:
Avec support métallique à l’avant et support
métallique + levier de basculement synthétique
à l‘arrière.
Pour des chaussures de montagnes 100% et
des chaussures de ski avec semelles rainurées
à l’avant et à l‘arrière adaptées aux crampons
voir illustration 6
Levier de basculement arrière:
Grâce à la vis de réglage intégrée, réglez le
levier de basculement à une hauteur optimale,
Assurez-vous que le levier de basculement
s’enclanche bien en place.

Supports métalliques avant et arrière:
Optimisez la forme spécifique grâce au support
métallique. A cet effet, plusieurs encoches sont
proposées, à l’avant et à l’arrière. Assurez-vous
que votre botte et placée centralement sur le
crampon et ne dépasse pas, soit à l’avant, soit à
l’arrière (en particulier).
Sangle de crampon:
Lorsque le levier de basculement est bien
enclanché, passez une fois la sangle au-dessus
du coup-de-pied et fixez-la avec les anneaux
de sangle.
b) KOMBI
Avec la capture de boucle synthétique à
l’avant et le soutien métallique+ le levier de
basculement synthétique à l’arrière.
voir illustration 7
Levier de basculement et soutien métallique:
voir 3. a)
Sangle de crampon:
Faites passer la sangle par l’œillet ou la
rainure, sur la boucle de capture synthétique
avant, puis fixez-la avec les anneaux de sangle.
c) CONCEPT:
Avec une boucle de capture synthétique, à
l’avant et à l‘arrière.
Pour les chaussures de montagne avec
semelles sans rainures. voir illustration 8
Sangle de crampon:
Passez la sangle par l’œillet ou la rainure, sur
la boucle de capture synthétique avant.
voir illustration 9
Puis continuez ainsi:
MÉTHODE 1
(avantage : moins d’usure de friction) :
Passez la sangle par les anneaux de sangle et
tirez pour bien serrer.
ou
MÉTHODE 2
(avantage : de nombreux points de contact) :
I. Faites passer la sangle de l’intérieur par
l’œillet vers le côté extérieur de la boucle de
capture synthétique arrière.
voir illustration 10
II. La sangle passe au-dessus du coup-de-pied
de la chaussure, à partir du côté intérieur,
par l’œillet opposé. voir illustration 11
III. Faites à nouveau passer la sangle sur le
coup-de-pied, par les anneaux de sangle,
puis tirez pour bien serrer.
voir illustration 12
Pour bien fixer les crampons SKY à la
chaussure, faites passer la sangle à l’intérieur
des deux rebords de la boucle de capture
arrière. voir illustration 13
VEUILLEZ NOTER: Si vos chaussures de
montagne sont douces et souples, la semelle
doit être pliée autant que possible au moment
de tirer la sangle, afin d’éviter que le crampon
ne glisse ultérieurement. Faites un pas et
attachez la sangle bien serré lorsque la
chaussure et le crampon sont en position « de
roulement ».
4. PLAQUE ANTIBOTT:
a) Plaque Antibott pour SKY:
Les crampons SKY sont fournis prêts à être
utilisés, sans plaque antibott, pour éviter qu’ils
ne s‘enroulent.
Installation de nouvelles plaques antibott (les
parties avant et arrières sont identiques):
1. Otez la barrette centrale.
II. Prenez l’un des crampons.
II. Appuyez la plaque antibott dans la forme
en U. Faites glisser la plaque vers la partie
du crampon, afin que l’un des composants
synthétiques s’enclanche sur le métal et un
autre sous le métal. voir illustration 14
III. Fixez tout d‘abord la barrette centrale à la
partie avant. Assurez-vous en particulier
que de passer la barrette centrale par le
tunnel métallique, puis par l’encoche de la
plaque antibott (composants synthétiques
colorés). La partie synthétique blanche
dans la zone du tunnel métallique repose
au-dessus de la barrette centrale.

voir illustration 15
b) Plaques Antibott Vibram (pour TYROL,
TREKKING, EASY, FORST) :
comprenant une partie avant et une partie
arrière. voir illustration 16
IMPORTANT : la face lisse doit être EN
DESSOUS!
Installation:
I. Ôtez la barrette centrale.
II. Fixez la plaque avec une pince sur les
crochets. voir illustration 17
III. Placez la plaque antibott sur le crampon
et faites glisser la barrette centrale par le
tunnel métallique. La barrette doit toujours
reposer sous la plaque Vibram.
voir illustration 18
5. CONVERSION SKYSTEEP:
a) Double-point / Mono-point:
Le SKYSTEEP peut être utilisé soit avec un
double-point, soit avec un mono-point.
I. Desserrez la vis longue (clé Allen
hexagonale no. 5 et vis-écrou) de la partie
avant et ôtez les douilles d’écartement
noires.
II. Resserrez la vis, réglez les vis d’écartement
et pointez-les dans la position souhaitée. La
position finale dépend du nombre de points.
voir illustration 19
III. Serrez bien la vis-écrou.
b) Attache KOMBI:
Le SKYSTEEP est fourni avec une attache
STEP-IN. Muni d‘un set de conversion Art.
ST00K KOMBI-TUNING (comprenant une
boucle de capture synthétique et des douilles
d’écartement blanches), il peut être converti en
une attache-COMBI.
I. Desserez la vis longue (clé Allen hexagonale
no. 5 et vis-écrou) et ôtez le support
métallique STEP-IN.
II. Resserez la vis et réglez la boucle de capture
synthétique, les douilles d’écartement
blances et le(s) point(s). La boucle de
capture synthétique doit être placée entre
le CÔTÉ INTÉRIEUR des points extérieurs et
les douilles blanches. voir illustration 20
III. Serrez bien la vis-écrou.
6. GRÖDEL (Art. SG...) :
Veuillez noter : non certifié conformément à
EN 893.
a) Réglage de la largeur :
Placez le Grödel sur la semelle de la chaussure
et réglez à une largeur optimale. Serrez bien la
vis-écrou (certains modèles possèdent une clé
Allen intégrée au point). Les anneaux de sangle
doivent toujours se trouver sur le côté extérieur
de la chaussure. voir illustration 21
b) Sangle de crampon:
MÉTHODE pour le Modèle POWER GRIP :
I. Allongez la sangle sur le coup-de-pied de la
chaussure et faites la passer diagonalement
à l’intérieur via l’anneau métallique avant
opposé. voir illustration 22
II. Faites passer la sangle de l’intérieur via
l’anneau métallique avant opposé.
voir illustration 23
III. Faites passer la sangle diagonalement
derrière les anneaux de sangle et serrez
bien. voir illustration 24
MÉTHODE pour les Modèles SG20A & SG30A :
Faites passer la sangle par dessus le coup-de-
pied et fixez-la avec les anneaux de sangle.
Essai:
Assurez-vous bien que les crampons sont
bien fixés sur la chaussure. Secouez les
jambes et faites quelques pas. Le crampon
ne doit absolument pas bouger. S’il bouge,
recommencez les étapes de « Pose et fixation ».
Climat d‘utilisation:
La température d‘utilisation permanente du
produit (à l‘état sec) se situe entre env. -30°C
à +40°C.
Durée de vie du produit:
ATTENTION: Des conditions inhabituelles
peuvent réduire la durée de vie du produit
à une seule utilisation (contact avec des
produits chimiques, températures extrêmes,
atmosphère salée/acide, arêtes vives, grande
This manual suits for next models
6
Table of contents
Languages:
Other AUSTRIALPIN Safety Equipment manuals


