Authentic Adventure Gear Texsport Lakeway Hammock User manual

INSTRUCTIONS
Item 14268
Lake ay™ Hammock does not include hard are
CAUTION: DO NOT JU P UP AND DOWN ON THE HA OCK. DO NOT USE IT AS A PLAYGROUND SWING.
CHILDREN HAVE BEEN KNOWN TO USE HA OCKS AS A TRA POLINE OR TRY TO SWING OFF OF THE
HOOKS. THIS IS DANGEROUS AND NOT THE INTENDED USE OF YOUR HA OCK. IT ALSO WILL CAUSE
EXCESSIVE WEAR AND TEAR ON THE HA OCK AND OUNTING HARDWARE.
THE AXI U SAFE WEIGHT LI IT FOR THIS HA OCK IS 400 LBS.
PLEASE NOTE AND OBSERVE THIS LI IT.
AINTENANCE:
By observing the following suggestions, your hammoc will provide many hours of relaxing pleasure:
• Store your hammoc in a cool, dry place. Be certain that it is not wet or damp when rolled and stored or the rope may mildew
or rot. If he hammoc does get wet, let it dry completely before storing.
• Although this hammoc is intended for outdoor use, exposure to adverse weather conditions such as UV rays, rain or snow alter
the appearance and decrease the life span of the hammoc . Therefore, please handle your hammoc with care in order to
obtain maximum enjoyment.
• Do not hang or store your hammoc in an area where wildlife may potentially have access. Avoid storing near chemicals and
pesticides which, if spilled, may effect the strength or integrity of the fibers used in this hammoc .
• Handwash your hammoc using a mild detergent. Rinse well and hang to dry. Allow it to air dry completely before using or
storing. Do not use any products with bleach or strong chemicals.
INSTALLATION OF HA OCK:
STEP 1 ..First determine where you would like to hang the hammock. It may be hung between two
posts, on our specially designed hammock stands, on your porch, or just about anywhere you
prefer. Ideally, the space in which you plan to hang your hammock should be 18 inches greater
than the overall length of your hammock. ALWAYS TEST YOUR HA OCK CAREFULLY PRIOR TO
EACH USE TO AKE CERTAIN THAT IT IS HUNG SECURELY AND IN SAFE CONDITION.
STEP 2 ..If you are installing the hammock where a wooden surface will hold an eye hook; such as
between trees, posts, or wall studs, observe the following:
a. .. AKE CERTAIN THE WOODEN OBJECT IS AT LEAST SIX INCHES IN DIA ETER AND THAT THE
WOOD IS SUITABLE TO HOLD THE EYE HOOK. SO E WOODS ARE VERY SOFT, SUCH AS WIL-
LOW, PAL OR BEECH, AND AY NOT HOLD THE HA OCK WHEN IN USE.
b. ..Drill 3/16” pilot hole 1” deep at each installation point approximately 5’ to 6’ above the
ground. The exact height will depend on the distance between the two points of installa-
tion and how high you wish to hang the hammock. (See Figure A - reverse).
c. ..Screw an eye hook in each of the pilot holes drilled. Use a screwdriver partially inserted in
the eye of the hook for leverage while screwing the hook in place. BE SURE TO SCREW THE
HOOK CO PLETELY INTO THE WOOD UNTIL THE EYE IS SNUG AGAINST ITS OUNTING
LOCATION. WHERE THE HA OCK IS OUNTED USING A WALL STUD, BE CERTAIN THAT
THE EYE HOOK IS DIRECTLY IN THE CENTER OF THE STUD AND IS SECURELY E BEDDED. CAU-
TION: DO NOT CONTINUE TO TIGHTEN THE SCREW ONCE IT IS E BEDDED.
Than you for purchasing this Texsport hammoc . Please read and understand each step of the set-up instructions. We hope you
enjoy your new hammoc and that it will give you many years of outdoor pleasure.
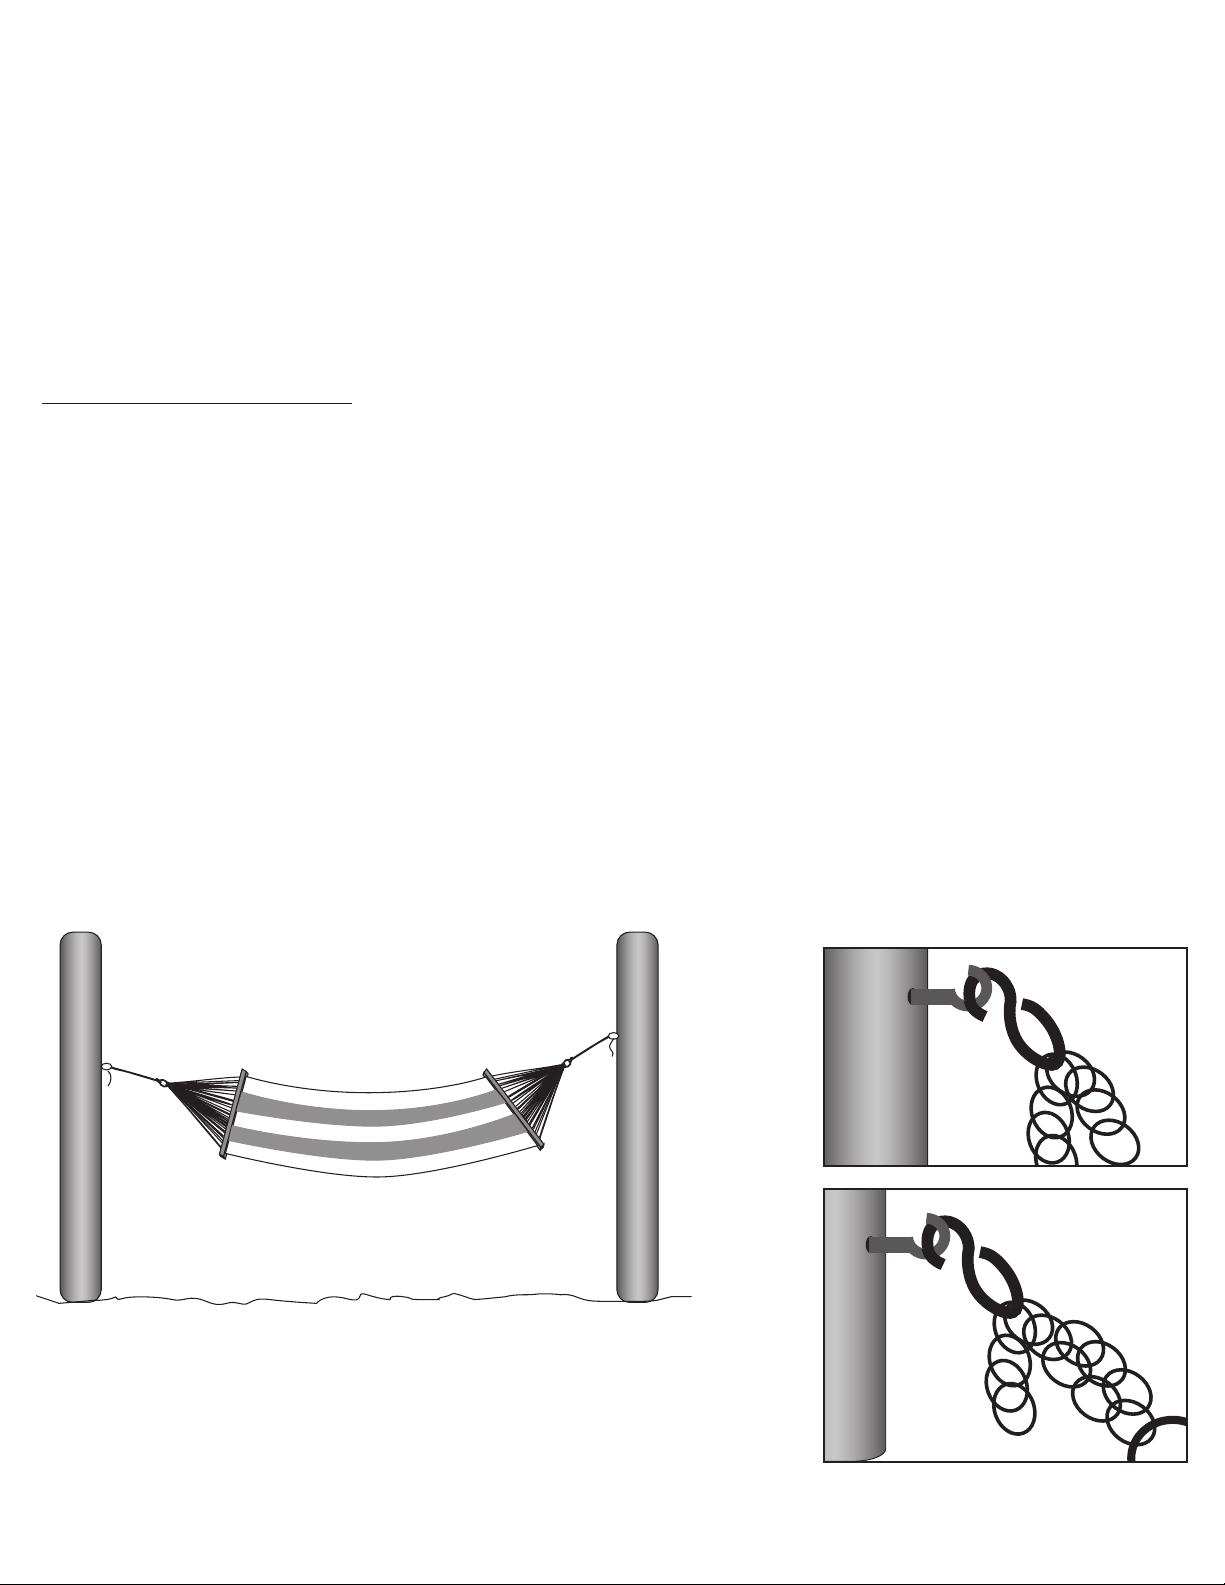
d. ..Hook a chain over the hook as shown in the upper part of Figure B. You may adjust this
later depending on how high you wish to hang the hammock and as the ropes stretch to
their maximum length. DO NOT WRAP THE CHAIN AROUND THE HOOK. ALSO BE CERTAIN
THE CHAIN IS NOT TWISTED. Either of these may cause the links of the chain to bend and
weaken.
e. ..Attach the end of each chain containing “S” hook to the ring on each end of the hammock
(see Figure C). DO NOT ALLOW THE CHAIN TO BECO E TWISTED, AS NOTED ABOVE.
f. ..Once you have used your hammock, it may hang lower due to stretching of the ropes. This
is to be expected. To have the hammock hanging at the height originally chosen, simply
decrease the number of links used where the chain attaches to the hook. ake certain you
follow the precautions regarding hanging and straightening of the chain.
INSTALLATION OF THE POSTS:
STEP 1 ..If you choose to hang your hammock using a post (or between two posts), please observe the
following:
a. .. aterials: Each post used should be 6” x 6” x 9’ tall minimum for rectangular posts, or
6” diameter X 9’ tall for round posts. Use 160 lbs. of premixed concrete for each post.
b. ..Dig two holes about 10” in diameter and 3’ deep. They should be spaced at least 18”
greater than the length of the hammock.
c. ..Place the posts in the holes and be sure that no more than 6’ of each post extends out of
the ground.
d. ..Prepare the concrete according to the package directions. Pour 160 lbs of mixed concrete
in each hole until the concrete reaches the level of the ground surface. Be certain to pack
the concrete around the posts and the hole and remove air pockets in the concrete.
e. ..While the cement is still wet, angle the posts slightly away from the side on which the
hammock will be hung. If you are using rectangular posts, be certain that the 6” side of
the posts face toward the hammock. Allow concrete to harden for at least 24 hours.
f. ..When you have completed installation of the post (or posts), mount hammock as explained
in steps 2a through 2f.
5’ to 6’
Fig. A
Fig. B
Fig. C
QUESTIONS:
If you should have any questions, problems or comments, please call our Customer
Department is open M–F from 8 a.m.–5 p.m. CST.
ODEL: LAKEWAY™ HA OCK
ITE 14268
ADE IN CHINA
(BR42)10
This manual suits for next models
1
Table of contents


