Auto Care Products Clean Park User manual

Clean Park®
Warning:
• The Clean Park®is Slippery When Wet.
• To use with Snow Chains or Studded Snow Tires, purchase Protector Strips from
Auto Care Products, Inc.
• Do Not Turn Front Tires While Vehicle is Stationary on the Clean Park®.
For More Information Contact: Auto Care Products, Inc.
6345 Nancy Ridge Drive
San Diego, CA 92121
(800) 992-2018 or (858) 625-0005
Fax: (858) 625-0010
Email: [email protected]
www.autocareproducts.com
U.S. Patent #6,258,430
Clean Park®Limited Warranty
Auto Care Products, Inc. warrants your Clean Park®to be free from defects in material
and workmanship for a period of three (3) years from the date of purchase for the 50
mil mat, and one (1) year for the 20 mil mat, subject to the following conditions and
limitations:
Conditions:
• This warranty only applies to the original purchaser of the Clean Park®.
Limitations:
This warranty does not cover the following:
• Improper installation of the Clean Park®.
• Placement of the Clean Park® on any surface that is not smooth and at.
• Improper use of the Clean Park®.
• Use with snow chains or studded snow tires.
• Punctures caused by rocks and other sharp objects.
• Use of Solvents, Chemicals and Detergents to clean the Clean Park®.
• Normal wear and tear.
• Discoloration of the vinyl sheeting that may occur over time.
• Tire impressions made on the vinyl sheeting, which is considered normal.
Should a defect occur, contact Auto Care Products, Inc. to request a Return
Authorization Number. No returns will be accepted without a Return Authorization
Number. It is the responsibility of the customer to pay for all shipping costs including
insurance. Upon receipt of the returned part(s), Auto Care Products, Inc. will either
repair or replace the defective part(s) as it deems necessary.
Made in the USA
Warning:
Rocks and other sharp objects may puncture the Clean Park®. To avoid punctures,
regularly remove debris by sweeping with a soft bristle broom.
Cleaning Instructions:
Remove one or more of the end pieces closest to the garage door. Be careful not to puncture
or cut the vinyl sheeting with the edge of the top piece as you pull it off. Sweep the Clean
Park®with a soft bristle broom. Hose off the Clean Park®. Use a soft bristle broom to push
water towards the open area, off of the Clean Park®. Only a mild dish soap may be used on
the Clean Park®. Do not use solvents, harsh chemicals, abrasive cleaners or bleach.
Discoloration of the vinyl sheeting may occur over time and does not affect the integrity of
the material.
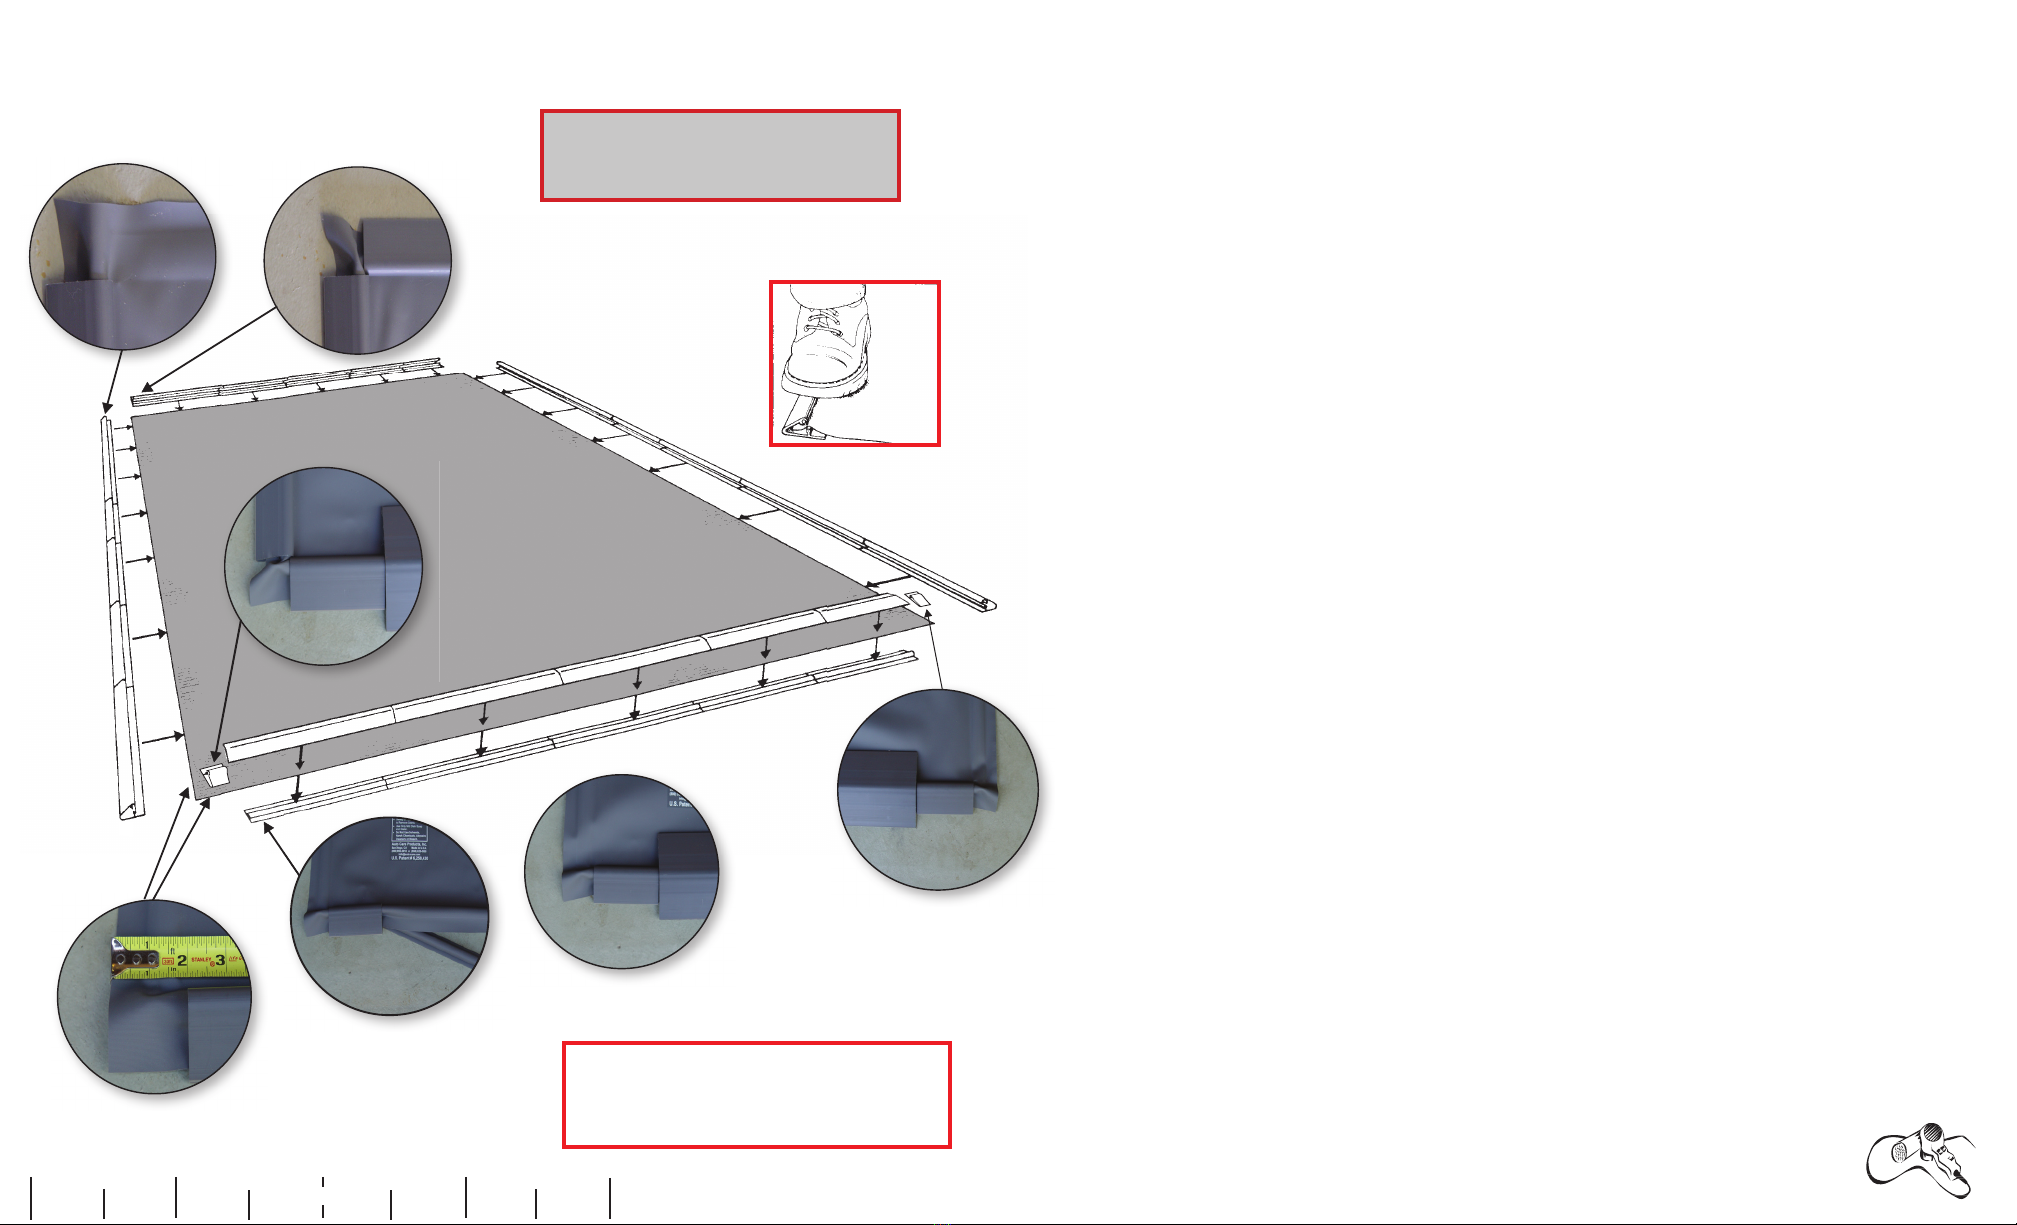
1. Sweep or vacuum garage oor. Repair or cover (with duct tape) any cracks in garage oor.
2. Lay out all of the edge pieces before beginning assembly.
3. See fi gure 1. Starting at the edge closest to the street, attach the small (approximately 2.5”)
V-shaped side piece to the front edge of the mat, 2” in from the left side.
4. See fi gure 2 & 3. Slide one of the bottom ramp sections (mushroom-shaped profi le) under
the mat, so that it butts up against the previously attached small V-shaped side piece. The bot-
tom ramp section should be aligned with the tallest part of the V-shaped piece. Next, snap on
one of the top ramp sections onto the bottom ramp section. Continue attaching the remaining
ramp sections onto the mat. See fi gure 4. Finally, attach the other small V-shaped side piece
next to the last ramp section.
5. See fi gure 5. Attach one of the long (approximately 24”) V-shaped side pieces to the left
side of the mat, next to the previously installed small V-shaped side piece. Continue attaching
the long V-shaped side pieces down the left side of the mat. Repeat this step on the right side
of the mat.
6. See fi gure 6. On the end farthest away from the street, cut down vinyl sheet so it protrudes
1½” beyond the last long V-shaped side piece.
NOTE: All Clean Parks® can be shortened by 2ʼ increments just by omitting long V-shaped
side pieces and cutting the vinyl sheet, as described above.
7. See fi gure 7. On the side farthest away from the street, attach the short (approximately
18”) V-shaped pieces.
Assembly Instructions
Figure 6 Figure 7
Figure 5
Figure 2
Figure 1
Figure 3
Figure 4
Lay out all the edge pieces
before beginning assembly.
Cold Weather Assembly Tip
In extremely cold weather, the vinyl sheet may become stiff, making it diffi cult to attach the edge
pieces. To soften up the vinyl sheet, bring the vinyl sheet inside the house and allow it to warm up to
room temperature.
Or
Use a hair dryer and blow warm air along the vinyl sheet, as you attach each edge piece.
DO NOT USE A HEAT GUN
Clean Park
AutoCare Products, Inc. www.autocareproducts.com 800-992-2018 Patent# 6,258,430
®
Go to YouTube.com and search:
New Design Clean Park Assembly
to view step-by-step assembly video
New Improved Design
0 1” 2” 3” 4”
Ruler for Guide
Other Auto Care Products Cleaning Equipment manuals


