AutoDab FM Operation manual

V0.02
Getting Started - Initial Setup of Head Unit
• On rst install, the AutoDAB controller will default to transmitting on 87.5MHz. Tune the car radio to this frequency.
• The car radio will display ‘AutoDAB’ and the audio message ‘Scanning AutoDAB, please wait’ will be heard.
• The audio message repeats every 5 seconds.
• Choose a preset on the car radio and store the AutoDAB frequency to it.
What’s in the pack?
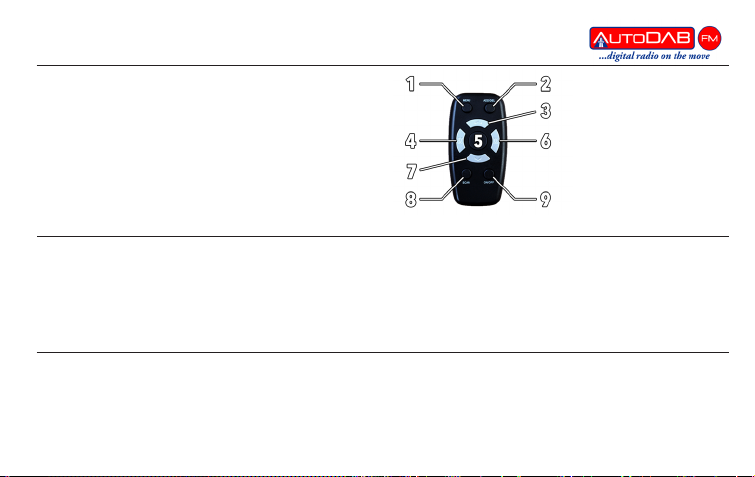
Remote Key:
1 - Menu 6 - Station Right
2 - Add/Delete 7 - Preset Down
3 - Preset Up 8 - Scan
4 - Station Left 9 - On/O
5 - OK
Pairing a Remote
• To pair remote press ‘Menu’ and ‘On/O’ together for two seconds. A short beep will be heard conrming
your device has been paired.
• Next press ‘Menu’ to start the digital radio. After a short delay the car radio will display the rst available
digital radio station found e.g. Absolute

Browsing through Preset Stations
• Your AutoDAB will come with presets already loaded. To browse through your presets, simply use the
‘Preset Up/Down’
Scanning for Stations
• To update the available station in your current location, press ‘Scan’ and the audio message ‘Scanning
will repeat twice.
• After around 60 seconds, the car radio will display the total number of DAB stations found and the number
of DAB stations currently available e.g. 63 Stations have been found, 53 stations are available.
• Note: Found stations are all the stations that have been found in all scanned areas
Available stations are the stations that have been found in this scanned area
• After a short delay, the car radio will display the rst available DAB station name e.g. Absolute
Navigating the Station List (Alphabetical)
• Press ‘Station Left/Right’ to move up or down the station list from the current tuned station.
• Tip - If you are looking for a specic station, then go to the preset nearest to it in the alphabet and
move up and down from there, by pressing the ‘Preset Up/Down’ on the remote.
Adding/Deleting Presets
• When you locate a station that you want to add or delete from your presets, simply press ‘Add/Del’.
• If the preset is not already in your preset list, then the station will be added, and the voice conrmation
‘Preset Added’ will be heard.
• If the preset is already included within your list, then it will delete the preset and the voice conrmation
‘Preset Deleted’ will be heard.
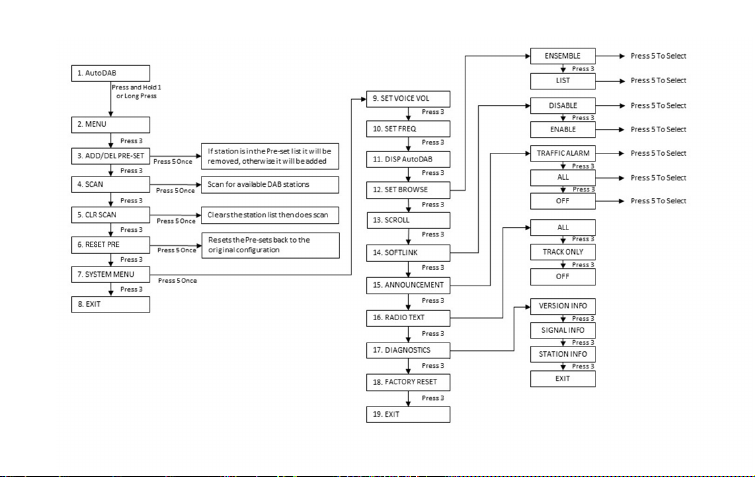

Menu Tree Key
1. AutoDAB - Normal DAB mode. DAB station name is shown on head unit display.
2. Menu - Enter AutoDAB menu.
3. Add/Del Presets - If the current tuned station is already in the AutoDAB preset list, the option
of ‘Delete Preset’ will be oered to the user. If the current tuned station is not already in the
AutoDAB preset list, the option of ‘Add Preset’ will be oered.
4. Scan - AutoDAB will scan for all available stations in your area and update the station list
accordingly. The display will show ‘Scanning’ and you will hear ‘Scanning AutoDAB please wait’
twice. When complete, your display will tell you how many stations were found and how many
are available for you to select.
5. Clear and Scan - Deletes existing station list and re-scans. All stations and presets that are no
longer in range will be deleted.
6. Reset all Presets - Deletes all presets and restores them to the factory default.
7. System Menu - Allows access to the system menu of the AutoDAB.
8. Exit - Exits the AutoDAB menu and returns to normal DAB mode.

Menu Tree Key
9. Set Voice Volume - The voice prompt can be increased by pressing ‘Preset Up’ and
decreased by pressing ‘Preset Down’. The voice volume level is displayed as a gure between
01 to 10 max.
10. Set Frequency - Allows user to adjust the FM freq. which the AutoDAB broadcasts on. The
default is 87.5MHz.
11. Disp AutoDAB - Forces the RDS to always display ‘AutoDAB’ when tuned to AutoDAB. Voice
constantly says ‘AutoDAB...AutoDAB’. This is to help the user nd the AutoDAB broadcast
frequency.
12. Set Browse - AutoDAB can be navigated in either List mode (all available stations listed
alphabetically A to Z or in Ensemble mode (all stations listed by ensemble i.e. a group or bundle
of stations that are transmitted together).
13. Scroll - Enables or disables scrolling text. The radio text can be set to scroll on the display
where you would normally see your DAB station. The display will show what you’re listening to
and the text the station transmits. This can, however, be dicult to read on some radios and be
distracting to the driver. We therefore recommend that this feature is disabled.

Menu Tree Key
14. Softlink - A station can have a link to another transmitter, same station but with dierent content.
15. Announcement - You can select to receive either all announcements, just trac and alarm,
or turn them all o.
16. Radio Text - If your head unit supports this feature, you can display all the radio text the
broadcaster sends, just track information or none at all.
17. Diagnostics - The Diagnostics Menu is for use if a problem occurs with your AutoDAB. You can
also check your antenna’s signal or show the current station’s statistics.
18. Factory Reset - Restore the AutoDAB tuner to factory settings. All the presets/stations will be
deleted and the AutoDAB will be reset to it’s original conguration.
19. Exit - Exit the DAB menu and returns to normal AutoDAB mode.
How to t - PLUG
• Remove all the contents from the AutoDAB box
• Position the antenna in the top right of the front windscreen (top left for right
hand drive cars). The antenna should be located parallel to the A-pillar of
the car (FIG 1). We recommend that it is held in position with a temporary x
until you conrm that you have a good reception.
• Plug the cigarette lighter charger into the nearest 12v supply to where you
want to locate the AutoDAB box – the red light should illuminate.
• Plug the 3.5mm Jack into the cars aux-in socket.
• Now plug all connections into the AutoDAB box (FIG 2)FIG 1
FIG 2
Table of contents
Other AutoDab Automobile Accessories manuals


Popular Automobile Accessories manuals by other brands


Brodit
Brodit ProClip 853435 installation instructions

Brodit
Brodit ProClip 853353 installation instructions

Toyota
Toyota TM4875A Operation manual

AdvanceTec
AdvanceTec Verizon V860 - BARRAGE user manual

SKS–Kinkel Elektronik
SKS–Kinkel Elektronik DS2010 instruction manual

Kargo Master
Kargo Master 8006A Instruction guide


