AutoDab USB Operation manual

Features & Benets
• Universal, plug and play digital radio interface
• True Digital Sound
• Integrates seamlessly with the original vehicle stereo
• Operated via the vehicle’s head unit or steering wheel controls
• Voice prompt system for added safety (if supported by the original head unit)
• Glass mount DAB antenna included for high quality signal
The information provided in this document is subject to change without notice due to manufacturer changes and/or improvements to the product/s. This
instruction manual is based on documented data and research. The manufacturer of this product cannot be held responsible for any changes made to the
vehicle by the manufacturer or damages that may occur through the installation of this product in accordance with the steps outlined herein.
DISCLAIMER
AUTODAB-USB_IUG_en-GB_v3
i. AutoDAB USB Interface
ii. Amplied Antenna
iii. USB Connection Lead
Installation & User Guide
ii
i
iii
What’s Included?
USB

2AUTODAB-USB_IUG_en-GB_v3
PRIOR TO INSTALLATION
Read the manual prior to installation. Technical knowledge is necessary for installation. The place of installation must be free of moisture
and away from heat sources. Please ensure that the correct tools are using during the installation to avoid damage to the vehicle or
product. Connects2 can not be held responsible for the installation of this product.
CONNECTION DIAGRAM
i
Glass Mount Antenna
Position on windscreen
according to
installation manual
Connect to Interface via
SMB (Push)
Status LED Micro USB in for
Software update
ii
iii
AutoDAB USB Interface
USB Connection Lead
USB ‘B’ to Interface, USB ‘A’ to
OEM USB socket
i. AutoDAB RF Interface
ii. Amplied Antenna
iii. USB Connection Lead
Key
ANTENNA INSTALLATION
Note: We recommend placing the antenna 3/4 of the way up the windscreen and away from all heating elements
to ensure a reliable installation. Optimal location for signal will vary from vehicle to vehicle.
Important: Only install the AutoDAB USB using the included antenna.

3
Need help? Visit support.connects2.com/tickets/technical
AUTODAB-USB_IUG_en-GB_v3
SET UP
1. Connect the interface to the vehicle as outlined in the Connection Diagram on Page 2. Connections must
be made to the vehicle’s OEM USB port and to the amplied antenna in order for the interface to function
correctly.
2. Install the included antenna in the vehicle as outlined in the ‘Antenna Installation’ diagram on Page 2.
Note: Only install the AutoDAB USB using the included antenna. Using a different style or brand of antenna
could cause damage to the interface
3. The vehicle will recognise that the AutoDAB USB is connected and may begin to scan for stations. If it
does not, select the ‘Scan’ le inside the ‘2_Scan’ folder to initiate scanning.
4. Once the scanning is complete, your playing device may attempt to continue playing the ‘Scan’ le, in
which case, navigate to ‘1_Stations’ and choose a station or it may automatically choose the rst station
for you. The interface itself has no control over this selection.
5. To select a new station or change the volume level, use the OEM steering wheel control functions or the
head unit.
Tips:
• A short delay will occur when changing stations. If skipping up or down through stations, it may be faster to
select the desired station through the AutoDAB USB’s ‘Stations’ folder instead.
• After a number of hours of playback, some playing devices may automatically change the station. To prevent
this, use the ‘Repeat Track’ function of your device.
CHANGING THE CONFIGURATION
If you are having problems playing stations with your device (e.g. stuttering or intermittent audio), you can
change the default radio conguration to try and x these issues.
To change the conguration, navigate to the ‘5_Cong’ folder and select from the 5 available options.
The default conguration from the factory is 1. If you are experiencing issues then select conguration 2
through 5 until the interface functions correctly.
Note: Each conguration has a unique buffer time which indicates the amount of time needed to change
between stations. This buffer period will occur after every station change.
ADJUSTING SETTINGS
LANGUAGE
The following languages are supported by the interface: English, German, Norwegian. You can choose
between them by selecting the ‘Language’ folder and playing the appropriate track.
SPEECH/VOICE
By default, the interface produces speech on certain actions such as selecting a station, scanning for sta-
tions or events such as when the signal is too poor. To disable these voice prompts, navigate to the ‘Voice’
folder and play the ‘Voice off’ track. The prompts can be enabled again at any time.
4AUTODAB-USB_IUG_en-GB_v3
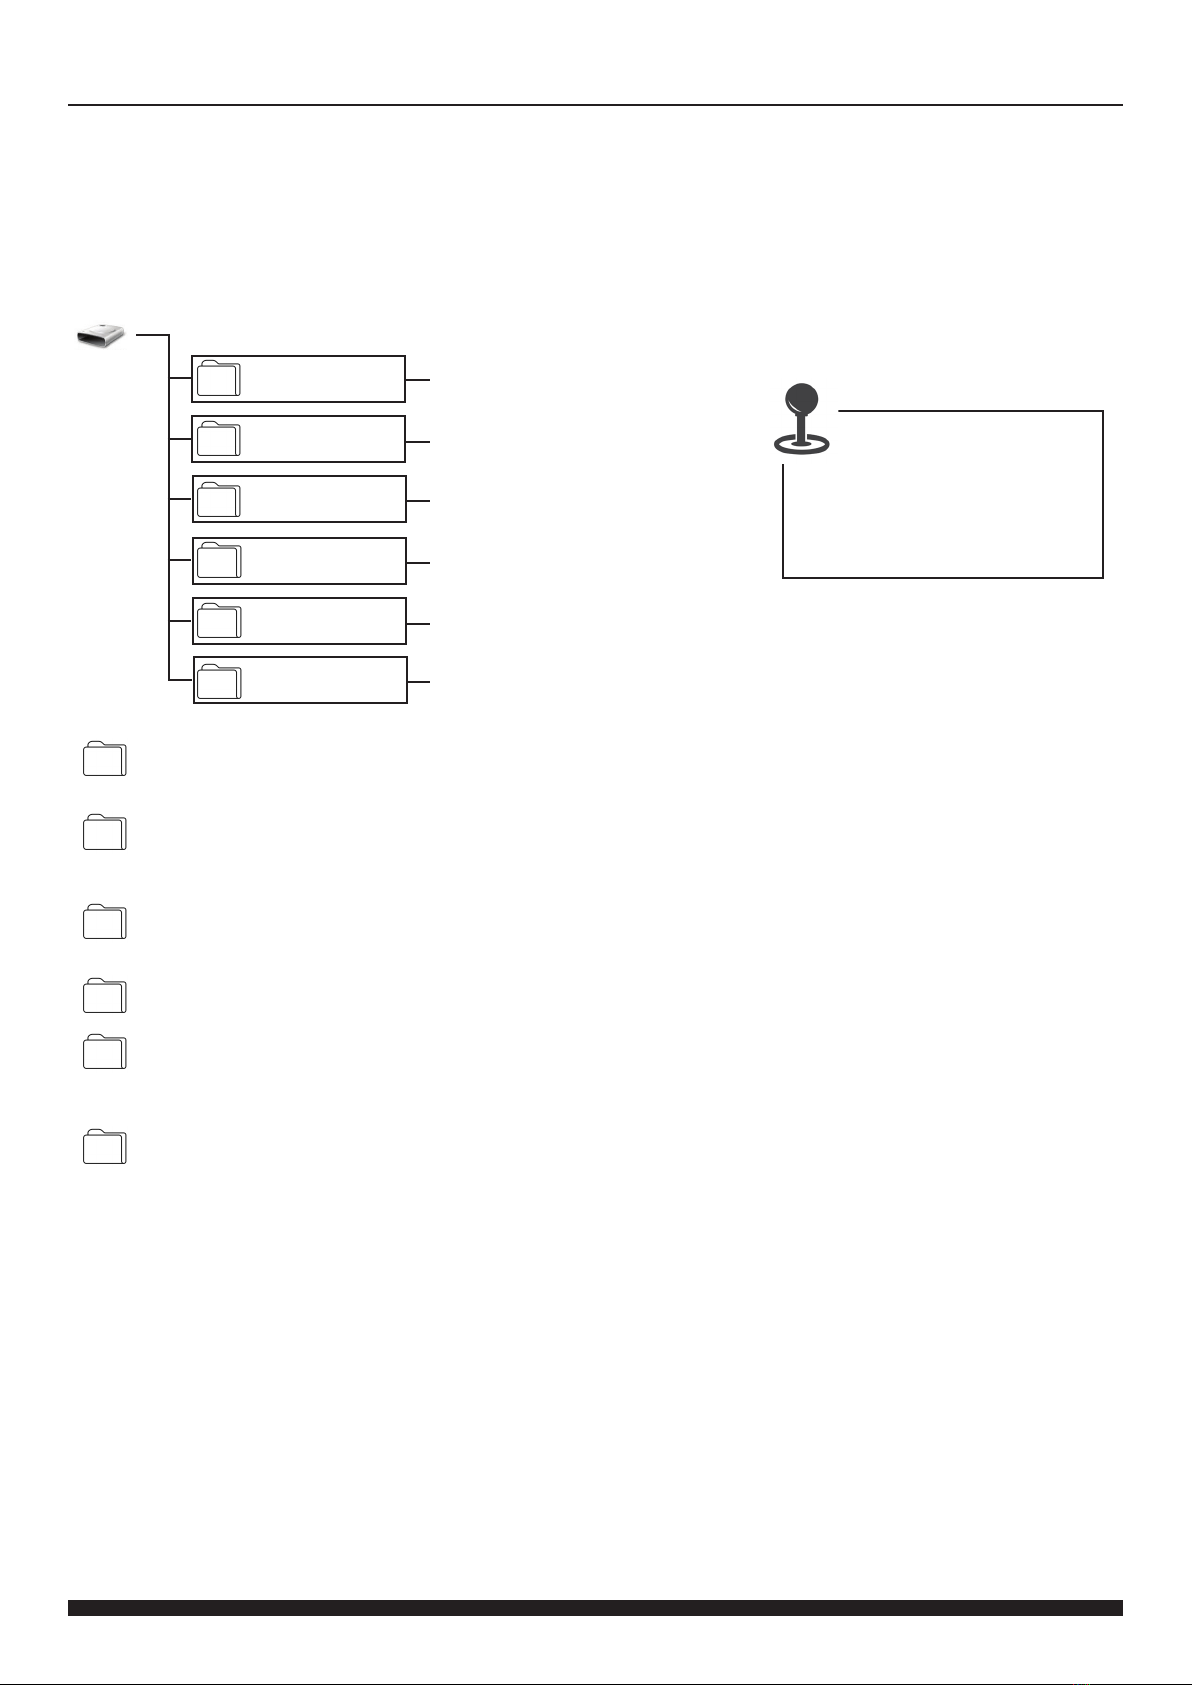
MENU TREE
To enter the AutoDAB USB Interface menus, change the source to USB and select ‘Browse’. This will then open a series of folders
that can be navigated through using the OEM steering wheel controls or via the OEM head unit touchscreen or buttons.
Note: if the AutoDAB USB is connected to a PC, the interface will be recognised as a device with removable storage. To access the set-
tings, simply click on and open the device and navigate through the folders.
Stations
The AutoDAB USB Interface comes preloaded with 60 DAB stations. Selecting a station in this
folder will load and play content from the station.
Scan
Select ‘Scan’ le to begin scanning for DAB stations. Once the scan is complete, the interface will return to DAB radio
playback at the rst available station. Please note: after completing a scan, the interface will briey switch the radio to FM
and then back to DAB.
Language
Select a language (English, German, Norwegian) to change the language of the AutoDAB USB’s voice prompts and folder
names. Please note: when changing language, the interface will briey switch the radio to FM and then back to DAB.
Voice
Select ‘Voice ON’ or ‘Voice ‘OFF’ to toggle voice prompts on or off
Conguration
The AutoDAB USB Interface features 5 different congurations to ensure compatibility with a wide range of vehicles and
devices. The default conguration from the factory is 1. If you are experiencing issues then select conguration 2 through
5 until the interface functions correctly.
Factory Settings
Select ‘Factory Reset’ to reset the interface to factory default settings
Stations
Scan
Language
Voice
Conguration
Factory Reset
Select a Playable Station
Scan for Stations
Choose from 5 Cong Options
English, German, Norwegian
Select ‘On’ or ‘Off’
Reset to Factory Defaults
AutoDAB USB Menu Tree
Navigating the Menus
To navigate the menus and select
options, the AutoDAB USB should
be operated in the same way as any
other connected USB device. It can be
controlled with the OEM steering wheel
controls or head unit (where applicable).
Other AutoDab Automobile Accessories manuals


