Autodiagnos MULTI TESTER PRO User manual

MULTI TESTER PRO
User manual
A37MAN I318495 Iss1

Part Number A37MAN
EN - Issue 1
© Autodiagnos 2009
Multi Tester Pro
User Manual
Part Number A37MAN
EN
Issue 1
© Autodiagnos 2009


Contents
i
Introduction
Copyright ................................................................................................ 1
Introduction............................................................................................. 1
Getting Started
Setting up ............................................................................................... 2
Multi-Cartridge Manager - Installation ............................................................. 2
Multi-Cartridge Driver - Installation.................................................................. 3
Multi-Cartridge Driver - Update........................................................................ 5
Connecting Multi-Cartridge Manager............................................................. 10
Downloading applications.............................................................................. 11
Updating License........................................................................................... 12
Software updates - Website .......................................................................... 13
Snapshot Reader - Installation ...................................................................... 14
Using Multi-Tester Pro
Getting familiar with Multi-Tester Pro ................................................... 15
Connection points.......................................................................................... 15
Display and keys ........................................................................................... 16
Typical screen layout..................................................................................... 17
Keypad operation .......................................................................................... 18
Connections .................................................................................................. 19
Cable Quick Guide Chart............................................................................... 20
Display and Keys........................................................................................... 21
Communicate ................................................................................................ 21
Functionality Overview ......................................................................... 22
Monitor list ..................................................................................................... 24
Actuators ....................................................................................................... 25
Reset adaptation values................................................................................ 26
Self Test ........................................................................................................ 26
Module Synchronisation ................................................................................ 26
Snapshot Reader functions .................................................................. 27
Viewing Snapshots........................................................................................ 27
Downloading Snapshots................................................................................ 27

Contents
ii
Support Services
Product Support.................................................................................... 30
Technical Information.................................................................................... 30
Training ......................................................................................................... 31
Autodiagnos Website .................................................................................... 31
Contact Details
Addresses............................................................................................. 32
Parts list................................................................................................ 33

Introduction
1
Introduction
Copyright
The contents of this document may be changed without prior notice, and should
therefore not be regarded as being binding on Autodiagnos.
Autodiagnos declines all responsibility for faults and omissions, which may occur in
this document, or the hardware & software described herein.
Under no circumstances can Autodiagnos be held responsible for damage, which
could occur due to use of this document, or of the hardware and software described
herein.
This document must not be wholly or partly reproduced, copied, or duplicated by any
means, nor may it be stored in an information retrieval system, except for personal
use, without written permission from Autodiagnos. Nor may the contents be divulged
to any third party or used in any unauthorised manner. Any breach of these
stipulations may lead to legal action
Introduction
The Autodiagnos Multi-Tester Pro is a hand-held serial diagnostic tool for carrying out
fault finding on Electronic Control Units (ECUs) fitted to cars and light commercial
vehicles.
The equipment has been designed to be quick and easy to use whilst still offering the
in-depth functionality required to diagnose and service today’s modern vehicle control
systems.

Getting Started
2
Getting S tarted
Setting up
Multi-Cartridge Manager - Installation
The Multi-Cartridge Manager software is used to manage the information held on the
Multi-Cartridge. It allows software applications and customer licence information to be
updated when required. It is recommended that this software is installed immediately,
by following these steps:
Note: Do not connect the Multi-Cartridge until advised.
1. Insert the CD into the drive; it should auto-run and display the ‘Autodiagnos’
window.
2. Press the ‘Multi-Cartridge’ button. Follow the on-screen prompts to install the
Multi-Cartridge Manager software.

Getting Started
3
Multi-Cartridge Driver - Installation
1. Once the Multi-Cartridge Manager installation is complete, connect the
Multi-Cartridge to a USB port on the PC. Windows will detect a new device and
display the installation wizard. Select ‘No, not this time’ and press ‘Next >’ to
continue.

Getting Started
4
2. Select ‘Install the software automatically’ and press ‘Next >’. Windows will
install the USB driver from the CD.
3. If a warning message saying that the driver ‘.... has not passed Windows Logo
testing....’ is displayed, press ‘Continue anyway’.
4. The Multi-Cartridge Manager software is now ready to use.

Getting Started
5
Multi-Cartridge Driver - Update
If the above error message is displayed when trying to start the Multi-Cartridge
Manager software but no ‘Found New Hardware’ message has appeared, then the
following procedure will update the driver.
Note: This procedure must be repeated for each USB port to which the
Multi-Cartridge is connected.
1. Ensure the latest Autodiagnos CD is in the CD drive and the Multi-Cartridge is
connected to the PC.

Getting Started
6
2. To update the driver used for the Multi-Cartridge press the right mouse button on
‘My Computer’ (which can be found either on the desktop or within the ‘start’
menu), select ‘Properties’ then the ‘Hardware’ tab followed by the ‘Device
Manager’ button.
Getting Started
7
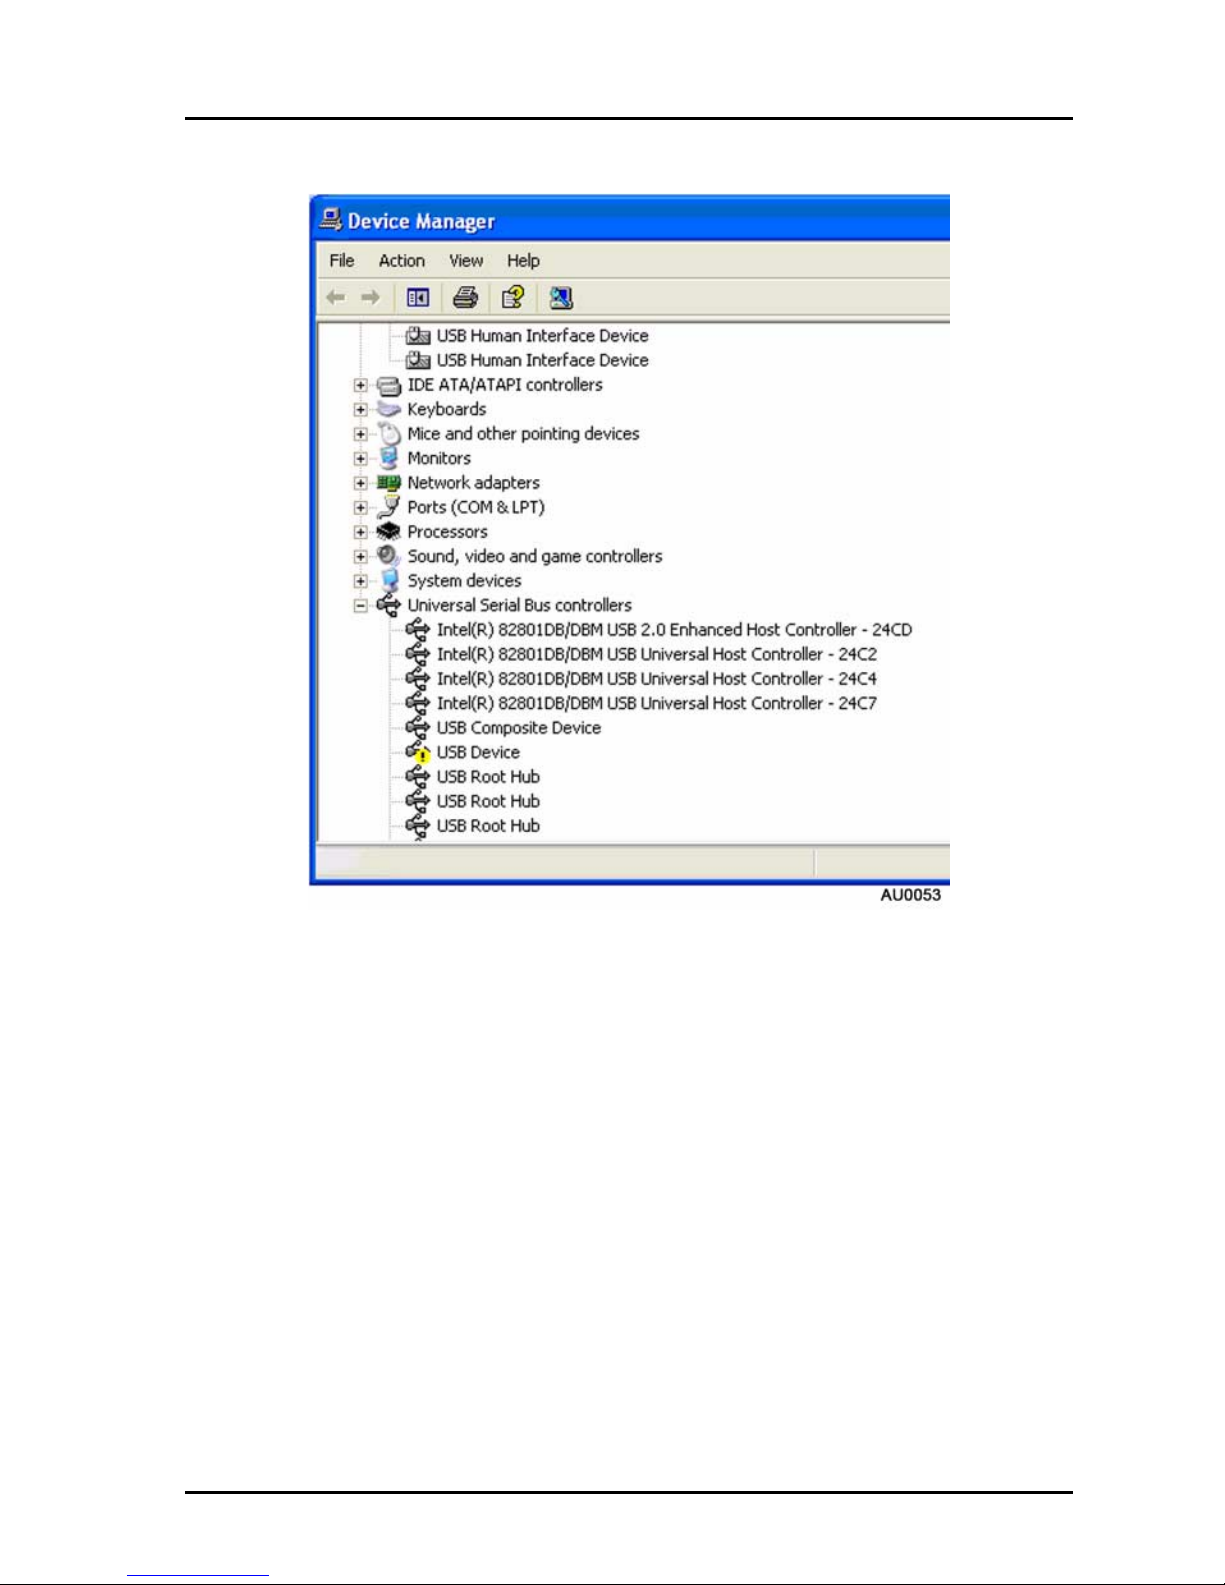
3. Look for any unknown device. An unknown device will normally be highlighted by
either a yellow ‘!’ or ‘?’.

Getting Started
8
4. Reconnect the Multi-Cartridge to the PC and press the right mouse button on the
‘unknown device’. Select ‘Update Driver’ to display the above message box.
5. Select ‘No, not this time’ then press the ‘Next >’ button.
6. Select ‘Install the software automatically’ then press the ‘Next >’ button.

Getting Started
9
7. Press ‘Continue Anyway’.
8. The Multi-Cartridge is now a recognised USB device. The Multi-Cartridge
Manager software is ready to use.

Getting Started
10
Connecting Multi-Cartridge Manager
1. Connect Multi-Cartridge to the PC using the USB cable.
2. Launch the Multi-Cartridge Manager from the icon on the Desktop. Click ‘OK’ to
begin connecting to the cartridge.
3. If the ‘Found New Hardware’ message appears, repeat the ‘Multi-Cartridge
Installation’ procedure. See ‘Multi-Cartridge Driver - Installation’, page 3.
4. During the installation process, the Multi-Cartridge Manager connection to the
cartridge may have timed out; this will cause an error message to be displayed.
Press the ‘Retry’ button to reconnect; the Multi-Cartridge Manager will then start
as normal.
5. If the following message box appears, the desired operating language must be
selected.

Getting Started
11
Downloading applications
1. When connecting to the Multi-Cartridge, the software versions are checked.
Details of all current and available versions are shown against their respective
applications. If a later version is available, a tick will automatically be placed in
the ‘Update’ box.
2. Click the ‘Update application’ button to begin updating.
3. When all required applications have been updated the above message will be
displayed. Press the ‘OK’ button to continue.

Getting Started
12
Updating License
A unique license key is provided by Autodiagnos for every Multi-Cartridge. License
keys provide the Multi-Cartridge with application and subscription information.
1. Press the ‘Update License’ button.
2. Enter the new license key in the text box.
3. Press the ‘OK’ button to confirm.

Getting Started
13
Software updates - Website
The ‘Downloads’ area of the www.autodiagnos.com website allows users of the
Multi-Tester Pro to obtain the latest releases and beta releases of vehicle application
software.
The ‘Downloads’ area of the website provides the following.
•Latest Beta versions of software applications. Beta versions are applications that
are currently under development and test. No support is offered for Beta version
software.
•Latest software applications release notes.
•Latest Snapshot Reader application.
To download a software release, press the required language flag to download the
latest file. Please ensure the CD is inserted before running the downloaded file.
Run the Multi-Cartridge Manager; a tick will appear in the box next to your
downloaded application. Click ’Update Application’ to complete the installation.

Getting Started
14
Snapshot Reader - Installation
1. To install the software press the ‘Install Snapshot Reader’ button and follow the
prompts.

Using Multi-Tester Pro
15
Using Multi-Tester Pro
Getting familiar with Multi-Tester Pro
Connection points
1. Connection to PC.
2. Connection to vehicle serial interface.
AU0062
2
1
12V DC
Table of contents


