AUTOMATE SCIENTIFIC EcigAero User manual

EcigAero™Aerosol Exposure Apparatus
User’s Manual

For indoor use only from 5° to 40°C.
Do not get wet or subject to visible condensation.
Cleaning acrylic parts with alcohol or acetone will cause them to crack and
void the warranty.
Clean with a mild soap solution with a damp cloth only.
If this equipment is used in a manner not specied by the manufacturer,
the protection provided by the equipment may be impaired.
JUUL, Juul Labs, and JUULpods are trademarks of JUUL Labs, Inc.
myblu™, blu™, the blu logo and the myblu logo are trademarks of Fontem
Holdings 4 B.V. PyriSalt™ and the PyriSalt logo are trademarks of Purilum LLC.
!Supply Voltage:
EcigAero™ controller = 12V DC, 5A external power supply
Activating the atomizers inside the tank/pod at low resistance
(ohms) could lead the atomizer coils to get extremely hot, causing
malfunction or possibly re.

EcigAero™Aerosol Exposure Apparatus
User’s Manual
The EcigAero™ is intended for research use only.
Table of Contents
Introduction..............................................................................3
Hardware Overview
Laboratory Applications
Accessories ......................................................................4
Exposure Software ..................................................................6
Device Diagrams.....................................................................7
Flow Schematic........................................................................8
Set-up Tips .......................................................................9
Rodent water reservoir
Air pressure connection
ValveLink® controller
Important note about manifold ports
Using a fume hood
Set-up Diagram .....................................................................10
Operation ...............................................................................11
Fresh air valve
Inserting and replacing E-Cigs
For JUULpods and myblu Liquidpods
For battery-powered (blu PLUS+)
For Universal "510" threading
Josef Kewekordes II, Xuesi (Max) Shao, M.D., David Barton
©2021 AutoMate Scientic, Inc.
All rights reserved.

Operation ...............................................................................12
Flow meters
Air ow rates
Working pressure
E-Cig supply voltage (by Pod/Tank Type)
Cleaning .................................................................................15
Replacing Parts......................................................................15
How to change the manifold (specic to Pod/Tank type)
How to replace the HEPA lter
Accessories & Replacement Part List ...............................17
Safety Instructions................................................................18
Warranty .................................................................................20
Table of Contents Continued
Please observe all animal use procedures in accordance with
the National Institutes of Health (United States) or your
regional Guide for the Care and Use of Laboratory Animals,
and your institution's Animal Care and Use Guidelines.
2

Introduction
FOR RESEARCH USE ONLY
The EcigAero™Aerosol Exposure Apparatus is a device to consistently
deliver electronic cigarette (E-Cig) aerosol to rodents under programmable,
reproducible conditions to study the health eects and toxicology of
electronic cigarettes. AutoMate Scientic, Inc. is not responsible for injury
or death resulting from medical or pharmacological use.
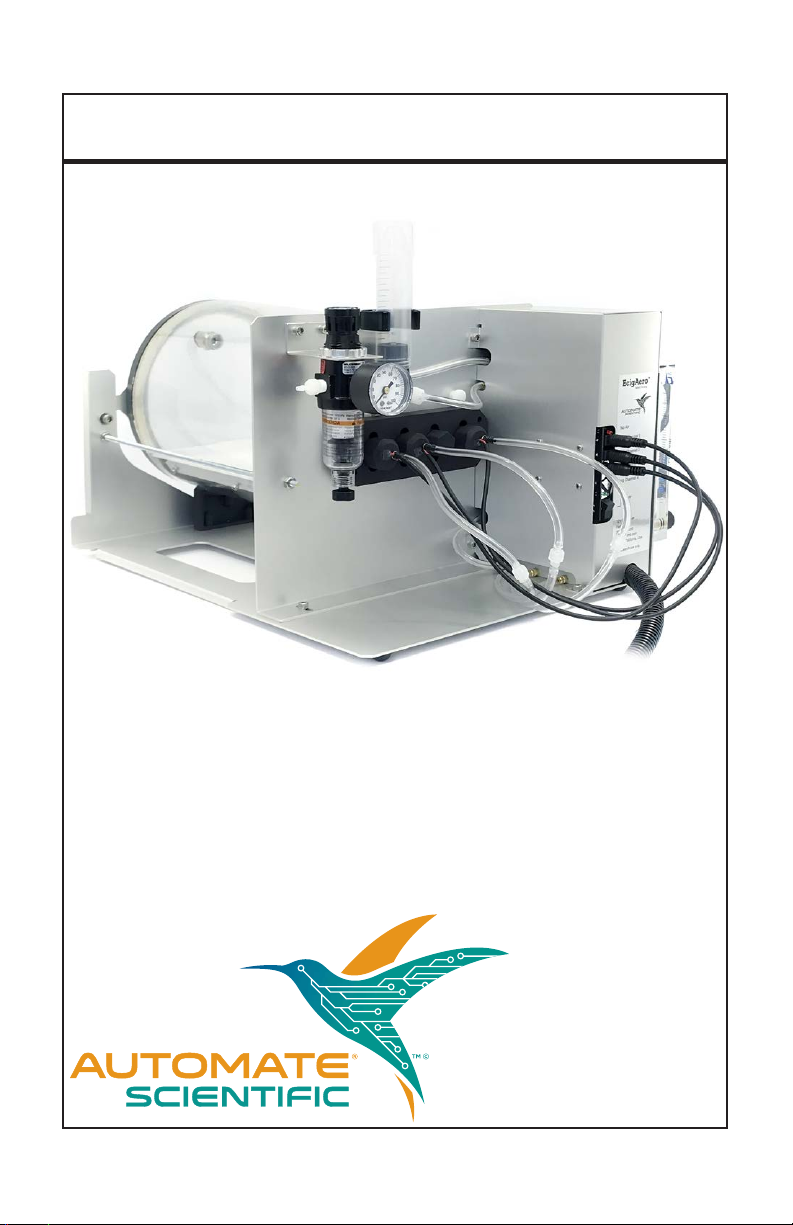
Hardware Overview
The EcigAero consists of a large cylinder and drinking water for one
or more freely-moving rodents. Electronic valves control intermittent,
pressurized air ow through four (4) E-Cigs or pods. A power supply
delivers precise user-dened voltage to activate pods without requiring
their battery or mod. A programmable valve controller and Windows
software allow the user to deliver unattended E-Cig aerosol in user-dened
"pus" and timing over many hours to simulate the circadian vaping
pattern of E-Cig users.
Interchangeable manifolds facilitate the use of many popular types of
E-Cigs and pods. A nebulizer can be connected for delivery of an aerosol
of any liquid such as nicotine solution or saline for plain aerosol control.
Fresh air is delivered when E-Cig aerosol is o, even in the event of power
loss. A sensitive regulator and ow meters permit the monitoring and
adjustment of E-Cig and fresh air. The device is sealed and includes a
HEPA lter to protect personnel from exhaust while using the EcigAero.
Laboratory Applications
Timed control provides schedulable and accurate delivery in acute and
chronic settings to ensure E-Cig aerosol rapidly enters the blood of the
subject animal, minimizes rst-pass metabolism and achieves stable and
reproducible pharmacokinetics that are similar to human E-Cig vapers. The
EcigAero can be used to study E-Cig euent, nicotine addiction, nicotine
toxicology, and nicotine teratogenicity. It can also deliver aerosols of other
drugs of abuse such as marijuana, cocaine, heroin. EcigAero is a novel tool
for understanding the health eects of chronic nicotine exposures such as
with tobacco cigarettes, E-cigarettes and other tobacco products, for studies
of pharmacology, toxicology, tobacco-related diseases, and for discovery of
medications. 3

ValveLink®8.2 WiFi/digital/
manual controller
Part #01-18w
EcigAero™
JUULpod manifold
Part #19-J
EcigAero™
Battery-powered (blu PLUS+) manifold
Part #19-BP
Accessories & Manifolds
AutoMate Scientic oers a number of products which complement the
EcigAero: Aerosol Nebulizer, E-Cig Manifolds specic to manufacturer,
Exposure Control Software (Windows) and ValveLink8.2 WiFi/digital/
manual controller.
3-jet Collsion Aerosol Nebulizer
with direct connections to cylinder
Part #19-N
4

EcigAero™
myblu Liquidpods manifold
Part #19-BL
Accessories & Manifolds
EcigAero™
Universal "510" thread manifold
Part #19-510
Can accommodate most vape tanks that are either
22mm or 24mm in diameter with 510 battery threads
and air entry ports on the end near the battery
threads. The holders will not t tanks that have air
entry ports near the front (mouthpiece), and they will
only t tanks with a round outer diameter and overall
length greater than 1.75”. The holders use O-rings to
seal to the outer diameter of the tanks, so tanks with
large grooves or embossed designs on the body may
not seal. Please contact AutoMate Scientic if you
have questions about whether a specic tank will t.
ECig Tank Sizing Chart
22 mm or 24 mm
Outer Diameter
35.6 mm | 1.4”
or longer
,
not including
mouthpiece
Air entry ports at rear of tank
(near battery threads)
Smooth outer diameter for
O-ring seals
Atomizer at least 0.5
Ωand
requiring less than 5A current
5
10 battery threads
5

Exposure Control Software
Please see the separate manual for the Exposure Control Software.
6

Device Diagrams
(1) E-Cig air ow meter & regulator knob
(2) E-Cig air pressure gauge
(3) Fresh air ow meter & regulator knob
(4) E-Cig voltage meter
(5) E-Cig voltage adjuster (small brass screw marked "CV" on meter)
(6) Area (under animal cylinder) for optional wireless telemetry system, i.e.
DSI PhysioTel® Implantable Telemetry
(7) Animal cylinder (do not clean with alcohol or acetone)
(8) Removable tray
(9) Replaceable HEPA Filter (see page 17 for instructions)
Footprint dimensions: 16 in x 10 in, 12 in (h)
Recommended table space: 18 in x 18 in
(2) (3)
(4)
(7)
(6)
(9)
(5)
(1)
(8)
16 in.
10 in.
7

Flow Schematic
Chamber
exhaust tube
House air
supply
Filter regulator knob
Normally-open
fresh air valve
Connection to the
outlet (top) of the fresh
air ow meter
E-Cig valves
Fresh air
ow meter
E-Cig
ow meter
Supply line that
connects to both
fresh air and E-Cig
ow meter
E-Cig manifold
& (4) holders
8

Set-up Tips
Save the packing material
We suggest you save the box and packing materials for future storage or in
the event you need to ship the unit back to us. Always ship your EcigAero
in one box inside another due to its fragile but heavy nature.
Rodent water reservoir
Fill the included water reservoir and insert it into clip above the manifold.
Remember to replenish the water for each experiment as needed.
Air pressure connection
Connect air pressure from house air, tank, or compressor to the ⅛" hose
barb inlet next to pressure regulator black knob.
ValveLink® controller
E-Cig aerosol delivery is controlled by 5 solenoid pneumatic valves
which are operated by any 12V valve controller like AutoMate Scientic's
ValveBank or ValveLink. Connect EcigAero plugs as follows:
Ecig Plug ValveLink port Use
1-4 4-7 Valves 1-4
5 8 Optional Nebulizer
0 3 White light for nose pokes
Important note about manifold ports
Please note the manifolds are specic to the E-Cig pod/tank type. During
use, all four holders must be installed, including unused holders to keep
a closed system and prevent aerosol from escaping. If you use less than
four holders, you must use a plug for proper operation.
Using a fume hood
It is always preferential to use the device in a fume hood to prevent
unwanted exposures to aerosols to those outside the vented hood space –
especially in case an animal must be removed from the device during an
experiment.
9

(1) Power switch
(2) Main power LED (green)
(3) Red LED will come ON when lack of supply air pressure is detected
(4) Fill water reservoir and insert into clip above the manifold with the
feeder tube leading into chamber.
(5) Connect air pressure from house air, tank, or compressor to the ⅛” hose
barb inlet next to (6) pressure regulator black knob. Use the supplied
hose clamp as needed.
(7) Attach the numbered valve cables to the ports on the back of the Valve-
Link as shown on the previous page. Plug power plug into ValveLink.
(8) Barb tting for nebulizer valve (sold separately)
(9) E-Cig manifold and (4) holders
(4)
(5)
(6)
(7)
(9)
Set-up Diagram
(1-3)
(8)
10

Operation
Fresh air valve
The fresh air valve into the chamber is OPEN by default.
1. Turn ON your air supply when you have subjects in the chamber.
2. Be sure to turn your air supply OFF when you are not doing experiments
with rodents in the chamber, to prevent your pressurized air from
escaping.
3. When ON the supply pressure should be at least 2-3 times the working
pressure, with an upper limit of 120 psi. Use the black regulator knob to
control the pressure supply to the device. To adjust: pull the black knob
up one step, adjust the pressure and push knob back down to lock desired
pressure.
Keep the air pressure between 0.5 and 2 psi with JUUL pods or they leak.
11

Operation - Continued
Inserting and replacing E-Cigs
*Please note, the holders and manifolds are specic to the Pod/Tank Type.
For JUULpods and
my
blu Liquidpods
1. Remove holder from manifold.
2. Insert pod into holder making
sure the two metal contacts of
the pod touch the pins inside
the holder. (pic.11-1)
3. Insert holder into the manifold
and twist ¼ turn to secure.
(pic 11-2)
**Set the air pressure between
0.5 to 2 psi.
pic. 11-1
pic. 11-2
12

Operation - Continued
For battery-powered (blu PLUS+)
1. Apply a tiny amount of lubricant on E-Cig to easily slide through the
manifold and keep the o-ring seals moist.
2. The E-Cig can be inserted into the holder by either:
a) directly inserting it through the inside of the chamber which does not
require removal of the E-Cig holder, or
b) removing the holder from the manifold, inserting the E-Cig, and
replacing the E-Cig holder into the manifold.
NOTE: Make sure the mouthpiece of the E-Cig is facing into the animal
exposure chamber**
For Universal "510" thread tanks
1. Remove holder from manifold.
2. Insert tank into holder and gently turn to thread tank into holder.
**NOTE: Do not over-tighten the tank into the holder**
3. Replace holder into the manifold.
Flow meters
The two ow meters display the ow rate for aerosol and fresh air supply.
Use the knobs on the two ow meters to adjust the desired ow. The meter
on the left controls the E-Cig aerosol, and the meter on the right controls
the fresh air supply. Only make adjustments when all the holders and/or
plugs are inserted in the manifold. Be careful adjusting air ow while the
EcigAero is in operation and connected to a power source, as insucient
air ow through the holders may burn-out pods. The red "no air" warning
light should illuminate and protect pods if air ow stops.
13

Operation - Continued
Air flow rates
Typical air ow rate for mouse/rat:
1 E-Cig/pod/tank* 0.8 - 1 L/min
2 E-Cig/pod/tank* 1.6 - 2 L / min
3 E-Cig/pod/tank* 2.4 - 3 L/min
4 E-Cig/pod/tank 3.2 L - 4 L /min
Fresh air ow is recommended at 2.8 – 3.8 L/min or 40-55 air changes /
hour (ACH) for mouse chamber, or 5 L/min (40 ACH) for rat chamber.
*If you are using less than four holders, you must use the provided plugs
for proper operation. The device requires a closed system to operate
correctly.
If a pod overheats or leaks in the E-Cig holder, the holder and electrical
contacts can be wiped out using alcohol on a cloth or swab.
Do not actuate the E-Cig valves without fresh air owing
through the system, or any installed pods/tanks may overheat
and burn out.
!
14

Operation - Continued
Working pressure
Working pressure with E-Cigs: 10-20 psi maximum. 2 - 3 psi may be
adequate to generate 4 LPM of air ow. Working pressure with the
nebulizer: 20-80 psi.
3-jet Collsion Nebulizer
Maximum working pressure: 100 psi
Typical air ow for 3-jet Nebulizer: 8 LPM @ 30 psi, 17 LPM at 80 psi, 21
LPM at 100 psi
Follow the nebulizer directions to ll the bottle with the correct volume of
solution.
E-Cig supply voltage (by Pod/Tank Type)
The E-Cig and tank holders are pued with electricity whenever their
valves are opened to start airow. The supply voltage can be adjusted by
turning the small brass screw labeled “CV” on the display mounted to the
base frame. The system can deliver a maximum of 8 Amps (2A per channel
if 4 channels are pued at the same time). If working with low-resistance
pods or tanks that draw more than 2A each, then not all channels can be
pued at once.
Pod/Tank Type Supply Voltage (V)
JUULpods 3.0
myblu Liquidpods 3.0
Battery-powered (blu PLUS+) N/A
VaporFi or "510" thread Depends on the tank atomizer
being used
Do not to bend, kink or block the large tube from the nebulizer
into the cylinder while it is pressurized.
The glass bottle of the nebulizer will explode with back
pressure > 1 psi.
!
15

Cleaning
DO NOT CLEAN THE CLEAR PLASTIC CYLINDER WITH
ALCOHOL OR ACETONE. Cleaning the rodent chamber with
either will cause it to crack, and cylinders cracked by alcohol or
acetone exposure are not covered under the warranty.
After each use the inner surface of the rodent chamber should be
thoroughly cleaned by wiping with water, detergent or disinfectant, but
not alcohol or acetone. The tray inside the cylinder is removable for easy
cleaning.
E-Cig holders can be wiped out using alcohol on a cloth or swab.
Replacing Parts
Please note the manifolds and holders are specic to the type of E-Cig
pod/tank type (JUULpods, myblu Liquidpods, blu PLUS+ and VaporFi/
Universal "510" tanks ).
How to change the manifold (specific to Pod/Tank type)
First disconnect the air tubes, then disconnect the electrical plugs. Remove
the screws on each end of the manifold. Install new manifold and screws,
reconnect electrical plugs and air tubes.
*Adjust airow settings respective to Pod/Tank type (see page 10)
1. Disconnect air tubes
2. Disconnect electrical plugs
3. Remove manifold end screws
4. Remove the manifold from the manifold holder and replace it with the
desired manifold
5. Replace the manifold end screws
6. Reconnect the electrical plugs
7. Reconnect air tube
!
16

Replacing Parts
How to replace the HEPA filter
First note the ow direction (arrow) indicated on the lter. Air must ow
from the cylinder and out of the open hole. Unscrew the tube tting from
the lter. Remove thumb nut to open lter clamp and remove the old lter.
Insert new lter into the clamp, making sure the ow direction is correct,
then nger tighten the thumb nut and reconnect tube ttings. We suggest
replacing the HEPA lter at least once a year.
All of the eliquid passes through the HEPA lter which can eventually clog
and limit ow through the system. For extreme users, it may be benecial
to bypass the HEPA lter and exhaust directly into a fume hood.
17

Accessories & Replacement Part List
AutoMate Scientic oers a number of products which complement the
EcigAero™.
Part No. Item
19-4-R EcigAero Rodent aerosol exposure apparatus
Order one or more E-Cig manifolds separately:
E-Cig Manifolds
19-J EcigAero JUULpod manifold
19-BP EcigAero blu PLUS+ manifold (battery-powered)
19-510 EcigAero Universal "510" thread Horizontal manifold
19-BL EcigAero myblu Liquidpods manifold
19-N 3-jet Collsion Aerosol Nebulizer with direct connections to
cylinder for E-Cig
Accessories:
19-ECS EcigAero Windows Exposure Control Software
01-18w ValveLink8.2 WiFi/digital/manual valve controller
19-H20 Replacement rodent drinking reservoir and sipper tube
19-HEPA Replacement HEPA lter
compressor Quiet air compressor (115 VAC) - 220V also available
18
Table of contents
Popular Medical Equipment manuals by other brands

SinoCastel
SinoCastel IDD-213C user manual

Gima
Gima GIMAled81 instruction manual

inhealth
inhealth Blom-Singer Instructions for use

Acuson Corporation
Acuson Corporation Aspen Service manual

Physiomed
Physiomed PHYSIOMED-IF-Expert Opearting instructions

schwa-medico
schwa-medico TENStem eco basic 104041 instruction manual

Artus
Artus 703S user manual

Weinmann
Weinmann homecare SOMNOcomfort 2 Servicing and Repair Instructions

Stiga
Stiga PROTECTION SET COMFORT JR instruction manual

Amico
Amico S-M-100 Operation & maintenance manual

Ambu
Ambu aScope 4 Broncho Series Instructions for use

SPIRIVA
SPIRIVA Respimat Instructions for use