AutoMedx SAVe II Assembly Instructions

Operating and
Maintaining the
SAVe II and SAVe II+
There are two training videos online.
SAVe II Setup: https://www.youtube.com/watch?v=T0Wfiw4OaGc
SAVe II Alarms: https://www.youtube.com/watch?v=avN1IDeBBdo
TD-0008, Rev. C
4/23/2021
© AutoMedx, LLC
•Using a Bag Valve Mask (BVM) for patient completely incapacitates a medic
from performing other critical duties
•Bagging in high stress environments has been linked to hyperventilation
which increases intrathoracic pressure. This can speed up the rate of a
bleed and has been shown to raise ICP and cause secondary brain injury in
TBI patients

Improves triage capabilities by permitting medic to treat other injuries, assist other
patients, start fluids, administer drugs, help with the evacuation or re-engage.
Removes the guesswork and operator error associated with bagging

SAVe II / II+ Operation
Extreme Functional Simplicity
4

Tidal Volume is based on ARDSnet
By selecting the height of the patient, the SAVe II dials in a lung protective,
ARDSnet based TV of 6mL/Kg of ideal body weight. The Respiratory Rate is set
to target a minute volume between 5-6.6 LPM depending on the height of the
patient. This keeps mean intrathoracic pressure low
ADULT
HEIGHT
(FT’ IN”)
TIDAL
VOLUME
(mL)
RR
(BPM)
MINUTE
VOLUME
(LPM)
PIP
(cmH2O)
PEEP
(cmH2O)
4’ 3” 250 20 5 30 0
4’ 6” 250 21 5.3 30 0
4’ 9” 260 21 5.5 30 0
5’ 0” 300 20 6.0 30 0
5’ 3” 340 18 6.1 30 0
5’ 6” 380 16 6.1 30 0
5’ 9” 420 15 6.3 30 0
6’ 0” 470 14 6.6 30 0
6’ 3” 510 13 6.6 30 0
The preset values for each height were calculated using 6 mL/Kg of a male patient’s ideal body weight (IBW). If you use the
presets females will receive on average 6.5 mL/Kg of ideal body weight. A look up chart on the bottom of the device will help the
operator fine tune the volume. The presets do not go below 250 mL so patients at 4’3” and 4’6” are receiving higher relative tidal
volumes 6mL/Kg.
5
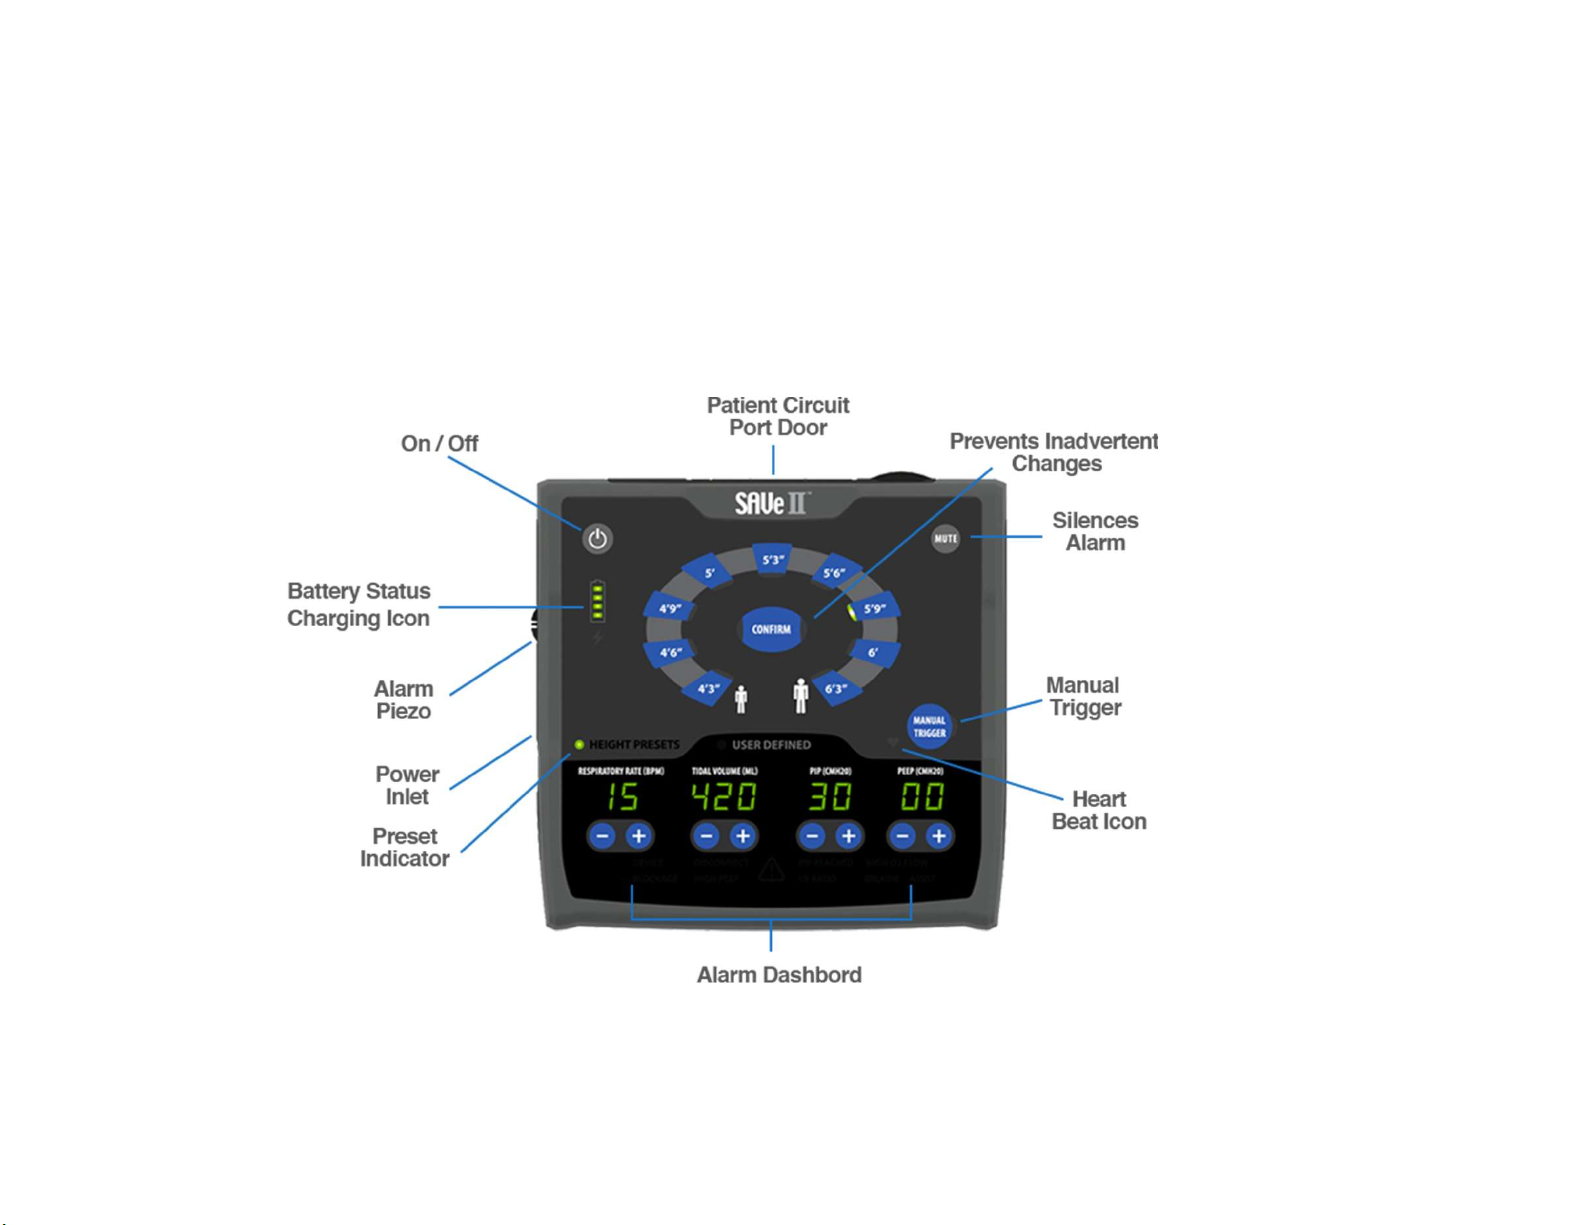
SAVe II/II+ Overview
6

Setup Instructions
Setup instructions can be found on the bottom of the device
Step A – Look, listen & feel
Step B – Clear airway
Step 1 – Insert airway or connect mask
Step 2 - Connect breathing circuit to device
Step 3 – Turn on SAVe II
Step 4 – Connect breathing circuit to airway
Step 5 – Verify chest rise. Monitor Alarms
Step 6 – If desired, connect low pressure O2
7

Step 1 – Insert Airway
The use of an ET tube, surgical or
supraglottic airway is preferred over a
mask. This will help reduce the risk of
airway collapse or leakage around the
seal of the mask. If this can’t be done,
immediately ventilate with a mask until
an airway can be inserted.
Tip: It isn’t always possible to immediately insert an airway. Consider training others on your team on
how to perform a head tilt or jaw thrust and two-handed mask seal to buy time while you stop massive
hemorrhaging or perform other critical duties.
8

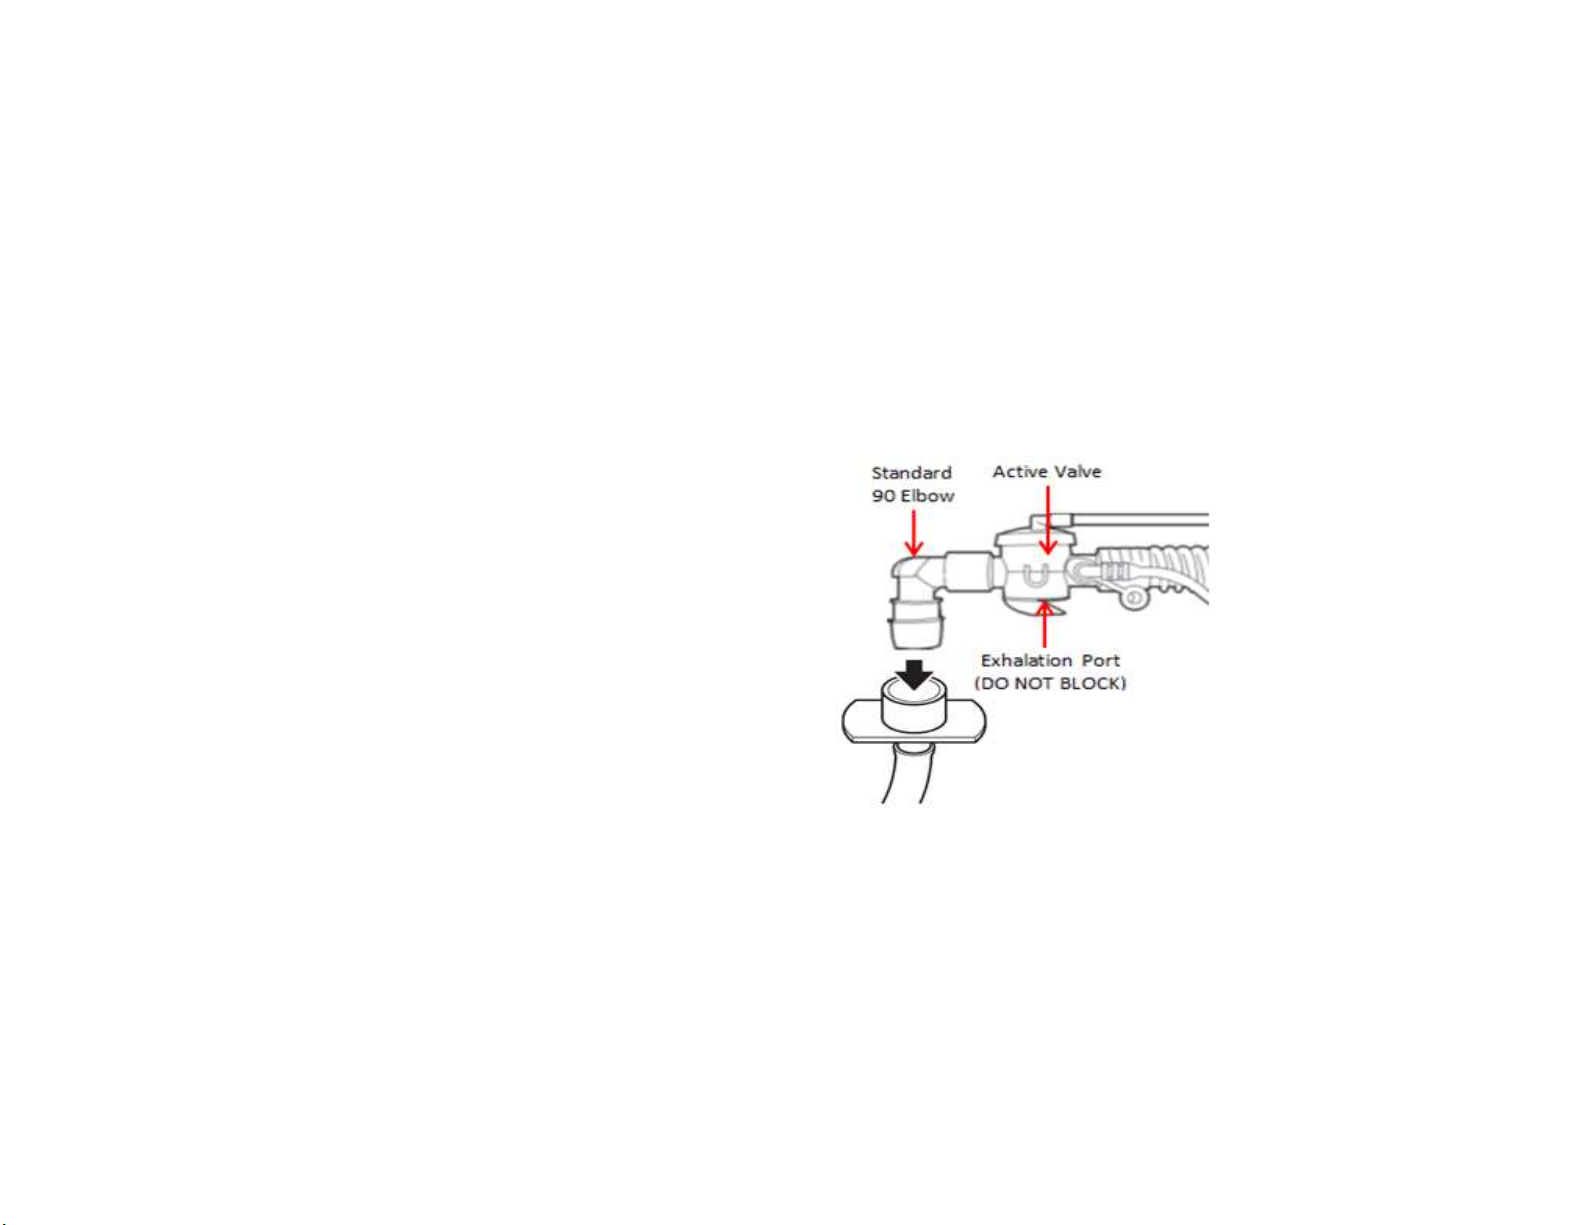
Step 2 – Connect Breathing Circuit
•Open port cover and connect all 3 tubes as pictured
•To minimize the chances of connecting the smaller tubes incorrectly, the
tubes and the ports have been made different sizes. Smaller blue tube
goes on blue color port.
Tip: Practice until you can pull out and fully deploy the SAVe II with a mask in less than 20 seconds.
Consider teaching Combat Lifesavers or others on your team how to head tilt or jaw thrust and hold a
two-handed mask seal. This could buy time while you stop massive hemorrhage.
9
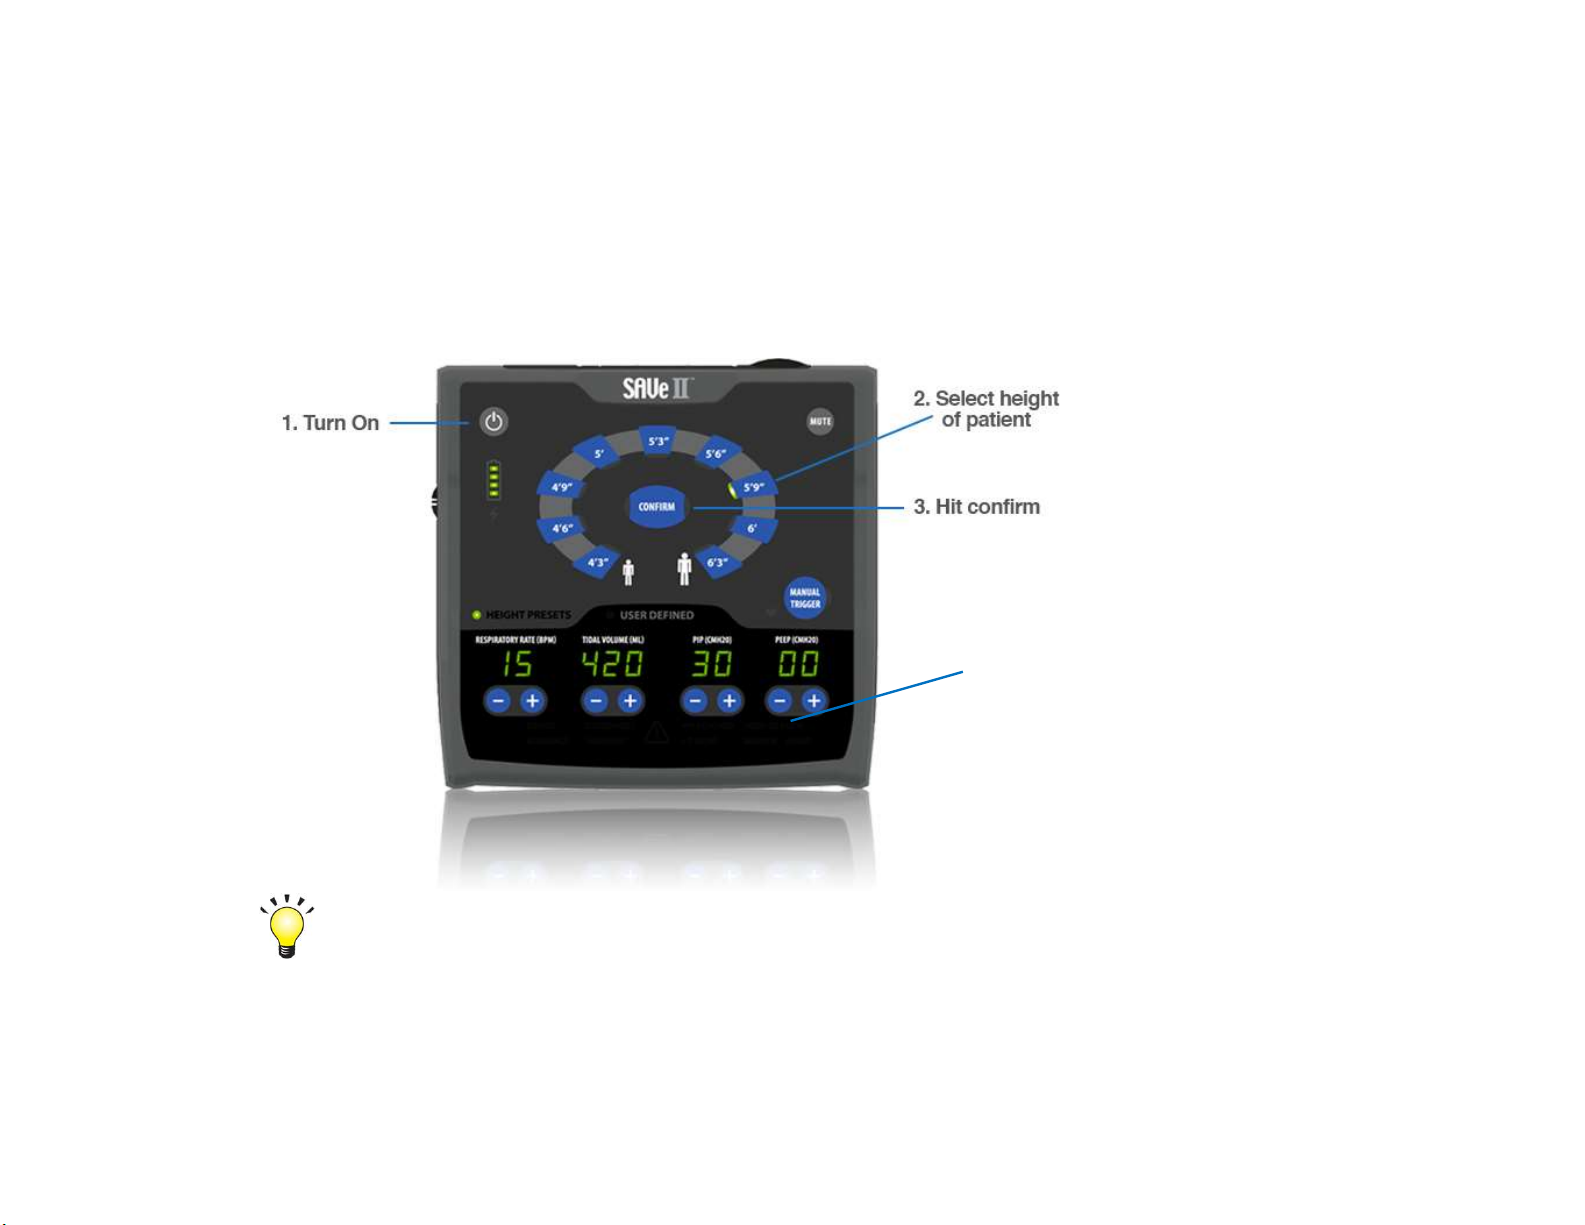
Step 3 – Turn on SAVe II
Tip: Once the alarm is resolved, the sound will cease, and the flashing alarm indicator will remain solid
for 30 seconds. Practice setting up the device regularly so that when its not a drill you remember that
initially the alarms are supposed to sound.
4. Verify Disconnect alarm
and then block patient-end
of breathing circuit and
verify PIP Reached alarm
10
Disconnect PIP Reached
Step 4 – Connect Breathing Circuit to Airway
Connect the other end of the
breathing circuit to the airway
device or mask.
11

Step 5 – Verify chest rise. Monitor Alarms
1. Verify adequate chest rise
2. Use look up table on the back of the
device to make any needed fine
adjustments
3. Continue to monitor alarms
12
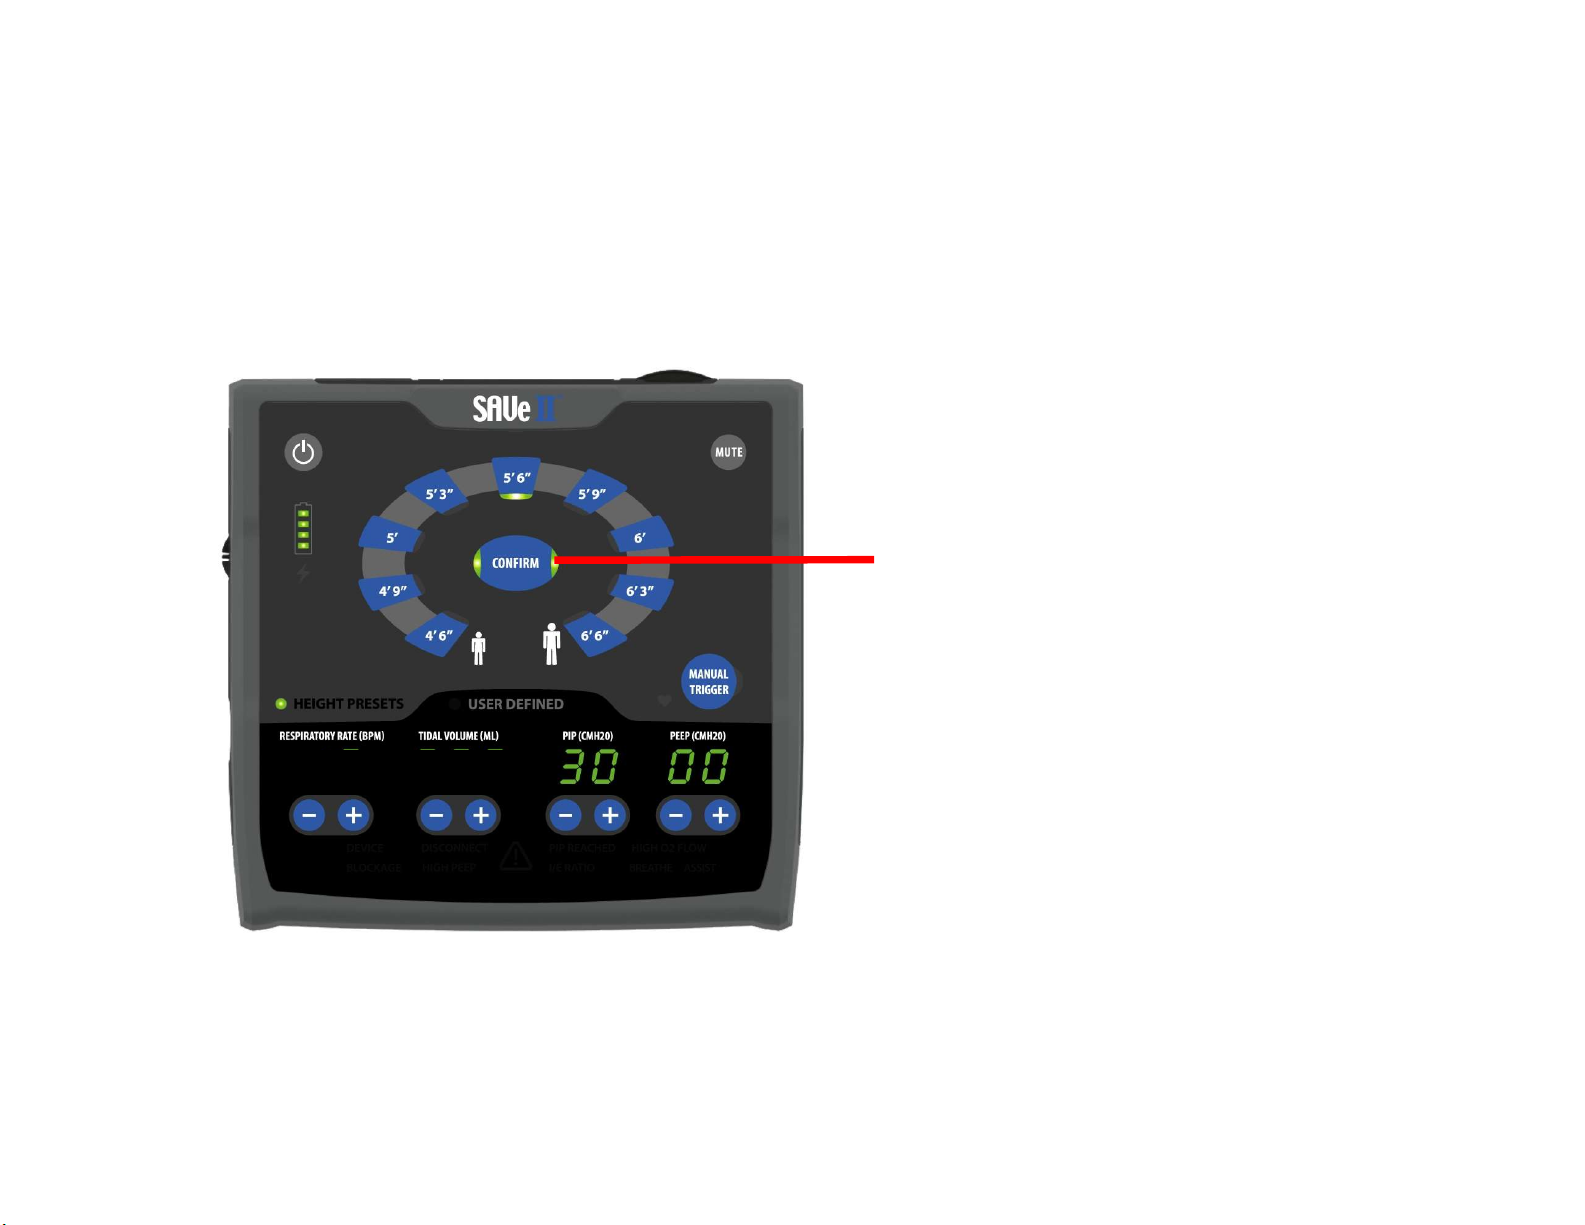
Step 5 – Verify chest rise. Monitor Alarms
To Monitor Pressure Simply
hit the Confirm button during
normal operation to see the
peak pressure of the last
breath
13
Note: requires software version 1.0.4 or
later. Standard on all SAVe II+ units.
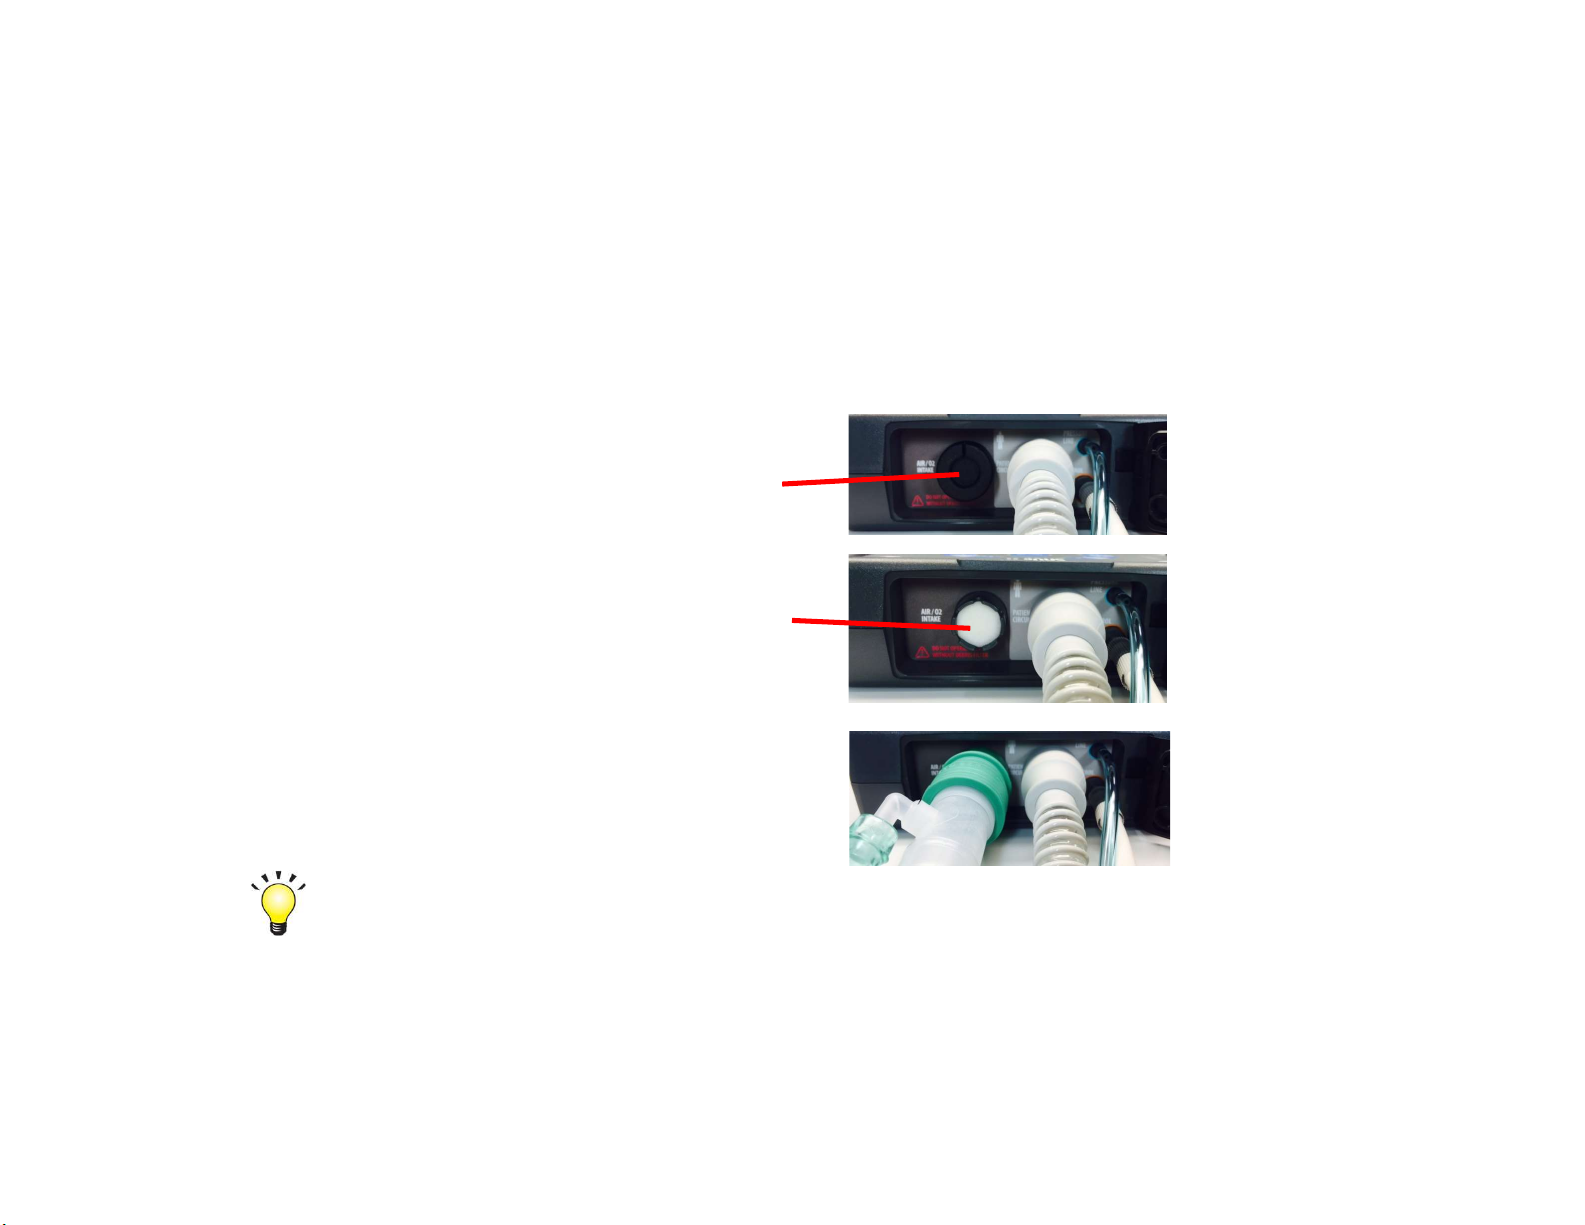
Step 6 – If desired, connect low pressure O2
via reservoir connector
1. Remove port cap
(Port cap provides extra protection to
the filter. It should remain in place
unless the reservoir tube or the
attenuator are in use)
2. Do not remove filter
(Do not run the device without a
filter(s) in place as sand or dirt may
get into compressor)
3. Attach collapsible
reservoir tube and fully
extend
Tip: If you aren’t using supplemental O2 you may want to connect the attenuator instead of the reservoir
tube. It will significantly reduce the sounds of the ventilator. The reservoir tube and attenuator are reusable.
14

Step 6 – If desired, connect low pressure O2
via reservoir connector
Note: this table is in the Operator’s Manual
All but the smallest default height values result in a minute volume of around 6 LPM so
focus on the highlighted values
15
Minute Volume: 2L 3L 4L 5L 6L 7L 8L
O2Flow Rate:
160 47 40 36 33 31 30
2100 74 60 52 46 43 40
3100 100 80 68 59 54 50
4100 100 100 84 74 66 60
5100 100 100 100 87 77 70
6100 100 100 100 100 89 80
7100 100 100 100 100 100 90
8100 100 100 100 100 100 100
9100 100 100 100 100 100 100
The amount of Supplement O2required to achieve a desired FIO2is determined
by the minute volume being delivered to the patient. For instance, at 5’9” the
default setting is to deliver 420 mL at a rate of 15 BPM. That is a minute volume
of 6.3 LPM. As such by adjusting the O2source to deliver 3 LPM would achieve an
FIO2of around 59%. To get near 100%, deliver 6 LPM of supplemental O2.

Troubleshooting

Device Disconnect PIP Reached
Battery High PEEP High MV Breath Assist
!
Alarm Overview
Alarm Dashboard
(visual)
Piezo
(sound)
Silences alarm
for 2 minutes
17
?
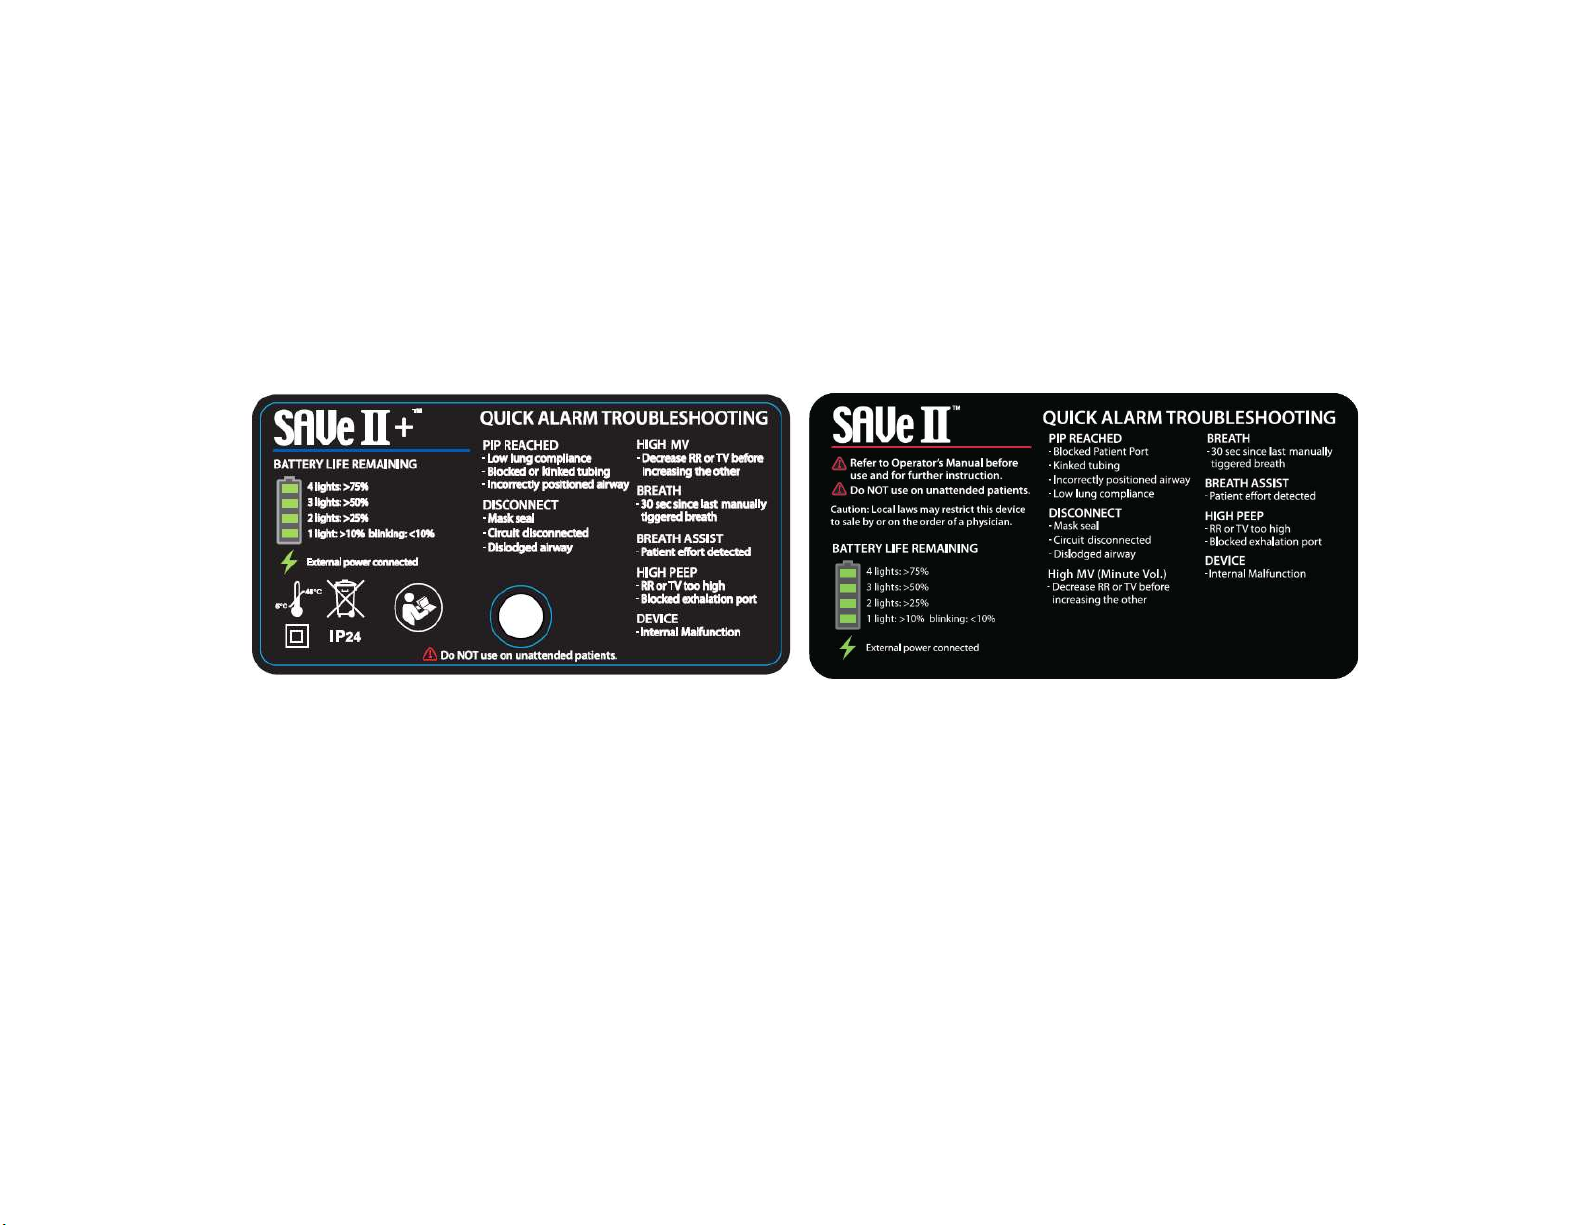
Alarm Troubleshooting Guide
18
Located on back of the device.
More details on alarm causes and resolution are
available in the Operator’s Manual.

?
Alarm Potential Cause Solution
Disconnect Inadequately connected circuit
tubing
Inadequate seal between patient
and airway
Leak in Patient Breathing Circuit
1. Verify Patient Circuit tubing connections to SAVe II
control unit and airway
2. Verify airway is tightly sealed to patient. Adjust seal
pressure if necessary.
3. Replace patient circuit (if available)
4. Ventilate by alternative means
5. If 3 and 4 are not possible, listen/feel patient circuit
for leaks. Patch leak if found.
PIP
Reached
Obstructed airway – Vomitus or
blood in airway or patient circuit
Low lung compliance / High airway
resistance / Excessive Tidal Volume
for size of patient
1. Verify patient circuit does not have kinks
2. Verify correct placement of airway and that it is
clear of obstructions. (see pg. 36 for instructions on
clearing debris)
3. Verify PIP limit and TV setting are appropriate
4. Verify patient does not have a tension
pneumothorax
Alarms
19

?
Alarm Potential Cause Solution
Battery Low battery
-At 15% last battery LED flashes and
low priority alarm sounds for 30 seconds
- At 10% last battery LED flashes and
med priority alarm sounds for 30 seconds
- At 5%, BATTERY indicator flashes and
high priority alarm sounds
- At 2% stops delivering breaths and
continues high priority alarm sounds
1. Connect device to external power if available
Breath
Assist
Spontaneous breath 1. If patient is not synchronizing with ventilator consider
removing patient from ventilator if patient is able to
breathe adequately on their own
2. If performing chest compressions, consider putting
the ventilator into MASK CPR Mode . We are going
to suggest they go from ALS to BLS CPR?
Device Internal malfunction
Battery temperature above 60°C
1. Turn device off then on to clear transient alarm
2. If alarm not cleared ventilate by alternative means
3. Allow unit to cool down and retry
Alarms
20
Other manuals for SAVe II
1
This manual suits for next models
1
Table of contents
Other AutoMedx Medical Equipment manuals


