Autostyle CITY BIKE DELUXE User manual

CITY BIKE
DELUXE
EN Instructions
NL Handleiding
FR Manuel
DE Anleitung
26’’ - BI 18002873
28’’ - BI 18002880


- 1 -
5
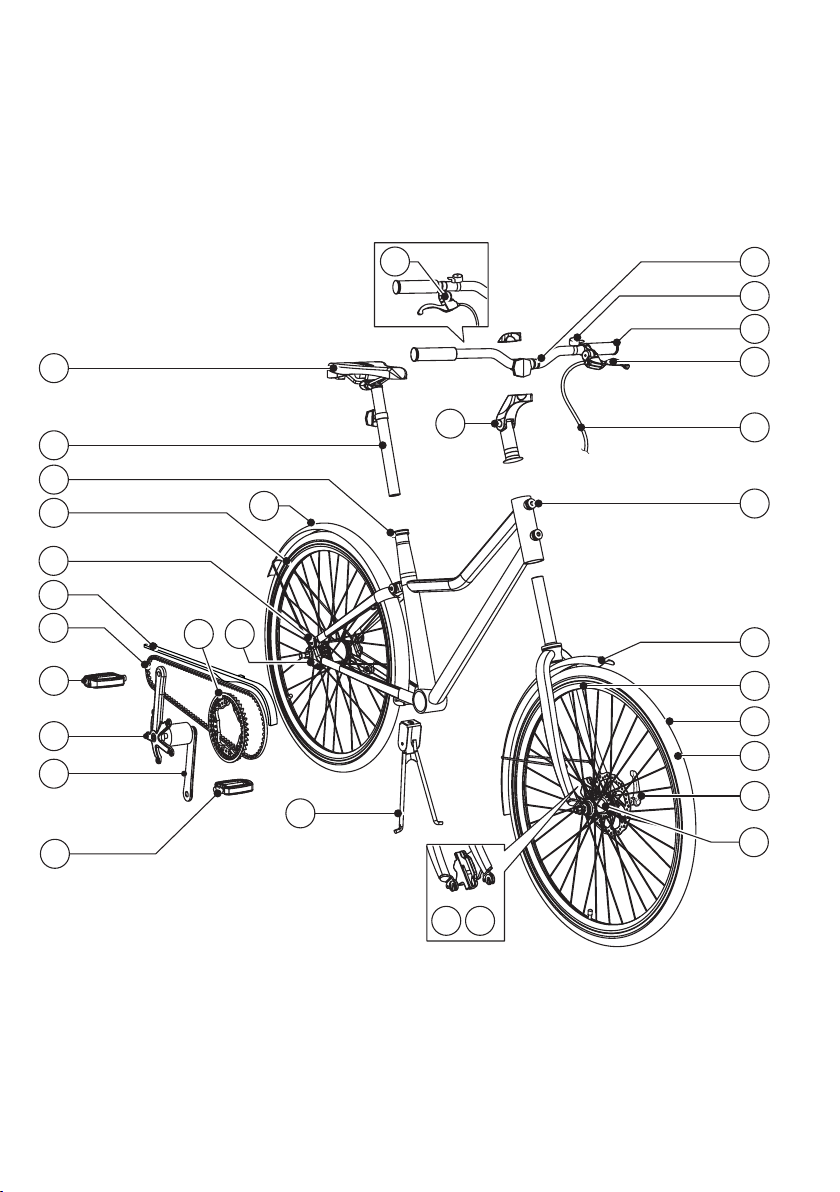
1 ICOMP knob connection and washer short (S:146902, W:146968)
2 ICOMP knob connection and washer long (S:147927, W:146968)
3 Handle bar (naked) (151271)
4 Grip (151278)
5 Handle bar stem with screws (151279)
6 Brake cable, complete (28”:151333, 26”:151340)
7 Left brake lever with bell (screw and adjuster included) (151280)
8 Right brake lever with/without bell (screw and adjuster included) (151281)
9 Bell (151282)
10 Tyre (28”:151343, 26”:151344)
11 Inner tube with valve (28”:151316, 26”:151331)
12 Brake disc with 6 screws (151346)
13 Brake pads, with spring and lock pin (152505)
14 Brake caliper with screws (152504)
15 Saddle (STD:151347, NA:152541)
16 Seat post (28”:151348, 26:151354)
17 Seat post clamp with screw (151355)
18 Front and rear sprockets (28”:151357, 26”:151358)
19 Drive belt (151356)
20 Belt protection (28”:151359, 26:151361)
21 Front wheel, complete. With rim tape. With/without inner-tube, tyre, brake-disc, reectives
(28”:151284, 26”:151317)
22 Rear wheel, complete. With rim tape, nuts. With/without inner-tube, tyre, reectives, sprocket
(28”:152507, 26”:151365)
23 Mud guards, complete. Front and rear, with screws (28:151366, 26:151368)
24 Kick stand (28:151370 26:151371)
25 Quick release front wheel, complete (152508)
26 Pedal with reector (STD:151364, AU:152506)
27 Crank right (151362)
28 Crank left (151363)
2. BIKE PARTS & COMPONENTS
1
11
21
23
12
10
25
2
4
3
9
8
6
7
5
1314
15
16
17
22
18
18
24
19
20
26
26
27
28
23
15
16
17
22
2
20
19 18 18
23
26
26
24
14 13
12
25
11
10
21
23
1
6
7
4
9
3
5
8
27
28
PARTS OVERVIEW | ONDERDELEN OVERZICHT | APERÇU DES PIÈCES |
TEILEÜBERSICHT

- 2 -
1. Knob connection and
washer short
Vergrendelpen met
borgring, kort
Vis et rondelle
ICOMP, court
Integrierte Griffverb-
indung und Unterleg-
scheiben, kurz
2. Knob connection and
washer long
Vergrendelpen met
borgring, lang
Vis et rondelle
ICOMP, long
Integrierte Griffverb-
indung und Unterleg-
scheiben, lang
3. Handle bar (naked)
Stuur (kaal)
Guidon (dénudé)
Lenker (Kahl)
4. Grip
Handvat
Poignée
Handgriffe
5. Handle bar stem with
screws
Stuurpen met schroeven
Potence avec vis
Lenkerrohr mit
Schrauben
6. Brake cable, complete
Remkabel, complete
Câble de frein, kit
complet
Bremszug komplett
7. Left brake lever with
bell (screw and adjus-
ter included)
Linker remhendel met
bel (inclusief schroef en
versteller)
Levier de frein gauche
avec sonnette (vis et vis
de réglage incluses)
Handbremszug links mit
Klingel (Schraube und
Beschlag beiliegend)
8. Right brake lever
with/without bell
(screw and adjuster
included)
Rechter remhendel met/
zonder bel (inclusief
schroef en versteller)
Levier de frein droit
avec/sans sonnette
(vis et vis de réglage
incluses)
Handbremszug rechts
mit/ohne Klingel
(Schraube und Beschlag
beiliegend)
9. Bell
Bel
Sonnette
Klingel
10. Tyre
Band
Pneu
Reifen
11. Inner tube with valve
Binnenband met ventiel
Chambre à air avec valve
Schlauch mit Ventil
12. Brake disc with 6
screws
Remschrijf met
6 schroeven
Disque de frein
avec 6 vis
Bremsscheibe mit
6 Schrauben
13. Brake pads, with
spring and lock pin
Remblokken, met
veerbelaste pin
Garnitures de frein,
avec ressort et tige
de blocage
Bremsbelag mit
Verschlussfeder und
Sperrstift
14. Brake caliper with
screws
Remblokhouder met
schroeven
Étrier de frein avec vis
Bremssattel mit
Schraube
15. Saddle
Zadel
Selle
Sattel
16. Seat post
Zadelpen
Tige de selle
Sattelstütze
17. Seat post clamp
with screw
Zadelpenklem met
schroef
Collier de tige de selle
avec vis
Klemme für Sattelstütze
mit Schraube
18. Front and rear
sprockets
Voor- en achtertandwiel
Pignons roues avant
et arrière
Vorderes und hinteres
Ritzel
19. Drive belt
Aandrijfriem
Courroie de transmission
Antriebsriemen
20. Belt protection
Riembescherming
Carter de la courroie
Riemenschutz
21. Front wheel, com-
plete. With rim tape.
With/without inner-tu-
be, tyre, brake-disc,
reflectives
Voorwiel, compleet.
Met velglint. Met/zon-
der binnenband, band,
schijfrem, reflectoren.
Roue avant, dispositif
complet. Avec bande
adhésive. Avec/sans
chambre à air, pneu,
disque de frein, élé-
ments réfléchissants
Vorderrad, komplett. Mit
Felgenband. Mit/ohne
Schlauch, Reifen
22. Rear wheel, complete.
With rim tape, nuts.
With/without inner-tu-
be, tyre, reflectives,
sprocket
Achterwiel, compleet.
Met velglint, moeren.
Met/zonder binnenband,
band, reflectoren,
tandwiel.
Roue arrière, dispo-
sitif complet. Avec
bande adhésive, écrous.
Avec/sans chambre
à air, pneu, éléments
réfléchissants, pignon
Hinterrad, komplett. Mit
Felgenband, Muttern.
Mit/ohne Schlauch
23. Mud guards, com-
plete. Front and
rear, with screws
(28:151366, 26:151368)
Spatborden, compleet.
Voor en achter, met
schroeven
Garde-boue, dispositif
complet. Avant et arriè-
re, avec vis
Schutzbleche, komplett.
Hinten und vorne, mit
Schrauben
24. Kick stand (28:151370
26:151371)
Dubbele standaard
Béquille
Fahrradständer
25. Quick release front
wheel, complete
(152508)
Snelspanner voorwiel,
compleet
Attache rapide roue
avant, dispositif complet
Schnellspanner Vorder-
rad, komplett
26. Pedal with reflec-
tor (STD:151364,
AU:152506)
Trapper met reflector
Pédale avec élément
réfléchissant
Pedale mit Reflex
27. Crank right (151362)
Crank rechts
Manivelle, droite
Pedalarm rechts
28. Crank left (151363)
Crank links
Manivelle, gauche
Pedalarm links

- 3 -
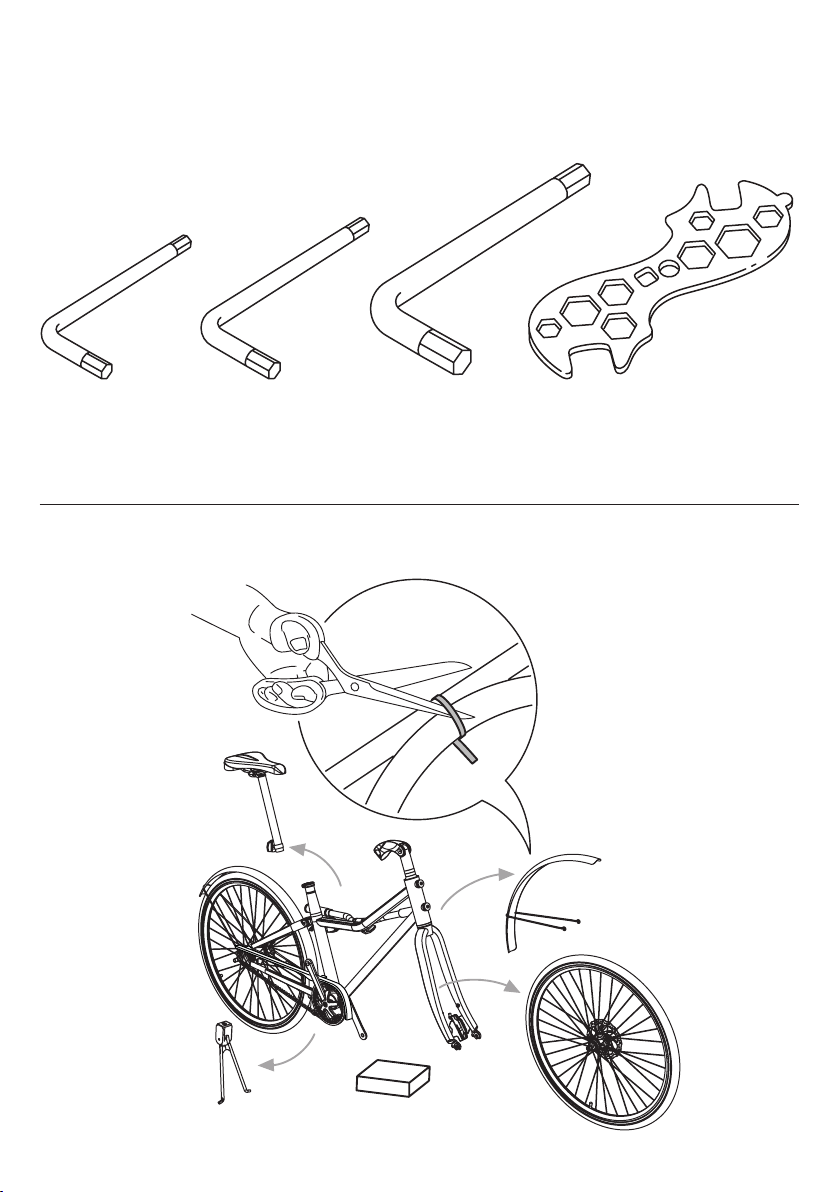
INSTALLATION INSTRUCTIONS | INSTALLATIE INSTRUCTIES | INSTRUCTIONS
D’INSTALLATION | INSTALLATIONSHINWEIS
6
3. ASSEMBLE YOUR BIKE
1x 1x 1x1x
100092
108490
152131
151753
6
3. ASSEMBLE YOUR BIKE
1x 1x 1x1x
100092
108490
152131
151753
1x
1
1x 1x 1x

- 4 -
2
3
7
100092
5Nm
152131
20Nm
7
100092
5Nm
152131
20Nm
i

- 5 -
7
100092
5Nm
152131
20Nm
4

- 6 -
5
8
100092
4Nm
2x
4Nm
6
8
100092
4Nm
2x
4Nm

- 7 -
8
100092
4Nm
2x
4Nm
7
8
i

- 8 -
9
9

- 9 -
9
10
!

- 10 -
11
10
100092
100092
10Nm
12Nm
108490

- 11 -
12
10
100092
100092
10Nm
12Nm
108490

- 12 -
13
EN: A low positioned handlebar will give you more of a
“racing” position, which is comfortable if you are
cycling longer distances and makes it easier to go
fast since wind resistance decreases. But it also
puts more pressure on your wrists and limits your
ability to see behind you and to the side.
A high positioned handlebar will give you more of
a “classic” riding posture, where you have the best
visibility of traffic around you. This posture is also
better when riding with a child in the child seat
as it allows better contact between you. It does
however make cycling uphill a little more difficult.
NL: Met een laag stuur zit je meer in een soort racehou-
ding op je fiets. Dat is prettig als je langere afstanden
fietst en je gaat sneller omdat je minder last hebt van
luchtweerstand. Maar deze houding is wel belastender
voor je polsen en je kan minder goed achterom en
naast je kijken.
Met een hoog stuur zit je meer in een soort klassieke
fietshouding op de fiets. In deze houding heb je het beste
overzicht op het omringende verkeer. Deze houding is
ook beter als je een kind in een kinderzitje op de fiets hebt
omdat je zo beter met elkaar in contact staat. Heuvel op
fietsen, is in deze houding wel een stukje zwaarder.
FR : Un guidon monté bas permet d’adopter une position de
coureur cycliste ce qui est confortable pour parcourir de
longues distances et permet d’aller plus vite du fait d’une
prise au vent réduite. En revanche les poignets sont
davantage sollicités et la capacité à regarder derrière soi
et sur le côté est limitée.
Un guidon monté haut permet d’adopter une position
plus classique avec une meilleure visibilité sur la circu-
lation alentours. Cette position est préférable quand on
transporte un enfant du fait d’un meilleur contact entre
les personnes. Monter des côtes s’avère cependant plus
difficile dans cette position.
DE: Ein niedrig angebrachter Lenker führt zu einer etwas
nach vorne gebeugten Rennradlerhaltung. Das ist auf
langen Strecken bequem und erleichtert das schnelle
Fahren, da der Windwiderstand geringer ist. Doch es
belastet auch die Handgelenke mehr und vermindert die
Möglichkeit, nach hinten und nach der Seite zu schauen.
Ein höher angebrachter Lenker führt zu einer klassisch
aufrechten Sitzposition beim Radfahren mit besserer
Übersicht im Straßenverkehr (als bei niedrig angebrach-
tem Lenker). Diese Position erleichtert die Kommunika-
tion, wenn man ein Kind im Kindersitz dabei hat. Beim
Radeln bergauf muss man sich mehr anstrengen.
11
A low positioned handlebar will give you
more of a “racing” position, which is comfortable
if you are cycling longer distances and makes it
easier to go fast since wind resistance decreas-
es. But it also puts more pressure on your wrists
and limits your ability to see behind you and to
the side.
A high positioned handlebar will give you
more of a “classic” riding posture, where you
have the best visibility of trafc around you. This
posture is also better when riding with a child in
the child seat as it allows better contact between
you. It does however make cycling uphill a little
more difcult.
108490
17Nm
108490

- 13 -
14
11
A low positioned handlebar will give you
more of a “racing” position, which is comfortable
if you are cycling longer distances and makes it
easier to go fast since wind resistance decreas-
es. But it also puts more pressure on your wrists
and limits your ability to see behind you and to
the side.
A high positioned handlebar will give you
more of a “classic” riding posture, where you
have the best visibility of trafc around you. This
posture is also better when riding with a child in
the child seat as it allows better contact between
you. It does however make cycling uphill a little
more difcult.
108490
17Nm
108490
!

- 14 -
15
16
12
R
20Nm
151753
L
151753
20Nm
12
R
20Nm
151753
L
151753
20Nm

- 15 -
TESTING THE BICYCLE, SAFETY AND MAINTENANCE | TESTEN VAN DE FIETS +
SAFETY & MAINTENANCE | TEST DU VÉLO, SÉCURITÉ ET ENTRETIEN | TESTEN DES
FAHRRADS, SICHERHEIT UND WARTUNG
Before riding your bicycle you should perform a
safety check on level ground and away from heavy
traffic. It is important that you ensure all parts
are fastened and working properly and that you
are familiar with the controls and features of your
bike, such as the rear wheel coaster brake and
automatic gears. There are two gears that shift
automatically depending on the speed at which
you are cycling.
1. CHECK THE TYRES
Make sure that the tyres are inflated to the re-
commended pressure limit using a tyre pump with
a gauge. The pressure should not exceed the re-
commended limit as stated on the tyre. It is better
to use a hand or foot pump rather than a service
station pump as over inflation can cause the tyre
to blow out.
2. CHECK THE SADDLE
Make sure that the saddle is in line with the centre
of the bike and that the handlebar is at 90 degrees
to the wheel. Check that it is tightened sufficiently
so that it will not twist out of alignment.
3. CHECK THE BRAKES
Check that the front wheel brake is working
properly. Ride the bike at slow speed and apply
the front wheel brake using the hand lever. The
bike should come to an immediate stop. Make sure
you can apply full braking force on the hand brake
without the brake lever touching the handlebar. If
not, your brakes may need adjusting. Do not test
the full braking force when riding at fast speed
since it can cause your front wheel to stop turning
and your bike to flip over.
Check that the rear wheel coaster brake is working
properly. Start with the pedal cranks in an almost
horizontal position, and apply pressure downwards
on the back pedal. The more pressure you apply,
the greater the braking force.
Please note that the brake lever on the handle bar
controls the front wheel brake and the coaster bra-
ke controls the rear wheel brake.
4. CHECK REFLECTORS, LIGHTS AND ACCESSO-
RIES
Check that reflectors are positioned correctly.
Make sure that your front and rear lights and any
other accessories are working properly. Test the
bell on the handlebar.
WARNING: As with all mechanical components,
the bicycle is subjected to wear and high stress.
Different materials and components may react
to wear or stress fatigue in different ways. If the
design life of a component has been exceeded, it
may suddenly fail possibly causing injuries to the
rider. Any form of cracks, scratches or change of
colouring in highly stressed areas indicate that
the life of the component has been reached and it
should be replaced.
Voordat je met de fiets gaat rijden, dien je altijd eerst
een veiligheidscheck te doen op een vlakke ondergrond
en op een plek waar niet veel verkeer is. Het is be-
langrijk dat je goed controleert of alle onderdelen goed
vastzitten en juist functioneren. Zorg ook dat je goed
weet hoe je de fiets moet bedienen en hoe alles werkt,
zoals de terugtraprem en de automatische versnellin-
gen. De fiets heeft twee versnellingen die automatisch
schakelen, afhankelijk van hoe hard je gaat.
1. TEST DE BANDEN
Zorg dat de banden de juiste bandenspanning hebben.
Dat kan je het beste doen door een fietspomp met een
drukmeter te gebruiken. Pomp de banden niet harder
op dan de maximale bandenspanning zoals vermeld op
de band. Je kan het beste een hand- of een voetpomp
gebruiken in plaats van een luchtpomp bij een tanksta-
tion. Als je de band te hard oppompt, kan hij namelijk
klappen.
2. CONTROLEER HET ZADEL
Zorg dat het zadel loodrecht op het centrum van de
fiets staat en dat het stuur in een hoek van 90 graden
op het wiel staat. Controleer of het stuur goed vastzit,
zodat het niet kan gaan draaien.
3. CONTROLEER DE REMMEN
Controleer of de voorrem goed werkt. Rij langzaam een
stukje op de fiets en knijp de remhendel in. De fiets
moet in dat geval onmid-dellijk tot stilstand komen.
Zorg dat je met alle kracht kan remmen zonder dat
de remhendel het stuur raakt. Als dat niet lukt, is het
wellicht zaak om je remmen opnieuw af te stellen. Test
de volledige remkracht niet als je hard fietst. Je voorwiel
kan blokkeren waardoor je fiets over de kop kan gaan.
Controleer of de terugtraprem goed werkt. Zet de
trappers bijna horizontaal en zet kracht op de achterste
trapper. Hoe meer kracht je zet, hoe groter de rem-
kracht.
Merk op dat de handrem op het stuur het voorwiel remt
en de terugtraprem het achterwiel.
4. CONTROLEER REFLECTOREN, VERLICHTING
EN TOEBEHOREN
Controleer of de reflectoren op de juiste positie zitten.
Controleer of je voor- en achterlicht werken en dat alle
andere accessoires ook juist functioneren. Test de bel
op het stuur.
WAARSCHUWING: Net als voor alle mechanische
onderdelen geldt ook voor deze fiets dat hij onderhevig
is aan slijtage en hoge belast-ing. Verschillende mate-
rialen kunnen anders reageren op slijtage of belasting.
Als de levensduur van een onderdeel is verstreken, kan
het opeens niet meer goed functioneren en dat kan tot
letsel bij de fietser leiden. Elke breuk, kras of verkleuring
op zwaar belaste plekken vormt een indicatie dat de
levensduur van het onderdeel is bereikt en dat het tijd is
om het te vervangen.

- 16 -
Avant d’utiliser votre vélo, faites un test sur un terrain
plat, à l’écart de la circulation. Il est im¬portant de
s’assurer que toutes les pièces sont bien fixées, que le
vélo fonctionne correcte¬ment, et que vous maîtrisez
les commandes et connaissez les caractéristiques de
votre vélo, comme le freinage par rétropédalage et le
changement de vitesses automatique. Le changement
des deux vitesses du vélo se fait automatiquement en
fonction de la vitesse à laquelle vous pédalez.
1. VÉRIFIER LES PNEUS
Assurez-vous que les pneus sont gonflés con¬formé-
ment à la pression recommandée. Utilisez pour cela une
pompe à vélo équipée d’un manomètre. La pression ne
doit pas dépasser la limite recommandée indiquée sur
le pneu. Il est préférable d’utiliser une pompe à main
ou à pied plutôt qu’un compresseur de station-ser-vice,
en raison du risque de surgonflage qui pourrait faire
exploser le pneu.
2. VÉRIFIER LA SELLE
Assurez-vous que la selle est bien dans l’aligne¬ment
du cadre du vélo et que le guidon forme un angle à 90°
par rapport aux roues. Vérifiez que les fixations sont as-
sez serrées pour éviter toute déviation de l’alignement.
3. VÉRIFIER LES FREINS
Vérifiez que le frein de la roue avant fonc¬tionne cor-
rectement. Roulez à faible vitesse et testez le frein de
la roue avant à l’aide du levier de frein manuel. Le vélo
doit s’arrêter immédiatement. Assurez-vous que le levier
de frein ne touche pas le guidon quand vous le serrez
au maximum. Si tel n’est pas le cas, il est indispensable
de procéder à un réglage. Ne testez pas le freinage
maximum quand vous roulez à grande vitesse car la
roue avant cesse alors de tourner et le vélo peut se
retourner.
Vérifiez que le frein de la roue arrière par rétropédalage
fonctionne correctement. Commencez au moment où
les manivelles du pédalier sont en position horizontale,
et appliquez une pression vers le bas sur la pédale
arrière. Plus la pression est forte plus la puis¬sance
de freinage est importante. Notez que le levier de frein
situé sur le guidon commande le frein de la roue avant
et que le rétropédalage commande le frein de la roue
arrière.
4. VÉRIFIER RÉFLÉCHISSANTS, FEUX ET ACCES-
SOIRES
Vérifiez que les éléments réfléchissants sont correc-
tement positionnés. Assurez-vous que vos feux avant
et arrière et tous les autres accessoires fonctionnent
correctement. Testez la sonnette fixée sur le guidon.
ATTENTION : Comme c’est le cas pour toutes les piè-
ces mécaniques, les pièces de votre vélo sont soumises
à l’usure et à de fortes contraint¬es. Les matériaux et
les pièces sont différents et réagissent différemment à
l’usure et aux contraintes répétées. Quand la fin de la
durée de vie d’une pièce est dépassée, elle peut su¬-
bitement lâcher ou ne plus fonctionner et être la cause
de blessures pour le cycliste. Toute fissure, rayure
ou changement de couleur d’éléments très sollicités
indique que la pièce a atteint la fin de sa durée de vie et
qu’il faut la remplacer.
Bevor mit dem Radfahren begonnen wird, emp¬fiehlt
sich ein Sicherheitstest an einem Platz in ebener Lage
mit wenig Verkehr. Es ist wichtig, dass alle Teile gut und
sicher befestigt sind und ordnungsgemäß funktionie-
ren und dass der Benutzer des Fahrrads sich mit den
Funk¬tionen und der Ausrüstung des Rads wie der
Rücktrittbremse und der Automatikschaltung vertraut
gemacht hat. Das Rad hat zwei Schaltstufen, die ent-
sprechend der gefahrenen Geschwindigkeit automatisch
wechseln.
1. REIFEN TESTEN
Kontrollieren, ob die Reifen ausreichend auf¬gepumpt
sind. Das geht am besten mit einer Luftpumpe mit Ma-
nometer. Der Druck soll die auf dem Reifen angegebene
Grenze nicht überschreiten. Es ist besser, statt einer
autom¬atischen Pumpe eine Hand- oder Fußluftpum¬-
pe zu benutzen, da bei Überdruck der Reifen platzen
könnte.
2. SATTELKONTROLLE
Kontrollieren, ob der Sattel in gerader Linie zum Radmit-
telpunkt ausgerichtet und der Len¬ker im 90°-Winkel zu
den Rädern montiert ist. Sicherstellen, dass Sattel und
Lenker ordentlich festgezogen sind, damit sie sich nicht
aus der eingestellten Position verdrehen.
3. BREMSKONTROLLE
Kontrollieren, dass die Vorderradbremse ord¬nungs-
gemäß funktioniert. Langsam radeln und den Hand-
bremsgriff betätigen. Das Rad muss sofort stehen
bleiben. Kontrollieren, ob mit voller Kraft gebremst
werden kann, ohne dass der Handbremsgriff den Lenker
berührt. Ist das nicht der Fall, müssen die Bremsen
möglicher¬weise reguliert werden. Keine Vollbremsung,
wenn schnell geradelt wird. Dabei könnte das Vorderrad
blockieren und das Fahrrad sich überschlagen.
Kontrollieren, dass die Rücktrittbremse ordnungsgemäß
funktioniert. Dazu die Ped¬ale in fast horizontale Lage
bringen und dann Druck auf das hintere Pedal ausüben.
Je mehr Druck ausgeübt wird, desto stärker ist die
Bremswirkung.
Bitte beachten, dass der Bremsgriff am Lenker das
Vorderrad bremst und der Rücktritt das Hinterrad.
4. REFLEXE, BELEUCHTUNG UND ZUBEHÖR
PRÜFEN
Kontrollieren, dass alle Reflexe an der richtigen Stelle
sitzen. Sicherstellen, dass die vordere und rückwärtige
Beleuchtung sowie alles an¬dere Zubehör ordnungs-
gemäß funktioniert. Die Klingel am Lenker testen.
WARNHINWEIS: Wie alle anderen Produkte mit me-
chanischen Komponenten und Bauteilen ist auch das
Fahrrad Verschleiß und Materialer¬müdung ausgesetzt.
Material und Teile reag¬ieren unterschiedlich auf hohe
Beanspruchung. Wenn die ausgelegte Lebensdauer
eines Bauteils überschritten ist, kann es plötzlich auf-
hören, zu funktionieren und der Benutzer des Rads kann
dadurch zu Schaden kommen. Risse, Sprünge oder
Farbveränderungen in stark beanspruchten Bereichen
können Warnzeichen sein, dass die Verschleißgrenze
des Teils erre¬icht ist und es ausgetauscht werden
muss.

- 17 -
Always wear a bicycle helmet when riding your bike
to reduce the risk of head injuries if you are involved
in a road accident. Make sure your bicycle helmet
fits you properly and that it meets the required safety
standards.
WARNING! This bicycle is intended for use on roads
and bicycle paths and not for performing stunts,
jumps or off-road use. Riding this bike in a way or in
an environment for which it is not suitable may put
you at risk of injury and may damage the bicycle.
Observe your national bicycle laws and regulations
regarding bicycle lighting, riding on pavements/
roads or cycle paths, helmet laws, child carrier laws
and traffic laws. It is your responsibility to be aware
of the laws that are applicable in your country.
After you have ridden your bike the first 20 km
(approx 12 miles) we advise that you once again
check that all screws and fittings are secured, and
re-tighten if necessary.
Increase your visibility by wearing bright clothing or
a reflective vest for cycling in foggy conditions or at
night.
Take extra precautions when you ride in wet weather
since the grip of your tyres are greatly reduced. Ap-
ply your brakes earlier and more gradually than when
riding in dry conditions.
WARNING! Reflectors are not a substitute for requi-
red lights. Riding in dark conditions or at times of
poor visibility without adequate lighting and reflec-
tors is hazardous and may result in serious injury or
death.
Draag altijd een helm tijdens het fietsen om het risico op
hoofdletsel bij een verkeersongeluk te beperken. Zorg dat
de helm de juiste pasvorm heeft en dat hij voldoet aan de
geldende veiligheidsvoorschriften.
WAARSCHUWING! De fiets is bedoeld voor gebruik
op de weg en fietspaden en niet om mee te stunten, te
springen of offroad mee te gaan. Door de fiets voor die
doeleinden te gebruiken of door te fietsen in een onge-
schikte omgeving, loop je het risico op letsel en kan de
fiets beschadigd raken.
Hou je aan de geldende fietswetgeving- en voorschriften
wat betreft fietsverlichting, rijden op trottoirs/wegen of
fietspaden, helmplicht, kinderzitjes en verkeersregels. Het
is je eigen verantwoordelijkheid om je te houden aan de
geldende regels in je land.
Als je 20 kilometer op je nieuwe fiets hebt gereden, advise-
ren we je om nogmaals te controleren of alle schroeven en
bevestigingen goed vastzitten. Draai ze indien nodig aan.
Verhoog je zichtbaarheid door het dragen van felle kleding
of een reflecterend veiligheidshesje tijdens het fietsen in de
mist of in het donker.
Wees extra voorzichtig en begin tijdig met remmen als je
op een nat of rul wegdek fietst, zoals zand of grind.
WAARSCHUWING! Reflectoren zijn geen vervanging van
de noodzakelijke verlichting. Zonder geschikte verlichting
en reflectoren is fietsen in het donker, of wanneer het zicht
slecht is, gevaarlijk en kan leiden tot ernstig letsel of de
dood.
Adjust the saddle to a comfortable height (see
illustration). Test that you have the right height by
sitting on the saddle with your heel on the lower
pedal and your leg fully extended. Your leg should be
almost straight, and if it is too bent you need to raise
the saddle. If it is difficult to reach the lower pedal
comfortably you need to lower the saddle.
Zet het zadel op een comfortabele hoogte (zie afbeelding).
Test of het zadel de juiste hoogte heeft door op het zadel
te gaan zitten met je hiel op de laagste trapper en je been
13
Adjust the saddle to a comfortable height
(see illustration). Test that you have the right
height by sitting on the saddle with your heel
on the lower pedal and your leg fully extended.
Your leg should be almost straight, and if it is
too bent you need to raise the saddle. If it is dif-
cult to reach the lower pedal comfortably you
need to lower the saddle.
Before riding your bicycle you should perform
a safety check on level ground and away from
heavy trafc. It is important that you ensure
all parts are fastened and working properly
and that you are familiar with the controls and
features of your bike, such as the rear wheel
coaster brake and automatic gears. There are
two gears that shift automatically depending on
the speed at which you are cycling.
1. CHECK THE TYRES
Make sure that the tyres are inated to the
recommended pressure limit using a tyre pump
with a gauge. The pressure should not exceed
the recommended limit as stated on the tyre.
It is better to use a hand or foot pump rather
than a service station pump as over ination can
cause the tyre to blow out.
2. CHECK THE SADDLE
Make sure that the saddle is in line with the
centre of the bike and that the handlebar is at
90 degrees to the wheel. Check that it is tight-
ened sufciently so that it will not twist out of
alignment.
3. CHECK THE BRAKES
Check that the front wheel brake is working
properly. Ride the bike at slow speed and apply
the front wheel brake using the hand lever. The
bike should come to an immediate stop. Make
sure you can apply full braking force on the hand
brake without the brake lever touching the han-
dlebar. If not, your brakes may need adjusting.
Do not test the full braking force when riding at
fast speed since it can cause your front wheel to
stop turning and your bike to ip over.
Check that the rear wheel coaster brake is
working properly. Start with the pedal cranks in
an almost horizontal position, and apply pres-
sure downwards on the back pedal. The more
pressure you apply, the greater the braking
force.
Please note that the brake lever on the
handle bar controls the front wheel brake
and the coaster brake controls the rear
wheel brake.
4. CHECK REFLECTORS, LIGHTS AND
ACCESSORIES
Check that reectors are positioned correctly.
Make sure that your front and rear lights and
any other accessories are working properly. Test
the bell on the handlebar.
WARNING: As with all mechanical components,
the bicycle is subjected to wear and high stress.
Different materials and components may react
to wear or stress fatigue in different ways. If the
design life of a component has been exceeded, it
may suddenly fail possibly causing injuries to the
rider. Any form of cracks, scratches or change of
colouring in highly stressed areas indicate that
the life of the component has been reached and
it should be replaced.
4. TEST YOUR BIKE BEFORE RIDING
14
5. FOR YOUR SAFETY
• Always wear a bicycle helmet when riding
your bike to reduce the risk of head injuries
if you are involved in a road accident. Make
sure your bicycle helmet ts you properly
and that it meets the required safety
standards.
•WARNING! This bicycle is intended for
use on roads and bicycle paths and not
for performing stunts, jumps or off-road
use. Riding this bike in a way or in an
environment for which it is not suitable may
put you at risk of injury and may damage
the bicycle.
WARNING
•Observe your national bicycle laws and
regulations regarding bicycle lighting,
riding on pavements/roads or cycle
paths, helmet laws, child carrier laws
and trafc laws. It is your responsibility
to be aware of the laws that are
applicable in your country.
• After you have ridden your bike the rst 20
km (approx 12 miles) we advise that you
once again check that all screws and ttings
are secured, and re-tighten if necessary.
• Increase your visibility by wearing bright
clothing or a reective vest for cycling in
foggy conditions or at night.
• Take extra precautions when you ride in
wet weather since the grip of your tyres are
greatly reduced. Apply your brakes earlier
and more gradually than when riding in dry
conditions.
•WARNING! Reectors are not a substitute
for required lights. Riding in dark conditions
or at times of poor visibility without
adequate lighting and reectors is hazardous
and may result in serious injury or death.
The SLADDA bike is designed to require minimal
maintenance but here are a few tips on how to
keep your bicycle in top condition.
Simply clean your bicycle with water, or with
a mild detergent and a non-abrasive sponge if
very dirty.
To replace parts (e.g. worn brake pads or
broken parts from an accident) please call IKEA
Customer Service or contact your local IKEA
store. Use only genuine original replacement
parts. If you use anything other than geniune
replacement parts you may compromise the
safety of your bicycle. A complete list of parts
and components with article numbers are
included in this manual.
Make sure that all ttings are tightened
regularly. Please contact IKEA or professional
bike store if you need to adjust the belt to the
recommended tension of 100Nm. A complete list
of parts and components with article numbers
are included in this manual.
Note! If you have any questions about the care
and/or maintenance of your bicycle, please
contact IKEA.
6. CARE AND MAINTENANCE
A
B
A + B= Max 60 kg/132 lbs
Max
160 kg
352 lbs
!

- 18 -
volledig gestrekt. Je been moet vrijwel recht zijn. Als je
been nog te veel gebogen is, moet je het zadel hoger
zetten. Als je slechts met moeite bij de onderste trapper
kan, moet het zadel lager.
Régler la hauteur de la selle en fonction de votre confort
(voir illustration). Vérifier que la selle est à la bonne hauteur
en plaçant, une fois assis sur la selle, le talon sur une pé-
dale en position la plus basse, jambe tendue. Votre jambe
doit être presque totalement tendue. Relevez la selle si
votre jambe est pliée. Si vous avez du mal à atteindre
confortablement la pédale dans sa position la plus basse,
il vous faut baisser la selle.
Den Sattel auf eine bequeme Höhe einstellen (siehe Abb.).
Mit ausgestrecktem Bein und der Ferse auf dem unteren
Pedal testen, ob die Höhe angenehm ist.
Das Bein sollte fast gerade sein. Wenn es zu sehr gebeugt
ist, muss der Sattel höher eingestellt werden. Wenn das
untere Pedal schwer erreichbar ist, muss der Sattel niedri-
ger eingestellt werden.
Portez toujours un casque lorsque vous roulez à vélo afin
de réduire les risques de blessure à la tête si vous êtes
victime d’un accident de la circulation. Assurez-vous que
votre casque est bien ajusté et répond aux normes de
sécurité.
ATTENTION ! Ce vélo est destiné à être utilisé sur route
ou piste cyclable et il ne doit pas servir pour faire de la
cascade, des sauts ou du tout-terrain. Utiliser ce vélo pour
un usage ou dans un environnement inadaptés présente
un risque de blessure et peut endommager le vélo.
Se conformer aux lois et règlements locaux en vigueur
pour ce qui concerne l’éclairage, l’utilisation du vélo sur
les chaussées et pistes cyclables, le port du casque,
le transport d’enfant et les règles de circulation. Il vous
appartient de connaître les lois et règlements en vigueur
dans votre pays.
Après avoir parcouru les 20 premiers kilomètres (env.
12 miles) il est recommandé de vérifier encore une fois
que toutes les vis et fixations sont bien serrées, et de les
resserrer si nécessaire.
Rendez-vous bien visible en portant des vêtements de
couleurs vives, ou un gilet réfléchissant en cas de brouil-
lard ou la nuit.
Soyez encore plus prudent et commencez à freiner plus
tôt que d’habitude par temps humide ou sur une surface
peu stable comme le sable ou le gravier.
ATTENTION ! Les éléments réfléchissants ne peuvent
remplacer les éclairages requis. Il est dangereux d’utiliser
le vélo dans l’obscurité ou par temps de faible visibilité
sans l’éclairage adéquat et les éléments réfléchissants ;
risque de blessure grave et d’accident mortel
Beim Radfahren immer einen Fahrradhelm tragen, um das
Risiko von Kopfverletzungen zu mindern, falls man in einen
Unfall verwickelt wird. Kontrollieren, dass der Helm passt
und die erforderlichen Sicherheitsanforderungen erfüllt.
WARNHINWEIS! Dieses Fahrrad ist für die Benutzung auf
Straßen und Radwegen entwickelt - nicht zum Ausführen
von Kunststücken, Sprüngen oder für den Geländeeinsatz.
Wer das Fahrrad auf eine Weise oder in einer Umgebung
benutzt, für die es nicht geeignet ist, gefährdet sich selbst
und riskiert die Beschädigung des Fahrrads.
Die nationalen Bestimmungen zum Radverkehr und die
Vorschriften in Bezug auf Beleuchtung, Rad fahren auf
Bürgersteigen/Straßen oder Radwegen, Helmpflicht,
Kindersitz, Straßenverkehr beachten. Es liegt in der
eigenen Verantwortung, sich über die geltenden Gesetze
zu informieren.
Nachdem das Rad die ersten ca. 20 Kilometer in
Gebrauch war, empfehlen wir, alle Schrauben und
Befestigungen nochmals zu prüfen und gegebenenfalls
nachzuziehen.
Bei Dunkelheit, Dämmerung oder Nebel empfiehlt sich
beim Radeln das Tragen von heller Kleidung oder einer
Reflektorweste.
Auf feuchtem oder glitschigem Boden, auf Sand oder
Schotterwegen besonders vorsichtig fahren und früher
abbremsen.
WARNHINWEIS! Reflexe ersetzen nicht die notwendige
Beleuchtung. Im Dunkeln oder bei schlechter Sicht mit un-
zureichender Beleuchtung zu radeln, ist riskant und kann
schwere Verletzungen oder Todesfälle nach sich ziehen.
14
5. FOR YOUR SAFETY
• Always wear a bicycle helmet when riding
your bike to reduce the risk of head injuries
if you are involved in a road accident. Make
sure your bicycle helmet ts you properly
and that it meets the required safety
standards.
•WARNING! This bicycle is intended for
use on roads and bicycle paths and not
for performing stunts, jumps or off-road
use. Riding this bike in a way or in an
environment for which it is not suitable may
put you at risk of injury and may damage
the bicycle.
WARNING
•Observe your national bicycle laws and
regulations regarding bicycle lighting,
riding on pavements/roads or cycle
paths, helmet laws, child carrier laws
and trafc laws. It is your responsibility
to be aware of the laws that are
applicable in your country.
• After you have ridden your bike the rst 20
km (approx 12 miles) we advise that you
once again check that all screws and ttings
are secured, and re-tighten if necessary.
• Increase your visibility by wearing bright
clothing or a reective vest for cycling in
foggy conditions or at night.
• Take extra precautions when you ride in
wet weather since the grip of your tyres are
greatly reduced. Apply your brakes earlier
and more gradually than when riding in dry
conditions.
•WARNING! Reectors are not a substitute
for required lights. Riding in dark conditions
or at times of poor visibility without
adequate lighting and reectors is hazardous
and may result in serious injury or death.
The SLADDA bike is designed to require minimal
maintenance but here are a few tips on how to
keep your bicycle in top condition.
Simply clean your bicycle with water, or with
a mild detergent and a non-abrasive sponge if
very dirty.
To replace parts (e.g. worn brake pads or
broken parts from an accident) please call IKEA
Customer Service or contact your local IKEA
store. Use only genuine original replacement
parts. If you use anything other than geniune
replacement parts you may compromise the
safety of your bicycle. A complete list of parts
and components with article numbers are
included in this manual.
Make sure that all ttings are tightened
regularly. Please contact IKEA or professional
bike store if you need to adjust the belt to the
recommended tension of 100Nm. A complete list
of parts and components with article numbers
are included in this manual.
Note! If you have any questions about the care
and/or maintenance of your bicycle, please
contact IKEA.
6. CARE AND MAINTENANCE
A
B
A + B= Max 60 kg/132 lbs
Max
160 kg
352 lbs
!
14
5. FOR YOUR SAFETY
• Always wear a bicycle helmet when riding
your bike to reduce the risk of head injuries
if you are involved in a road accident. Make
sure your bicycle helmet ts you properly
and that it meets the required safety
standards.
•WARNING! This bicycle is intended for
use on roads and bicycle paths and not
for performing stunts, jumps or off-road
use. Riding this bike in a way or in an
environment for which it is not suitable may
put you at risk of injury and may damage
the bicycle.
WARNING
•Observe your national bicycle laws and
regulations regarding bicycle lighting,
riding on pavements/roads or cycle
paths, helmet laws, child carrier laws
and trafc laws. It is your responsibility
to be aware of the laws that are
applicable in your country.
• After you have ridden your bike the rst 20
km (approx 12 miles) we advise that you
once again check that all screws and ttings
are secured, and re-tighten if necessary.
• Increase your visibility by wearing bright
clothing or a reective vest for cycling in
foggy conditions or at night.
• Take extra precautions when you ride in
wet weather since the grip of your tyres are
greatly reduced. Apply your brakes earlier
and more gradually than when riding in dry
conditions.
•WARNING! Reectors are not a substitute
for required lights. Riding in dark conditions
or at times of poor visibility without
adequate lighting and reectors is hazardous
and may result in serious injury or death.
The SLADDA bike is designed to require minimal
maintenance but here are a few tips on how to
keep your bicycle in top condition.
Simply clean your bicycle with water, or with
a mild detergent and a non-abrasive sponge if
very dirty.
To replace parts (e.g. worn brake pads or
broken parts from an accident) please call IKEA
Customer Service or contact your local IKEA
store. Use only genuine original replacement
parts. If you use anything other than geniune
replacement parts you may compromise the
safety of your bicycle. A complete list of parts
and components with article numbers are
included in this manual.
Make sure that all ttings are tightened
regularly. Please contact IKEA or professional
bike store if you need to adjust the belt to the
recommended tension of 100Nm. A complete list
of parts and components with article numbers
are included in this manual.
Note! If you have any questions about the care
and/or maintenance of your bicycle, please
contact IKEA.
6. CARE AND MAINTENANCE
A
B
A + B= Max 60 kg/132 lbs
Max
160 kg
352 lbs
This manual suits for next models
2
Table of contents