manuals.online logo
Brands
  1. Home
  2. •
  3. Brands
  4. •
  5. Avago
  6. •
  7. Media Converter
  8. •
  9. Avago HEDC-5 Series Installation and operating instructions

Avago HEDC-5 Series Installation and operating instructions

HEDC–5xxx Series
Kit Encoders with a Connector Latch
Application Note 5554
Introduction
The HEDC-5xxx-xxx encoder with a connector latch on
the cover housing requires a dierent assembly method
than the HEDS-55xxx series. However, the internal encoder
module is exactly the same.
This application note provides step-by-step mounting
instructions on how to install the new Avago HEDC-5xxx
series encoders onto a motor.
Encoder Mounting and Assembly Instruction
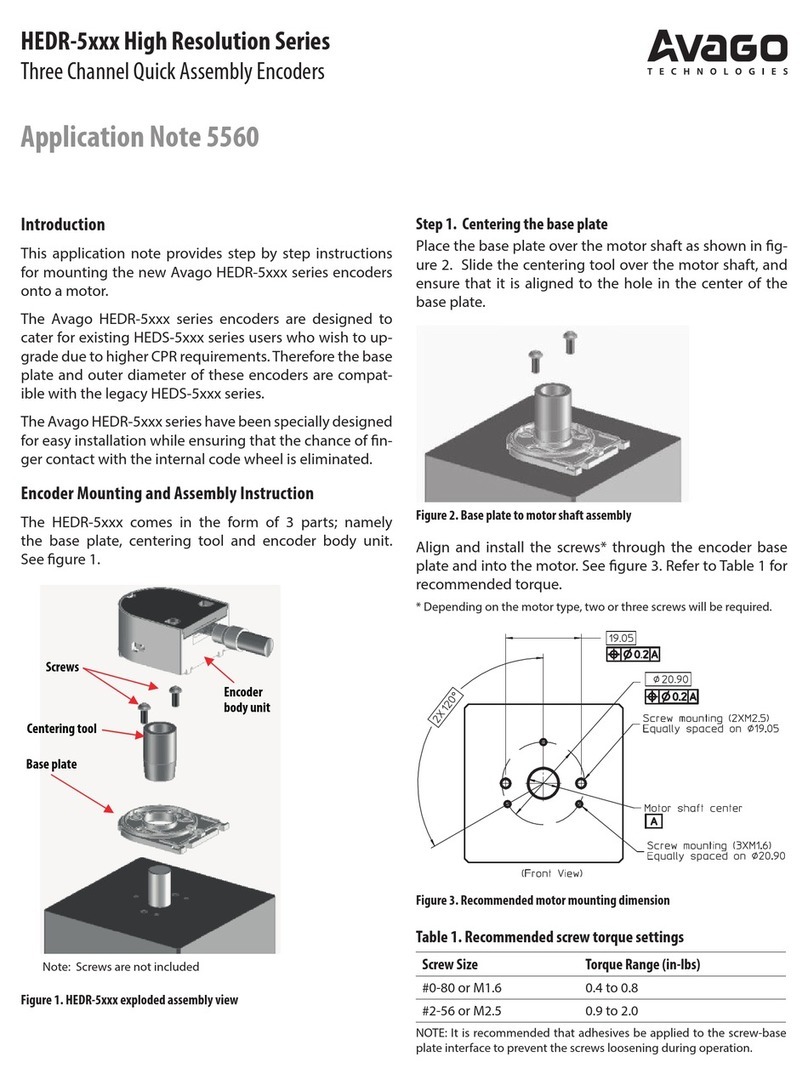
Step 1. Base plate centering
Place the base plate over the motor shaft as shown in
Figure 1. Place the centering tool over the motor’s shaft,
and ensure that it is aligned to the hole in the base plate.
Align and install the screws through the encoder base plate
and screw into the motor. Depending on the motor, this
process will involve either two or three screws. The process
is the same for the base plate with extended mounting
ears. It is recommended that adhesives be applied to the
screw-base plate interface.
Remove the centering tool.
Screw Size Torque Range (in-lbs)
#0-80 or M1.6 0.4 to 0.8
#2-56 or M2.5 0.9 to 2.0
#4-40 or M3 3.5 to 4.5
Centering tool
Base plate
Figure 1. Base plate assembly
Figure 2. Codewheel height setting
Step 2. Codewheel placement height setting
Place the height setting tool over on top of the base plate
as shown in Figure 2.
Height setting tool
Figure 3. Codewheel mounting
Step 3. Codewheel mounting
Mount the hub of the codewheel to the motor shaft.
DO NOT handle the codewheel. Touch only the hub during
installation. Ensure that the codewheel hub is well ”seated”
on top of the height setting tool, as shown in Figure 3.
Press down on the top of the hub while tightening the set
screw with the hex wrench (supplied). The hub set screw
attaches the codewheel to the motor shaft. The recom-
mended torque to tighten the set screw is 15-18 oz-in
(0.9-1.2 in-lbs).
Remove the hex wrench and spacer tool.
For product information and a complete list of distributors, please go to our web site: www.avagotech.com
Avago, Avago Technologies, and the A logo are trademarks of Avago Technologies in the United States and other countries.
Data subject to change. Copyright © 2005-2012 AvagoTechnologies. All rights reserved.
AV02-3426EN - April 30, 2012
Figure 4 b. Secure the module to the base plate with two screws
Step 4. Encoder module assembly
With the encoder module part number side up, slip it into
position with the codewheel in the slot in the housing.
Moving from the side, as shown in Figure 4a, and being
careful not to contact the codewheel, seat the module on
the base plate guide posts. Its nal position should be as
shown in Figure 4b.
Avoid any collision with the fragile codewheel, which
could result in damage to the codewheel and adversely
aect the performance of the encoder.
As shown in Figure 4b, install two screws (supplied)
through the module and into the base plate. The recom-
mended screw torque is 3.5-4.0 in-lbs.
Figure 4 a. Position the encoder module with the codewheel passing
through the slot
Module with the
part number side
facing up
Module guide posts,
two places
Figure 5. Housing cover assembly
Step 5. Housing cover installation
Place the housing cover over the base plate and install
two screws (supplied) to secure. The recommended screw
torque is 2-4 in-lbs.
The completed encoder assembly is shown in Figure 6. It is
now ready for cable attachment and operation.
Figure 6. Completed HEDC-5xxxx assembly

Other Avago Media Converter manuals

Avago AED -8 Series Instruction Manual

Avago

Avago AED -8 Series Instruction Manual

Avago HEDS-8949 User manual

Avago

Avago HEDS-8949 User manual

Avago HEDR-5 High Resolution Series Installation and operating instructions

Avago

Avago HEDR-5 High Resolution Series Installation and operating instructions

Avago USB-2-I2C User manual

Avago

Avago USB-2-I2C User manual

Popular Media Converter manuals by other brands

Kiloview N50 quick start guide

Kiloview

Kiloview N50 quick start guide

RGBlink MSP 312 quick start

RGBlink

RGBlink MSP 312 quick start

Kramer VM-50AN user manual

Kramer

Kramer VM-50AN user manual

Alta DT eNet-1553 Hardware manual

Alta DT

Alta DT eNet-1553 Hardware manual

SC&T AD001HD4 manual

SC&T

SC&T AD001HD4 manual

Cypress nT13AX06/CPLUS-V8E Operation manual

Cypress

Cypress nT13AX06/CPLUS-V8E Operation manual

METRUM Amethyst user manual

METRUM

METRUM Amethyst user manual

Sarowin HDSP0008M1 user manual

Sarowin

Sarowin HDSP0008M1 user manual

Datalogic AMT58 Series Mounting instructions

Datalogic

Datalogic AMT58 Series Mounting instructions

Baumer HOG 86 M Installation and operating instructions

Baumer

Baumer HOG 86 M Installation and operating instructions

Contronics SXP-320A user manual

Contronics

Contronics SXP-320A user manual

Atlona AT-AD2 user manual

Atlona

Atlona AT-AD2 user manual

Conrad 98 61 69 operating instructions

Conrad

Conrad 98 61 69 operating instructions

Imagine Selenio SEL-1DEC1 Installation and operation manual

Imagine

Imagine Selenio SEL-1DEC1 Installation and operation manual

JVC RX-8010VBK Service manual

JVC

JVC RX-8010VBK Service manual

Baumer HUBNER BERLIN Proibus DP HMG 10 Installation and operating instructions

Baumer

Baumer HUBNER BERLIN Proibus DP HMG 10 Installation and operating instructions

Eusso UVE7312-MSPD user manual

Eusso

Eusso UVE7312-MSPD user manual

Videonics PowerScript PS4000S instruction manual

Videonics

Videonics PowerScript PS4000S instruction manual

manuals.online logo
manuals.online logoBrands
  • About & Mission
  • Contact us
  • Privacy Policy
  • Terms and Conditions

Copyright 2025 Manuals.Online. All Rights Reserved.