manuals.online logo
Brands
  1. Home
  2. •
  3. Brands
  4. •
  5. Avantco
  6. •
  7. Power Tools
  8. •
  9. Avantco B105 User manual

Avantco B105 User manual

B105/B155/B230
Hydraulic breaker
Table of contents
2
hydraulic breaker
TABLE OF CONTENTS
OPERATION .......................................................................................................................3
1.FOREWORD............................................................................................................................................................4
1.1 IMPORTANT SAFETY INFORMATION ...........................................................................................................4
1.2 WARRANTY ......................................................................................................................................................5
1.3 SPARE PART ORDERS.......................................................................................................................................5
2. MACHINE NUMBERS............................................................................................................................................6
2. 1 MODEL AND SERIAL NUMBER......................................................................................................................6
3. PRODUCT INTRODUCTION ..............................................................................................................................7
3.1 OVERVIEW ........................................................................................................................................................7
3.2 REMOVAL FROM PACKA E ............................................................................................................................7
3.3 LIFTIN INSTRUCTIONS ................................................................................................................................7
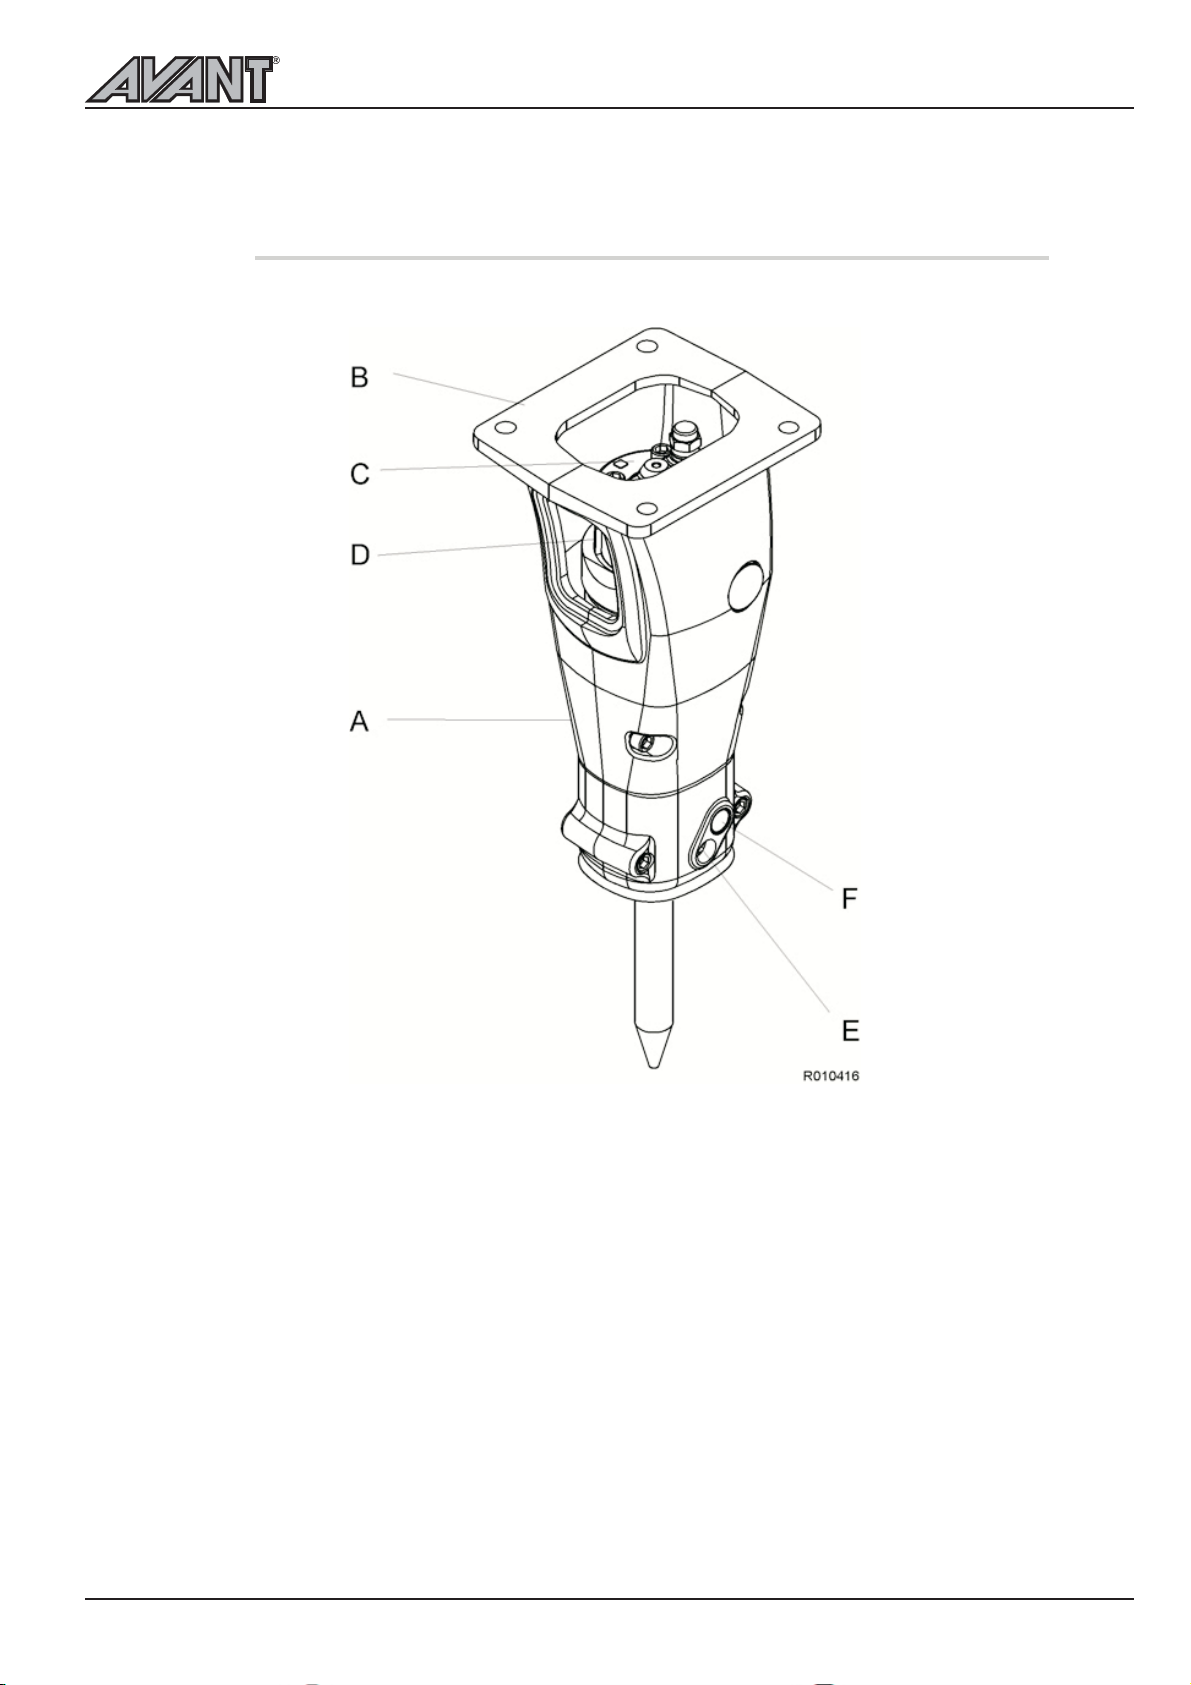
3.4 MAIN PARTS......................................................................................................................................................9
4. SAFETY .................................................................................................................................................................10
4.1 ENERAL SAFETY ..........................................................................................................................................10
4.2 SAFETY INSTRUCTIONS ...............................................................................................................................10
5. OPERATION.........................................................................................................................................................18
5.1 OPERATIN INSTRUCTIONS .......................................................................................................................18
5.2 DAILY OPERATION ........................................................................................................................................19
5.3 MOUNTIN AND DISMOUNTIN THE HAMMER....................................................................................24
5.4 MOVEMENT....................................................................................................................................................25
5.5 SPECIAL CONDITIONS OF USE ...................................................................................................................25
5.6 STORA E ........................................................................................................................................................26
LUBRICATION..................................................................................................................27
1. HAMMER TOOL REASIN ...............................................................................................................................28
1.1 RECOMMENDED REASES...........................................................................................................................28
1.2 MANUAL REASIN ......................................................................................................................................28
2. CARRIER HYDRAULIC OIL..................................................................................................................................30
2.1 REQUIREMENTS FOR HYDRAULIC OIL.......................................................................................................30
2.2 OIL COOLER...................................................................................................................................................32
MAINTENANCE ...............................................................................................................33
1. ROUTINE MAINTENANCE ................................................................................................................................34
1.1 OVERVIEW ......................................................................................................................................................34
1.2 INSPECTION AND MAINTENANCE BY THE OPERATOR .........................................................................34
1.3 INSPECTION AND MAINTENANCE BY THE DEALER ...............................................................................35
1.4 MAINTENANCE INTERVALS IN SPECIAL APPLICATIONS .........................................................................35
1.5 OTHER MAINTENANCE PROCEDURES......................................................................................................36
2. REMOVAL OF TOOL...........................................................................................................................................37
3. LOWER TOOL BUSHIN ...................................................................................................................................39
4. TROUBLESHOOTIN .........................................................................................................................................41
4.1 THE HAMMER DOES NOT START................................................................................................................41
4.2 THE HAMMER OPERATES IRRE ULARLY BUT THE BLOW HAS FULL POWER ......................................42
4.3 THE HAMMER OPERATES IRRE ULARLY AND BLOW HAS NO POWER ................................................42
4.4 IMPACT RATE SLOWS DOWN ......................................................................................................................43
4.5 THE HAMMER DOES NOT STOP OR HAS RUNON ...................................................................................43
4.6 OIL OVERHEATS.............................................................................................................................................44
4.7 RECURRENT TOOL FAILURE........................................................................................................................44
4.8 FURTHER ASSISTANCE..................................................................................................................................45
SPECIFICATIONS.............................................................................................................47
1.HAMMER SPECIFICATIONS.................................................................................................................................48
1.2 MAIN DIMENSIONS .......................................................................................................................................49
2.TOOL SPECIFICATIONS ......................................................................................................................................50
OPERATION
3
Operation
hydraulic breaker
1. FOREWORD
1.1 IMPORTANT SAFETY INFORMATION
Basic safety precautions are outlined in the "Safety" section of this manual
and in the description of operations where hazards exist. Warning labels have
also been put on the machine to provide instructions and to identify specific
hazards which if not observed could cause bodily injury or death to you or
other persons. hese warnings in the guide and on the machine labels are
identified by the warning symbol.
o use the attachment correctly, you must also be a competent operator of
the carrier machine. Do not use or install it if you can not use the carrier
machine properly. he attachment is a powerful tool. If used without proper
care, it can cause damage.
Do not rush when you are learning to use the product. ake your time and
most importantly, take it safely. Do not guess. If there is anything you do not
understand, ask your local dealer. He will be pleased to advise you.
Improper operation, lubrication or maintenance of this machine can be
dangerous and could result in injury.
Do not operate this machine until you read and understand the instructions
in this manual.
Do not perform any lubrication and maintenance on this machine until you
read and understand the instructions in this manual.
Foreword
4
hydraulic breaker
1.2 WARRANTY
A complete warranty claim for a hydraulic breaker attachment includes at
least the following information.
- Model and serial number
- Carrier model
- Working hours and service history
- Installation: Oil flow, operating pressure and return line pressure if known
- Application
Providing this information makes it easy to handle the warranty claim prop-
erly and swiftly.
1.4 SPARE PART ORDERS
When you need spare parts or some information concerning maintenance
to your machinery, please contact your local dealer. Quick deliveries are en-
sured by exact orders.
Required information:
1. Name of customer, contact person
2. Order number (when available)
3. Delivery address
4. Mode of delivery (air mail, etc.)
5. Required delivery date
6. Invoicing address
7. Model and serial number of product
8. Name, number and required amount of spare parts
5
Warranty
hydraulic breaker
INSTALLATION INSPECTION
An installation inspection must be carried out after the product has been
installed on the carrier. In the installation inspection certain specifications
(operating pressure, oil flow, etc.) are checked so that they are within given
limits. See Hammer specifications on page 48.
2. MACHINE NUMBERS
2.1 MODEL AND SERIAL NUMBER
he equipment serial number is stamped on the valve body. he model and
serial number are also located on the CE marking. Check that the model cor-
responds to the one given on the cover of this manual.
It is important to make correct reference to the serial number of the attach-
ment when making repairs or ordering spare parts. Identification of the serial
number is the only proper means of maintaining and identifying parts for a
specific product.
Machine numbers
hydraulic breaker
3. PRODUCT INTRODUCTION
3.1 OVERVIEW
he product is a hydraulically operated breaker. It can be used on all AVAN -carriers
which meet the necessary hydraulic and mechanical installation re-
quirements. he unit functions by repeatedly raising a steel piston and
driving it down onto the head of a removable breaking tool.
No additional pressure accumulators are necessary since the integrated
pressure accumulator absorbs hydraulic pressure peaks. he impact ener-
gy of the hammer is almost constant and independent of the carrier's hy-
draulic system.
3.2 REMOVAL FROM PACKAGE
Remove all the steel belts from the package. Open the package and remove
all plastics covering the product. Recycle all package materials (steel, plas-
tic, wood) properly.
Check that the product is in good condition and that there is no visible dam-
age. Check that all ordered parts and accessories have been enclosed with
the product. Some options may be provided by your local dealer like installation
kits; including hoses and mounting bracket.
3.3 LIFTING INSTRUCTIONS
Use a hoist when lifting components which weigh 23 kg or more, to avoid
back injury. Make sure all chains, hooks, slings etc., are in good condition
and are in the correct capacity. Be sure hooks are positioned correctly. Lift-
ing eyes are not to be side loaded during a lifting operation. Do not use the
hammer's tools for lifting.
7
Product introduction
hydraulic breaker
Lifting devices must safely carry the working weight of the product. See
Hammer specifications on page 48. Place chains or slings, as shown by
the illustration, to lift the product.
SAFETY INSTRUCTIONS FOR LIFTING
Below are some common safety instructions concerning lifting operations.
In addition to this, the local, national standards for machines and lifting-tack-
les must always be strictly observed. Please note that the list below is not
all inclusive, you must always ensure the procedure you choose is safe for
you and others.
lDo not lift load over people. No one shall be under the hoisted load.
lDo not lift people and never ride the hoisted load.
lKeep people clear from lift area.
lAvoid side pull of the load. Make sure you take up the slack slowly. Start
and stop carefully.
lLift load a few centimeters and verify it before proceeding. Make sure the
load is well balanced. Check for any loose items.
lNever leave the suspended load unattended. Maintain load control at all
times.
lNever lift the load over the rated capacity (see product's operating
weight from specification page).
lInspect all lifting equipment before use. Do not use twisted or damaged
lifting equipment. Protect lifting equipment from sharp corners.
lObey all local safety instructions.
Product introduction
8
hydraulic breaker
3.4 MAIN PARTS
he main parts of the hammer are shown below.
A. Side plates
B. Mounting flange
C. Accumulator
D. Hammer mechanism
E. Hose connections
F. Grease nipples
9
Product introduction
hydraulic breaker
4. SAFETY
4.1 GENERAL SAFETY
All mechanical equipment can be hazardous if operated without due care or
correct maintenance. Most accidents involving machine operation and
maintenance are caused by failure to observe basic safety rules or precau-
tions. An accident can often be avoided by recognizing potentially hazard-
ous situations before an accident occurs.
Because it is impossible to anticipate every possible circumstance that
might involve a potential hazard, the warnings in this guide and on the ma-
chine are not all inclusive. If a procedure, tool, working method or operating
technique not specifically recommended by manufacturer is used, you must
satisfy yourself that it is safe for you and others. You should also ensure that
the product will not be damaged or made unsafe by the method of operation
or maintenance procedures you choose.
Safety is not just a matter of responding to the warnings. All the time you are
working with your attachment you must pay attention to what hazards there
might be and how to avoid them. Do not work with the product until you are
sure that you control it. Do not start any job until you are sure that you and
those around you will be safe.
War i g! Read the followi g war i g messages carefully. They tell
you of differe t hazards a d how to avoid them. If proper precautio s
are ot take you or others could be seriously i jured.
4.2 SAFETY INSTRUCTIONS
MANUALS
Study this manual before installing, operating or maintaining the product. If
there is anything you don't understand, ask your employer or your local deal-
er to explain it. Keep this manual clean and in good condition.
Safety
10
hydraulic breaker
he related safety label on the hammer and the
text on the label are shown here.
CARE AND ALERTNESS
All the time you are working with the product, take care and stay alert. Al-
ways be alert for hazards. he possibility of a serious or even fatal accident
is increased when you are intoxicated.
CLOTHING
You can be injured if you do not wear proper clothing. Loose clothing can
get caught in the machinery. Wear protective clothing to suit the job.
Examples are: a safety helmet, safety shoes, safety glasses, well-fitting
overalls, ear-protectors and industrial gloves. Keep cuffs fastened. Do not
wear a necktie or scarf. Keep long hair restrained.
PRACTICE
You and others can be killed or injured if you perform unfamiliar operations
without practising them first. Practice away from the job site, in a clear area.
Keep other people away. Do not perform new operations until you are sure
you can do them safely.
REGULATIONS AND LAWS
Obey all laws, work site and local regulations which affect you and your
equipment.
COMMUNICATIONS
Bad communications can cause accidents. Keep people around you in-
formed of what you will be doing. If you will be working with other people
make sure they understand any hand signals you will be using.
Work sites can be noisy. Do not rely only on spoken commands.
11
Safety
hydraulic breaker
WORK SITE
Work sites can be hazardous. Inspect the site before working on it.
Check for potholes, weak ground, hidden rocks etc. Check for utilities (elec-
tric cables, gas and water pipes etc.). Mark the positions of underground ca-
bles and pipes if you will be breaking the ground.
Poor visibility can cause accidents and damage. Make sure that visibility and
lightning of the working area are adequate.
BANKS AND TRENCHES
Banked material and trenches can collapse. Do not work too close to banks
and trenches where there is a danger of collapse.
SAFETY BARRIERS
Unguarded equipment in public places can be dangerous. Place barriers
around the machine to keep people away.
Safety
12
hydraulic breaker
AIRBORNE POLLUTANTS
he related safety label on the hammer
and the text on the label are shown here.
Airborne pollutants are microscopic
particles, which will damage your health,
when inhaled. Airborne pollutants on
construction sites can be e.g. silica dust,
oil fumes or diesel exhaust particles, visible
or invisible. Especially in demolition sites,
there may be other dangerous substances,
such as e.g. asbestos or lead paints or
other chemical substances.
he effect of airborne pollutants may be
immediate if the substance is poisonous.
he main danger with airborne pollutants
comes from long term exposure, where
particles are inhaled but not removed from
the lungs. he disease is called e.g.
silicosis, asbestosis or other and will result in death or serious injury.
o protect yourself from airborne pollutants, always keep excavator doors and
windows closed during operation. Excavators with pressurized cabins should
be utilized in hammer operation. Proper maintenance of fresh air filters of the
excavator is essential. Where pressurized cabins are not available, proper
respirators must be utilized.
FLYING CHIPS OF ROCK
HIGH NOISE LEVEL
13
Safety
hydraulic breaker
Stop working, when bystanders are in the area of airborne pollutants and
make sure they have proper respirators. Respirators are as important for
bystanders as hard hats.Respirators for both operator and bystanders must
be approved by the respirator manufacturer for the application in question. It
is essential that the respirators protect from the tiny dust particles which cause
silicosis and which may cause other serious lung diseases. You should not
use the equipment until you are sure the respirators are working properly.
his means the respirators must be checked to make sure that it is clean,
that its filter has been changed, and to otherwise make sure the respirator
will protect in the way it is meant to.
Always make sure dust has been cleaned off your boots and clothes whenyou
leave your shift. he smallest particles of dust are the most harmful. hey
may be so fine that you can not see them. Remember, you MUS protect
yourself and bystanders from the danger of breathing or inhaling dust. Always
follow local laws and regulations for airborne pollutants in the working
environment.
he safety label on the hammer is shown here:
Protect yourself and your neighbourhood against
flying chips of rock. Do not operate the product or
carrier if someone is too close.
he European standard EN 474-1 on safety of earth-
moving machinery requires that adequate operator's
protection, such as bullet proof glass, mesh guard
or an equivalent protection is used.
Keep the cabin windows and doors closed during
operation. Window bars are recommended to protect
the windows from flying chips of rock.
he safety label on the hammer is shown here:
A hammer in operation creates a high noise level.
Always wear ear protec-tion to prevent personal
injury.
EQUIPMENT LIMITS
Operating the product beyond its design limits can cause damage. It can
also be dangerous. See Hammer specifications on page 48.
Do not try to enhance the product's performance by unapproved modifica-
tions.
HYDRAULIC FLUID
Fine jets of hydraulic fluid at high pressure can penetrate the skin. Do not
use your fingers to check for hydraulic fluid leaks. Do not put your face close
to suspected leaks. Hold a piece of cardboard close to suspected leaks and
then inspect the cardboard for signs of hydraulic fluid. If hydraulic fluid pen-
etrates your skin seek medical help immediately.
Hot hydraulic fluid can cause severe injuries.
HYDRAULIC HOSES AND FITTINGS
Ensure all hydraulic components will withstand maximum pressure and me-
chanical stresses caused by operation of the attachment. Consult your local
dealer for instructions.
FIRE HAZARD
Most hydraulic fluids are flammable and might ignite when contacting hot
surface. Avoid spilling hydraulic fluid to hot surfaces.
Working with the product on certain materials can cause sparks and hot
splinters to get loose. hese can ignite flammable materials around working
area.
Ensure that adequate extinguisher is available.
HYDRAULIC PRESSURE
Hydraulic fluid at system pressure can injure you. Before disconnecting or
connecting hydraulic hoses, stop the carrier engine, operate the controls to
release pressure trapped in the hoses. During the operation, keep people
away from the hydraulic hoses.
here might be pressurized oil trapped inside the product even if it is discon-
nected from the carrier. Be aware of possible blank firing while greasing or
removing and installing hammer tools. See Changing the tool on page 37.
Safety
14
hydraulic breaker
PRESSURE ACCUMULATORS
LIFTING EQUIPMENT
You can be injured if you use faulty lifting equipment. Make sure that lifting
equipment is in good condition. Make sure that the lifting tackle complies
with all local regulations and is suitable for the job. Make sure that the lifting
equipment is strong enough for the job and you know how to use it.
Do not use this product or any of its parts for lifting. See Lifting instructions
on page 7. Contact your carrier dealer to find out how to lift with your carrier.
SPARE PARTS
Use only genuine spare parts. Use only genuine tools with hydraulic ham-
mers. he use of other spare part or hammer tool brands may damage the
product.
EQUIPMENT CONDITION
Defective equipment can injure you or others. Do not operate equipment
which is defective or has missing parts.
Make sure the maintenance procedures in this manual are completed be-
fore using the product.
REPAIRS AND MAINTENANCE
Do not try to do repairs or any other maintenance work you do not under-
stand.
15
Safety
hydraulic breaker
he safety label on or near the accumulator is shown
here:
he hammer incorporates one or two pressure
accumulators, depending on the model. he
accumulators are pressurized even when there is
no hydraulic pressure to the hammer. Attempting to
dismantle the accumulators without first releasing
the pressure can cause injury or death. Do not try
to dismantle pressure accumulators, contact your
local dealer first.
METAL SPLINTERS
Safety
1
hydraulic breaker
You can be injured by flying splinters when driving metal pins in and out. Use
soft-faced hammer or drifts to remove and fit metal pins, such as pivot pins.
Always wear safety glasses.
LABELS ON THE PRODUCT
Safety labels communicate the following four things:
 he severity level of the risk (i.e. signal word "DANGER" or "WARN-ING").
 he nature of the hazard (i.e. the type of hazard: high pressure, dust,etc.).
 he consequence of interaction with the hazard.
 How to avoid the hazard.
You must ALWAYS follow the instructions of the safety messages and symbols
of the product safety labels and the instructions set forth in the manuals to
avoid death or severe injury!
Keep the safety labels clean and visible at all times. Check the condition of
safety labels daily. Safety labels and instructions which have disappeared,
been damaged, painted over, come loose or do not meet the legibility
requirements for safe viewing distance, must be replaced before operating
the product.
If a safety label is attached to a part that is replaced, install a new safety
label on the replacement part. If this manual is available in your language,
then the safety labels should be available in the same language.
here are several specific safety labels on this hammer. Please become
familiarized with all safety labels. he location of the safety labels is shown
in the illustration below.
When you clean the safety labels, use a cloth, water and soap. Do not use
solvent, gasoline or other harsh chemicals to clean the safety labels.
Solvents, gasoline or harsh chemicals could loosen the adhesive that secures
the safety labels. Loose adhesive will allow the safety label to fall.
17
Safety
hydraulic breaker
5. OPERATION
5.1 OPERATING INSTRUCTIONS
RECOMMENDED USE
he hammer is designed to be used in breaking concrete, road surface or
asphalt, hard or frozen ground. It is also suitable for light trenching and
benching applications or in ground compacting. It can be also used in break-
ing small and soft boulders. Your local dealer will gladly give you more infor-
mation.
OPERATING CONDITIONS
Hydraulic oil
In general the hydraulic oil originally intended for the carrier can be used
with this product. See Requirements for hydraulic oil on page 30.
Operating temperature
he operating temperature is -20 °C to 80 °C. If the temperature is lower
than -20 °C, the hammer and tool have to be preheated before any opera-
tions can begin, in order to avoid breaking the accumulator's membrane and
the tool. During operation they will remain warm.
Note: he temperature of the hydraulic oil must be monitored. Ensure that
oil grade and monitored oil temperature together guarantee correct oil vis-
cosity. See Oil specifications on page 31.
PRINCIPLES OF BREAKING
o increase the hammer's working life, pay particular attention to correct
working methods and how to choose the correct tool for the job. here are
essentially two ways of breaking with a hydraulic hammer.
Operation hydraulic breaker
18
Noise dampening
Operating the hammer near residential areas or other noise sensitive areas
can cause noise pollution. In order to avoid unnecessary noise, please follow
these basic rules:
1.When operating with the hammer, keep the tool at 90 degree angle to the
material and the feed force in-line with the tool.
2.Replace or fix all parts that are worn out, damaged or loosened. his not
only saves your hammer but it also decreases the noise level.
Penetrative breaking (or cutting)
In this form of breaking a moil point or chisel tool is forced inside the mate-
rial. his method is most effective in soft, layered or plastic, low abrasive
material. he high impact rate of the small hammers makes them ideal for
penetrative breaking.
CHOOSING TOOLS
Chisel and moil point
lFor sedimentary (e.g. sandstone) and weak metamorphic rock into
which the tool penetrates.
lConcrete.
lrenching and benching.
It is important to choose a tool, which is suitable for your hammer and for the
application you are working on. he tool selection available depend on ham-
mer model. See  ool specifications on page 50.
5.2 DAILY OPERATION
War i g! Protect yourself a d your eighbourhood agai st flyi g
chips of rock. Do ot operate the hammer or carrier if someo e is too
close to the hammer.
The hammer as a sta dard assembly, must ot be used u der water. If
water fills the space where the pisto strikes the tool, a stro g pres-
sure wave is ge erated a d the hammer may be damaged.
War i g! To avoid falli g objects, do ot use Product to lift other prod-
ucts. See Lifti g i structio s o page 7.
19
Operation
hydraulic breaker
Impact breaking
With impact breaking, the material is broken by transferring very strong
mechanical stress waves from the tool into the material. Impact breaking is
most effective in hard, brittle and very abrasive materials. he high impact
energy of the big hammers makes them ideal for impact breaking. he best
possible energy transfer between the tool and the object is achieved with a
blunt tool. he use of a chisel tool in hard material will cause the sharp edge
to wear very quickly.
1. Set the engine speed to the
recommended engine RPM for
correct amount of oil supply.
2. Carefully operate the carrier
controls to place the hammer and
boom into the breaking position.
Quick and careless boom
movements could result in
damage to the hammer.
3. Use the boom to press the
hammer firmly against the object.
Do not pry the hammer with the
boom. Do not press too hard or
too gently with the boom. he
correct force is applied, when the
tires start to lift slightly from the
ground.
4. Place the tool against the object
at a 90 degree angle (see picture
1.). Avoid small irregularities on
the object which will break
easily and cause either idle
strokes or an incorrect working
angle.
5. When demolishing vertical
structures (e.g. brick walls),
place the tool against the wall at
a 90 degree angle.(see picture
2.)
6. Start the hammer.
Operation hydraulic breaker
20
2.
1.
90°
90°

This manual suits for next models

2

Other Avantco Power Tools manuals

Avantco B70 Silent User manual

Avantco

Avantco B70 Silent User manual

Avantco B70 Silent Instruction manual

Avantco

Avantco B70 Silent Instruction manual

Popular Power Tools manuals by other brands

Bosch AGS 7 Original instructions

Bosch

Bosch AGS 7 Original instructions

Ingersoll-Rand 1100P-EU instructions

Ingersoll-Rand

Ingersoll-Rand 1100P-EU instructions

Sealey Professional TOOLS SA3702 quick start guide

Sealey

Sealey Professional TOOLS SA3702 quick start guide

Kyocera TJEP MF-14/150 manual

Kyocera

Kyocera TJEP MF-14/150 manual

DeWalt P1000 Operating instructions manual

DeWalt

DeWalt P1000 Operating instructions manual

Jet JHPB-20 Operating instructions and parts manual

Jet

Jet JHPB-20 Operating instructions and parts manual

Craftsman 572.6112 owner's manual

Craftsman

Craftsman 572.6112 owner's manual

Huck ERT1D instruction manual

Huck

Huck ERT1D instruction manual

Crown CT44088-R Original instructions

Crown

Crown CT44088-R Original instructions

Lukas e3 operating instructions

Lukas

Lukas e3 operating instructions

Omer PL 110 LJ Use, maintenance and spare parts manual

Omer

Omer PL 110 LJ Use, maintenance and spare parts manual

BSM Dahle 250 instructions

BSM

BSM Dahle 250 instructions

Extrol 8891866 Translation of the original user manual

Extrol

Extrol 8891866 Translation of the original user manual

Clarke Strong-Arm CSA30FPB Operation & maintenance instructions

Clarke

Clarke Strong-Arm CSA30FPB Operation & maintenance instructions

Fervi 0560 Use and maintenance manual

Fervi

Fervi 0560 Use and maintenance manual

Sealey AK6290 instructions

Sealey

Sealey AK6290 instructions

Makita DTW284 instruction manual

Makita

Makita DTW284 instruction manual

Makita DTM41 technical information

Makita

Makita DTM41 technical information

manuals.online logo
manuals.online logoBrands
  • About & Mission
  • Contact us
  • Privacy Policy
  • Terms and Conditions

Copyright 2025 Manuals.Online. All Rights Reserved.