Avaya RC100 User manual

AVAYA ROOM CAMERA
RC100
QUICK GUIDE
Package Contents
• 1XAvayaRC100Camera
• 1XRemoteControl
• 2XAAATypeBatteries
• 1XPowerSupply
• 1XHDMICable
• 1XUSB2.0Cable
• 1XWallMount
• 1XScrewsSet
• 1XLensCover
• Documentation
Congratulations on purchasing your
Avaya Room Camera RC100. With its
UltraHD 4k sensor, RC100 provides an
edge quality experience with XT Series,
CU360, and with your laptop
• XT Series:upto1080p60
• CU360:upto1080p30inIPmode,and720p30inUSB
mode
• Laptop:upto2160p60(dependinguponthelaptop
capabilities)
• 24xFullHDZoom
• 8xExtraDigitalZoom
• Optimalhorizontaleldofviewforvideoconferencing
rooms

©2021AvayaInc.AllRightsReserved.AvayaandtheAvayalogoaretrademarksof
AvayaInc.andareregisteredintheUnitedStatesandothercountries.Allothermarks,
trademarksandservicemarksbyAvayaInc.orthirdpartyareidentiedby®,TMorSM.
10/21•AvayaRC100Camera-QSG
About Avaya
BusinessesarebuiltontheexperiencestheyprovideandeverydaymillionsofthoseexperiencesarebuiltbyAvaya(NYSE:AVYA).
Foroveronehundredyears,we’veenabledorganizationsaroundtheglobetowin—bycreatingintelligentcommunications
experiencesforcustomersandemployees.Avayabuildsopen,convergedandinnovativesolutionstoenhanceandsimplify
communicationsandcollaboration—inthecloud,onpremise,orahybridofboth.Togrowyourbusiness,we’recommitted
toinnovation,partnership,andarelentlessfocusonwhat’snext.We’rethetechnologycompanyyoutrusttohelpyoudeliver
ExperiencesthatMatter.Visitusatwww.avaya.com.
IfyouarereceivingservicesfromanAvaya Authorized Partner,pleasecontactyourPartner.TheSerialNumberofyourCameraisfoundon
theproductboxlabel.
IfyouareacertiedAvayapartner,pleaserefertoyour‘SoldTo’(‘FunctionalLocation’)Numbertoreceivetechnicalsupport.Thisisthe
Avayaaccountnumberforyourspeciccustomerlocation.
• The‘SoldTo’or‘FunctionalLocation’numbercanbefoundonyourinvoiceintheupperrightcorner.
• YoucanalsocontactyourAccountManagerorClientServiceManagertoobtainit.
• Pleasenotethatall‘SoldTo’and‘FunctionalLocation’numbersarecomprisedof10digits,meaningsomewillrequiretwoleading
zeroes(e.g.0012345678),andotherswillrequirethree(e.g.0001234567).Pleaseincludetheseleadingzeroeswhenprovidingyour
accountnumber.
Using your RC100 as USB Camera for your Laptop
Step1
• ConnectthecameratotheUSBportofyourlaptopusingtheprovidedUSBcable.
Note: Tocontrolthecamera,useitsownremotecontrol.
Step2
LaunchorbrowsetooneofthefollowingconferencingapplicationsandselecttheAvayaRC100videosourcefromtheappropriatesettingor
userpreferencesection.
• AvayaSpaces®(https://spaces.avayacloud.com).LoginwithyourAvayaSpaces®account,orcreateanewaccount.Youcanjoinany
AvayaSpaces®meetingwithyourbrowserandthencongureyourwebclientwiththeAvayaRC100videosource.
• AvayaCloudOce™.Clickthedown-leftSettingswheelandbrowsetoVideo > Video MeetingsSettingstoconguretheAvayaRC100
videosource.
• AvayaWorkplaceConferencing/MeetingsServer.DownloadtheAvayaWorkplaceapplicationfromyourPortalHomePageandclickthe
SettingswheeltoconguretheAvayaRC100videosource.
• AppforvideoconferencinglikeMicrosoft®SkypeforBusiness,Microsoft®Teams,Zoom®,BlueJeans®,selecttheAvayaRC100asthe
videosourceinthesettingsmenuoftheApp.
CAUTION: the mains
cable is used as a
disconnecting device,
use therefore an easily
accessible outlet
located near the
device for the power
supply connection.
Never remove the
mains plug while the
device is connected.

Note: NocontrolandnoaudiomanagedfromCU360viaIPonv11.3.TocontroltheCameraandtosetitsVideoParametersonCU360v11.3
orlower,onlytheCameraRemoteControlprovidedwithinthepackagecanbeused.Thislimitationisexpectedtoberemovedinfuture
versions.ForfurtherinformationpleaserefertotheRC100UserGuideavailableinhttps://support.avaya.com/
CAUTION: the mains
cable is used as a
disconnecting device,
use therefore an easily
accessible outlet
located near the
device for the power
supply connection.
Never remove the
mains plug while the
device is connected.
EthernetCable
EthernetCable
IPNetwork
Using your RC100 with Avaya CU360 Device
TheAvayaRC100CameracanbeusedasUSBorIPcamerawiththeCU360.Pleasefollowthesesteps.
Note: Thecameravideoiscapturedatupto720p30andcanbeusedasanadditionallivecameraintheCU360app.CamerapresetsandPTZ
(PanTiltZoom)canbemanagedviaRC100RemoteControlorCU360’sone.
CAUTION:the mains
cableis used as a
disconnectingdevice,
usetherefore an easily
accessibleoutlet
locatednear the
devicefor the power
supplyconnection.
Neverremove the
mainsplug while the
deviceis connected.
2. Setting up RC100 as USB Camera
Step1-ConnecttheUSBCable
• PlugonesideoftheUSBcableintotheCameraUSB 2.0socketandtheothersideintotheCU360USBType-Asocket.
Step2-ConnecttheCameraPowerSupply
• ConnectthePowerSupplyplugintotheDC IN 12V socketoftheCameraandturnontheCU360unit.
Step3-ConguretheUSBCamera
• EnsurethatEnableandControl CameraaresettoYes.FromtheCU360mainmenu:
[GUI] Congure > Advanced > I/O Connections > Cameras > USB
[WEB][adminlogin]Administrator Settings > I/O Connections > Cameras > USB
Step4-RestarttheCU360
• PushthePowerON/OFFbuttonontherearsideoftheCU360orwithitsownRemoteControl.
1. Setting up RC100 as IP Camera
Step1-ConnecttheEthernetCable
• PlugonesideoftheEthernetcableintotheCameraLANsocketandtheothersideintoyourIPNetwork.
Step2-ConnecttheCameraPowerSupply
• ConnectthePowerSupplyplugintotheDC IN 12V socketoftheCameraandturnontheCU360unit.
Step4-ConguretheIPCamera
EnsurethatEnable issettoYes.FromtheCU360mainmenu:
[GUI] Congure > Advanced > I/O Connections > Cameras > IP
[WEB] [adminlogin]Administrator Settings> I/O Connections > Cameras > IP
URL:rtsp://admin:@[ip_address]/ch1
FromtheRC100menusetthe[ip address] withtheCameraRemoteControl:Menu > System > Network.

Using your RC100 Camera with Avaya XT Series Devices
TheAvayaRC100CameracanbeusedasyourprimaryoradditionalcameraonAvayaXTSeries.Pleasefollowsthesesteps.
Note: DonotplacethecameraontopoftheXTseriesdevice.Usethewallmountifneeded.
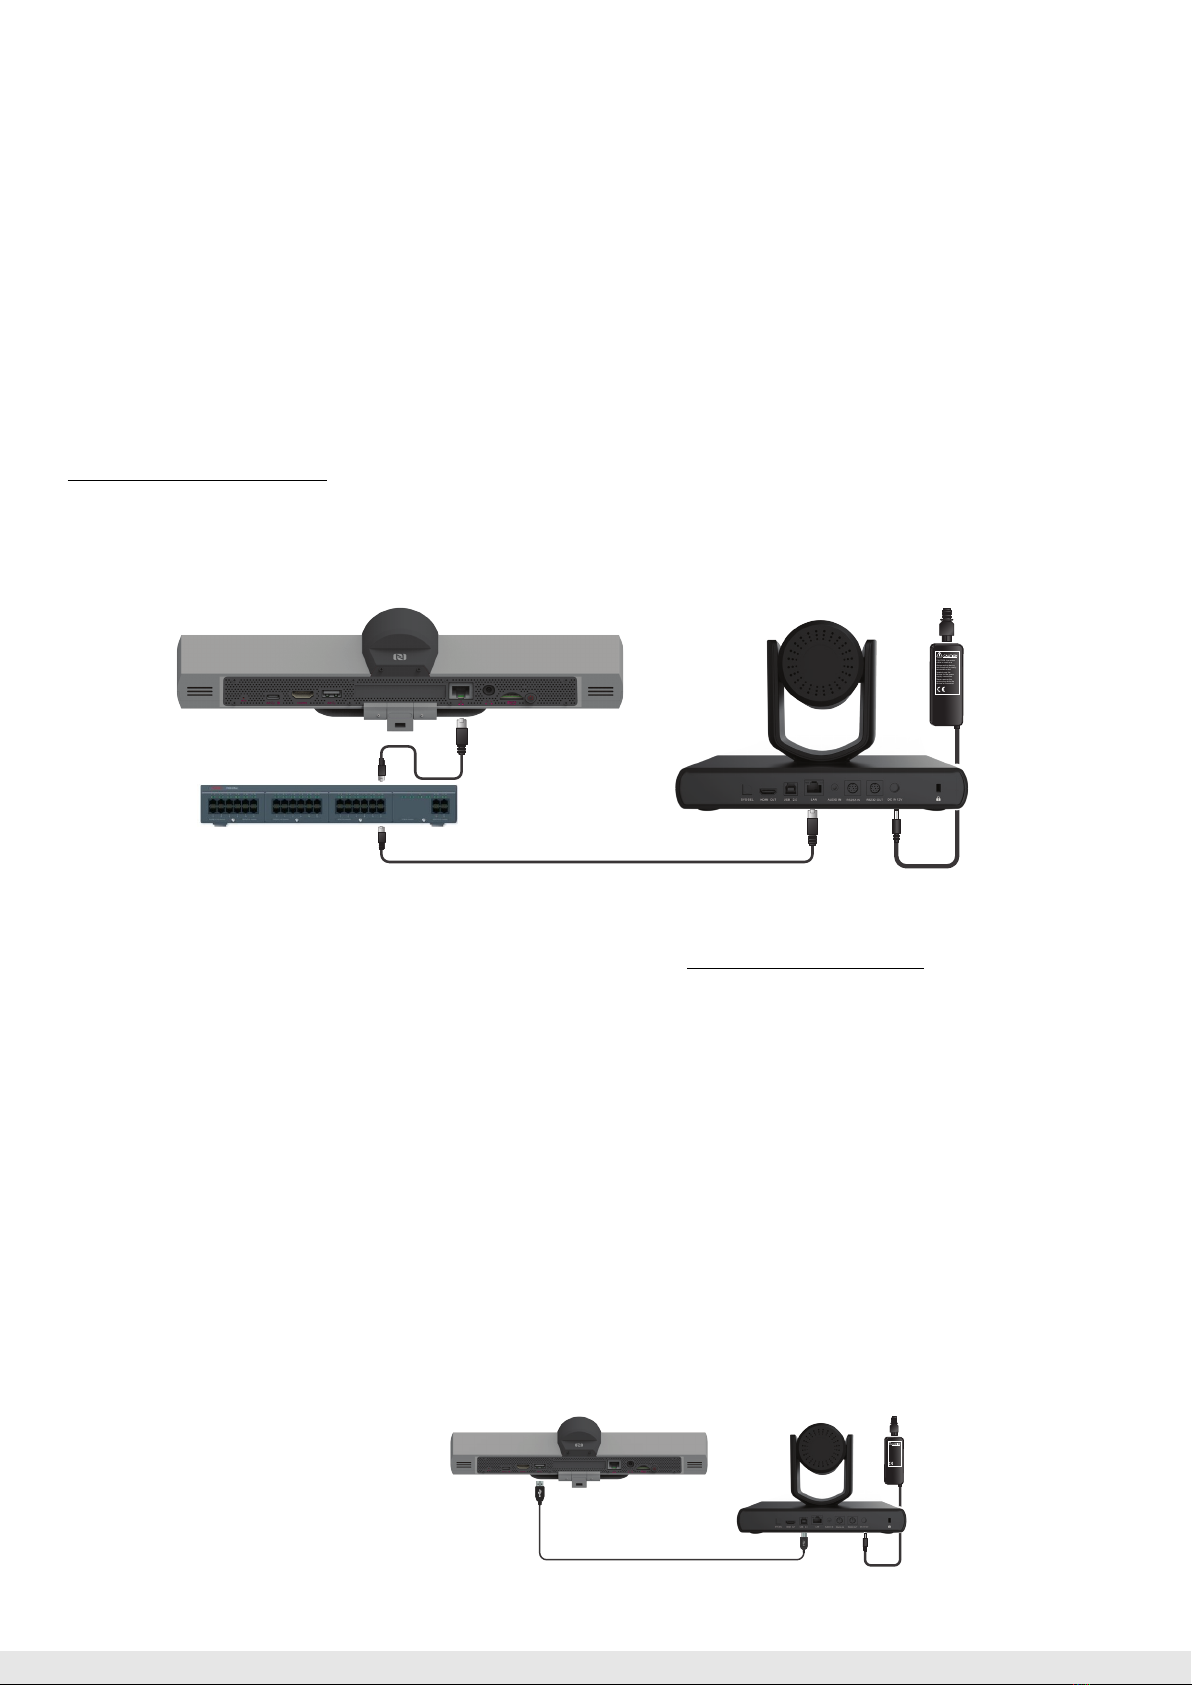
1. Setting up RC100 as Main Camera - HDMI/DVI
Step1-ConnecttheHDMIcable
• PlugonesideintotheCameraHDMI OUT socket.
• PlugtheothersideintotheCodecUnitHDMIIN vertical socket.
Step2-ConnectthePower+SerialControlcable
• Plugthe8-pinconnectorintotheCameraRS232-IN socket.
• PlugthepowerconnectorintotheCameraDC IN 12V socket.
• PlugtheotherspecialconnectorintotheCodecUnitSERIALCONTROLhorizontalsocket.
Note: UsethecableforPowerandSerialControlprovidedwithXToryoucanorderseparatelythe5mversion(P/N700515002).
Step3-ConguretheMainCamera
EnsurethatEnableandControl CameraaresettoYes.Fromthemainmenu:Congure>Advanced>I/Oconnections>Cameras >HD1
Note: YoucanonlyusetheXTRemoteControltocontroltheCamera.
2. Setting up RC100 as Additional Camera - HDMI/DVI
Step1-ConnecttheHDMI/DVIcable
• PlugonesideintothecameraHDMI OUT socket.
• PlugtheothersideintotheXT4/5000CodecUnitDVIIN horizontal socketorHDMI IN verticalsocketincaseofXT7100.
Step2-ConnecttheVISCAcable
• ConnecttheVISCAControlCrosscableintotheRS232 OUT socketoftherstCameraandthe RS232 IN ofyourRC100Camera.
Step3-ConnecttheCameraPowerSupply
• ConnectthePowerSupplyplugintotheDC IN 12V socketoftheRC100CameraandturnontheXTCodecUnit.
Step4-ConguretheAdditionalCamera
• EnsurethatEnableandControl CameraaresettoYes.Fromthemainmenu:
Congure>Advanced>I/OConnections>Cameras >DVI/HD2
Note: YoucanonlyusetheXTRemoteControltocontroltheCamera.
Help
CAUTION:the mains
cableis used as a
disconnectingdevice,
usetherefore an easily
accessibleoutlet
locatednear the
devicefor the power
supplyconnection.
Neverremove the
mainsplug while the
deviceis connected.
CAUTION:the mains
cableis used as a
disconnectingdevice,
usetherefore an easily
accessibleoutlet
locatednear the
devicefor the power
supplyconnection.
Neverremove the
mainsplug while the
deviceis connected.
Note: TheSys-Sel rotaryswitchdenesthevideoformatonHDMIcameraoutput.Theavailableformatsaredescribedinthelabelunderthe
Camera.Thedefaultsettingis“F”,thevideoformatisautomaticallysetthroughtheVISCA.
Note: It’spossibletoconnectanaudioline-insourcetotheAUDIO IN Cameraconnector.ThisaudiowillbepresentintheXTcodecviaHDMI.
TheXTwillmanageitthroughtheadvancedmenuI/O Connections > Audio - Inputs > HD
XTSeries
VISCACable
ViscaControlisastandardprotocoltocontrolPTZ(Pan
TiltZoom)Cameras.YoucanbuyaVISCACrossCablefrom
athirdpartyifyou’replanningtouseRC100asadditional
cameracontrollingitwithXTSeries.
Note:TheViscaCrossCable,andHDMItoDVICable,used
toconnecttheAdditionalCamera,canbepurchased
separatelyintheCameraCablekit(P/N700512192).
3. Setting up RC100 as Main or Additional Camera - USB
Step1-ConnecttheUSBCable
• PlugonesideoftheUSBcableintotheCameraUSB 2.0socketandtheothersideintotheXTUSBType-Auppersocket.
Step2-ConnecttheCameraPowerSupply
• ConnectthePowerSupplyplugintotheDC IN 12V socketoftheCameraandturnontheCU360unit.
Step3-ConguretheUSBCamera
• EnsurethatEnableandControl CameraaresettoYes.FromtheCU360mainmenu:
[GUI] Congure > Advanced > I/O Connections > Cameras > USB
[WEB][adminlogin]Administrator Settings > I/O Connections > Cameras > USB
CAUTION:the mains
cableis used as a
disconnectingdevice,
usetherefore an easily
accessibleoutlet
locatednear the
devicefor the power
supplyconnection.
Neverremove the
mainsplug while the
deviceis connected.
Other manuals for RC100
1
Other Avaya Security Camera manuals