Avery Weigh-Tronix 1040/XL User manual
User Instructions
Model 1040/XL Indicator
29811-0016 Issue AD July 2009
2Model 1040/XL User’s Manual
1040_u_en_29811_0016.p65
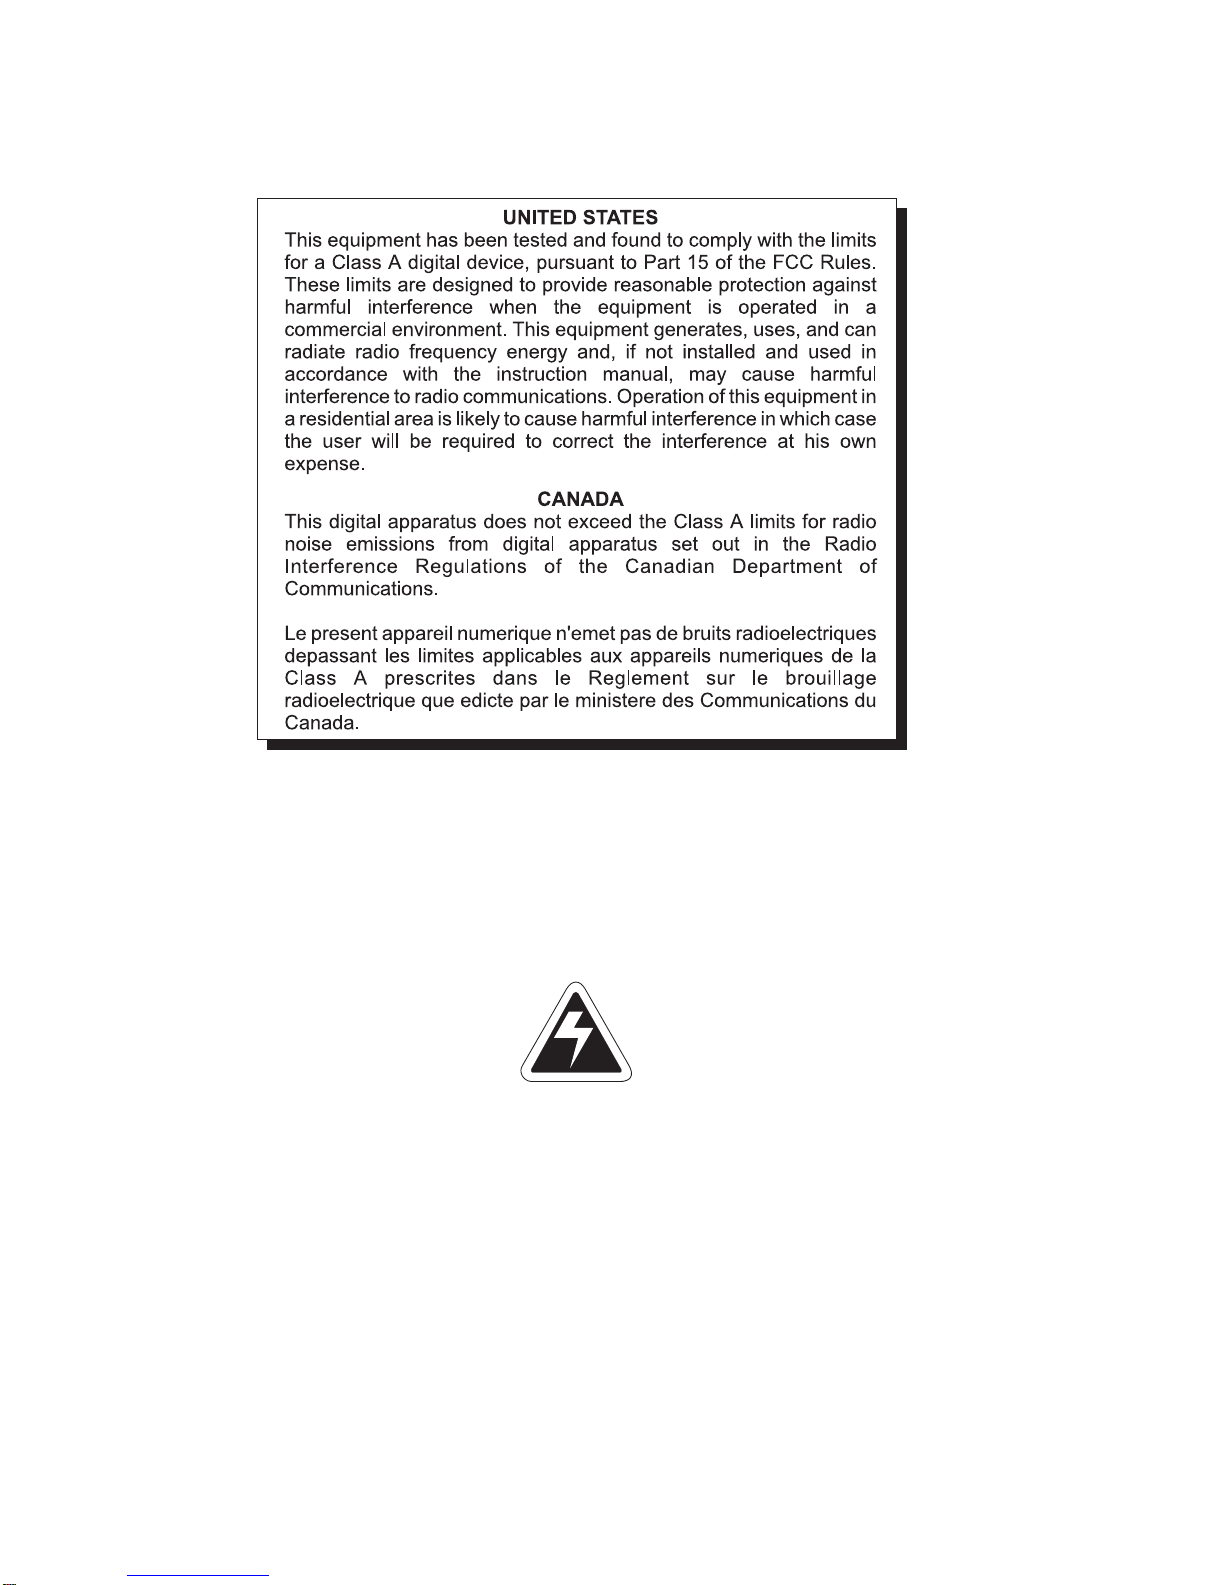
Risk of electrical shock. Do not remove cover. No user service-
able parts inside. Refer servicing to qualified service personnel.
Weigh-Tronix reserves the right to change
specifications at any time.
CAUTION

3
Model 1040/XL User’s Manual
Table of Contents
TableofContents ...................................................................................................................................3
Specifications ........................................................................................................................................5
Introduction ............................................................................................................................................7
AboutThisManual...........................................................................................................................7
The1040Indicator ...........................................................................................................................7
Key Descriptions .............................................................................................................................8
Annunciators ...................................................................................................................................8
Display Messages ...........................................................................................................................9
EnteringAlphanumericCharacters.......................................................................................................10
GettingStarted ....................................................................................................................................11
MountingtheModel1040 ..............................................................................................................11
CableConnectionsandPowerRequirements ......................................................................................12
WeighingProcedures...........................................................................................................................15
SimpleWeighing ...........................................................................................................................15
Loading/UnloadingIngredientsIntoAMixer ...................................................................................15
LoadingorUnloadingIngredientsByUsingtheXM64 ....................................................................16
OperationalOverview ............................................................................................................................17
Menus ...........................................................................................................................................17
GrossModeandPowerFailures ...................................................................................................17
Data Entry .....................................................................................................................................17
UserMenu ...........................................................................................................................................18
LIST ...............................................................................................................................................18
CLR.ACC .......................................................................................................................................19
BAT.CNT .......................................................................................................................................20
ING.TOL&DELAY ........................................................................................................................20
TIMER ...........................................................................................................................................22
ENTRY ..........................................................................................................................................22
TIME ..............................................................................................................................................25
DATE .............................................................................................................................................25
VOLUME .......................................................................................................................................26
SLEEP ..........................................................................................................................................26
NATION .........................................................................................................................................26
CLR.DAT .......................................................................................................................................27
Recipesand Pens................................................................................................................................28
RecipeFeatures ............................................................................................................................28
Choose a Recipe Entry Mode........................................................................................................28
RecipeMenu .................................................................................................................................29
CreatingaRecipe ..........................................................................................................................29
EditingOperations .........................................................................................................................31
Pens..............................................................................................................................................32
UsingID.........................................................................................................................................33

4Model 1040/XL User’s Manual
OtherOperations .................................................................................................................................34
ManualHoldMode.........................................................................................................................34
BatchingRecipe(IngredientLoadingMethod)................................................................................34
MixTimerOperation ......................................................................................................................36
PenUnloading ...............................................................................................................................37
ViewingtheAccumulators .............................................................................................................39
TheXM64Transmitter/Receiver .....................................................................................................42
Printing ..........................................................................................................................................42
IndicatorDiagnostics............................................................................................................................47
Access the Test Menu ..................................................................................................................47
RD64/XL/MRemoteDisplaysandXM64RemoteTransmitter...............................................................51
XM64RemoteTransmitter/Receiver ...............................................................................................51
Troubleshooting....................................................................................................................................52
PowerOn.......................................................................................................................................52
IndicatorOver/UnderCapacity .......................................................................................................53
InaccurateWeightReadings..........................................................................................................53
MeasuringSupplyBatteryVoltage ................................................................................................54
ServiceRepairs .............................................................................................................................54
WindowsSetup .............................................................................................................................55
ToDownload..................................................................................................................................56
TransferDataModule(TDM-40) .....................................................................................................56

5
Model 1040/XL User’s Manual
Specifications
Power Input: 10 to 18 volts, DC negative ground
400ma at 8 350 weigh-bar load
Display: 1.1 inch (Model 1040) 2.0 inch LCD (Model 1040XL), 6 Digits, 14 segment alpha-
numeric, fiber optic backlight
Display Rate: 1, 2, or 5 times per second
Enclosure: Water/dust resistant, structural polycarbonate, 8.50” high x 10.5” wide x 6.0” deep
IP65 Water resistant
CapacityRange: Up to 200,000 lb/kg
Increment sizes: .01,.02,.05,.1,.2,.5,1,2,5,10,20,50,100,200lb/kg
Accuracy: +/- 0.1 % of applied load +/- 1 division
Internal A/D resolution: 1,000,000 counts
Operational keys: 0-9 with alpha capabilities, Load/Unload, Gross, Recipe, Usage, Hold, Menu, Print, Id,
Select, Timer, and Zero Clear
Annunciators; Auto, Pen, Load, Gross, Recipe, Ingredient, Alarm, Usage, Motion, Hand-Add, Lb, and
Kg. (12 annunciators)
Audio Output: Audio tone feedback for key contact assurance
Weigh-bar Drive: 10 350 ohm weigh-bars
Serial Ports: 2 RS-232 serial ports programmable for different selectable output formats
(Std, TDM, Broadcast)
Lower Assembly: Connectors for the following: Power, Com1, Com 2, Weigh-bar J-box, Alarm Output,
RD64
Optional Connectors:Speed Sensor Input
There will be seven standard different lower base assemblies:
1. W/T standard 7 pin 5 conn
(pwr/alm/RD64/Com1/j-box)
2. W/T std 7 pin w/options 7 conn
(pwr/alm/speed/RD64/Com1/Com2/j-box)
3. Single conn (AMP) 5 conn
(pwr/alm/RD64/Com1/j-box)
4. Single conn (AMP w/options) 7 conn
(pwr/alm/speed/RD64/Com1/Com2/j-box)
5. *W/T 4 x 5pin w/ Com 1 and RD64 output 8 con
(pwr/alm/RD64/Com1/4-5 pin conn)
6. *W/T 3 x 5pin w/dual RS-232 and RD64 output 7 conn
(pwr/alm/RD64/Com1/3-5 pin conn)
7. *W/T 4 x 4pin w/dual RS-232 and RD64 output 8 conn
(pwr/alm/RD64/Com1/4-4pinconn)
*NOTE: These versions do not offer Speed Sensor input or com 2.

6Model 1040/XL User’s Manual
Two TTL Inputs: Two programmable inputs (Std, Zero Clear, Menu, Hold, Print)
Options: 1.1 inch LCD Display Option
TDM-40 Transfer Module/ with TDS-1040 or TDS-40 software packages
RD64 Remote Display
RD64XL Remote Display
RD125RF Remote Display
XM64 Transmitter/receiver set
Speed Sensor switch assembly
Operating Temperature: -40° to 140° F (-40° to 60° C)
Weight: 10 lb/ 4.5 kg
Agencies: FCC Class A
CE (European Approval)
Warranty: Three Year
7
Model 1040/XL User’s Manual
This manual covers the information you need to operate your Weigh-Tronix
batching Model 1040/XL indicator.
Major sections of this manual are headed by titles in a black bar like Intro-
duction above. Subheadings appear in the left column. Instructions and text
appear on the right side of the page. Occasionally notes, tips, and special
instructions appear in the left column.
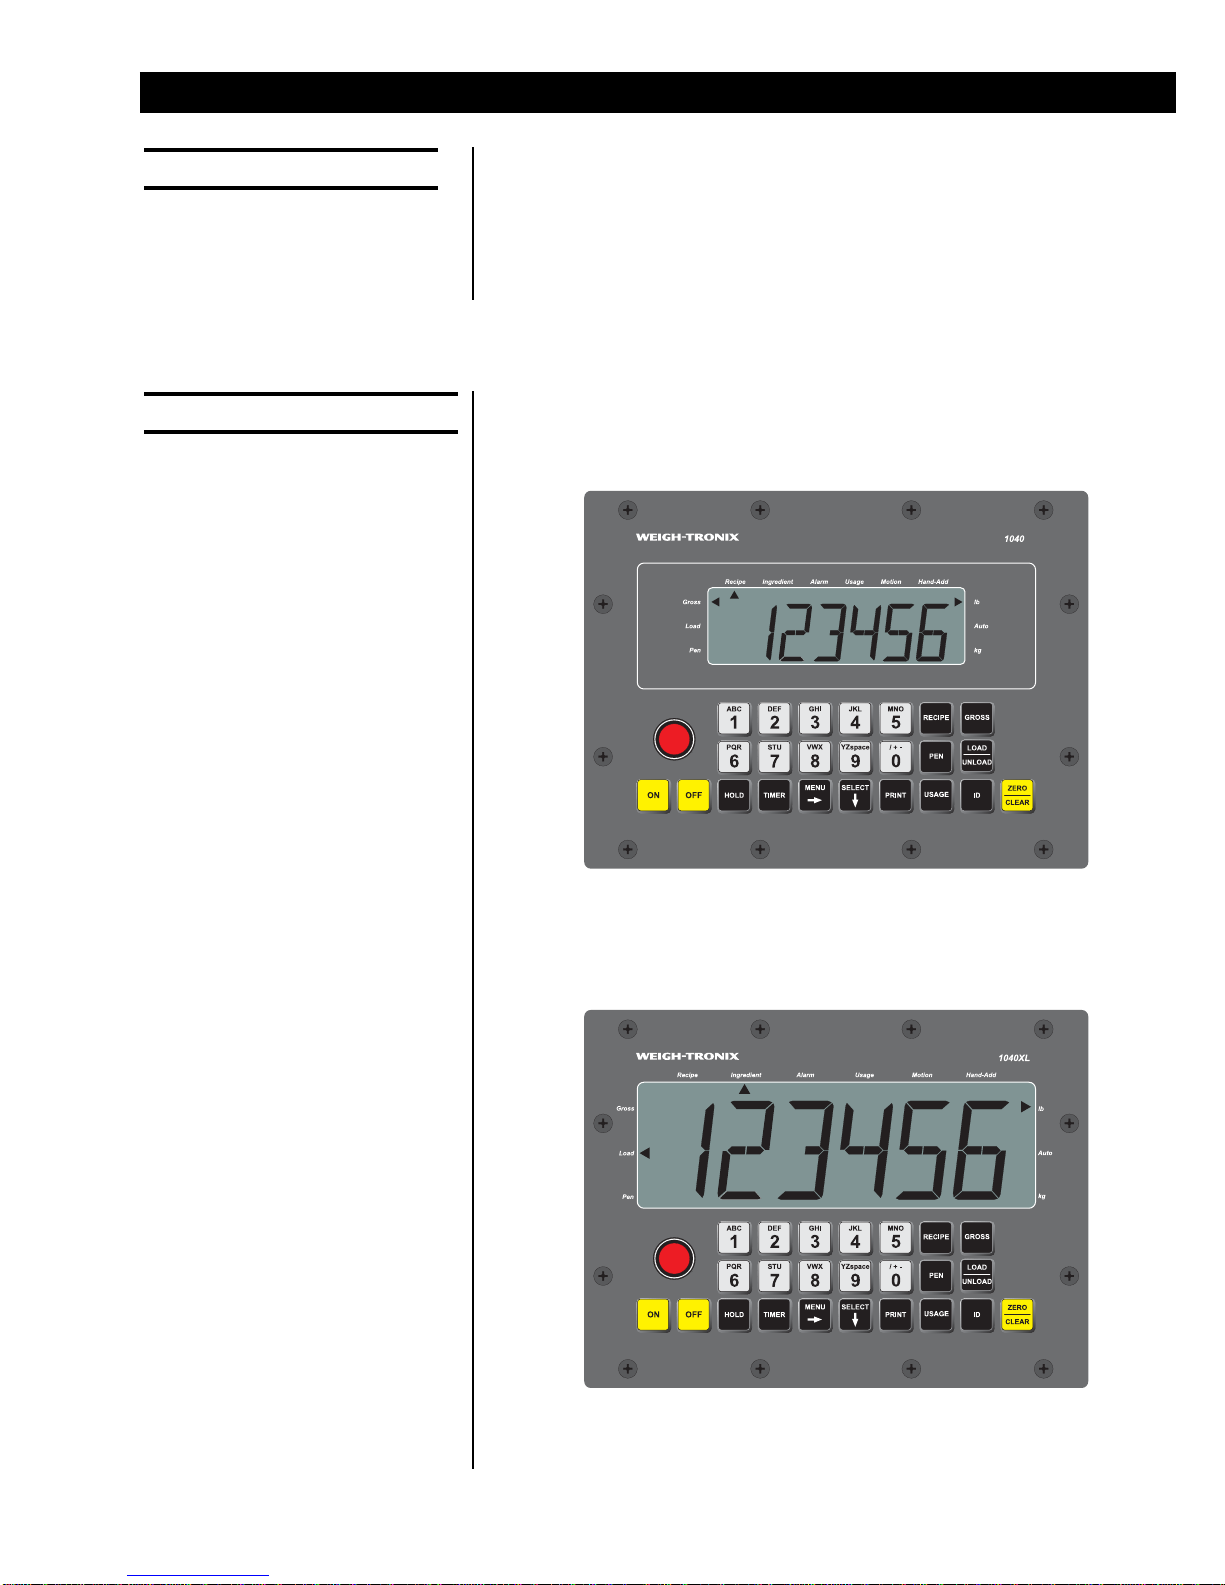
The 1040 indicator face is shown in Figure 1. The 1040XL is shown in
Figure 2. The Model 1040XL and the Model 1040 have the exact same
software. The only difference is the display size.
Figure 1
1040 Indicator face
Figure 2
1040XL Indicator face
Introduction
About This Manual
The 1040 Indicator

8Model 1040/XL User’s Manual
Key Descriptions
Annunciators
There are 24 keys. All keys except the ON and OFF have audible feedback;
low, medium, high.
Key Description
ON Press to turn the unit on.
OFF Press to turn the unit off.
1-9, A-Z Press to enter in numeric data. In specific modes, use
this to enter ingredient, recipe or pen alphanumeric
names.
ZERO/CLEAR Press to zero the indicator, clear the data entry display,
delete recipes, ingredient names and pen names.
RECIPE Press to access recipe programming mode, and/or
used to batch a recipe.
PEN Press to access pen programming mode, and pens.
GROSS Press to access the gross live weight mode.
LOAD/UNLOAD Press to access the net loading/unloading mode, or use
to get into the loading or unloading process.
USAGE Press to access the ingredient, recipe, and pen batch
accumulators.
ID Press to enter in a user ID number.
HOLD Press to access the HOLD mode. This mode allows the
weight to hold at its weight until released from this
mode.
TIMER Press to access the timer mode. Either time or rotations
timer.
MENU Press to move around in the appropriate menu struc-
ture.
SELECT Press to move down in the appropriate menu structure.
Use also to select the quick print.
PRINT . Press to transfer data to the serial port and transfer to a
printer, computer, or handheld data collection device. Or
use to enter decimal point in data entry mode.
The Model 1040 has 12 triangle annunciators along the edge of the display.
PEN To indicate unit is in the pen unloading mode, pen
programming/editing, or viewing the pen accumulators.
LOAD To indicate unit is in the loading/unloading mode when
using the LOAD/UNLOAD key, or the recipe loading
mode.
GROSS To indicate unit is in the gross weighing mode.

9
Model 1040/XL User’s Manual
Display Messages
RECIPE To indicate unit is in the recipe mode, either batching or
programming. Or, you are viewing recipe accumulators.
INGREDIENT To indicate unit is in the recipe entry mode, or ingredient
entry, or ingredient accumulators.
ALARM This is on when the user has activated the load/unload
or recipe modes that have made the alarm setpoint
active and ready to activate the alarm light when the
proper weight is reached.
USAGE To indicate that the usage mode is activated, whether
ingredient, recipe, or pens, then those annunciators will
be activated as appropriate.
MOTION Turns on when there is motion present, based on the
stability window parameters.
HAND-ADD Appears when editing ingredients and enabling the
ingredient as a hand-add. Then, later when the recipe is
recalled, the appropriate ingredient again will turn on if it
is a hand-add.
Lb Turns on if the indicator is programmed for weighing in
lb.
AUTO Turns on if the unit is programmed for AUTO ingredient
advance. (or anytime a tolerance and advance delay
have been entered).
Kg Turns on if the indicator is programmed for weighing in
kg.
M1040 Message displayed on power up initialization sequence.
HELLO Message displayed on power-up sequence for 3 sec-
onds
ADJ.AMT Indicator configured for self-adjusting mode
HD.CT Indicator configured for head count mode.
WT.AMT Indicator configured for standard weight ingredient entry
mode.
(- - - - - -)Upper dashes show the indicator is in a state of overca-
pacity, or analog input is too high.
(- - - - - -)Lower dashes show the indicator is in a state of
undercapacity, or analog input is too low.
PRINT Indicator is transmitting data. Appears after you press
the PRINT key for a second.
PR-X Indicator is showing appropriate quick print, (PR-1 to
PR-9) Shows on the display when the proper quick print
has been selected.
PRINT.X Shows on the display when the Print key was pressed
after a quick print was selected for printing.
LOW.BAT Alternates on the display between current mode and
LOW.BAT when input voltage is between 8-10 volts.

10 Model 1040/XL User’s Manual
HOLD Used when hold mode is activated.
CAN’T Usually displayed when trying to enter an invalid data.
(EX: entering in 9999 for a time)
NOPRGM Indicates accessed recipe is not programmed.
bAdKEY This indicates that one of the 22 active keys is on, or
one of the two inputs is stuck in the active state. Helpful
in debugging a bad keypad or faulty input (transmitter).
This remains displayed until the keypad condition is
fixed.
SHT.DWN Is shown on the display prior to shutting the indicator off
after the sleep timer has expired, or if voltage exceeds
17 or if voltage is less than 9 for more than 10 seconds.
(10 seconds before this the alarm beeps several times).
HI VOLT Indicates input voltage to Model 1040 has exceeded 17
volts.
OVR.TOL Displayed when in the load/unload mode or recipe
batching mode when a target is over tolerance. If after
over-tolerance meets the delay time and motion ceases
it will auto advance. Otherwise user will need to ad-
vance forward by using the MENU key.
There are times you will want to enter alphanumeric characters into the
1040. For example: Recipe, ingredient or pen names.
You can enter these characters through the front panel keys. Below is an
example to illustrate how it is done.
To key in the word CORN:
1. When the display will accept characters press the 1(ABC) key repeat-
edly until the Cis displayed.
2. Repeatedly press the 5(MNO) key until Oappears.
3. Repeatedly press the 6(PQR) key until Rappears.
4. Repeatedly press the 5(MNO) key until Nappears.
5. Press the SELECT key to accept the ingredient name or press the
ZERO/CLEAR key to clear the name and try steps 1-4 again.
Entering Alphanumeric Characters
If two consecutive alpha
characters are on the same
key, you must wait a second or
two after the first character is
entered before you can enter
the second.

11
Model 1040/XL User’s Manual
Before using your new Model 1040 indicator:
• please verify that everything has been properly connected. See
Figures 3-6
• If you are mounting the indicator, see the next section: Mounting the
Model 1040.
• check the scale system to ensure proper units are set (lb, kg)
• verify the system is weighing properly.
The Model 1040 mounts on a quick-detach bracket. Weld or bolt the
quick-detach bracket into place, as follows:
1. Choose a mounting location that is
• convenient for operation of the indicator, and
• protected from moving parts or from other moving machinery.
2. Hold the indicator at the proposed mounting location, and verify that
the display is legible and the controls accessible.
3. Positioning the quick-detach bracket with the wider end at the top,
mark the desired mounting location. If bolting, use the quick-detach
bracket as a template and mark and drill holes.
4. Weld or bolt the quick-detach bracket at the appropriate location. If
bolting, use double nuts or self-locking nuts to protect both indicator
and machinery.
5. Insert the indicator bracket into the quick-detach bracket and push it
down into place.
6. For mobile applications, wrap and twist a strong wire around the
indicator bracket and the quick-detach bracket to stabilize the mount-
ing.
Mounting the
Model 1040
Getting Started
12 Model 1040/XL User’s Manual
Make sure all cables are connected as shown in Figures 3-6.
Voltage to the Model 1040 must be 10-17 volts DC, negative ground only. If
voltage is between 9-10 volts, LOW.BAT is displayed on the indicator.
Dropping below nine volts will cause the Model 1040 to automatically shut
itself off, protecting the battery from being completely drained.
If voltage is above 17 volts, HI VOLT flashes on the the display. After ten
seconds the unit displays SHT.DWN and turns off.
If voltage is below nine volts, LOW.BAT flashes on the the display. After ten
seconds the unit displays SHT.DWN and turns off.
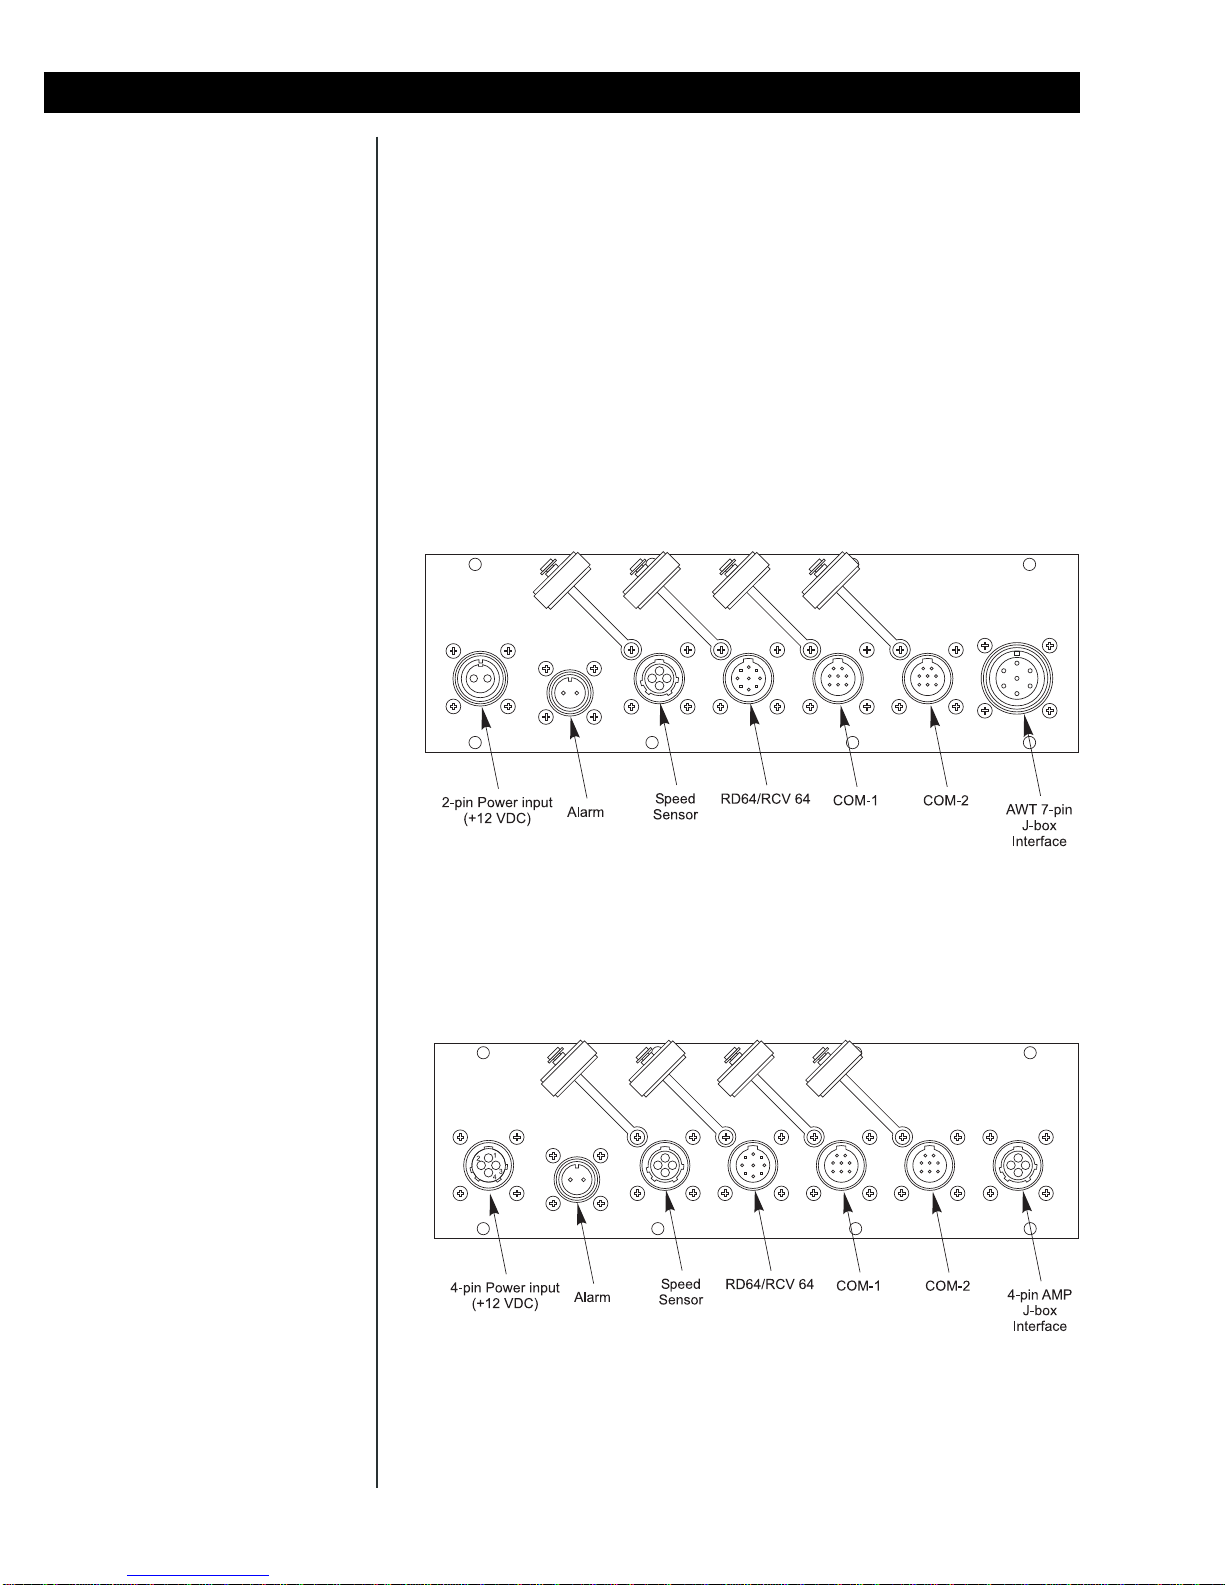
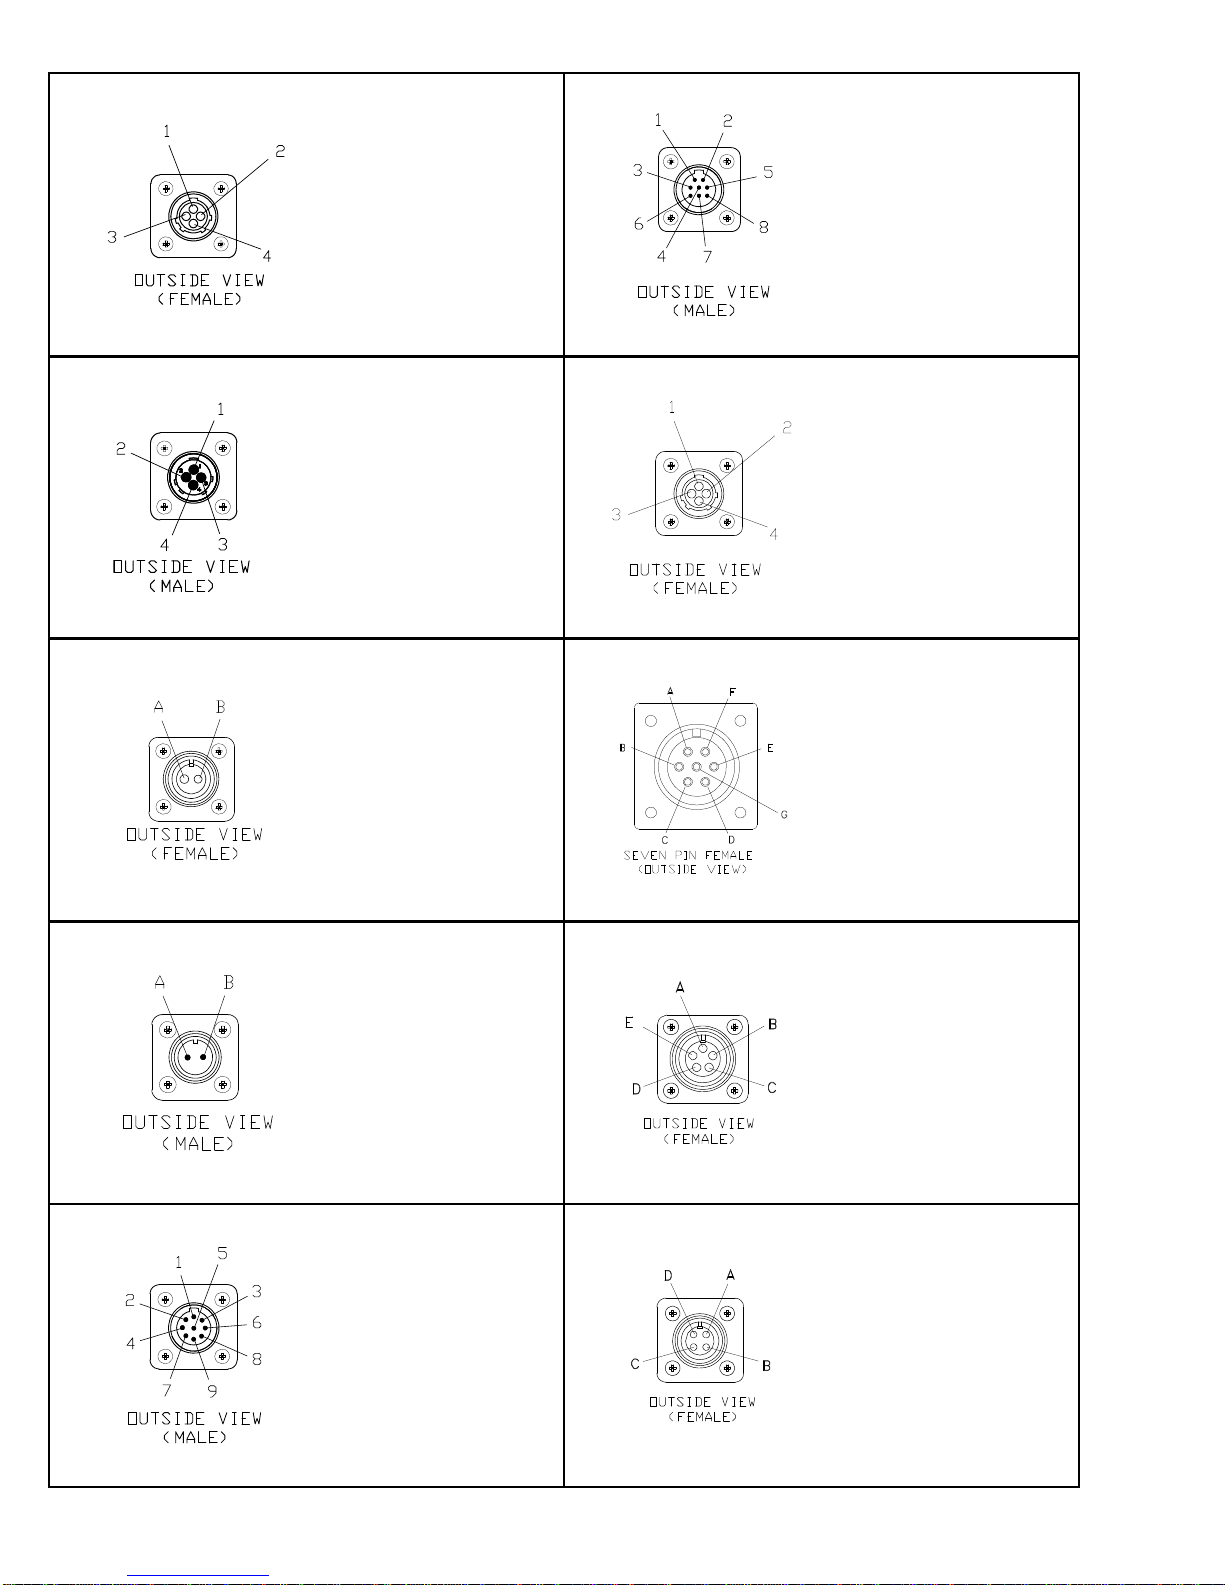
Cable Connections and Power Requirements
Figure 3
Bottom panel w/power, alarm, speed sensor, remote
display, 2 Com ports, and 7-pin J-box connections
Figure 4
Bottom panel w/power, alarm, speed sensor, remote
display, 2 Com ports, and 4-pin J-box connections

13
Model 1040/XL User’s Manual
Figure 5
Bottom panel w/power, alarm, remote display, 1 Com
port, and 3 Weigh Bar connections
Figure 6
Bottom panel w/power, alarm, remote display, 1 Com
port, and 4 Weigh Bar connections
14 Model 1040/XL User’s Manual
Pin Description
1 + 12V
2 GND
3 Input
4 N/C
Pin Description
1 +12V Input
2 GND
3 N/C
4 N/C
Pin Description
A +12V
B GND
Pin Description
A +12V Alarm
B GND
Pin Description
1 +12V
2 +5V
3 Pwr Ret
4 GND
5 Seg Test
6 Data In
7 Clock
8 Load
9 Remote
Pin Description
1 CTS
2 XMT
3 RTS
4 RXD
5 GND
6 GND
7 +5V
8 +12V
Pin Description
1 + Excitation
2 - Bridge
3 + Bridge
4 -Excitation
Pin Description
A - Bridge
B + Excitation
C + Bridge
D - Excitation
E - Sense
F + Sense
G Shield
Pin Description
A - Bridge
B + Excitation
C + Bridge
D - Excitation
E Shield
Pin Description
A GND
BNA
CNA
DNA
Speed Sensor Input
4-Pin Power Input
2-Pin Power Input
2-Pin Alarm Input
RD64/XL/M Input
RS-232 Port
7-Pin J-box Interface
5-Pin Weigh Bar Input
4-Pin Weigh Bar Input
4-Pin Amp J-Box Interface

15
Model 1040/XL User’s Manual
Weighing Procedures
Simple Weighing
Loading/Unloading
Ingredients Into A Mixer
If you miskey, simply press
ZERO/CLEAR and re-enter the
proper amount.
1. Press the ON key. . .
Display shows M 1040 then HELLO, then weight value is dis-
played in the Gross mode. If it shows RETURN, press SELECT to
resume batching process, otherwise GROSS to return to Gross
mode.
2. Press the GROSS key. . .
Live scale weight is displayed in the gross weighing mode.
3. Press the ZERO/CLEAR key. . .
Zero value is displayed, and the system is zeroed.
Press PRINT to print the displayed weight value. Below is an example of a
printout:
10000 lb
1. Zero the indicator before loading first Ingredient.
2. Key in the target weight of the first ingredient. . .
Quantity to load/unload is displayed.
3. Press the LOAD/UNLOAD key. . .
Target weight remains displayed, and the load and alarm annun-
ciator turns on. (this sequence now has the alarm setpoint en-
gaged)
4. Start loading/unloading the first ingredient. . .
Display shows the net amount of what needs to be loaded/
unloaded, decreasing from target amount towards zero. (It doesn’t
matter if you are loading or unloading)
When displayed weight approaches within 50 lb/kg (default) of
your selected target weight, the alarm light starts flashing once/
sec. When your target is reached the alarm light stays on solid.
5. Stop loading/unloading when target weight is reached.
6. Press the GROSS key to shut off the alarm and the display will return to
the gross mode. Press ZERO/CLEAR to shut off alarm and remain in
the Load/Unload mode with the previous target amount active. This is
very handy for loading/unloading a series of equal amounts.
7. If AUTO-HOLD is enabled. . .
The alarm shuts off and the indicator goes into Auto-Hold mode,
displayingHOLD)
If AUTO-HOLD is off. . .
The alarm shuts off, and the unit returns to the gross mode.
8. Move mixer to its next ingredient loading/unloading location. . .
Display shows HOLD. Because the unit is in HOLD mode it will
not allow the display weight to change because of the terrain. This
will prevent a scale zero shift. Press MENU (or XM64) or GROSS
key to return to Gross mode.

16 Model 1040/XL User’s Manual
Loading Or Unloading
Ingredients By Using the
XM64
The alarm light is nonfunctional
in this loading/unloading
sequence.
You can load or unload a series of ingredients or batched feed by using the
XM64 transmitter/receiver. You must know the net amount to be loaded or
unloaded. The XM64 gives you the ability to tare or zero each ingredient and
view the net amount as you load or unload. The remote can also be used to
indicate the gross amount between ingredients and can return the indicator
to the gross mode when done loading by simply holding down on the XM64
for three or more seconds.
Follow these steps:
1. Be sure the mixer or scale system is empty and zero the indicator.
2. Press the LOAD/UNLOAD key. . .
Zero value is shown, and the load and lb/kg annunciators turn on.
This means the net weighing mode is on.
3. Load or unload material as needed. . .
Net weight value increases. This is an absolute weight value. If
you are loading or unloading it shows the amount loaded or
unloaded so far.
4. When you reach the proper amount, stop loading or unloading material.
5. Press the ZERO/CLEAR button or the XM64 button. . .
The net value shown is reset or tared back to zero, ready for the
next amount.
You may view the gross weight by pressing and holding the XM64
button. If you release the button within three seconds, the unit
returns to the net mode showing zero.
If you are done loading and now want to return to the gross mode
for unloading, press and hold the XM64 button for more than three
seconds.
To return to the net mode, press LOAD/UNLOAD.
6. Load or unload additional quantities by repeating steps 3-5 as needed,
otherwise, if done loading, press the GROSS key to return to gross
weighing mode.

17
Model 1040/XL User’s Manual
Operational Overview
Menus
Gross Mode and
Power Failures
Data Entry
The following is an operational overview of the 1040/XL indicator.
The indicator has the following menus:
• User menu (no password)
• Test menu (111 Menu)
• Setup menu (covered in the Service Manual)
• History menu (covered in the Service Manual)
• Factory calibration menu (covered in the Service Manual)
The standard mode of operation is the gross mode. The Gross annunciator
will be on and gross weight on the scale will be displayed.
After a power failure, when you power up the indicator you are given the
opportunity to return to the step in any process you may have been in when
the power failure occurred. This is important if you lose power in the middle
of a batch and simply want to return to which ingredient you were loading.
If power is lost during batching of a recipe, the display will show RETURN
when power is restored. If you want to exit the recipe process, press the
GROSS key. If you want to return to recipe process, press the SELECT key.
The indicator will return to where it was when power was lost. If you were in
the middle of loading an ingredient and don’t remember what ingredient it
was, press the LOAD/UNLOAD key to see the ingredient name.
All data entered will become one of the following:
• weight - All weight entered data will be rounded on a standard rounding
scheme to the nearest division size. (Example: If you enter 5002, and
the indicator is counting by 5’s, once the next key is pressed signifying
that it is weight, the display will show and record the entry as 5000).
• Time or Rotation entry
•Id
• Quick print number
• Recipe or Pen number
• Recipe entry (If entering a recipe, all data will be allowed down to 1 lb/
kg. Rounding will be implemented when actually batching or printing
recipes.
Anytime you enter data by mistake, the ZERO/CLEAR key will clear the data
entry display and you can re-enter the correct data.
18 Model 1040/XL User’s Manual
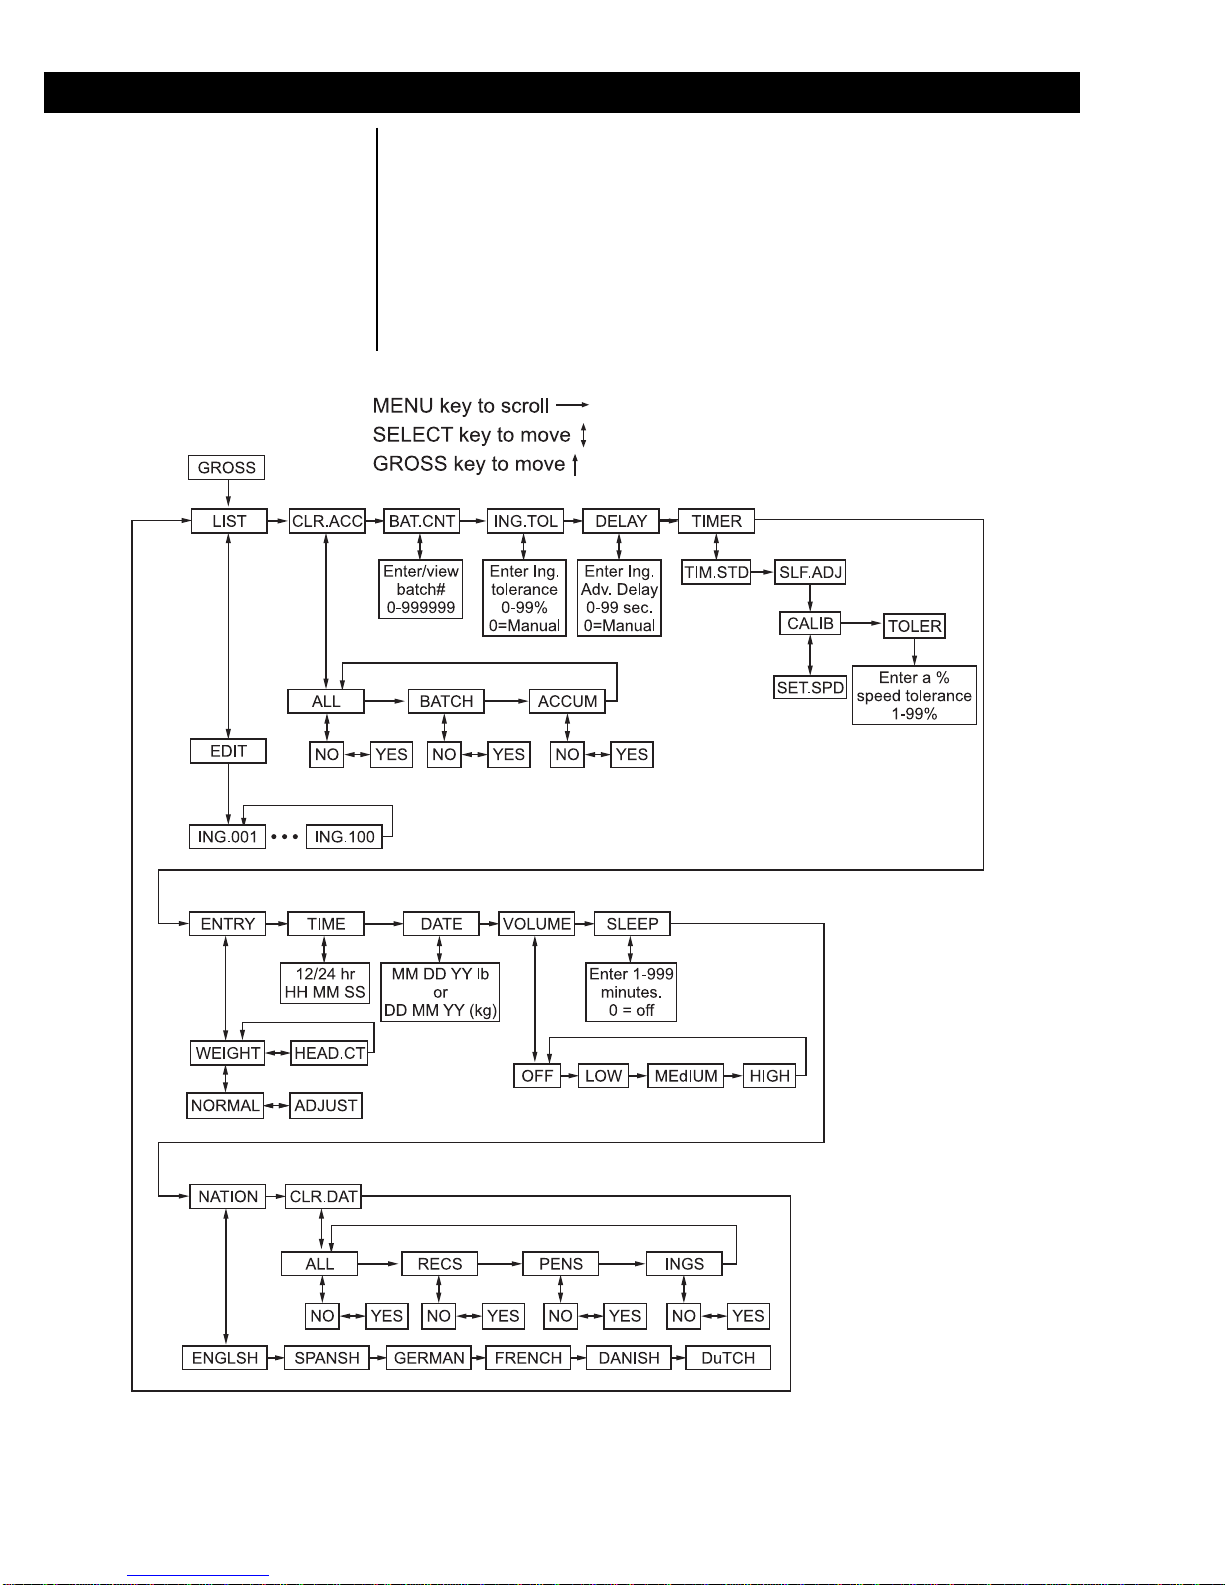
User Menu
Figure 7 shows the User menu. All the user configurable parameters are set
through this menu. This section deals with each of the items in the menu.
You will be referred back to Figure 7 several times.
To enter the menu, press and hold the MENU key until you hear the unit
beep twice (2 seconds). Release the key and the display will show LIST.
Use the SELECT key to move down from a menu item. Use the MENU key
to move to the right in the menu. When you are done configuring one of the
menu items, press the GROSS key to move back up to the menu item.
Press the GROSS key repeat-
edly to escape from any spot
on the menu and return to the
Gross mode.
Figure 7
User menu

19
Model 1040/XL User’s Manual
CLR.ACC
LIST The first item in the user menu, Figure 7, is LIST. Use this to edit your
ingredient list. You can have up to 100 ingredients stored in the 1040. By
default the names are ING.001 through ING.100.
Follow steps 1 - 3 to access the
1. From gross weighing mode, press and hold MENU for 2 beeps. . .
LIST is displayed.
2. Press SELECT. . .
EDIT is displayed.
3. Press SELECT to access the first ingredient in the list. . .
ING.001 is displayed
OR
Key in the ingredient number you want to edit and press SELECT. . .
That ingredient is displayed.
You can enter alphanumeric titles for each ingredient using the
front panel keys. See the section Entering Alphanumeric Charac-
ters for instructions.
4. Once edited properly, press SELECT then MENU to access the next
ingredient in the list
OR
Press the GROSS key repeatedly to return to the gross weighing mode.
Once edited, these new ingredient descriptions will show up on all applicable
printouts and in the batching process.
The next menu item is CLR.ACC. Under this item you can choose to clear:
• ALL accumulators (the last 100 batch printouts/data and all ingredient,
recipe and pen accumulators)
• BATCH accumulator ((the last 100 batch printouts/data)
• ACCUM (the ingredient, recipe and pen accumulators).
Follow these steps:
1. From the Gross mode, press and hold the MENU key for two beeps (2
sec), then release. . .
LIST is displayed.
2. Press the MENU key once. . .
CLR.ACC is displayed
3. Press the SELECT key. . .
ALL is displayed.
4. Use the MENU key to move through the choices. Display the one you
want to clear and press SELECT key. . .
NO is displayed.
To Set Ingredient Descrip-
tion Back to Default Setting
If you want to change back to
the default description, access
the proper ingredient and press
and hold the ZERO/CLEAR
key for 2 beeps and release.
ING.CLR will be briefly dis-
played and then returns to
EDIT.
To Setup Ingredient as an
Hand-add
While ingredient name is
displayed, press the HOLD key
and the Hand-add annunciator
will illuminate. The ingredient
will then always be treated as a
hand-add ingredient. Press the
HOLD key again to disable the
tagging of an ingredient as a
hand-addingredient.

20 Model 1040/XL User’s Manual
ING.TOL & DELAY
BAT.CNT
5. Press MENU and YES is shown. Press SELECT key. . .
WAIT is displayed while clearing, then ALL, BATCH, or ACCUM is
displayed.
6. Press GROSS key. . .
Unit returns to CLR.ACC.
7. Press the GROSS key to return to the gross weighing mode, or press
the MENU key to move to the next menu item.
The next menu item is BAT.CNT. This stands for Batch Counter. The
counter starts at 0 and increments each time a recipe is batched. This value
is cleared each time the batched data is cleared under CLR.ACC. This
counter goes up to 999999.
Follow these steps:
1. From the Gross mode, press and hold the MENU key for two beeps (2
sec), then release. . .
LIST is displayed.
2. Press the MENU key repeatedly until. . .
bAT.CNT is displayed.
3. Press the SELECT key. . .
Current batch counter is shown.
4. Press the SELECT key. . .
bAT.CNT is shown
5. Press the GROSS key to return to the Gross weighing mode or press
the MENU key to move to the next menu item.
ING.TOL stands for Ingredient Tolerance. DELAY stands for ingredient
advance Delay. These two parameters work together to make the Auto-
advance feature work. Set ingredient tolerance as a percentage (1-99) and
delay in seconds. See example below to help understand these items.
Example: Delay parameter is set to 20 seconds
Tolerance is set to 5%
When the ingredient weight being loaded falls within the tolerance
and stays within the tolerance for the time set in the delay
parameter, the indicator will auto-advance to the next ingredient.
If you undershoot the ingredient tolerance, you can advance the
ingredient manually by pressing the MENU key on the 1040. If
you overshoot, the display will alternate between OVR.TOL and
the amount overloaded until the indicator doesn’t sense motion,
then it will advance to the next ingredient.
Follow these steps to set or view the ING.TOL parameter:
Table of contents
Other Avery Weigh-Tronix Touch Panel manuals

Avery Weigh-Tronix
Avery Weigh-Tronix ZM303 User manual

Avery Weigh-Tronix
Avery Weigh-Tronix 1080 User manual

Avery Weigh-Tronix
Avery Weigh-Tronix E1070 User manual

Avery Weigh-Tronix
Avery Weigh-Tronix WI-130 User manual

Avery Weigh-Tronix
Avery Weigh-Tronix E1010 User manual

Avery Weigh-Tronix
Avery Weigh-Tronix ZM305 User manual

Avery Weigh-Tronix
Avery Weigh-Tronix 640XL User manual


