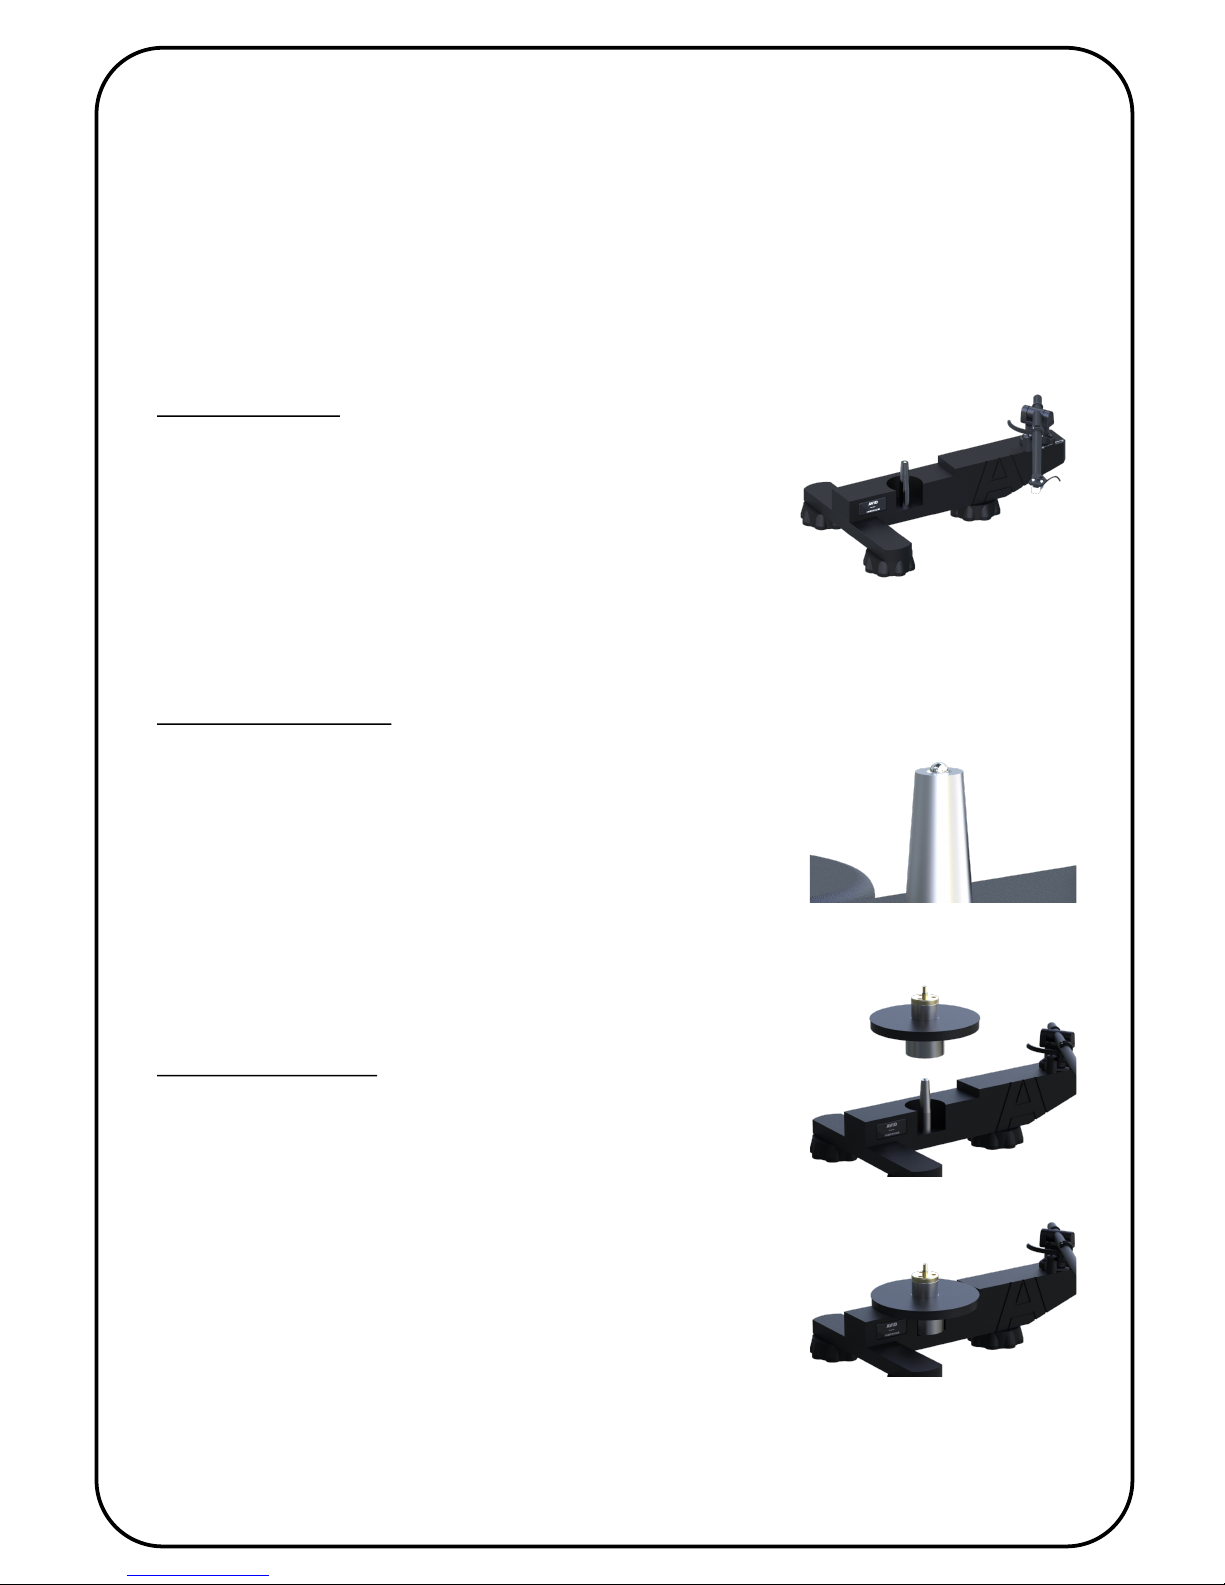
AVID HIFI Ingenium P&P User manual

Ingenium P&P
Turntable
USER MANUAL

2
Topic Page
Welcome 3
Cauon 3
Component List 4
Placement 5
Seng-up: 6
Posion the Chassis 6
Inserng the bearing ball 6
Aaching the drive hub 6
The Motor 7
Aaching the plaer 7
Changing the plaer speed 7
Counterweight 8
Connecng to your system 8
Using the clamp 8
Starng the turntable 8
Troubleshoong 9
Specicaons 10
Declaraon of Conformity 10
Warranty 11
Table of Contents

3
Congratulaons on purchasing your new AVID Ingenium P&P.
By using the highest quality materials and being assembled to the highest industry
standards, your AVID Ingenium should provide you with many years of trouble-free
enjoyment.
Please read this manual carefully to ensure you understand all the features and
operang funcons available.
Cauon
• Turntables, tonearms and cartridges are fragile items, please take extreme care when
moving, seng-up and using them.
• When cleaning, use only a so, lint-free cloth. Take special care not to damage the
cartridge and its delicate stylus assembly.
• Always clip the tonearm back into its rest when changing records, to minimise the risk
of damaging the cartridge.
• Keep all packaging—you will need them if you need to return the item for service or
upgrade at a later date.

4
Component List:
Before assembling your Ingenium please check that, along with this manual, you have all the
parts as listed below. If any items appear to be missing, please contact your dealer immediately.
Chassis with arm/cartridge Hub/bearing Assembly
Tonearm Counterweight Bearing Ball
PlatterDrive belt
Motor
Record Clamp

5
Placement:
By their nature, turntables are sensive devices. They are designed to retrieve the smallest vibraons and
convert them to sound. Unfortunately this means that they are also very good at picking up vibraons you
don’t want to hear, such as the footsteps of someone walking past the turntable.
Most turntable manufacturers aempt to minimise this problem—the Ingenium P&P uses a combinaon
of its high mass along with its compliant feet to create an eecve isolaon system.
These features can only do so much. Where, and on what you place the turntable is of even greater
importance. With this in mind, we would make the following observaons regarding the placement of
your turntable:
1: The turntable must be on a level, stable plaorm:
A rigid shelf or table is acceptable, a dedicated support is generally best
Keep the unit away from other high power devices—power ampliers tend to have large
magnec elds and are also a source of heat, both of which can adversely aect
the performance of your turntable.
Lightweight supports generally work best, as they store less energy, and therefore put
less unwanted energy back into the turntable—a wall mounted shelf is oen best, as
this is unaected by common oor vibraons.
2: Avoid placing the turntable near the loudspeakers—this could aect the sound quality, and even
induce feedback when played at high levels.
3: Posion the turntable where you can get easy access to it, and its component parts—you may need
to remove the plaer from me-to-me to gain access to the motor, so pung it in a cupboard may
prove impraccal.
4: Do not leave the turntable exposed to heat and direct sunlight, this may aect the cosmec nish of
the unit over me, and will potenally cause warping of records that are on the plaer.

6
Posion the chassis
The main chassis comes ready-assembled, with its feet, arm
and cartridge in place. Place the chassis on the surface you
intend to use the turntable. Posion the chassis so that the
tonearm and cartridge are easy to access, and there are no
objects that may interfere with the free movement of the arm.
Inserng the bearing ball
Before assembly, clean the conical recess on the top of the
sha using a so lint-free cloth. Place the bearing ball into the
recess. The bearing ball must be in place before connuing,
otherwise permanent damage will be done to the sapphire.
NEVER PUT ANY LUBRICATION ON THE SAPPHIRE OR
BEARING BALL AS THIS WILL CAUSE DAMAGE.
Aaching the drive hub
Remove the clamp from the bearing assembly by unscrewing it
with an an-clockwise acon. Store the clamp safely. Carefully
lower the bearing assembly over the sha—do not allow the
assembly to drop onto the sha, as this will shaer the
Sapphire bearing. Once the bearing is in place, the bearing
should inially spin freely, but once fully lubricated will cause
drag, slowing the hub quite quickly—this is normal.
Seng-up:
Prepare the area where you plan to locate the turntable—make sure you have plenty
of space around it to give you easy access.
We recommend the following sequence to assemble your Ingenium P&P turntable.

7
The Motor
The motor needs to be located to the rear of the chassis. The
centre of the motor spindle should be approximately 97mm
(3 ¾”) away from the centre of the hub assembly.
Take the drive belt, and place it around the hub, and then
stretch it over the motor pulley.
EVERY TIME YOU FIT THE DRIVE BELT—MANUALLY ROTATE
THE DRIVE HUB BY HAND TO ALIGN THE DRIVE BELT.
Aaching the Plaer
The plaer ts over the hub assembly. Gently lower the
plaer over the hub assembly being careful to align the centre
hole with the hub.
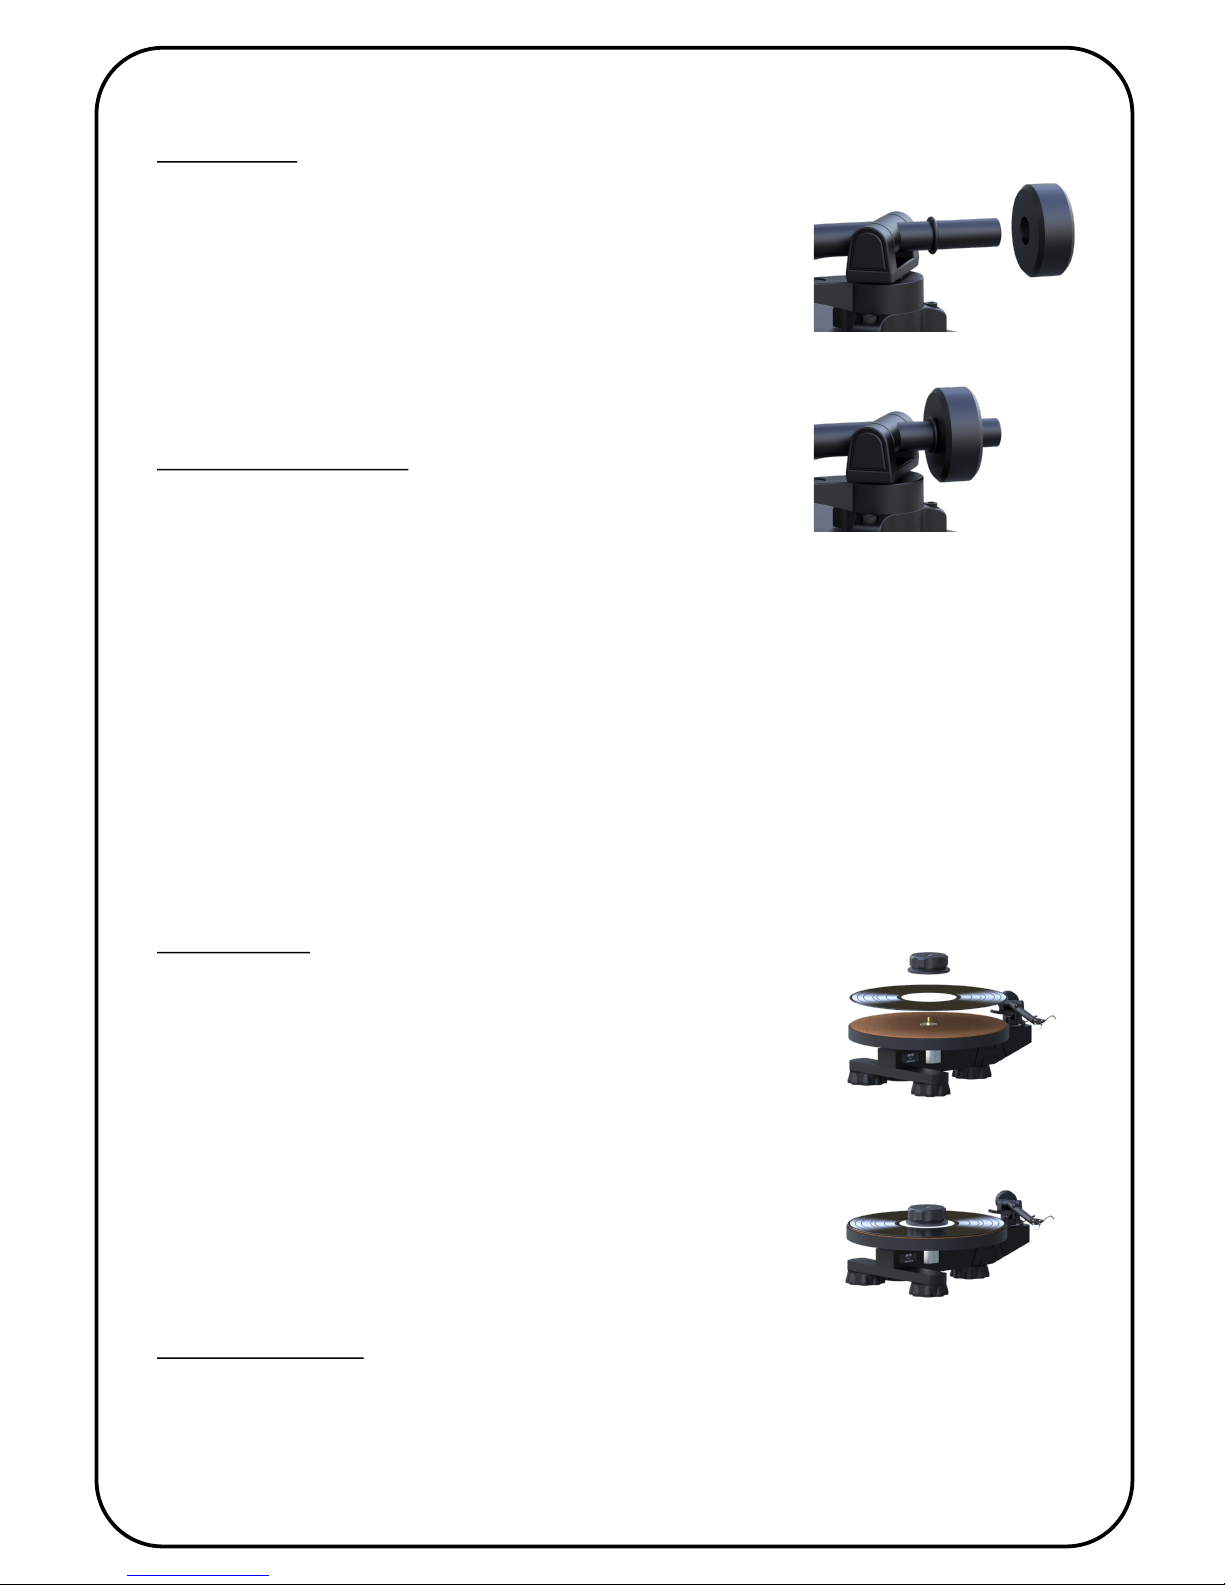
Changing the Plaer Speed
The motor pulley has two grooves into which the belt can be
placed—the larger diameter groove is for playing 45RPM
records, and the smaller plays at 33.3RPM.
Any me you want to change the turntable speed, simply
remove the plaer (push down on the spindle, so that it
disengages from the plaer) and reposion the drive belt,
replace the plaer and rotate manually to align drive belt.
The turntable speed has been calibrated at the factory. You
can accurately check the speed of the plaer by using a strobe
disk. A small speed adjustment is possible by altering the
distance between the motor and the drive hub.
Stretching the belt slightly will slow the plaer, whilst
releasing the tension will introduce an increased speed.
However, if the belt is too loose, it will start to slip, resulng in
a wowing sound. Conversely, if the belt is to ght it will cause
the speed will slow. Some experimentaon in this area is
required for crical adjustment.

8
Counterweight
The Ingenium comes with a cartridge already installed. Before
playing any records, you must aach the counterweight; this
ensures the cartridge is played at the correct tracking weight.
Using a twisng acon, gently push the counterweight onto the
rear of the tonearm unl it reaches the stop, and cannot be
pushed further—the tracking weight is now correctly set.
Connecng to your System
This turntable uses a convenonal Moving Magnet cartridge,
which is designed to work with the majority of ampliers with a
built-in phono stage. If your amplier does not have a phono
stage, you will need to acquire an external device. AVID produce a
range of suitable phono stages.
Please consult the amplier or phono stage instrucons supplied
by the manufacturer to correctly t the tonearm cables. Also note
the earth connecon is integrated into the tonearm lead and
there is no separate earth connecon lead required.
Once you have connected your turntable to your amplier, the
turntable is ready to be used.
Using the Clamp
Your Ingenium comes with a record clamp—this is designed to
minimise any warps in the record, but also to help control
vibraons within the record that adversely aect sound quality.
The clamp should be used at all mes.
Simply place the record over the spindle and then screw the
clamp onto the spindle—do this carefully to avoid cross
threading which will cause damage.
Do not use excessive force—hand-ght is more than adequate.
ALWAYS STOP THE TURNTABLE WHEN CHANGING THE RECORD
Starng the Turntable
You start the turntable by using the switch on the mains cable.

9
TROUBLESHOOTING
The Ingenium P&P is intentionally a straight-forward turntable, making set-up and use very simple.
Occasionally though, you may come across a problem, if so, please read the following to help find a
solution
Fault Soluon
Turntable plaer not
rotang
Check that the mains plug is correctly ed and switched ‘on’, and that the
in-line mains switch is also ‘on’.
Check that the drive belt is ed correctly around the hub and motor pulley
and that the motor is correctly posioned.
Check that the Plaer is free to turn, and that no foreign object may be
jamming it.
No, or very quiet sound Check that the tonearm leads are connected to the amplier, and that the
correct input is selected.
This turntable requires an amplier with a built-in phono stage, or an oponal
external one. It will not funcon if connected directly to a standard line-level
input.
Loud humming noise
coming from speakers
This is probably the result of an earth issue, and is best resolved by discussing
the issue with your dealer.
Turntable running
slightly fast or slightly
slow or varying
Adjust the tension of the belt by moving the motor. If the speed randomly
varies, try removing the belt and cleaning it with a dry lint-free cloth to
remove any contaminants.
Distorted sound Carefully, clean the stylus—use a stylus cleaning brush to remove any build
up of dust and u. Remember the stylus will eventually wear, and should be
replaced (with normal use, every one to two years). Using a worn stylus will
result in poorer sound quality, and eventually permanent damage to your
records.
If you ever have any issues with your AVID equipment that you are unable to resolve yourself, please,
in the rst instance, contact your dealer.

10
Specicaon
POWER CONSUMPTION
Input voltage (region dependent) 120V or 240V AC
Power Consumpon (Max) <4 Was
DIMENSIONS AND Weights
(W x D x H) : 500 x 420 x 265mm
Weight: 9 Kg
DECLARATION OF CONFORMITY
EC Declaraon of Conformity 06 December 2017
We declare that our Ingenium P&P turntable conforms to direcves
and harmonized internaonal standards:
EMC (89/36/EEC) Electromagnec conformity
BS EN 60065: 1994
Safety requirements for mains operated electronic and related apparatus for household
and similar use.
CENELEC HD21/22 Flexible cables and cords
EN 55020: 1988 Electromagnec Immunity
EN 55013: 1990 Electromagnec Emissions
C. Mas Director AVID HIFI Limited

11
Warranty Statement UK Residents
AVID HIFI Limited products are warranted against defects in materials and workmanship for a period of two years from the original date of
purchase, or no later than three years from the date of shipment to an authorized AVID agent, which ever comes rst, extending to ve
years subject to the product owner having submied the Registraon form (www.avidhi.com/register.htm). Also the following condions
being observed.
• The product must have been purchased through an authorized AVID dealer
• By default, the warranty is in favour of the original purchaser only, however warranes are transferable providing the new owner
completes the online product registraon form. In this case, warranty obligaon will pass from dealer to manufacturer.
• During the warranty period, AVID will repair, or replace any defects due to material or workmanship, without charge for parts or
labour.
• Should product need to be returned, a wrien descripon of the defect and a photocopy of the original purchase receipt must
accompany it. Receipts must show the model, serial number, date of purchase, name and address of purchaser and authorized
dealer and the price paid.
• Returned product must be packed in the original packing and returned to AVID or original dealer by the customer at his/her
expense. AVID will pay return freight of its choice.
• The warranty is void if the product has been used or handled other than in accordance with the instrucon manual supplied, abused
or misused, damage by accident or neglect or in being transported, or the defect is due to the product being repaired or tampered
with by anyone other than AVID or an dealer with prior authorizaon.
• The warranty is void if the product serial number has been removed, altered or made illegible.
• The warranty is void if the product has been taken out of the country of purchase.
• AVID shall not be held liable for incidental or consequenal damages of any kind arising from the sale or use of its products.
• The warranty applies to ex-demonstraon product, using manufacture date as purchase date.
• Where the product is sold under a consumer transacon (as dened by the Sale of Goods Act 1979) the statutory rights of the
purchaser are not aected by this warranty.
• Products are sold on the basis of specicaons applicable at the me of sale. AVID shall have no obligaon to modify or to update
products once sold.
Outside UK
AVID has formal distribuon in many countries throughout the world. In each country the AVID importer has contractually accepted the
responsibility for the product warranty. Warranty should normally be obtained from the imporng agent or distributor from whom you
obtained your product. In the unlikely event of service required beyond the capability of the importer, AVID will, of course, back up the
warranty.
• Where product has been either supplied directly or there is no current distributor, AVID accepts responsibility for the warranty
period. Returned product must be packed in the original packing and returned to AVID by the customer at his/her expense. AVID
will pay return freight of its choice. The warranty is only valid in the country of purchase.
• Products outside their original desnaon requires that units with remaining warranty be returned to the country of purchase for
the warranty to be valid. Customer is responsible for freight both ways and all associated import and export charges.
• Foreign distributors are not required to provide warranty service, repair or change AC mains voltage on units that they did not
originally import and sell.
• Foreign distributors may at their discreon oer service for a fee.
MISCELLANEOUS. ANY IMPLIED WARRANTIES RELATING TO THE ABOVE PRODUCT SHALL BE LIMITED TO THE DURATION OF THIS
WARRANTY. THE WARRENTY DOES NOT EXTEND TO ANY INCIDENTAL OR CONSEQUENTIAL COSTS OR DAMAGES TO THE PURCHASER.
WARRANTOR. Inquiries regarding the Limited Warranty may be sent to the following address:
AVID HIFI Limited. Bicton Industrial Park, Kimbolton, Hunngdon. PE28 0LW ENGLAND

12
AVID HIFI Ltd
Bicton Industrial Park,
Kimbolton, Huntingdon,
Cambridgeshire.
PE28 0LW
ENGLAND
Company Registered No: 5435528 — VAT Registration No: GB 694 9858 48 — Directors: C. Mas & S.J. Mas
Updated 23rd October 2018
Table of contents
Other AVID HIFI Turntable manuals

AVID HIFI
AVID HIFI ACUTUS User manual

AVID HIFI
AVID HIFI DIVA II SP User manual

AVID HIFI
AVID HIFI Ionic User manual

AVID HIFI
AVID HIFI Ingenium Series User manual

AVID HIFI
AVID HIFI DIVA II SP User manual

AVID HIFI
AVID HIFI VOLVERE User manual

AVID HIFI
AVID HIFI Naim Slide User manual

AVID HIFI
AVID HIFI DIVA II SP User manual