Avonic CD500 User manual

USER MANUAL
Avonic CD500
AV-CD500
www.avonic.com • © February 2023 • Version 1.0.6

DISCLAIMER, CONTACT AND MARKINGS
Disclaimer
All text, graphics, photographs, trademarks, logos, artwork and computer code (collectively, “Content”),
including but not limited to the design, structure, selection, coordination, expression, “look and feel” and
arrangement of such Content, contained in this Manual is owned, controlled or licensed by or to Avonic, and is
protected by trade dress, copyright, patent and trademark laws, and various other intellectual property rights and
unfair competition laws.
Except as expressly provided in these Terms of Use, no Content of this Manual may be copied, reproduced,
republished, uploaded, posted, publicly displayed, encoded, translated, transmitted or distributed in any way
(including “mirroring”) to any other computer, server, Web site or other medium for publication or distribution or for
any commercial enterprise, without the prior written consent of Avonic.
Copyright © 2023 AVONIC All Rights Reserved.
The information contained in this Manual is subject to change without notice.
Contact Info
For any questions or suggestions, contact your reseller or local distributor of Avonic.
Visit the Avonic website www.avonic.com to find your local Avonic distributor or to download the most recent
version of the documentation.
Join Avonic on Social Media
www.Facebook.com/avonicPTZ www.instagram.com/avonicPTZ
www.LinkedIn.com/company/avonic www.youtube.com/channels/avonic
www.twitter.com/avonic
Markings
The Product has Markings. The labels are placed at the bottom of the Product and on the packaging. See the
respective figures below:
Figure 1: Markings (Product) Figure 2: Markings (Packaging)
ii

EC DECLARATION OF CONFORMITY
Table 1: EC Declaration of Conformity
EC DECLARATION OF CONFORMITY
1. Models No: AV-CD500
2. Brand Name: Avonic
3. Product Name: CamDirector® AI Processing Unit
4. Manufacturer: Avonic
Exportweg 11a
2645ED Delfgauw
The Netherlands
3. This declaration of conformity is issued under the sole responsibility of the manufacturer
4. The object of the declaration described in point 1 is in conformity with the EMC2014/30/EU
5. Standards EN 55032: 2015/AC: 2016 Class A
EN 61000-3-2: 2014
EN 61000-3-3: 2013
EN 50130-4: 2011+A1: 2014
6. Signed for and on behalf of Avonic:
Delfgauw, 20th of May, 2021
Martijn van Bodegom,
Product Manager
iii

IMPORTANT INFORMATION
Liability
Avonic will NOT be held responsible for any damage or injury caused by unqualified persons carrying out these
tasks, or by not following the instructions in this Manual.
Intended Use and Non-Intended Use
Installation
The following applies to the installation of the Product:
• The installation activities described in this Manual should ONLY be executed by experienced technicians.
• The installation activities should NOT be executed by minors, mentally disabled persons or other persons not
qualified to perform these tasks.
Operation
The following applies to the operation of the Product:
• The operational activities described in this Manual should ONLY be executed by people with enough
technical knowledge to perform the activities in a safe manner.
• This Product is specifically developed for video conferencing / streaming via internet by companies, institutes
and universities. It is NOT meant for private use in the residential area.
• This Product should ONLY be used indoors.
• This Product is NOT a medical device and should NOT be used as a substitute for professional medical
judgment. It is NOT designed or intended for use in the diagnosis of disease or other conditions, or in the cure,
mitigation, treatment, or prevention of any condition or disease. Please consult your healthcare provider prior
to making any decisions related to your health.
Important Precautions
This Product is NOT intended for use where failure of the device could lead to death, personal injury, or
severe environmental damage.
Be sure that you have COMPLETELY READ and UNDERSTOOD ALL information in this Manual before
unpacking, installing and using this Product. Keep the Manual in a safe place for future reference or
download it from www.avonic.com.
Failure to follow the SAFETY NOTES as described in this chapter could result in fire, electric shock, injury, or
damage to the Product or other property.
Power the Product ONLY with the included cable and power adapter. Other adapters may not meet
applicable safety standards, and could pose a risk of death or injury when connected.
Symbols Used in This Manual
Symbol Meaning Description
Danger Not following the instructions associated with this symbol may lead to
personal injury and / or serious damage to the Product.
Electrical Shock Not following the instructions associated with this symbol may lead to life-
threatening situations and / or serious damage to the Product.
Important The information associated with this symbol requires special attention.
iv

Symbol Meaning Description
Information The information associated with symbol refers to a general remark or a
reference to other documentation.
Instruction This symbol refers to one or more user instructions.
Recycling Specific parts of the Product can be re-used.
Acronyms
The following acronyms are used in this Manual:
HD High Definition
HDMI High-Definition Multimedia Interface
IP Internet Protocol
PoE Power over Ethernet
PTZ Pan / Tilt / Zoom
SKU Stock Keeping Unit
v

Contents
DISCLAIMER, CONTACT AND MARKINGS............................................................................................ ii
EC DECLARATION OF CONFORMITY...................................................................................................iii
IMPORTANT INFORMATION.................................................................................................................. iv
Liability......................................................................................................................................... iv
Intended Use and Non-Intended Use......................................................................................iv
Installation......................................................................................................................... iv
Operation..........................................................................................................................iv
Important Precautions..................................................................................................... iv
Symbols Used in This Manual.................................................................................................... iv
Acronyms..................................................................................................................................... v
Introduction........................................................................................................................................... 7
Purpose of This Manual.............................................................................................................. 7
Target Audience......................................................................................................................... 7
Document Structure................................................................................................................... 7
SAFETY.................................................................................................................................................... 8
Important Precautions................................................................................................................ 8
Intended Use............................................................................................................................... 8
Handling.......................................................................................................................................8
Mounting......................................................................................................................................8
Ventilation....................................................................................................................................9
Repair........................................................................................................................................... 9
Power and Adapter................................................................................................................... 9
Atmospheric Conditions............................................................................................................. 9
PRODUCT OVERVIEW..........................................................................................................................10
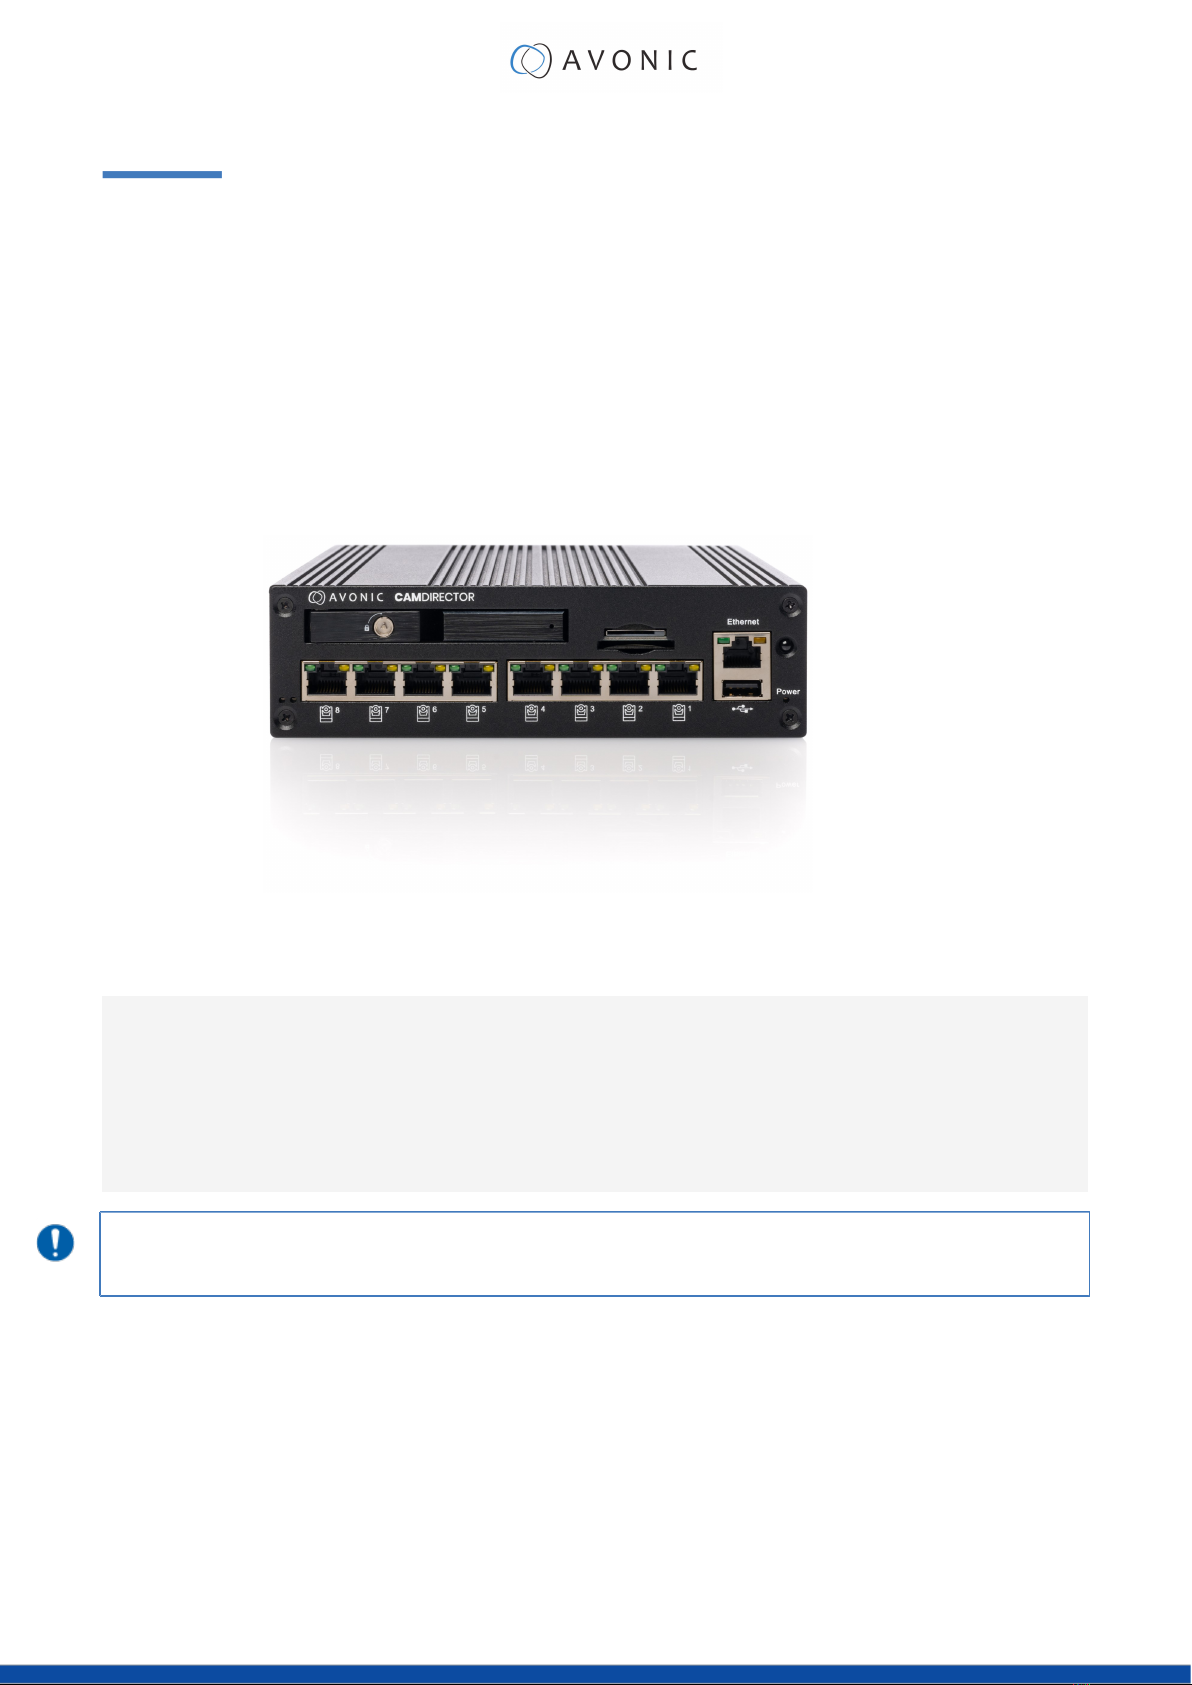
The beating heart of the CamDirector®.................................................................................10
Features......................................................................................................................................10
UNPACKING.........................................................................................................................................11
Package Contents................................................................................................................... 11
Handling precautions............................................................................................................... 11
Unpacking the AV-CD500........................................................................................................12
Return Procedure......................................................................................................................12
MOUNTING AND INSTALLATION......................................................................................................... 13
Mounting to a wall using the mounting shields..................................................................... 13
Connecting the components to the CD500..........................................................................14
Compatible hardware list.............................................................................................. 14
MAINTENANCE.....................................................................................................................................15
CD500 Maintenance................................................................................................................ 15
Usage Precautions.................................................................................................................... 15
TRANSPORT AND STORAGE................................................................................................................16
DISPOSAL AND RECYCLING............................................................................................................... 17
TROUBLESHOOTING............................................................................................................................. 18
General...................................................................................................................................... 18
Power Issues...............................................................................................................................18
No video output signal over IP or HDMI from the CD500 ..................................................... 18
vi

Introduction
Purpose of This Manual
This Manual describes the safety precautions and the instructions for safe unpackaging, installation, operation,
maintenance and disposal of the Avonic CD500. The Avonic CD500 is part of the CamDirector® (system) that
consists of a CD500 hardware unit, two CM70 series cameras and Teacher Tracker software (both separately
available).
In this Manual, the Avonic CD500 is referred to as the 'Product'.
Target Audience
This Manual is developed for installation technicians who install the Product at client sites, and for IT professionals
who are responsible for operating the Product.
Document Structure
The Manual is subdivided into the following Chapters:
1. Introduction
2. Safety
3. Product Overview
4. Unpacking
5. Mounting and Installation
6. Maintenance
7. Transport and Storage
8. Disposal and Recycling
9. Troubleshooting
7

SAFETY
This chapter contains important safety information regarding the unpacking, installation and use of the CD500.
Important Precautions
This Product is NOT intended for use where failure of the device could lead to death, personal injury, or
severe environmental damage.
Be sure that you have COMPLETELY READ and UNDERSTOOD ALL information in this Manual before
unpacking, installing and using this Product. Keep the Manual in a safe place for future reference or
download it from www.avonic.com.
Failure to follow the SAFETY NOTES as described in this chapter could result in fire, electric shock, injury, or
damage to the Product or other property.
Power the Product ONLY with the included cable and power adapter. Other adapters may not meet
applicable safety standards, and could pose a risk of death or injury when connected.
Intended Use
See section Intended Use and Non-Intended Use on page iv for details.
Handling
To prevent the risk of injury, take the following precautions when handling the Product:
• Handle the Product with care. It is made of metal, glass, and plastic and has sensitive electronic
components inside.
• The Product can be damaged if dropped, burned, punctured or crushed, or if it comes into contact with
liquid.
• Do not pick up and move the Product unit while a tripod is attached. The fitting may break under the weight
of the tripod, which may result in injury.
• If you suspect any damage to the Product, discontinue its use, as it may cause overheating or injury.
Mounting
To prevent the Product from falling down which may cause injuries:
• Set up the Product on a hard, stable surface or mount it to a wall.
• ONLY use an Avonic mount for mounting to a wall.
• Ensure the mounting construction is capable of supporting four times the weight of the Product. (See
'General Specifications > Weight product’ in the Product Datasheet for the exact weight.)
• Use a safety loop or drop protection that prevents the Product from falling if the mounting construction fails.
• During installation, NEVER install a the Product above a person.
• Check the installation at least once a year. An improper mounting could cause the unit to fall off, resulting in
personal injury.
8

Ventilation
To prevent the risk of life-threatening injury or damage to the Product or other property, caused by electric
shock or fire hazard due to overheating:
• Maintain adequate ventilation by NOT installing or placing the Product unit in a bookcase, built-in cabinet or
any other confined space.
• Ensure that curtains or any other material does NOT obstruct the ventilation.
Repair
Take the following precautions if the Product should be repaired:
• Don’t open the Product and don’t attempt to repair it yourself. Disassembling the Product may damage it or
may cause injury to you.
• If this Product is damaged, malfunctioning, or if it comes into contact with liquid, contact Avonic or an
Avonic Authorized Service Provider.
• Repairs by service providers other than Avonic or an Avonic Authorized Service Provider may not involve the
use of Avonic genuine parts and may affect the safety and functionality of the device. You can find more
information about repairs and service at www.avonic.com.
Power and Adapter
To prevent the risk of life-threatening injury or damage to the Product or other property, caused by electric
shock or fire hazard:
• Power the Product ONLY with the included cable and power adapter. Other adapters may not meet the
applicable safety standards. They could pose a risk of death or injury when connected.
• Do NOT use damaged cables.
• Do NOT power the Product in a moist / wet environment.
• Before you power the Product, ensure the cable is fully inserted into the power adapter.
• Plug the power adapter directly into a power outlet.
• Do NOT use the power adapter at a moist / wet location.
• Do NOT connector disconnect the power adapter with wet hands.
• Keep the Product, cable, and power adapter in a dry and well-ventilated area when in use.
• Stop using the power adapter and any cables if any of the following conditions exist:
• The power adapter plug or prongs are damaged.
• The cable becomes frayed or otherwise damaged.
• The power adapter is exposed to excessive moisture, or liquid is spilled into it.
• The power adapter has been dropped, and its enclosure is damaged.
Atmospheric Conditions
To prevent the risk of injury or damage to the Product or other property caused by a potentially explosive
atmosphere:
• Do NOT use the Product in an area with a potentially explosive atmosphere, such as areas where the air
contains high levels of flammable chemicals, vapors, or particles (such as grain, dust, or metal powders),
may be hazardous.
• Exposing the Product to environments having high concentrations of industrial chemicals, including near
evaporating liquified gasses such as helium, may damage or impair the Product functionality.
• Obey all signs and instructions.
9

PRODUCT OVERVIEW
The beating heart of the CamDirector®
Avonic’s CD500 is the beating heart of the CamDirector® and provides a continuously evolving video platform for
Avonic’s Pro-AV solutions. The CD500 can process, analyze and transmit video generated by the two PTZ cameras
it controls. The one-of-a-kind AutoTracking module uses locally run machine learning algorithms to offer smart
video recording.
As a continuously evolving video platform it allows for new high-tech modules to be added. Over-the-air updates
and support allow new functionality to be added overnight. Its ease of operation takes away expensive human
resources needed to create high-level and engaging content for the audience. With the introduction of the
CD500 in the CamDirector®, Avonic ushers in a new era in Pro-AV.
Features
• Process, analyze and transmit video of two PTZ camera’s it controls.
• Processes signals of up to 8 cameras
• Analyzes the video input using state of the art AI-algorithms.
• Transmits the video output over IP and/or HDMI.
Processing signals of more than two PTZ cameras and transmitting video output over IP is only possible when the
software's tracking functionality is set to OFF. Read the manual of the tracking software for the features it actually
has.
10

UNPACKING
This describes the contents of a complete Product package, and instructions for safe unpacking and (if
necessary) Product return.
It is subdivided into the following sections:
1. Package Contents
2. Handling Precautions
3. Unpacking the CD500
4. Return Procedure
Package Contents
The following table contains an overview of the package contents of the Product.
No. Quantity Description Avonic SKU
1 1 pc CD500 AV-CD500
2 1 pc CD500 Power Adapter AV-CD500-PSU
3 2 pc CD500 Mounting shield -
Each item is visualized below and referenced by the associated number in the table above:
Handling precautions
• Be careful with the CD500. The CD500 is made of sensitive electronic components that could be easily
damaged. Place the CD500 always on a hard and stable surface! Be sure that this surface could carry the
weight of the CD500!
• Be careful with the PSU cable and check the cable regularly.
11

Unpacking the AV-CD500
Execute the following steps to unpack the camera and associated components:
1. Open the box.
2. Verify that the contents of the box exactly matches the items as described in Package Contents on page 11.
If this is NOT the case, contact Avonic and stop here.
The AV-CD500 should be in its protective foam as follows:
3. Verify that the plastic CD500 bag is sealed. If this is NOT the case, contact Avonic and stop here.
4. Break the seal of the sealed CD500 bag.
5. Take the camera out of the bag. Be sure to follow the Handling precautions on page 11 while doing so.
6. Install the camera following the steps as described in the chapter Mounting on page 8
Return Procedure
If, for any reason, you have to return the CD500 to Avonic. Execute the following steps:
1. Place the CD500 back in its protective foam.
2. Place the CD500 with all of its components in the box.
3. Verify that the contents of the box exactly matches the items as described in Package Contents.
4. Contact Avonic for the Return Procedure.
12

MOUNTING AND INSTALLATION
The CD500 is a hardware unit and part of the CamDirector® (system). This chapter describes the steps you have
to perform to mount and install the CD500 in a correct and safe manner.
These steps are subdivided into the following groups, each of which is described in a separate section:
1. Mounting on a wall using the mounting shields
2. Connecting the Components to the CD500
Take the following precautions to prevent the CD500 from falling down which may cause injuries:
• Set up the Product on a hard, stable surface, or mount it to a wall or ceiling.
• ONLY use an Avonic mount for mounting to a wall or tripod.
• Ensure the mounting construction is capable of supporting four times the weight of the Product. (See
'General Specifications > Weight product’ in the CD500 Datasheet for the exact weight.)
• Use a safety loop or drop protection that prevents the Product from falling if the mounting construction fails.
• During mounting and installation, NEVER install the Product above a person.
• Check the installation at least once a year. An improper mounting could cause the unit to fall off, resulting in
personal injury.
Mounting to a wall using the mounting shields
It is also possible to mount the CD500 using the delivered mounting shields to a wall.
Follow instructions below:
1. The mounting shields are already connected to the CD500. Use the supplied screws (4) and place for
every screw hole 2 spacers. The spacer with a cut should be above the spacer without a cut.
2. Connect the bottom of the mounting shield to a wall using the screws. See the pictures below.
13

Connecting the components to the CD500
Execute the following steps to connect the components to the CD500:
1. Connect all provided components (see Package Contents) to the ports at the back of the CD500
1. RCA port (Audio Line IN)
2. RCA port (Audio Line OUT)
3. USB3.0 port
4. HDMI 2.0 a/b port
5. RS232 port (for future use)
6. RS485 port (for future use)
7. GPIO Harting, har-flexicon port
8. PSU port (to connect the provided power adapter)
2. Connect a HDMI cable to the HMDI port of the CD500 to see its video output.
3. Connect a Ethernet (CAT6a) cable to the ethernet port at the front of the CD500.
4. Connect the supplied power cable and adapter to the PSU port at the back of the CD500. After connecting
the power cable and adapter the CD500 will start automatically. The power light next to the Ethernet port will
turn ON. See the pictures below:
Download User Manuals
You can also download the manuals for the activated software modules and follow those instructions for the
additional steps necessary to configure the CamDirector® system further.
Compatible hardware list
The following hardware is compatible with the CD500:
Audio Interfaces Cameras
•Focusrite Scarlett 2i2 3rd Gen •AV-CM70-IP
•Focusrite Scarlett 4i4 3rd Gen •AV-CM70-NDI
•Behringer U-Phoria UMC204HD •AV-CM71-IP
•AV-CM73-IP
14

MAINTENANCE
CD500 Maintenance
Take the following actions to maintain the CD500:
• If you will not be using the CD500 for a long time, turn off the power switch and disconnect the AC
powercord of the AC adaptor to the outlet.
• Use a soft cloth or tissue to clean the CD500 cover.
• Please use the soft dry cloth to clean the lens. If the camera is very dirty, clean it with diluted neutral
detergent.
Do not use any type of solvents, which may damage the surface.
Usage Precautions
Take the following precautions to ensure good image quality:
• Do not operate close to powerful electromagnetic radiation, such as TV or radio transmitters, etc.
15

TRANSPORT AND STORAGE
The CD500 must be transported in its original packaging box. Inside the box, it is recommended to wrap the
CD500 in the original plastic bag and to place it in the protective foam.
Specific guidelines apply to the environmental temperature and humidity when operating and storing the
camera.
See 'Operating humidity' and 'Storage temperature' in the provided Datasheet for the applicable values.
16

DISPOSAL AND RECYCLING
In general, the term 'E-Waste' or 'Waste of Electrical and Electronic Equipment' applies to items of all types of
electrical and electronic equipment and its parts that have been discarded by the owner as waste without the
intention of re-use.
E-Waste, like the CD500 and ALL of its accessories, needs to be disposed separately from normal waste! See the
symbol below that can be found on the product and package label:
Avonic is NOT responsible for personal data left in the settings of the CamDirector as far as this is possible (like IP
Addresses, user names, passwords etc.) Delete personal data BEFORE you send the CD500 back to Avonic!
Send the CD500 and all its accessories to Avonic or your local distributor. See Package Contents to see
what you have to send back. Follow the instructions from the Return Procedure.
Avonic outsources the disposal and recycling of its E-Waste CD500 materials to Stichting Open.
See https://stichting-open.org/ for more information about the disposal and recycling.
17

TROUBLESHOOTING
General
1. Turn the CD500 off and on again and check if the problem persists.
2. If the problem persists after putting the CD500 off and on again, restore to the factory default.
Power Issues
If the CD500 power LED is OFF:
1. Check the net power.
2. Check the power cables and adapter.
3. Check the quality and length of the (HDMI) video cable connected to the CD500.
No video output signal over IP or HDMI from the CD500
If there is no video output over IP or HDMI from the CD500 check:
1. Power cable quality and connection to the NET power.
2. Check the Ethernet cable between the CD500 and the LAN switch.
3. Check the HDMI cable between the CD500 and the monitor.
18

Avonic CD500
AV-CD500
© February 2023 • Version 1.0.6
Exportweg 11a • 2645 ED Delfgauw • The Netherlands
+31(0)15 7112 712 • [email protected] • www.avonic.com
Other manuals for CD500
4
This manual suits for next models
1
Table of contents
Other Avonic Media Converter manuals
Popular Media Converter manuals by other brands

Extron electronics
Extron electronics DSC 301 HD Setup guide

FOLSOM
FOLSOM 2100DE Installation and operator's manual

General Instrument
General Instrument DSR-4800 Series operating manual

Converters.TV
Converters.TV Hand View III Operation manual

TR-Electronic
TR-Electronic CD_-582 Series Safety manual

AD Labs
AD Labs RD26 owner's manual

Hama
Hama 093839 operating instructions

Transition Networks
Transition Networks E-CX-TBT-03 user guide

ScienTECH
ScienTECH DB15 operating manual

Diamond
Diamond VC600 Quick Installation Guidance

Wharfedale Pro
Wharfedale Pro Diva 8 Operating manual and user guide

Cronyx
Cronyx E1 - L/S NSTALLATION AND OPERATING MANUAL