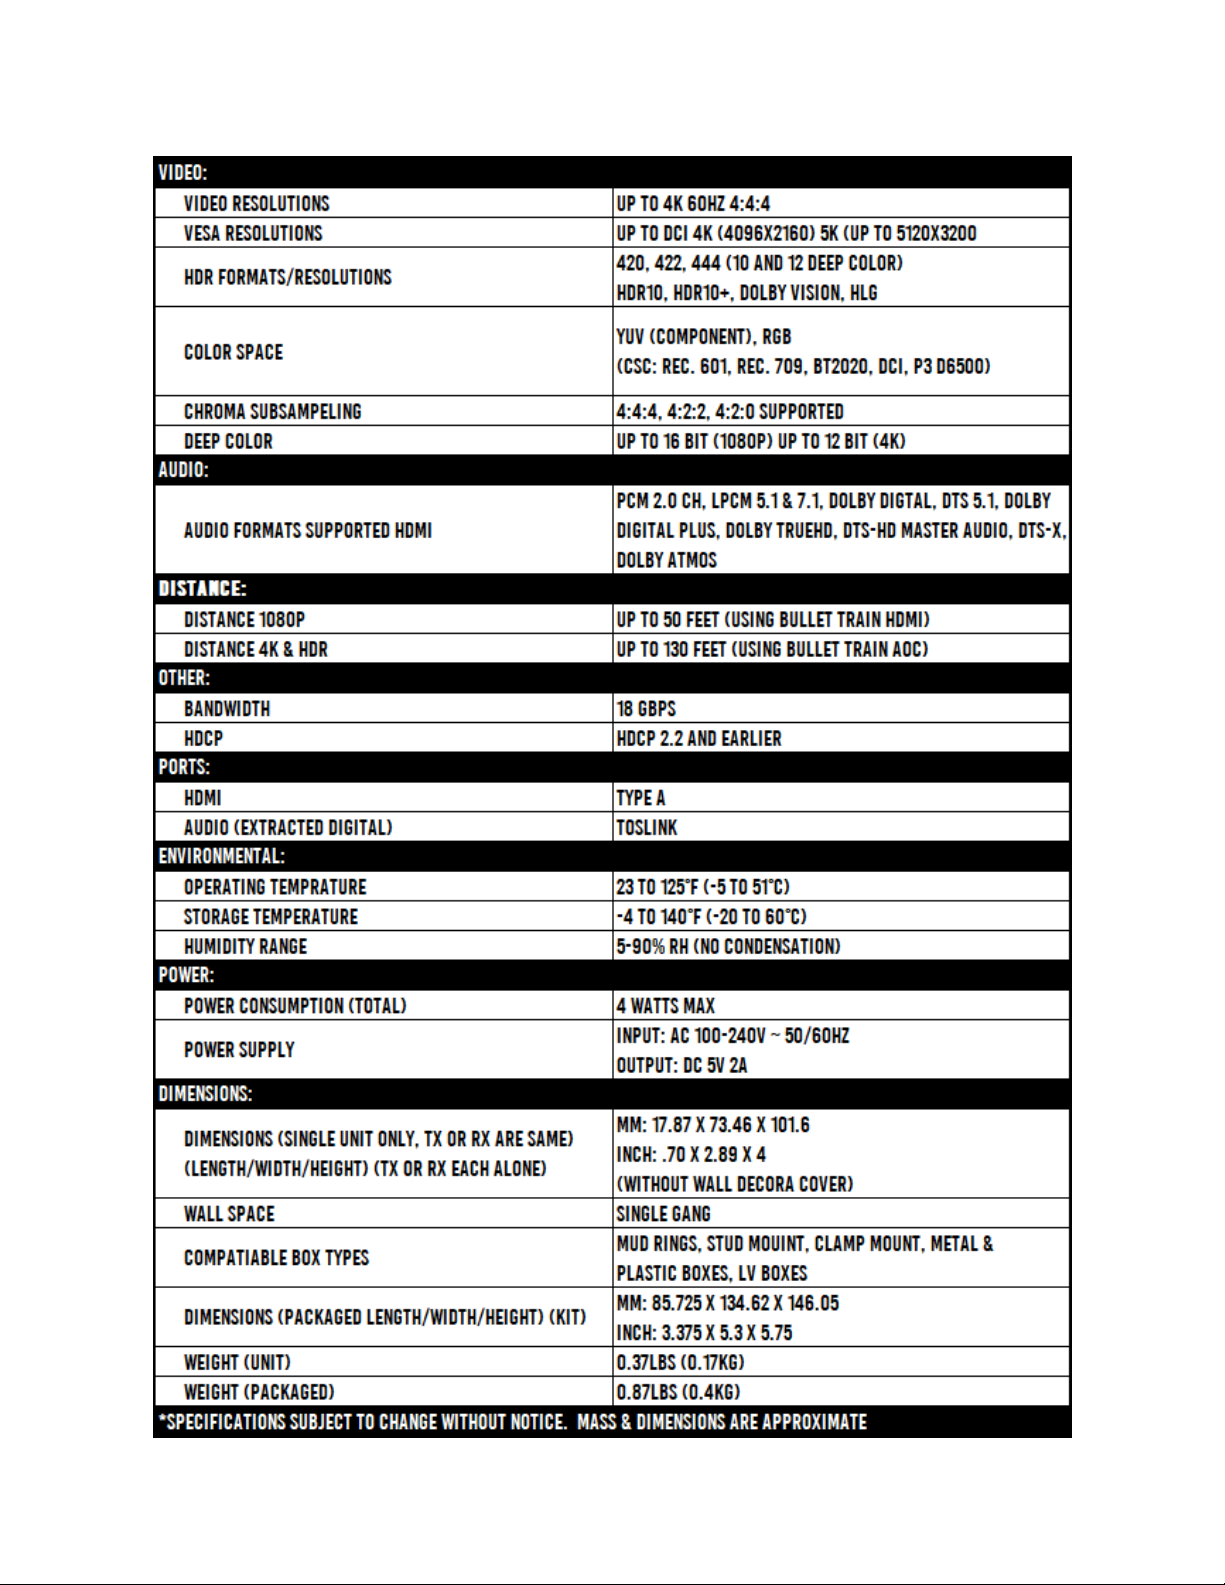
AVPro Edge AC-DA12-AUHD-GEN2 User manual

User Manual
AC-DA12-AUHD-GEN2
A full 4K60 4:4:4 (Up to 18GBPS) Distribution Amplifier with advanced
EDID management
AC-DA12-AUHD-GEN2
Page 1

Introduction
The AC-DA12-AUHD-GEN2 is an 18GBPS, full bandwidth HDMI2.0a (HDR) with
HDCP2.2 two-way HDMI splitter. Functionally, distributes the input HDMI signal to four
identical HDMI outputs. These four outputs are synchronized.
AC-DA12-AUHD-GEN2 has the ability of pre-emphasis and equalization. Multiple
cascaded AC-DA12-AUHD-GEN2 achieves long distance transmission of HDMI signal of more
than 15 meters even in 4K (HDR) resolution.
AC-DA12-AUHD-GEN2 offers solutions for usage as a component of digital HDMI
distributions and entertainment systems also UHDTV/4K retail and general show sites.
Use in conjunction with UHDTV, UHD Projector, STB, UHD-BD, UHD Media Player and in
environment where noise, space and security are concerns. Fits perfectly in data center control
rooms, information distribution premises, conference and presentation rooms, school
educational facilities and corporate training environments.
AC-DA12-AUHD-GEN2
Page 2

Contents)
AC-DA12-AUHD-GEN2
Page 3

Full 4K 60 (4:4:4) HDMI Splitter & Distribution Amplifier
■Product Overview (Model Number: AC-DA12-AUHD-GEN2)
■Features
lEasy to Use: Install in seconds, no need for setting.
lDistribution: One HDMI input, two identical HDMI outputs.
lSupports up to 18GBPS with resolutions of 4K60(YUV444), 4K30, 1080p,
1080i, 720p and other standard Video formats, PAL and NTSC.
lCustomer can configure EDID function to enable the best compatibility.
lSupports HDCP2.2
l4k-->1080P Downscaler
lEDID Blend (see page 11 for details)
lHDMI 2.0(a) w/ HDR.
lMounting ears are included for easy fixation on wall, furniture or ceiling.
?Notice AVProEdge reserves the right to make changes in the hardware, packaging and any accompanying
documentation without prior written notice.
AC-DA12-AUHD-GEN2
Page 4

Warning
To reduce the risk of fire, electric shock, or product damage:
1. Do not expose this apparatus to rai
moisture, dripping or splashing and
that no objects filled with liquids, such
as vases, shall be placed on the
apparatus.
6. Clean this apparatus on
with a dry cloth.
2. Do not expose this apparatus
rain, moisture, dripping or
splashing and that no objects filled
with liquids, such as vases, shall be
placed on the apparatus.
3. To prevent risk of electric sho
or fire hazard due to eoverheating,
do not obstruct th unit's
ventilation openings with
newspapers, toablecloths, curtains,
and similar items.
4. Do not install near any he
sources such as radiators, heat
registers, stoves, or other
apparatus (including amplifiers)
that produce heat.
9. Only use attachments
accessories specified by the
manufacturer.
8. Protect the power co
from being walked on or
pinched particularly at
plugs.
7. Unplug this apparat
during lightning storms
or when unused for long
periods of time.
AC-DA12-AUHD-GEN2
Page 5

AC-DA12-AUHD-GEN2
Page 6

■
Package Contents
①Main unit. P/N: AC-DA12-AUHD-GEN2
②5VDC Power Supply.
③Mounting Ears
■
Connections and Operations
1) Connect the HDMI input source into AC-DA12-AUHD-GEN2
2) Connect the HDMI output equipment (Displays) into AC-DA12-AUHD-GEN2
3) Insert the DC side of 5v power supply into AC-DA12-AUHD-GEN2 and then connect the
AC side of the Power supply into the wall outlet.
4) Plugging in the unit automatically powers up the device.
AC-DA12-AUHD-GEN2
Page 7

■
Panel Descriptions
Front Panel
Activity Display (Front):
a) When Power is applied all lights flash RED and the
machine begins to function. If no devices are
plugged in, you can verify power by looking inside
the Toslink out on the back of the unit.
b) When the INPUT device is plugged in, the Input light
stay solid RED.
c) When a sink (display) is plugged into an OUTPUT, the
corresponding light stays solid RED.
d) Scaler On/Off. When lit the scaler is on and will
convert a 4k signal to 1080p on Output #2.
AC-DA12-AUHD-GEN2
Page 8

Back Panel
·Power input.
·HDMI input.
·HDMI outputs (x2)
·Optical Toslink Out
Device Top Cover
And for easy HDMI port
recognition especially useful
when Mounting Ears are used
for fixation.
&NOTE: DIP Switch EDID
setting index on next page.
Device cover is labeled for Scaler Settings
AC-DA12-AUHD-GEN2
Page 9

EDID Settings: The 5 DIP switches are located on the side of the device, and each
switch has two settings, 0 & 1 (UP=0, DOWN=1). The default mode is “00000”
which is all up, in this mode the device copies the EDID from the sink (display)
plugged into OUTPUT 1. Custom EDID setting below.
00000: EDID COPY (See NOTE 1)
00001: 1080P_2CH(PCM)
00010: 1080P_6CH
00011: 1080P_8CH
00100: 1080P_3D_2CH(PCM)
00101: 1080P_3D_6CH
00110: 1080P_3D_8CH
00111: 4K30Hz_3D_2CH(PCM)
01000: 4K30Hz_3D_6CH
01001: 4K30Hz_3D_8CH
01010: 4K60Hz(Y420)_3D_2CH(PCM)
01011: 4K60Hz(Y420)_3D_6CH
01100: 4K60Hz(Y420)_3D_8CH
01101:4K60Hz_3D_2CH(PCM)
01110: 4K60Hz_3D_6CH
01111: 4K60Hz_3D_8CH
10000: Set EDID OUT1 Audio, OUT2 Video MIX
10001: Set EDID OUT2 Audio, OUT1 Video MIX
"EDID BLEND" see page 11 for details
10010: 1080P_8CH_HDR
10011: 1080P_3D_2CH(PCM)_HDR
10100: 1080P_3D_6CH_HDR
10101: 1080P_3D_8CH_HDR
10110:4K30Hz_3D_2CH(PCM)_HDR
10111: 4K30Hz_3D_6CH_HDR
11000: 4K30Hz_3D_8CH_HDR
11001: 4K60Hz(420)_3D_2CH(PCM)_HDR
11010: 4K60Hz(420)_3D_6CH_HDR
11011: 4K60Hz(420)_3D_8CH_HDR
11100: 4K60Hz_3D_2CH(PCM)_HDR
11101: 4K60Hz_3D_6CH_HDR
11110: 4K60Hz_3D_8CH_HDR
11111: Pass-through
AC-DA12-AUHD-GEN2
Page 10

EDID Setting Continued:
Note1: EDID Copy mode: EDID will be copied from sink on OUTPUT
1. The AC-DA12-AUHD-GEN2 is set this way by default for maximum
“Plug & Play” Compatibility. If you change sink (Display) plugged into OUTPUT 1,
please follow the steps below if you wish to use the new sink's EDID.
1. Start with power off
2. Set DIP to ‘00000’ (all up).
3. Power on the unit
4. Power on the source device and connect the HDMI input port.
2. The AC-DA12-AUHD-GEN2 has a new feature "EDID Blend" (
Firmware 1.63
)
where EDIDs #16 & #17 will combine the Video from one Output with the Audio
from the other Output. So for instance if you set the Dip Switch to '10000', this will
take the Audio section of the EDID from Output 1 and the Video section of the
EDID from Output 2 and blend them together (see example diagram below).
1. Start with power off
2. Set DIP to ‘10000'(Set EDID OUT1 Audio, OUT2 Video Mix) or
3. Set DIP to ‘10001'(Set EDID OUT2 Audio, OUT1 Video Mix)
4. Power on the unit
5. Power on the source device and connect the HDMI input port.
AC-DA12-AUHD-GEN2
Page 11

To use Scaler:
1.
2.
3.
4.
Press the SCALER Button to toggle on/off
Red LED On, then the scaler is on.
Scaler On - Downscales 4k to 1080p on output #2
Scaler light Off - No Scaling
CTRL/ISP
1.
2.
Micro USB Port for firmware and control.
Command list on Page 13.
For CTRL, use a Micro to USB cable and set the serial communications to:
57600,n,8,1 (baud: 57600, no parity, 8 data bits and 1 stop bit) with no
handshaking.
AC-DA12-AUHD-GEN2
Page 12

AC-DA12-AUHD-GEN2
Page 13

•Use the power supplies provided. If an alternate supply is required, check voltage,
polarity and that it has sufficient power to supply the device it is connected to.
•Do not operate these products outside the specified temperature and humidity range
given in the above specifications.
•Ensure there is adequate ventilation to allow this product to operate efficiently.
•Repair of the equipment should only be carried out by qualified professionals as these
products contain sensitive components that may be damaged by any mistreatment.
•Only use this product in a dry environment. Do not allow any liquids or harmful
chemicals to come into contact with these products.
•Clean this unit with a soft, dry cloth. Never use alcohol, paint thinner or benzene to clean
this unit.
Maintenance
To ensure reliable operation of this product as well as protecting the safety of any person
using or handling this device while powered, please observe the following instructions.
Damage Requiring Service
•The DC power supply cord or AC adaptor has been damaged
•Objects or liquids have gotten into the unit
•The unit has been exposed to rain
•The unit does not operate normally or exhibits a marked change in performance
•The unit has been dropped or the housing damaged
AC-DA12-AUHD-GEN2
Page 14

Support
Should you experience any problems while using this product, first, refer to the
Troubleshooting section of this manual before contacting Technical Support. When
calling, the following information should be provided:
•Product name and model number
•Product serial number
•Details of the issue and any conditions under which the issue is occurring
Warranty
If your product does not work properly because of a defect in materials or
workmanship, AVProEdge (referred to as “the warrantor”) will, for the length of the
period indicated as below, (Parts/Labor (10) Years), which starts with the date of original
purchase (“Limited Warranty period”), at its option either (a) repair your product with
new or refurbished parts, or (b) replace it with a new or a refurbished product. The
decision to repair or replace will be made by the warrantor. During the “Labor” Limited
Warranty period there will be no charge for labor. During the “Parts” warranty period,
there will be no charge for parts. You must mail-in your product during the warranty
period. This Limited Warranty is extended only to the original purchaser and only covers
product purchased as new. A purchase receipt or other proof of original purchase date is
required for Limited Warranty service.
This warranty extends to products purchased directly from AVPro or an authorized
dealer. AVPro is not liable to honor this warranty if the product has been used in any
application other than that for which it was intended, has been subjected to misuse,
accidental damage, modification or improper installation procedures, unauthorized
repairs or is outside of the warranty period. Please direct any questions or issues you may
have to your local dealer before contacting AVPro.
AC-DA12-AUHD-GEN2
Page 15

Troubleshooting
•Verify Power - Front Panel Pg.8
oTry power-cycling the device while all cables are connected
•Verify Connections - Front Panel Pg.8
oIf the lights are not showing a connection, try Hot Plugging the cable (remove
and re-insert while powered up)
•Possible EDID issue. Default out of the box is EDID Copy from downstream device.
Try one of the Canned EDIDs built in - Pg.10-11
•Lights showing correct connecting but still no picture. Try the last EDID option (all
down), this will force what ever signal is going in, out - Pg.10-11
•1080p signal working but not 4k - Verify all connected devices are 4k capable.
•Still having issues, contact us
oSupport Direct +1-605-977-3477
oAll inquiries +1-605-274-6055
oSubmit a support request ticket
https://support.avproedge.com/hc/en-us/requests/new
AC-DA12-AUHD-GEN2
Page 16

AVProEdge
2222 E 52nd St N ~ Sioux Falls, SD 57104
1-877-886-5112 ~ 605-274-6055
support@avproedge.com
Thank you for choosing AVProEdge!
Please contact us with any questions. We are happy to be
of service!
AC-DA12-AUHD-GEN2
Page 17
Other manuals for AC-DA12-AUHD-GEN2
1
Table of contents
Other AVPro Edge Amplifier manuals

AVPro Edge
AVPro Edge ConferX AC-CX100-RAMP User manual

AVPro Edge
AVPro Edge AC-DA14-AUHD User manual

AVPro Edge
AVPro Edge AC-DANTE-AMP-2CH User manual

AVPro Edge
AVPro Edge AC-DA14-AUHD User manual

AVPro Edge
AVPro Edge DANTE AC-DANTE-AMP-2CH User manual

AVPro Edge
AVPro Edge AC-DA28-AUHD User manual

AVPro Edge
AVPro Edge AC-DA18-AUHD User manual

AVPro Edge
AVPro Edge AC-FRESCO-DA116 User manual

AVPro Edge
AVPro Edge AC-DA18-AUHD User manual

AVPro Edge
AVPro Edge AC-DA18-AUHD-GEN2 User manual