AWIN Technology Corp. AW-ET350 User manual

Ni-MH Electric Tricycle
ASSEMBLY MANUAL
AW-ET350
n yEnviro mentall
rinl
F e d y
World’ s Best

I. Table of Contents 1
II.
………………………………………
Parts Description ……………………………………2
III. Installation ……………………………………………3
IV. Attentions……………………………………………8
V. Charge Mode……………………………………………9
VI. Charge Procedure…………………………………10
VII. Usage of Twin Battery…………………………11
VIII. Check before Riding ………………………………12
IX. Riding Instructions…………………………………14
X. Trouble Shooting…………………………………15
Table of Contents
AWIN TECHNOLOGY CORP.
-1-

Parts Description
AWIN TECHNOLOGY CORP.
-2-
1. GRIP
2. BRAKE LEVER
3. HANDLE BAR
4. CONTROL CABLE
5. HANDLE STEM
6. REFLECTOR
7. FRONT BRAKE
8. FENDER
9. TIRE
10. FRONT FORK
11. RIM
12. SPOKE
13. MOTOR
14. FENDER BRACE
15. CHAIN WHEEL
16. PEDAL
17. CRANK
18. CHAIN COVER
19. CHAIN
20. REAR FRAME
21. AXLE
22. FREEWHEEL
23. BASKET
24. SADDLE
25. SEAT POST
26. QUICK RELEASE
27. FRAME
28. CONTROLLER
29. BATTERY PACK
1.2.
3.
4.
5.
6.
7.
8.
9.
10.
11.
12.
13.
14.
15.
16.
17. 18.
19.
20.
21.
22.
23.
24. 25.
26.
27.
28.
29.

AWIN TECHNOLOGY CORP.
-3-
Carton A
Carton B
Group A Saddle &
Seat post
Fender
Rear Wheel Charger
Foldable
Basket
Battery Pack
Group B
Other Components
Installation

AWIN TECHNOLOGY CORP.
-4-
1. Rear wheels assembly
(a) Both wheels are the same. The hub has three holes
that fit the pins on the axle. Install the drive wheel
first (right side), and let the bolt of axle snug down locking nut.
(b) Put the idler wheel on the left side. First slip on the spacer.
Tighten nut until it touches the bearings.
(c) Tire inflation: Inflate tires tp proper inflation pressure, 35 psi.
2. Rear Fenders
Line up the screw hole of fender stays with frame bracket.
Tighten up the screws.
3. Handlebar and Stem
(a) Insert handlebar through stem. Secure handlebar by
tightening front stem binder bolt and nut.
(b) Insert stem into fork head tube. Penetrate at least to the
minimum insertion line. Secure stem by tightening stem
expander bolt. Be sure to center stem with the front wheel.
Installation
Screw
Rear Fender

AWIN TECHNOLOGY CORP.
-5-
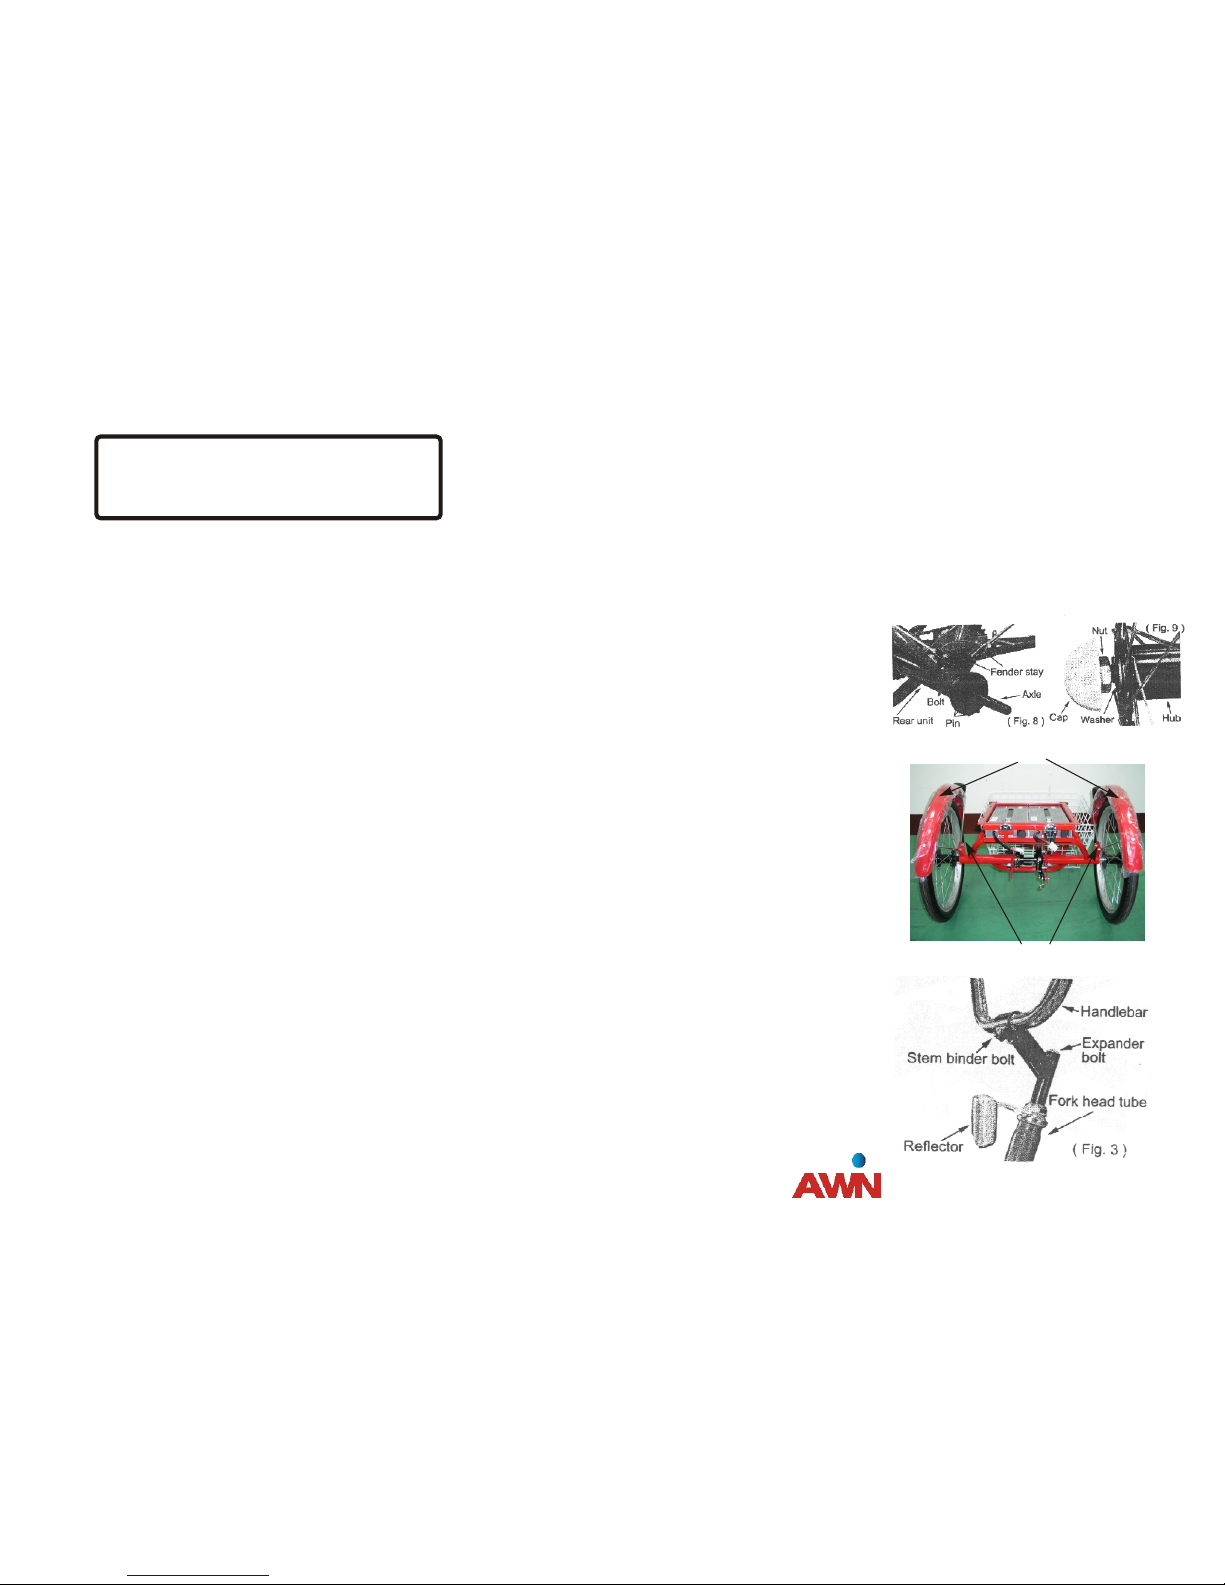
3. Rear frame end chassis
To mount rear frame end onto front frame:
(a) Remove bolts from slide-in bracket of rear end of chassis.
(b) Slide rear end of chassis onto frame making sure the fixed
bracket is on right side of bike frame.
(c) Re-insert 4 bolts through bike frame onto rear end of
chassis and secure finger tight.
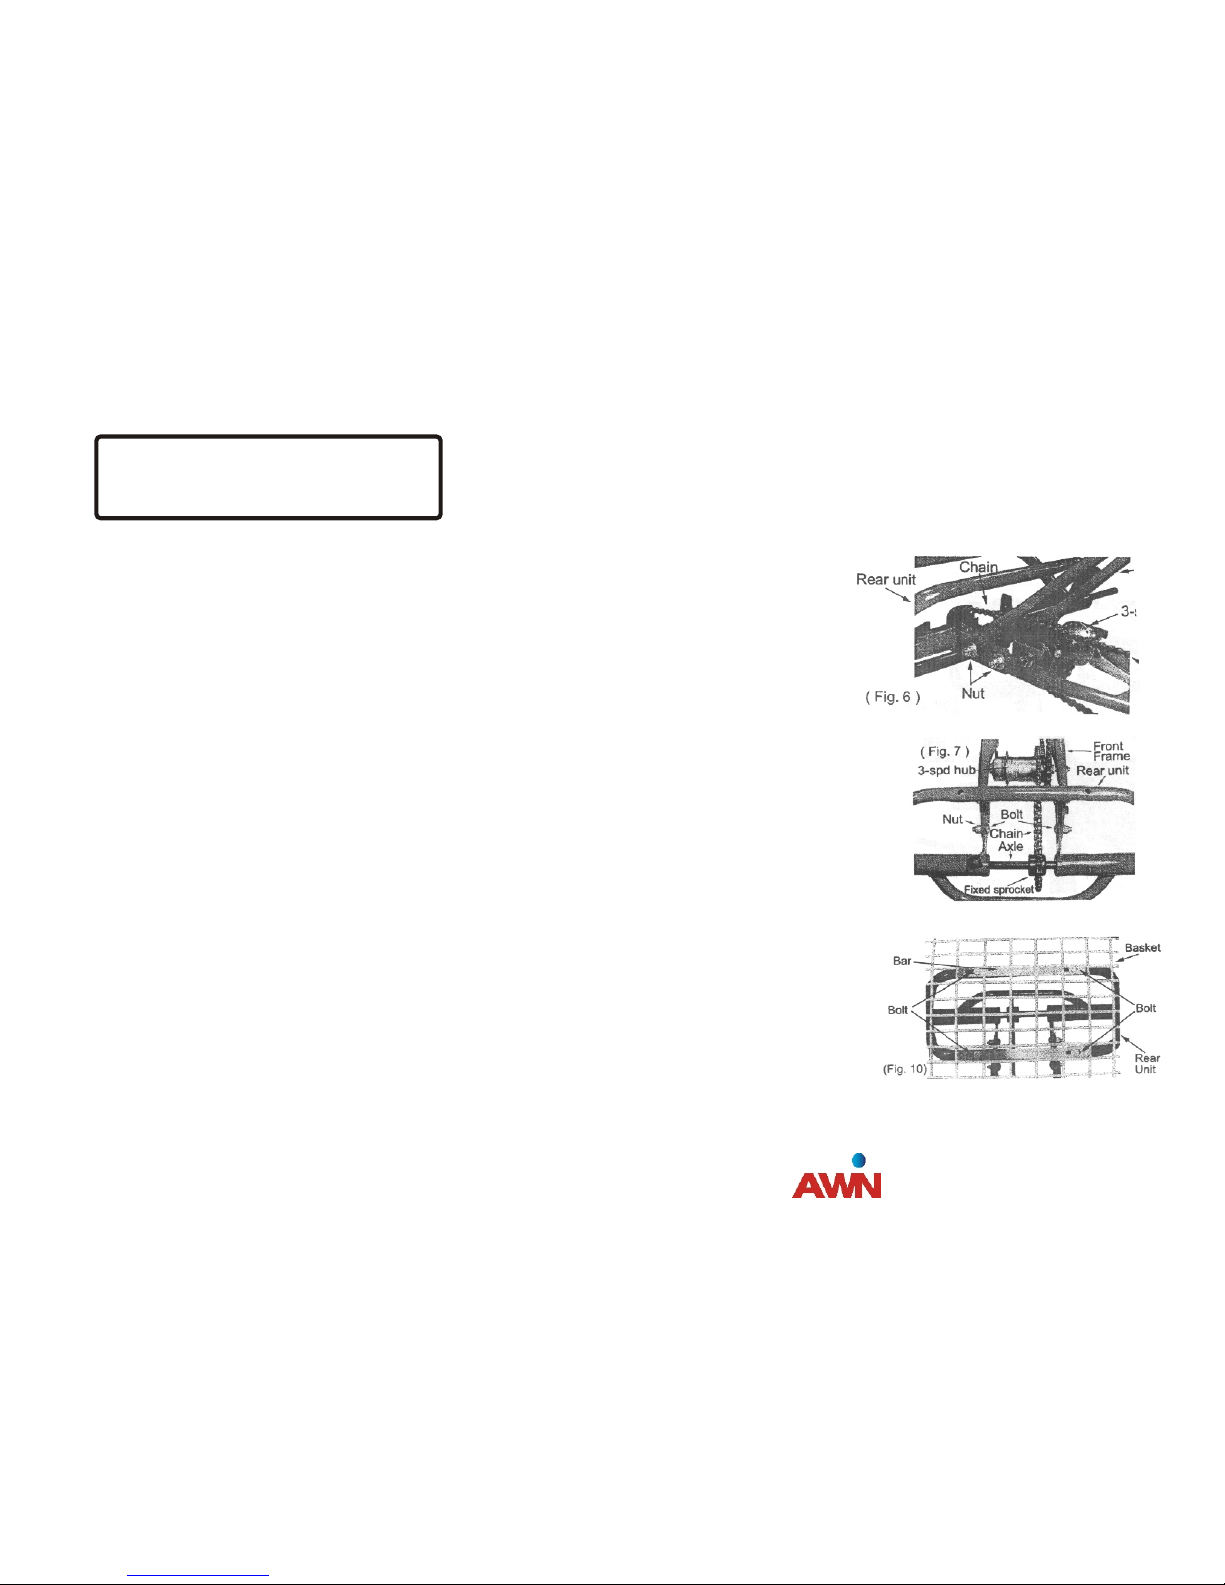
(d) Mount chain onto front chainwheel and the fixed bracket.
Now secure the 4 chassis bolts with wrench.
4. Basket Assembly
(a) Place the large bottom wire grid flat on the ground. Attach
the long side grids into the basket holes of the short side grids.
Attach to the bottom wire grid and lock the iron plates.
(b) Once the basket is assembled, place and center the basket
onto the frames basket bars, then screw in and tighten the bolts
to complete the assembly.
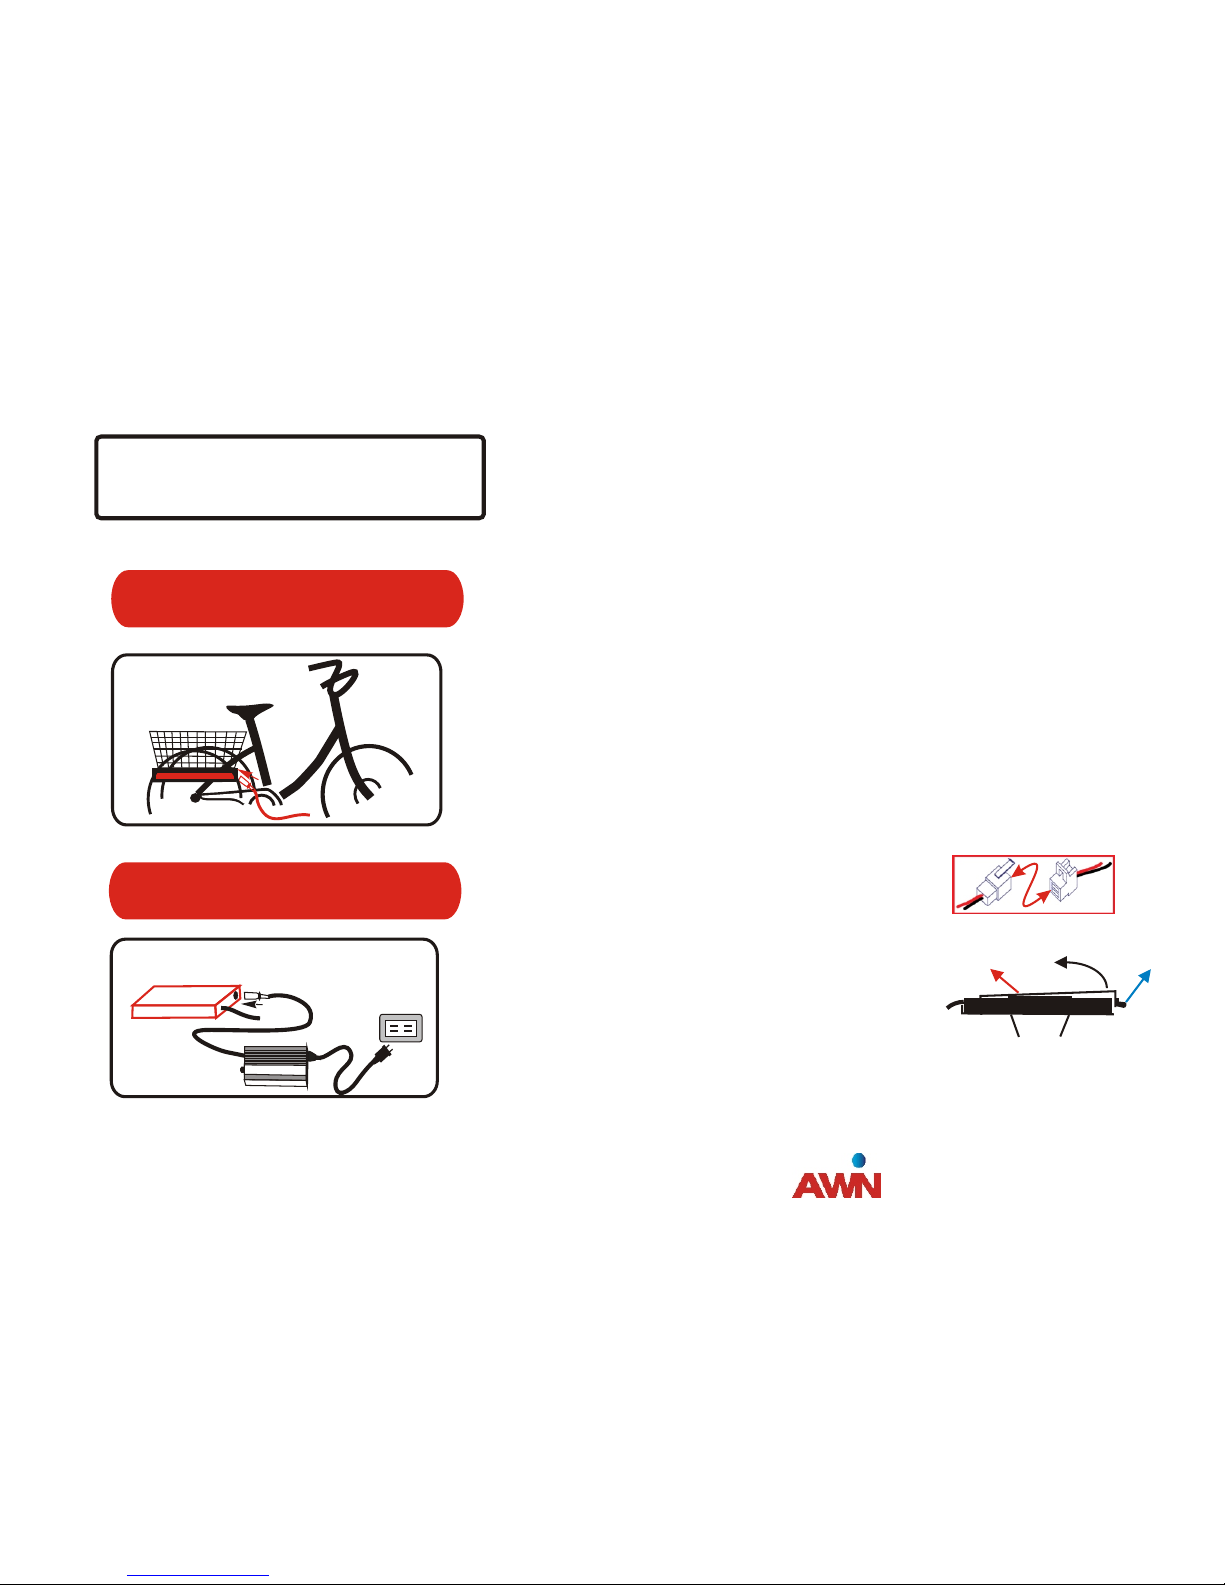
Installation

AWIN TECHNOLOGY CORP.
-6-
5. Rear band brake
Insert the spring into brake wire and the fixed screw
hole of band brake, then tighten up the screws.
6. Seat post and seat
(a) Insert seat post into frame. Penetrate at least to minimum
insertion line. Secure by tightening seat post nut and bolt.
(b) Attach seat to seat post by inserting seat clamp onto seat post.
Adjust seat to proper level. Secure by tightening nuts evenly
on both sides of seat clamp.
7. Pedals
Mount pedals onto crank. Note, there is a left and right pedal
indicated by an L or R on the end of each pedal.
Left pedal tightens left. Right pedal tightens right.
8. Chain Cover
Installation
Insert 3 bolts through bike frame onto chain cover and secure nuts tight.

Installation
AWIN TECHNOLOGY CORP.
-7-
9. Battery pack
(a) sockets
The method of p sockets are descirbed
in p.11 ““.
lugging in
the usage of Twin Battery

AWIN TECHNOLOGY CORP.
-8-
Attentions
AWIN
ONLY
Only the exclusively designed use "Awin"
battery pack and "Awin"Charger .
The user shall not modify or dismantle any
parts of the battery pack to avoid danger.
Charge the battery in a well-ventilated place .
Keep the charger out of reach of children .
Read the operation manual carefully before
using the electrical bike and the charger.

Charge Mode
A. On-bike chargingA. On-bike charging
B. Off-bike chargingB. Off-bike charging
Battery pack
Charger
Before charging , make sure that
power supply of both the electric
bike and the charger are off.And
Then follow charging procedure.
Before charging, unlock the padlock
of the carrier and peel off the connection
between the battery pack and controller.
Open the carrier and take out the battery
pack carefully.
AWIN TECHNOLOGY CORP.
-9-
Carrier
Batterypack

Charge Procedure
AWIN TECHNOLOGY CORP.
-10-
Connect tightly the charging plug of the
charger to the charging socket on the bike.
22
33
11
Use 110V or 220V AC Power for the charger.
Make sure that the plug is correctly inserted into the
socket then turning on the power switch of charger.
Charging time:
Charging will be completed
in 2~3 hours.
44
Red lights Power ON
Yellow lights Charging
Green lights Fully charged
Yellow blinks Incorrect connection or
abnormality being detected.
Indications:

Usage of Twin Battery
Electric Tricycle of AWIN is equipped with TWIN Battery Pack(24V).
You should choose to use only single or twin battery.
Twin battery
Single battery
Junction box
Junction box
Junction box
Battery A
Battery A
Battery B
Battery B
OR
AWIN TECHNOLOGY CORP.
-11-
1. Put the two battery packs into carrier, keep the pack holder
upside, and check the position of battery packs are correct or not.
2. Close the carrier and padlock.
3. Plug the two battery pack sockets into the two connectors of
the junction box, respectively.
1. Put the one or two battery packs into carrier, keep the pack holder
upside, and check the position of battery packs are correct or not.
2. Close the carrier and padlock.
3p one. Only lug the one battery pack socket into the connector of
the junction box if you would like to use single battery.

Note
Check Before Riding
Front handles: Make sure that the front handles are fixed well.
Use a hexagon wrench the fix the setscrews if they are loose.
Pedals: Make sure that the setscrews of the foot pedals are fixed tightly.
Seat: Adjust the height of the pedals to fit the height of the rider.
Front/rear wheels: Make sure that the setscrews of the front/rear wheels are
fixed tightly.
Battery pack: Make sure that the position of the battery pack is correct and
the residual capacity of the battery pack is enough.
Front handles:
Pedals:
Seat:
Front/rear wheels:
Battery pack:
Check and adjust the following points before riding the electric scooter.
Stop riding the electric bike when any abnormality is found during the riding.
one of our authorized service centers.
AWIN TECHNOLOGY CORP.
-12-

Breaklever:Makesurethatthetensionofthebreakleverisproper.
Tire:Make sure that the tire pressure is appropriate (air pressure: 35 psi)
Chain:Makesurethatthetensionofthechainisproper.
Bell:Makesurethatthebellisinstalledattherightpositionandringswell.
Reflectivestrip:Thereflectivestripshallbeusedwhenridinginthenightfor
thesakeofsafety.
Breaklever:
Tire:
Chain:
Bell:
Reflectivestrip:
Check Before Riding
Note Check and adjust the following points before riding the electric scooter.
Stop riding the electric bike when any abnormality is found during the riding.
one of our authorized service centers.
AWIN TECHNOLOGY CORP.
-13-

Indications:
11
22
33
44
55
Riding Instructions
Power switch: To ride the electric bike, turn on the switch and hold on the
break lever for more than 6 seconds.
Three indicators light
Battery Capacity Indicator
Two indicators light
One indicator lights
One indicator blinks
100~75% power
50~30% power
less than 20% power
charge immediately
Release the foot support and make sure that the road surface is even.
Make sure that no traffic coming from the left and right sides.
(Power output is controlled by the speed
control throttle in 100% Electric Mode.)
A. Power assisted Mode B. 100% Electric Mode
The power will shut off automatically when the electric
bike is not ridden within 3 consecutive minutes.
FULL
HALF
EMPTY
Sit on the seat and turn the speed
control throttle to ride the electric
bike in Electric Mode .100%
Sit on the seat and stamp the foot
pedals to ride the electric bike in
Power Assisted Mode.
AWIN TECHNOLOGY CORP.
-14-

Fault PossibleCauses Measures
Note
Capacity indicator doesn't light
Trouble Shooting
Stop riding the electric bike when any abnormality is found during the riding.
Contact us 886-3-597-3688 or any one of our authorized service centers.
Don't dismantle or adjust the electric bike without acquiring the prior consent of us.
Assembly
Power switch
3. If it doesn't work, contact with us or
our authorized service centers for repair.
3. If it doesn't work, contact with us or
our authorized service centers for repair.
1. Make sure the power switch is turned on.
1. Make sure the power switch is turned on
and the capacity indicator is light.
2. Make sure the c
.
onnection between the
controller and pack is tight
2 old on the break lever for more than 6
seconds .
. H
again
Controller and pack
Throttle doesn't work Controller and throttle
AWIN TECHNOLOGY CORP.
-15-

AWIN TECHNOLOGY CORP.
No. 15, TA TUNG RD., HSINCHU INDUSTRIAL PARK
HSINCHU 303, TAIWAN, R.O.C.
TEL: 886-3-5973688 FAX:886-3-5973699
http://www.awintech.com.tw
Table of contents