ax-lightness engage Parts list manual

Assembly And operAting instruction
– the AdvAntAge is yours
www.ax-lightness.de
www.engage-bikes.de

Some notes on this manual
Particular attention should be paid to the follow-
ing symbols:
gThis symbol indicates an imminent risk
to your life or health unless you comply
with the instructions given or take pre-
ventive measures.
aThis symbol warns you of wrongdoings
which may result in damage to proper-
ty and environment.
iThis symbol marks information about
how to handle the product or refers to
a passage in the operating instructions
that is particularly relevant.
The described possible consequences will not
be repeated in the operating instructions every
time one of the symbols appears.
Some notes on this manual..............1
Welcome ................................2
General safety notes.....................2
Before your rst ride – Intended use .....4
Before every ride ........................6
Special characteristics of carbon .........9
Cleaning and care..........................11
Maintenance...............................12
General notes on mounting and
compatibility ..............................13
Using a torque wrench .....................14
Warranty terms........................ 15
A note on wear ............................16
Terms of guarantee
AX-Lightness and engage ............. 17
AX-Lightness and engage
Crash Replacement ........................17
Terms and conditions of
Crash Replacement ........................17
BRAKES ............................... 19
RIMS WHEELS........................ 34
FORK HEADSET ..................... 65
CRANK SYSTEMS PEDALS ........... 76
HANDLEBARS STEM................. 85
FRAMESETS ASSEMBLY INSTRUCTIONS
AND TECHNICAL DATA...............104
SEAT POSTS SADDLES .............112
Technical details in the text and illustrations of
this manual are subject to change.
© No part of this publication may be reprinted,
translated, copied or transmitted in any form or
by any means, electronic, mechanical, by hand
or otherwise for another purpose without prior
written permission.
Text and concept:
Zedler – Institut für Fahrradtechnik und
-Sicherheit GmbH
www.zedler.de
Photos:
AX-Lightness GmbH
and Zedler – Institut für Fahrradtechnik und
und-Sicherheit GmbH Edition 1, June 2013
1

Dear AX-Lightness and
engage customer,
Congratulations for having purchased an AX-
Lightness or engage component. You have
made a very good choice. The AX-Lightness and
engage team develops, tests and manufactures
our products with dedication to uphold the
highest standards of quality.
General safety notes
Like all high-quality sports equipment, AX-Light-
ness and engage components require careful
installation and are best left to an AX-Light-
ness and engage dealer. This is the only way to
achieve optimum performance and long-term
durability.
This manual cannot teach you the skills of a bicy-
cle mechanic. Even a manual as big as an ency-
clopaedia could not describe any possible com-
bination of bicycle models and components or
parts on the market. It therefore focuses on your
newly purchased components and provides
useful information and warnings.
We therefore strongly recommend that you ask
a qualied mechanic at your AX-Lightness and
engage shop for help.
We recommend not to combine AX-Lightness
and engage components with other compo-
nents to achieve optimum performance and
durability for your product.
If you intend to combine the components with
components from other manufacturers, make
sure they are compatible, i.e. that all dimensions
are exactly the same according to the specica-
tions given in this manual. Our precise tolerances
are intended to ensure component compatibil-
ity, and are carefully monitored during produc-
tion and quality control so that the assembly will
be easy and proper.
This manual contains important notes about
use, care, maintenance and installation.
Be sure to rst read carefully the general infor-
mation of this user manual and then the chap-
ter providing you with information on the AX-
Lightness and engage component you have
purchased. Then, nothing will stand in the way
of a smooth assembly and a trouble-free use.
Keep this user manual for your records and future
reference and share it with the new user, if you sell,
lend or leave the AX-Lightness or engage bicycle or
component to anybody else.
All AX-Lightness and engage components, like all
lightweight components, require special care and
attention. Therefore, make sure to carefully assemble
the components and to only use them for their in-
tended purpose.
The material used by AX-Lightness and engage, es-
pecially carbon (also referred to as CRP), is extremely
strong and durable, i.e. the components are very du-
rable, as the material combines high resistance with
low weight. It is, however, important to know that
these materials are relatively brittle, which means
that AX-Lightness and engage components are more
likely to break than to bend.
Overstrained material can lead to internal damage
that may hardly show up. There will be no visible
signs of damage, such as deformations or the like, as
known from other metals, e.g. aluminium.
After undue stress, e.g. following an accident,
AX-Lightness and engage components can fail. This
can lead to a fall with possibly serious health con-
sequences. For this reason you must observe the
control notes in the chapter providing you with the
information on the component purchased by you. To
ensure safe use following a possible loss event, make
sure to have the components concerned checked by
an AX-Lightness and engage dealer. In such a case
always ask your AX-Lightness and engage dealer for
professional advice.
Enjoy your ride and have fun with your AX-Lightness
and engage products!
Your AX-Lightness and engage team
In case of any inquiries about your
AX-Lightness and engage products please
contact
AX-Lightness GmbH
Am Steinkreuz 12
D-95473 Creußen
Phone: +49 9270 91513-0
Fax: +49 9270 91513-30
www.AX-Lightness.de or
www.engage-bikes.de
32
Assembly And operAting instruction
– the AdvAntAge is yours
www.ax-lightness.de
www.engage-bikes.de

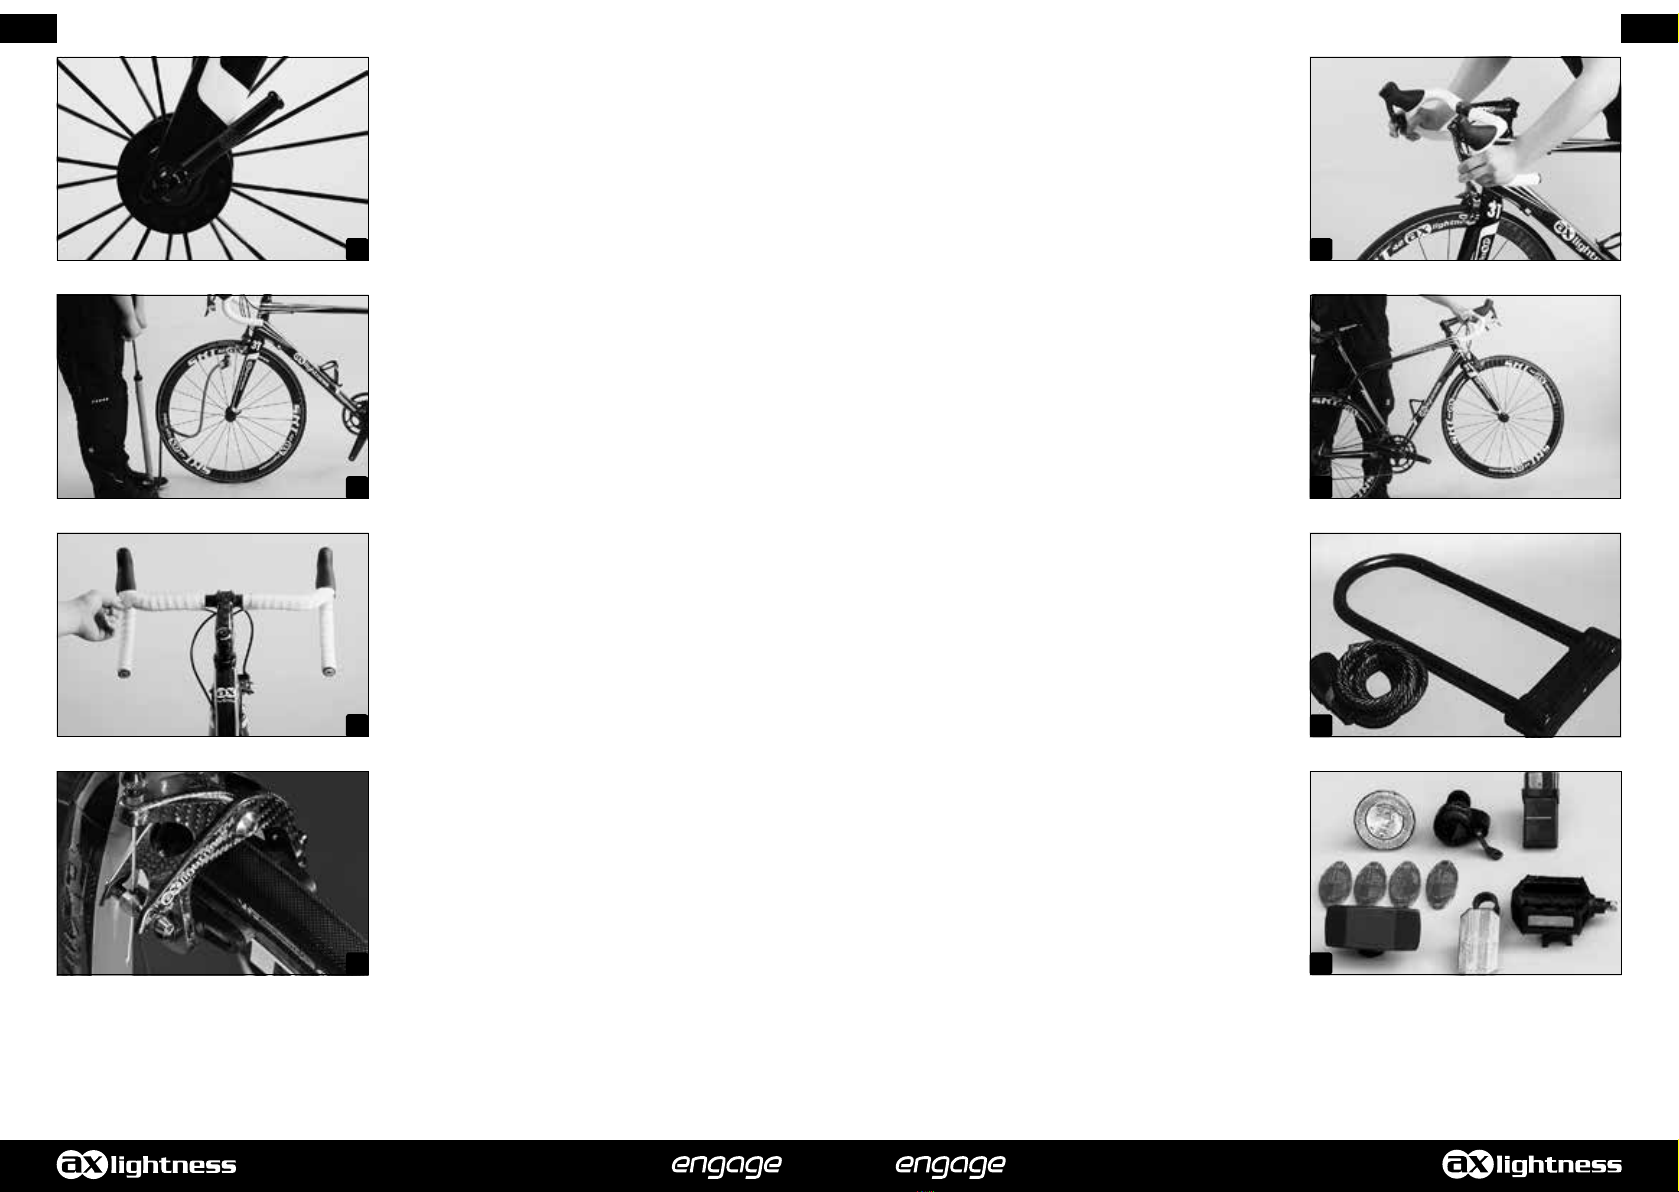
Before your first ride – Intended use
AX-Lightness and engage brakes and brake pads,
rims, rim tape and wheels, quick-releases, forks and
headsets, cranksets, pedals, handlebars and stems (a)
as well as seat posts and saddles (b) are designed for
use on road and triathlon (i.e. time trial), cyclocross
and mountain bikes and their typical use.
Road racing, triathlon and time trial bicycles
are exclusively designed for cycling on tarred and
hard-surface tracks with a smooth surface.
Cyclocross bicycles (c) are designed for o-road
cycling over typical cyclocross terrain, e.g. on eld
tracks and forest trails; they are, however, not suita-
ble for all-mountain and enduro use, downhill (DH)
riding, freeriding, dual slalom, downhill/freeride parks,
jumps, drops etc.
Mountain bikes (d+e) are designed to be used
for o-road cycling and for riding over natural ter-
rain (e.g. terrain of a mountain bike marathon and
cross-country racing). Due to their design and equip-
ment they are, however, not intended to be used on
public roads. Before being used, they must be tted
accordingly.
Our components are designed for common
cross-country, marathon and all-mountain bikes.
They are not suitable for freeriding, dual slalom,
downhill riding, jumps or the like. There are special
mountain bike components for these purposes. Ask
your AX-Lightness and engage dealer.
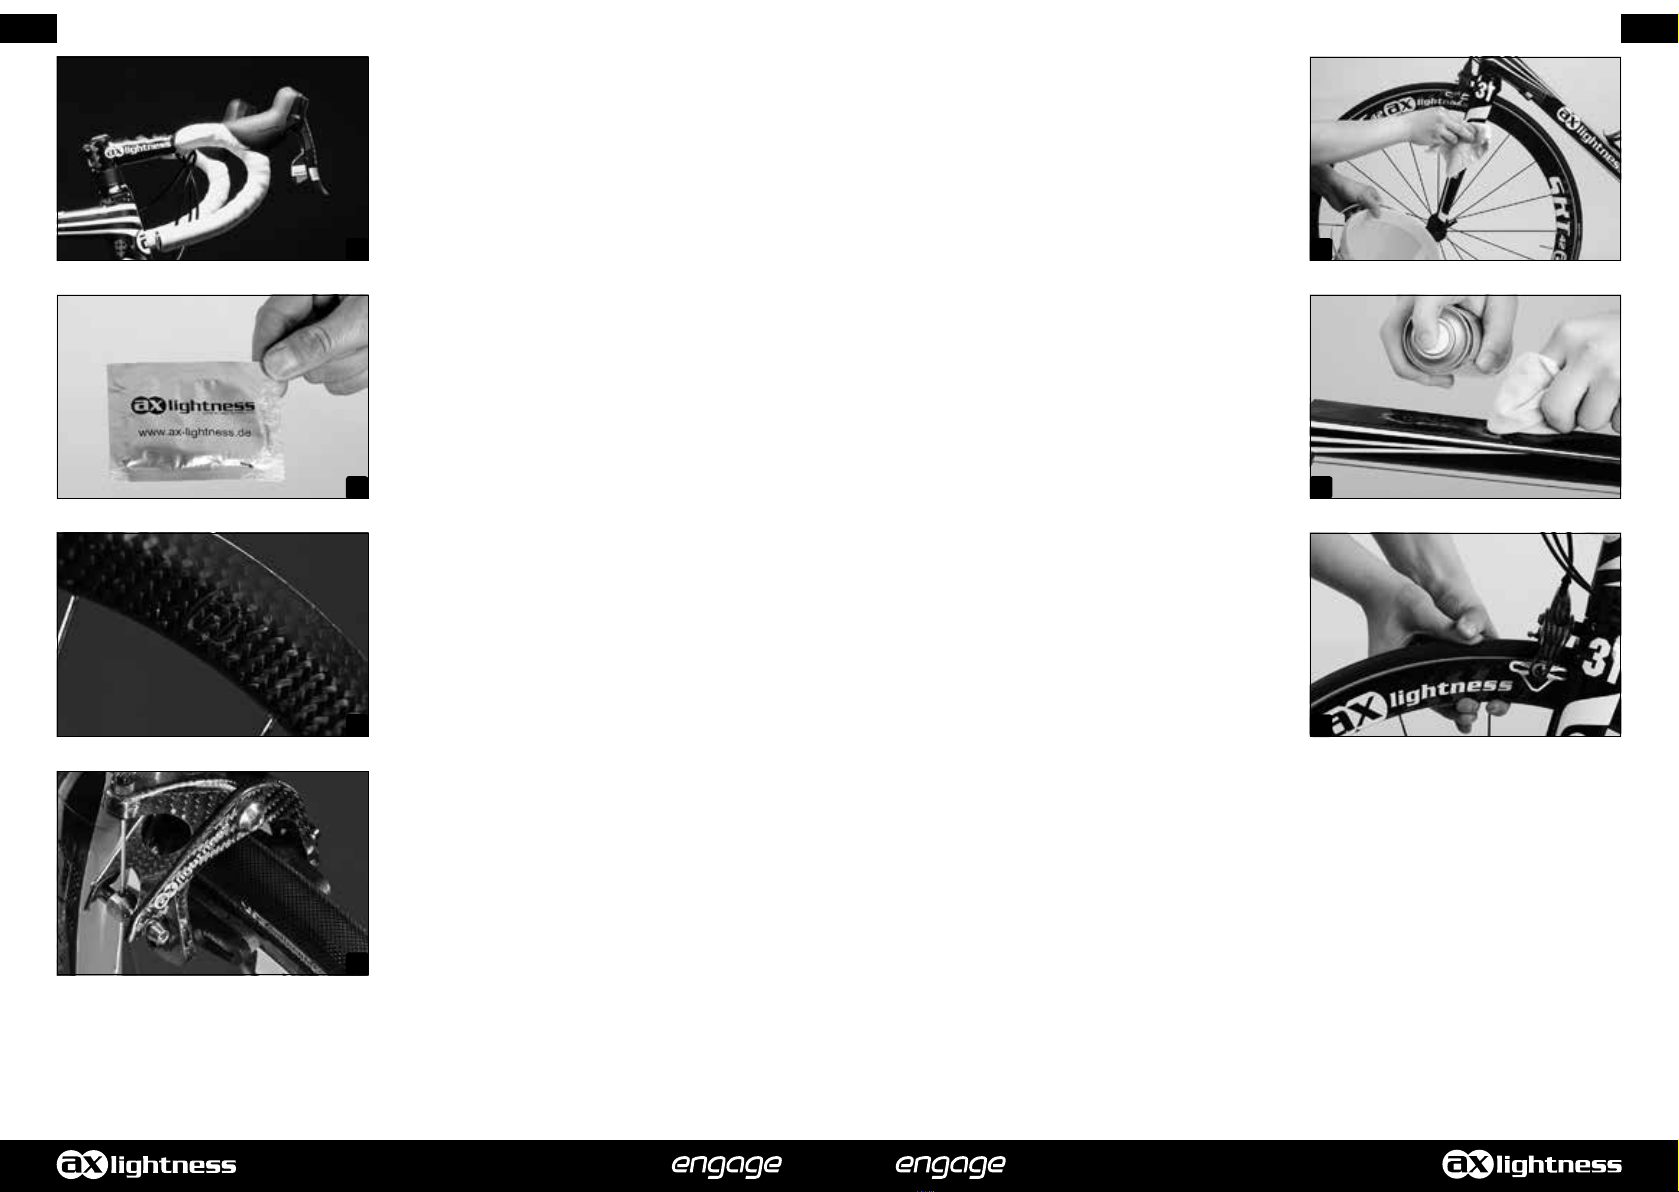
Never make any changes to handlebars, bar ends and
stems, forks and headsets, wheels, rim tapes or brake
pads of your AX-Lightness and engage bicycle. Nev-
er modify or make any changes to AX-Lightness and
engage seat posts, saddles, pedals or cranks. Do not
le or drill holes in AX-Lightness and engage compo-
nents, especially not in carbon components, as it will
compromise their structural integrity and void your
warranty.
For more information see the specications in our
catalogue and/or visit us at our website
www.AX-Lightness.de or www.engage-bikes.de
AX-Lightness and engage forks and stems are de-
signed to be only used with threadless headsets, also
referred to as Aheadset®-headsets. Attempting to use
them in combination with quill-stems and threaded
steerer tubes can lead to sudden failure, resulting in a
crash with unforeseeable consequences.
Make sure when performing any adjusting to your
AX-Lightness and engage bicycle that the brake le-
vers or brake/shift levers are always within easy reach.
Keep in mind that the brake levers are not within easy
reach when you ride with your hands on bar ends
mounted to AX-Lightness Poseidon handlebars espe-
cially reinforced for this purpose or to engage Chord
risebars or engage Chord atbars.
If you are in doubt or if you have any questions, con-
tact your AX-Lightness and engage dealer.
After a crash, accident or other major impact, have
your AX-Lightness and engage wheels, fork, headset,
saddle, seat post, stems and, if necessary, the bar ends
or aero bars checked and, if necessary, replaced by
your AX-Lightness and engage dealer for your own
safety.
Do not use your bicycle, but get in touch with your
AX-Lightness and engage dealer, in case:
» the AX-Lightness and engage wheels, quick-releas-
es, crank, fork, headset, handlebars, stem, bar ends
or aero bars give out cracking or creaking noises or
» the mentioned AX-Lightness and engage com-
ponents show external damage, such as notches,
cracks, dents, discolorations etc.
Ask your bicycle dealer to check the AX-Lightness
and engage components thoroughly and to replace
them, if necessary.
gAero bars are not allowed. If you
want to t your bicycle with aero
bars (clip-on), AX-Lightness oers
custom-made handlebars.
gengage products are designed for
an overall load of 110 kilos (242
lbs) including rider and baggage,
e.g. rucksack.
gThe overall load of AX-Lightness
products is marked on the compo-
nents. Upon request AX-Lightness
oer reinforced components with-
standing heavier overall loads.
gBe sure to use the AX-Lightness
and engage bicycle only for its in-
tended purpose, as it may other-
wise not withstand the stress and
fail! Risk of accident!
4 5
a
b
c
d e

Before every ride
Check the following points before setting o on your
AX-Lightness and engage bicycle:
1. Verify the tight t of the stem on the fork steerer
and of the handlebars in the stem. For more infor-
mation see chapters “Mounting AX-Lightness
and engage Aheadset®-stems” and “Mounting
AX-Lightness and engage handlebars”.
2. Are the quick-release levers or nuts of the front and
rear wheel and of the seat post properly closed (a)?
Improperly closed quick-releases or thru axles can
cause the wheels of AX-Lightness and engage bicy-
cles to come loose. and result in serious accidents!
For more information see chapters “Quick-releas-
es”, “Thru axles” and “Wheel mounting (moun-
tain bike/road racing bike)”.
3. Are the tyres in good condition and do they have
sucient pressure (b)? Do at least a thumb test by
pushing your thumb down on the tyre. The tyre
should only yield a little. For more information see
chapter “Tyres, inner tubes, rim tape, ination
pressure”.
4. Check whether the AX-Lightness and engage
headset is free of play and moves easily (c). Perform
a functional check as described in chapter “Check-
ing the headset”.
5. Spin the wheels to check whether the rims are true.
Watch the clearance between brake pad and rim
(d), or, in the case of disc brakes, between rim and
frame or fork. Untrue rims can be an indication of
tyres with ruptured sides, broken axles and a dam-
aged rim. As you look over the bicycle and nd
out that in the brake/wheel area the clearance on
the right side diers from that on the left side, the
AX-Lightness and engage wheel or the brake has
come out of its centred position.
6. Test the brakes in stationary by rmly pulling the
brake levers towards the handlebars (e). The brake
pads of the rim brakes must hit the rim sides with
their entire surface. They must not touch the tyres.
You should not be able to pull the lever all the way
to the handlebars!
With disc brakes you should have a stable pressure
point at the lever. Oil or brake uid must not leak
out onto the rotor or stopping power will be re-
duced and cause unsafe braking performance. For
more information, see your general bicycle user
manual.
7. Let your AX-Lightness and engage bicycle bounce
on the ground from a small height (f). If there is any
rattling, see where it comes from. Check the bear-
ings and the bolts, if necessary.
8. Do not forget to take a high quality D- (g) or chain
lock with you on your ride. The only way to eec-
tively protect your AX-Lightness and engage bicy-
cle against theft is to lock it to an immovable ob-
ject.
9. If you want to ride on public roads, make sure your
AX-Lightness and engage bicycle is equipped ac-
cording to the regulations of your country (h). Rid-
ing without lights and reectors in dark or dim con-
ditions is very dangerous, because you will be seen
too late or not at all by other road users. A lighting
set that corresponds to the regulations is a must on
public roads. Turn on the lights as soon as dusk sets
in.
gPlease note that the braking eect and
road grip of your bicycle are both greatly
reduced in wet conditions. Be particularly
cautious and do not ride as fast as under
dry conditions.
6 7
b
c
d
ea
g
f
h

gBraking on fast and steep descents can
cause your wheels to heat up, possibly
damaging the tyres, tubes and rims. In the
worst case this can result in a sudden loss of
air and thus in a serious accident. Get used
to proper braking and let the brakes cool
down from time to time.
gDo not use your AX-Lightness and engage
bicycle, if it fails on one these points! Riding
a defective bicycle can result in serious acci-
dents! If you are in doubt or if you have any
questions, contact your AX-Lightness and
engage dealer.
gImproperly closed fastenings (a-c) can
cause components of AX-Lightness and
engage bicycles to come loose and result in
serious accidents!
gDuring use your AX-Lightness and engage
bicycle is undergoing stress resulting from
the surface of the road and through the
rider’s action. Due to these dynamic loads,
the dierent components of your AX-Light-
ness and engage bicycle react with wear
and fatigue. Please check your bicycle reg-
ularly for wear marks, scratches, deforma-
tions, colour changes and any indication of
cracking. AX-Lightness and engage compo-
nents which have reached the end of their
lifespan may break without previous warn-
ing.
gBe aware that the distance you need to stop
your bicycle increases, when you are riding
with your hands on aero bars or bar ends.
The brake levers are not always within easy
reach.
iLet your AX-Lightness and engage dealer
maintain and service your bicycle regularly
and in cases of doubt it is always best to re-
place parts.
iRead the general user manual (d) of your
bicycle manufacturer before you set o!
Special characteristics of carbon
All AX-Lightness and engage products made of car-
bon bre-reinforced resin, also referred to as carbon
or abbreviated CFR (e-g),require special care and
attention.
Carbon is an extremely strong material which com-
bines high resistance with low weight.
Please note that carbon, unlike metals, shows no
visible deformation after undue stress even though
some of its bres may be damaged. This makes it very
dangerous to continue using an AX-Lightness and
engage carbon component after an impact or undue
stress, as it may fail without previous warning, thereby
causing an accident with unforeseeable consequenc-
es.
If your AX-Lightness or engage carbon component
sustained this kind of impact or undue stress, we
strongly recommend that you take your complete
bicycle to your AX-Lightness and engage dealer for
inspection. They will check the damaged bicycle and,
if necessary, replace the defective component. If nec-
essary, your AX-Lightness and engage dealer will con-
tact the service centre directly.
For safety reasons, damaged AX-Lightness and
engage components made of carbon (h) must nev-
er be repaired! They must be replaced at once! Make
sure damaged components will not be re-used. De-
stroy the component to prevent any re-use by a third
party.
AX-Lightness and engage components made of car-
bon must under no circumstances be exposed to
excessive heat. Therefore, never have a carbon com-
ponent enamelled or powder-coated. The tempera-
tures required for these treatments could destroy the
components. Do not leave AX-Lightness and engage
carbon components near a source of heat, or in a car
during hot or sunny weather.
8 9
Road Racing
En
En 14781opERating instRuctions
BicyclE usER manual
Please observe
bike card on
the rear cover!!
Please perform the functional
check on pages 8 and 9 before
every ride!
Please read pages
6 and 7 before your
rst ride!
a
b
c
d h
g
f
e

Components made of carbon have like all lightweight
components only a limited service life. Therefore, to
be on the safe side it is recommended that you re-
place AX-Lightness (a) and engage handlebars, stems
and headsets depending on use at regular intervals
(e.g. every three years), even if they were not involved
in an accident or similar incident.
Make sure the clamping areas are absolutely free
of grease and other lubricants, especially when the
clamping surfaces are made of carbon or carbon--
bre reinforced plastics! Grease will penetrate the
surface of the AX-Lightness and engage carbon com-
ponent and undermine the stability of joined parts
by reducing the coecient of friction. Once greased,
AX-Lightness and engage carbon components may
never again ensure reliable clamping!
When you install AX-Lightness and engage carbon
components, apply AX-Lightness carbon assembly
paste (b) to interconnecting surfaces to increase fric-
tion. This will allow you to tighten bolts to low and
therefore gentle torque values. If any notches, tears,
dents or discolorations etc. are visible on your AX-
Lightness and engage carbon component, or if it
makes creaking or cracking noises, do not use the
bicycle until the component has been replaced! Af-
ter undue stress, a crash or other major impact, re-
place the component or have it inspected by an AX-
Lightness and engage dealer.
If you have AX-Lightness or engage carbon road han-
dlebars, do not use clip-on or aero parts, unless the
handlebars are especially reinforced for these parts.
Please note that rims with carbon braking surfaces (c)
need special brake pads. AX-Lightness and engage
recommend that you use BBB brake pads, models
BS-03AC for Shimano and SRAM brakes and BS-03CC
for Campagnolo brakes or Ashima cork carbon brake
pads.
You need to get used to the braking response of car-
bon rims. A carelessly actuated front wheel brake (d)
can lead to a fall. Before you set o for the rst time
be sure to practise using the brakes o public roads.
Cleaning and care
Clean the AX-Lightness and engage tyres, wheels,
handlebars, stem, grips, grip tape as well as fork,
headset, seat post and your saddle with water and a
soft rag at regular intervals (e). If necessary, use a non
abrasive soap to remove grime. You may add a little
washing-up liquid for cleaning and removing tough
stains, such as oil or grease, from hard surfaces. Do
not use degreasing agents, which contain organic
solvents (such as acetone, trichloroethylene, methyl-
ene). Chemicals of this sort may damage the nish or
substructure of the material.
After your AX-Lightness and engage bicycle has dried,
you should apply a wax based polish to painted, car-
bon and metal surfaces (exception: braking surfaces
and saddles) (f). Polish the AX-Lightness and engage
components after the wax has dried. With this treat-
ment your AX-Lightness and engage wheels, fork,
headset, handlebars, stem and seat post will keep
their nice appearance for years.
aWhile cleaning your AX-Lightness and
engage bicycle and components, watch
out for cracks, scratches, dents, as well as
for deformed or discoloured material. If you
are in doubt contact your AX-Lightness and
engage dealer and have the damaged com-
ponents replaced at once.
gMake absolutely sure to keep the braking
surfaces or rotors free of cleaning agent,
grease or oil. Otherwise the braking per-
formance might be drastically reduced or
even rendered ineective.
aBe sure to never store the AX-Lightness and
engage handlebars, stem, wheels, tyres,
fork, seat post, saddle, frame and headset
in the blazing sun or near a source of heat.
When storing your bicycle for the winter
period, make sure the tyres have enough
pressure.
aCheck the tyre pressure (g) at regu-
lar intervals and follow the recom-
mendations of AX-Lightness and
engage.
aDo not use any aggressive agents,
such as benzine, thinners, etc., for
the cleaning of AX-Lightness and
engage wheels and tyres.
10 11
a
b
c
d
f
e
g

Maintenance
Check the true running of the rims, the bolts of the
sprocket assemblies and the play of the bearings after
the rst 100 to 300 km (60 to 180 miles) and true the
AX-Lightness and engage wheels (a) and/or adjust
the bearings, if necessary.
Check the torque values of all bolts (b) after the rst
100 to 300 km (60 to 180 miles) or 10 to 20 hours of
use. If necessary, tighten the bolts by approaching the
maximum torque prescribed by AX-Lightness and en-
gage in small steps and check in between the proper
t of the AX-Lightness and engage component (c).
Never exceed the maximum torque value indicated
by AX-Lightness! Re-check the bolted connections
every 2,000 km (1,200 miles) or 100 hours of use!
Although the AX-Lightness and engage headsets
have seals, they are not entirely tight. Therefore, have
the headset dismounted and re-lubricated by an
authorized AX-Lightness and engage dealer at least
once a year, depending on the intensity of use (d).
Please note that truing wheels and adjusting bear-
ings are jobs best left to skilled mechanics. Ask your
AX-Lightness and engage dealer to do these routines.
After about three years the tyres and inner tubes,
the handlebars, stem and bar ends have aged to
an extent that they need to be checked thoroughly
and have to be replaced, if necessary. Ask your AX-
Lightness and engage dealer.
If your AX-Lightness and engage bicycle has rim
brakes, have the thickness of the sides of clincher rims
measured after the second set of brake pads at the
latest. If the thickness is found to be less than 1 mm,
have the rims replaced!
The hubs rotate on hermetically sealed, replaceable
industrial bearings. Replacing the bearings requires
some experience. We therefore advise you to leave
this job to your AX-Lightness and engage dealer.
gLoose or overly tightened bolts
may result in an accident!
General notes on mounting
and compatibility
In general, mounting stems, handlebars, grips,
wheels, cranksets, forks, headsets, seat posts, saddles
and tyres as well as the replacement of brake pads
are jobs for a skilled mechanic. Have this work done
by an authorized AX-Lightness and engage dealer for
your own safety. Be sure to strictly observe each of
the following instructions. Non-observance of these
instructions can lead to the failure of AX-Lightness
and engage components, resulting in a severe acci-
dent or injuries.
aInstalling non-matching components can
also result in bolt failure and consequently
in a bad fall.
We recommend that you use the following AX-Light-
ness and engage components, as they are designed
to t and function as an integrated whole: seat post
and saddle (e), fork and headset (f), stem and handle-
bars (g), wheels and brake pads (h).
If you decide to use a component from another man-
ufacturer and to combine it with an AX-Lightness and
engage component, read the user manual of this
component regarding size accuracy to ensure proper
t and usability with AX-Lightness and engage com-
ponents.
AX-Lightness and engage assume no responsibili-
ty for problems resulting from an AX-Lightness and
engage component being used with a component
from another manufacturer.
AX-Lightness and engage strongly advise against
using stems with a large recess in the steerer clamp
pointing towards the stem. The top and bottom col-
lar of the steerer clamp must measure 5 mm at least.
Stems with recesses on the rear side of the steerer
clamp are unsuitable!
12 13
g
e
h
f
a
b
c
d

Before installation watch out for sharp edges and
burrs in the seat tube of the frame (a), at the seat post
clamp and the saddle clamping, in all clamping areas
of the fork, the headset, the stem, the handlebars and,
if necessary, on the handlebars approved for bar ends.
Do not use these components, if they have burrs or
sharp edges. Have components from any manufac-
turer with sharp edges or burrs checked by your AX-
Lightness and engage dealer. They will see, whether
this is a problem that can be solved or whether the
component has to be replaced.
Using a torque wrench
To achieve a reliable clamping of two components,
AX-Lightness and engage consider the use of a
torque wrench (b) absolutely necessary.
Exceeding the maximum torque value on clamp
bolts of the AX-Lightness and engage stem, head
tube or handlebars creates too much clamping force.
This can lead to a failure of the AX-Lightness and en-
gage component and not only bears the high risk of
an accident, but also voids the warranty.
Loose or overly tightened bolts can result in compo-
nent failure and in an accident. Strictly observe the
torque specications of AX-Lightness and engage (c).
If you do not have a high-quality torque wrench, con-
tact your AX-Lightness and engage dealer.
gDo not use components, if you are not ab-
solutely sure about their compatibility. If
you are in doubt contact your AX-Lightness
and engage dealer. If necessary, they will
get in touch with our AX-Lightness and
engage service centre.
gDamaged AX-Lightness and
engage components must not be
re-used! If you are in doubt, we
recommend that you replace the
component. Do not use your bicy-
cle until this has been done.
aFor a secure clamping force, apply
AX-Lightness carbon assembly
paste to interconnecting surfaces
to increase friction.
Warranty terms
Under European consumer law, the purchaser
has full statutory warranty rights within the rst
two years from date of purchase. In North Amer-
ica, these rights apply to the rst year from the
date of purchase. According to these laws, your
AX-Lightness and engage dealer is responsible
for ensuring the product is free of defects that
could cause premature wear from normal use.
iThe European sales law guarantee is
only valid in states where European
legislation applies. Please ask your AX-
Lightness and engage dealer about
the regulations in your country.
Warranty claims will only be accepted, if the bi-
cycle has been used solely for its intended pur-
pose (see chapter “Before your rst ride – In-
tended use”).
It does not cover damage resulting from wear
(wear of saddle cover, lubricants, seals, wear of
bar tapes and grips, tyres, brake pads and brak-
ing surface of the rim in the case of rim brakes),
neglect (insucient care and maintenance),
accidents, overstress caused by overloading,
overstress due to an over-tightening, incorrect
installation, improper treatment or as a result
of modications made to the AX-Lightness and
engage component.
Be sure to strictly follow all installation instruc-
tions (especially torque values), maintenance
instructions as well as all additional instructions
provided by the manufacturers of products used
in conjunction with AX-Lightness and engage
products.
Observe the indicated behavioural and control
procedures as well as all instructions referring to
the replacement of safety-relevant components,
e.g. in the case of colour changes and cracks oc-
curring on the components etc.
Keep the user manuals of all safety-relevant com-
ponents for your records and future reference.
Your AX-Lightness and engage dealer is your di-
rect contact point for all issues in this user man-
ual. They will gladly answer comprehensively to
your questions.
In the event of a defect or if you have a warran-
ty issue, please contact your AX-Lightness and
engage dealer who sold you the AX-Lightness
and engage product in question.
AX-Lightness and engage have exclusive agree-
ments with all reseller partners to handle war-
ranty cases. If you purchase an AX-Lightness
and engage product from an unauthorized re-
seller, e.g. an auction site on the internet, you
are not entitled to recovery from AX-Lightness
or engage. In this case you must contact the re-
seller.
You must include your original proof of purchase
when initiating your claim.
14 15
a
c
b

A note on wear
Bicycles components are subject to wear due to nor-
mal and proper use. The wearing rate depends on
care and maintenance, bicycle usage and environ-
mental conditions, such as UV light, rain, mud, dust,
and sand.
Some AX-Lightness and engage components require
regular care and maintenance. But even with the best
maintenance all components will reach sooner or
later the end of their service life, depending on the
intensity and the conditions of use.
The following AX-Lightness and engage components
are especially subject to wear due to the nature of
their intended use and not covered for wear under
this warranty:
• The covering material of saddle that is subject to
compression, abrasion and soiling.
• The brake pads (a) and the braking surfaces of the
rims (b): Once the yellow marks are visible on the
braking surfaces, the rim must be replaced.
• The chainrings of the crankset (c) wear through
abrasion caused by the chain and stone chippings.
• Grips and bar tape (d) are subject to compression,
abrasion and soiling.
• The lubricants and seals of the bearings.
Terms of guarantee
AX-Lightness and engage
Crash Replacement
Accidents and falls can result in damage due to
the high forces of impact. This aects functionali-
ty and in some cases even the safety of AX-Light-
ness and engage components.
For this reason in 2011 we introduced our Crash
Replacement programme for rst owners (the
person who bought the product from us or one
of our distributors) that covers all parts for a peri-
od of four years from the date of purchase.
Crash Replacement means: It doesn’t matter
whether you had a hard fall or an accident,
whether your AX-Lightness and engage product
is no longer in working order due to excess stress,
or whether for any other reason the functionality
of the part or your safety is compromised, AX-
Lightness and engage will give you a discount of
up to 30% o the purchase price for a new part.
We will still meet our warranty obligations
through our AX-Lightness and engage distribu-
tor, at no cost if the damage is already covered
by our warranty.
We will repair the damage for you if repairing
the damage not covered by warranty is less ex-
pensive than Crash Replacement. We oer this
service so that you can enjoy your high-quality
carbon components again as quickly as possible.
We reserve the right to inspect damage and de-
cline Crash Replacement if we determine that
the damage was caused wilfully, through im-
proper use or if the damage is only of an optical
nature.
Terms and conditions of
Crash Replacement
Crash Replacement works like this:
The damaged part can only be replaced by an
identical part.
Crash Replacement can only be claimed within
a period of four years after the date of purchase
by the rst buyer.
In the rst two years after purchase the discount
is 30%; in the third and fourth year 20%.
Crash Replacement does not cover wilfully
caused damage or damage as a result of im-
proper use.
To claim Crash Replacement simply send the
damaged AX-Lightness or engage item with a
complete damage report and a copy of the in-
voice to AX-Lightness or engage.
Please note: The end customer, not the dealer,
must send in the item!
Please clearly and concisely describe how the
damage was caused. This information is impor-
tant so that we can use it as a reference point
when we inspect the parts.
Crash Replacement is a voluntary service from
AX-Lightness and engage. We reserve the right
to make changes to these terms and conditions.
In case of any inquiries, please contact our
AX-Lightness and engage service centre.
For more information visit us at
www.AX-Lightness.de or at
www.engage-bikes.de
AX-Lightness GmbH
Am Steinkreuz 12
D-95473 Creußen
Phone: +49 9270 91513-0
Fax: +49 9270 91513-30
1716
a
b
c
d

This user manual is sub-divided into “compo-
nent chapters” referring to the AX-Lightness
and engage components. This user manual
has edge indices which help you to quickly
nd the desired chapter.
Brakes 19
Rims - Wheels 34
Fork - Headset 65
Crank systems - Pedals 76
Handlebars - Stem 85
Framesets - Assembly instructions 104
Seat posts - Saddles 112
18
BRAKES
Framesets Rims - WheelsFork - Headset
Crank systems - Pedals
Handlebars - Stem BrakesSeat posts - Saddles

BRAKES ...........................................................19
General notes on mounting and compatibility.....................21
Compatibility ............................................................ 22
Operation and wear ...............................................24
Functional check......................................................... 24
Brake adjustment and maintenance ...............................26
Synchronising and readjusting the brakes................................ 26
Replacing brake pads .................................................... 28
Mounting brakes and brake cables ....................................... 30
General notes on mounting
and compatibility
Brakes (a+b) are used for adjusting one’s speed to
the surrounding terrain and trac. In an emergency
situation, the brakes must bring the bicycle to a halt
as quickly as possible. In the event of such emergen-
cy braking, the rider’s weight shifts forward abruptly,
thus reducing the load on the rear wheel. The rate of
deceleration is thereby limited by the danger of the
rear wheel losing contact with the ground and by
the loss of the tyres’ grip on the road. This can lead
to an overturning of the bicycle (c). Such a problem
becomes particularly acute when riding downhill.
Therefore, in case of an emergency braking you must
try to shift your weight back and down as far as pos-
sible.
Actuate both brakes simultaneously and bear in mind
that, due to the weight transfer, the front brakes can
generate a far better braking eect on a surface with
good grip. Wet weather reduces the braking pow-
er. Actuate the brakes carefully when riding on wet
or slippery ground, as the tyres can easily slip away.
Therefore, reduce your speed when riding in such
conditions. Prolonged braking or permanent drag-
ging of brake pads can lead to overheating of the
rims in the case of rim brakes. This can damage the
inner tube or make the tyre slip on the rim This can
damage the inner tube or make the tyre slip on the
rim. Risk of accident!
When riding downhill, get used to braking hard and
then releasing the brake again, whenever the road
surface and the situation allows for it. If you are in
doubt about the braking action, stop and let the
brake system cool down.
GThe assignment of brake lever to brake cal-
liper can vary, e.g. left lever acts on front
brake (d). Ask your AX-Lightness and en-
gage dealer to change the brakes as you
want them.
GBe careful while getting used to the
AX-Lightness and engage brakes. Be careful
while getting used to the AX-Lightness and
engage brakes. This can save you from hav-
ing accidents.
20 21
BremsenBrakes
d
c
b
a

GWet weather reduces your braking power
and the road grip of the tyres. Wet weather
reduces your braking power and the road
grip of the tyres.
GEnsure that braking surfaces and brake
pads are absolutely free of wax, grease and
oil (a). Risk of accident!
AWhen replacing any parts, be sure to only
use parts that bear the appropriate mark
and, to be on the safe side, original spare
parts (b). Your AX-Lightness and engage
dealer will be pleased to help you.
GIf you need full braking power in a sudden
situation of danger, there is the risk already
with slightly worn down brake pads that
you can pull the brake levers all the way
to the handlebars. There is no chance for
the theoretically maximum possible delay
eect to be built up. Regular checks of the
free travel of the brake lever (c) and read-
justment are therefore mandatory.
Compatibility
The leverage of AX-Lightness and engage brakes is
best with SRAM (c) and Campagnolo (d).
If you use the brake levers of other manufacturers, the
brake may not reach the necessary braking power.
If you want to combine these AX-Lightness and en-
gage brakes with the latest Shimano levers (e), the
braking power may also be reduced.
As the braking performance depends on many fac-
tors (cable length, cable routing, brake pads / rim
combination, height of the brake pads in the brake
pad holder), other brake levers apart from SRAM
and Campagnolo may also work. Please ask your
AX-Lightness and engage dealer or even better an
independent institute to check this.
AX-Lightness and engage recommend that you use
high-end brake cables of one of the leading suppli-
ers. It is recommendable to use the brake cables de-
livered with your brake levers.
In principle, you can use all brake pads designed for
Shimano and SRAM brake pad holder. Always keep
the rims (f) in mind, when choosing the bake pads
and observe the specications of the wheel manu-
facturer.
Use dierent brake pads for aluminium rims (g) and
carbon rims (h).
For AX-Lightness and engage rims and wheels we
recommend that you use BBB brake pads, models
BS-03AC for Shimano and SRAM brakes and BS-03CC
for Campagnolo brakes or Ashima cork carbon brake
pads.
GThe brakes are vital to your safety. Do not
compromise when it comes to the brake
cables and brake pads on your bicycle. The
brake may be reduced in its performance or
even rendered ineective.
GWhen combining AX-Lightness and engage
brakes with other road racing or time trial
machine brake levers than Campagnolo or
SRAM brake levers, you must check wheth-
er maximum brake performance is given
even in case of an emergency braking un-
der dicult conditions. AX-Lightness and
engage advise against using other combi-
nations than the mentioned ones without
adequate checks.
22 23
Brakes
a
b
c
f
e
d
g
h

Operation and wear
Actuating the levers on the handlebars
(
a
)
and the
cables
causes a brake pad to be pressed against a
braking surface (b+c), and the ensuing friction slows
down the wheel. If water, dirt or oil comes into con-
tact with one of the braking surfaces, this changes
the coecient of friction and deceleration is reduced.
This is why brakes respond with a slight delay and less
powerfully in wet weather.
In order to maintain their eectiveness, the AX-Light-
ness and engage brakes need to be checked and re-
adjusted regularly.
The friction generated by braking causes wear to the
brake pads as well as to the rims. Frequent rides in the
rain and dirt and over hilly terrain can accelerate wear
on both braking surfaces. Some rims are provided
with wear indicators, e.g. grooves or circular indenta-
tions. Once these are visible (e.g. yellow marks on the
braking surfaces), the rim must be replaced. When
the abrasion of the rim has reached a certain critical
point, the rim may break under the tyre pressure. This
can make the wheel jam or the inner tube burst, both
of which can cause an accident! Risk of accident!
Functional check
Check whether the brake pads are accurately aligned
with the rims (d) and still suciently thick. You can
judge the wear of the brake pads by the appearance
of grooves. If the pads are worn down to the bottom
of the grooves, it is time to replace them (e). Be sure
to observe the appropriate instructions of the respec-
tive manufacturer.
See your AX-Lightness or engage dealer and ask them
to examine the remaining thickness of the rims when
you have worn through your second set of brake
pads with an aluminium rim at the latest. Your bicycle
dealer has special measuring devices for determining
the remaining thickness of the rims.
Both brake arms must hit the rim simultaneously,
when you actuate the brake lever. They must keep o
the tyre.
The brake lever must always remain clear of the han-
dlebars. You should not even be able to pull it all the
way to the handlebars (f) in the event of an emergen-
cy braking. If this is the case, however, observe the
following chapter “Synchronising and readjust-
ing the brakes”.
A correctly adjusted AX-Lightness and engage brake
must have passed all these checks.
GBrake cables that are damaged (g), e.g.
frayed, should be replaced immediately, as
they can otherwise fail at a critical moment,
possibly causing an accident.
GAdjusting the position of the brake pads
relative to the rims requires a considera-
ble degree of skill. Replacing and adjust-
ing the brake pads is a job best left to your
AX-Lightness and engage dealer.
GHave your rims regularly inspected and
measured by your AX-Lightness and en-
gage dealer (h).
24 25
Brakes
a
b
c
d
e
g
f
h

Brake adjustment and maintenance
Synchronising and readjusting the brakes
To adjust the brake pads in parallel to the braking
surfaces of the rims, place a at 12 mm open-ended
wrench to the wrench surfaces directly behind the
brake arms (a).
Keep the brake xed with the tool and check with a
torque wrench and a 6-mm bit, whether the sleeve
nut with which the brake is connected to the frame is
still tightened to a torque of 2 to 3 Nm (b).
The position of the brake lever where the brake starts
to act, also referred to as pressure point (c), can be
adjusted to the size of the hand as well as to individu-
al convenience by readjusting the brake cable. Make
absolutely sure you cannot pull the brake lever all the
way to the handlebar grip. With an unapplied brake
the brake pads should not be too close to the rim
sides, otherwise they could drag along the rim during
riding.
Prior to this adjustment, read the relevant instructions
in your general bicycle user manual or the manuals of
the component manufacturers Campagnolo, SRAM
or Shimano.
With ongoing brake pad wear, the pressure point at
the brake lever moves towards the handlebars. Check
the free travel at regular intervals. It should not be
longer than a quarter of the whole travel.
For readjustment turn the knurled bolt (d) through
which the cable runs into the brake body anticlock-
wise until the lever has the desired travel.
Hold the bolt tight (e) and screw the knurled nut
downwards until you feel resistance. This countering
with the ngers has a self-locking eect, thus xing
the adjustment.
Test the brakes subsequently in an area free of trac.
iA decreasing braking performance can also
be caused by soiled rims and brake pads. In
such a case, clean the braking surfaces of
aluminium rims with a soft rag and benzine
or with a special rim cleaning rubber. The
braking surfaces of carbon rims should be
cleaned carefully by using a little acetone.
To remove dirt from the brake pads, use
emery paper and rub o the top layer.
AScraping noises during braking indicate
impurities sticking in the brake pads which
must be removed at once. Small stones as
well as very hard components of the brake
pad can scratch out aluminium particles
from the surface of an aluminium rim. The
rim wears down quickly and the braking
performance decreases. In the case of car-
bon rims the top layer can be aected.
GAlways test the brakes’ function when sta-
tionary (f) after adjusting them, making
sure the brake pads engage fully with the
rim without touching the tyre (g) when you
pull them hard. Make sure you cannot pull
the lever all the way to the handlebars (h).
GBe sure to rst practise using the brakes
away from normal road trac to get used
to the changing braking response and to
achieve full braking performance of the
brake pads.
26 27
Brakes
a
b
c
d h
g
f
e

Replacing brake pads
For dismounting the brake pads unscrew the adjust-
ing nut of the re-tensioning unit at the AX-Lightness
and engage brake calliper. Relieve the brake calliper,
by pressing together both brake arms with one hand
and unhooking the entire brake cable xing with the
other hand (a), as you usually do when dismounting
a wheel. If you have Campagnolo brake lever/shifter
units, you can slacken even more at the lever (b). Re-
lease the brake pad bolts.
On the rear wheel brake pad replacement works with
the brake pad holder mounted; on the front wheel it
will be better to unscrew the entire brake pads.
Unscrew the entire brake pad holders with a T25 Torx-
wrench on the rear brake (c). Do not forget to wipe
clean the brake and the brake pad holder on this oc-
casion.
Release and remove the bolts on the brake pad hold-
er outside with a 2 mm Allen key on the front and
rear wheel (d). If you have other brake pad holders,
remove the pin by pulling it out upwards (e). Remove
the brake pad and observe both the contour and the
direction of the arrow.
Slide a suciently thick brake pad of identical shape
that matches the rim type onto the pad holder (f).
For AX-Lightness and engage carbon rims we recom-
mend that you use BBB brake pads, models BS-03AC
for Shimano and SRAM brakes and BS-03CC for Cam-
pagnolo brakes or Ashima cork carbon brake pads.
If you have rims of other manufacturers, be sure to
observe their instructions. Secure the brake pad with
a new bolt treated with locking agent. If there are no
bolts added to the new brake pads, apply some liquid
locking agent on the already used bolt.
A washer indented on one side (g) is inserted be-
tween brake pad holder and brake calliper. Due to
their ball-shaped form of these components, the
brake pad is ush with the braking surface. To adjust
the perfect angle, tighten the bolt including washer
only slightly and slide the brake pads in to the desired
position. The brake pad must not project beyond the
rim’s braking surface neither to the tyre nor to the
spokes
When mounting the brake pads to the brake, be sure
to check its alignment (h). In direction of motion, the
holders must be closed in the front and open in the
rear, which presses the brake pad into the holder
rather than pulling it out! In addition, the bend must
t the run of the rim.
Pull the brake lever to hold the aligned brake pads
in their position. Use a torque wrench to tighten the
bolts to a torque value of 4 Nm.
If your brakes make squeaking noises, adjust the
brake pads in a way that the front part of the brake
pad hits the rim rst. In this case, tightening with the
brake lever being pulled doesn’t work. You must x
the brake pad by hand.
Hang the brake cable xing unit back in its mount (a).
Retighten the release device that you have possibly
loosened before starting the replacement. Check
the gap between the brake pads and the rim sides
as well as the functioning of the brake. If necessary,
re-adjust the travel of the brake lever or the position
of the brake pad in case of dierent gaps to the rim,
as above described, on the AX-Lightness and engage
brake calliper.
28 29
Brakes
a
b
c
d h
g
f
e

Mounting brakes and brake cables
Bowden cables transmit the rider’s signals between
the brake levers/shifter units and the brakes. It is
not least the net brake mounting and cable routing
which makes for a perfect functioning of the brake.
Unscrew the sleeve nut from the brake fastening bolt.
Slide the AX-Lightness and engage brake with the
long bolt into the fork and that with the short one
into the rear frame (a). Insert the grease-free sleeve
nut from behind into the fork and screw it slightly
onto the brake bolt (b).
Use a 6 mm Allen key to screw the nut fully to the
end. A secure xing is achieved with 8 to 10 full turns;
by then you should feel a resistance. If you do not feel
a resistance, you must use a longer sleeve nut. Ask
your AX-Lightness and engage dealer for advice.
Bring the AX-Lightness and engage brake in a sym-
metrical position and tighten the sleeve nut to a
torque value of 2 to 3 Nm by using a torque wrench
(c).
Pull the brake lever to the handlebars and slide the
cable through the brake lever and in the rear through
the borehole in direction of the handlebars. Check
the proper position of the cable mount in the brake
lever and make sure the nipple engages in the re-
cess. The largest opening range for Shimano levers is
achieved by rst releasing the shift lever and then by
moving it entirely inwards, as you do when shifting.
Slip the outer brake cable housing over the brake
cable and move it from the handlebar side into the
brake lever until it stops inside (d). Do not use cable
stops! Keep in mind that a coat of grease is applied by
Shimano inside the cable housings on the side with
the lettering. The lettering should therefore show to
the grips.
Route the cable housing in the front along the han-
dlebars and, if available, along the crimp to the thick-
ened are beside the centre of the handlebars. This
is where the bar tape ends later on and the cable
comes out. Fix the cable housings with adhesive tape
in this area. Route the outer brake cable housing in a
large bend to the front wheel brake (e).
Press the brake calliper together and hold the cable
housing tight nearby the counterbearing on the
brake arm to determine the actual length. Make sure
the cable housing is not bent. Mark where you want
to cut the cable housing.
Before routing the Bowden cables of the rear wheel
brake, turn the handlebars to the full left or right po-
sition to determine the longest length required (f).
With the handlebars turned it must still be possible
to move the cable up or downwards along the head
tube without bending or getting stuck at the headset.
Turn the handlebars from its farthest left to its farthest
right position. The handlebars must remain freely
movable, the outer housings must remain slack and
not be in the way of another cable.
Pull out all inner cables so far that you can be sure
that they are out of the area where you use the cut-
ting tool.
Cut the outer housings to the desired length by using
a special cable cutter, e.g. from Shimano or Park Tool,
or a highly sharp side cutter (g). Make sure the cables
are cut at right angle, thus ensuring a rm contact at
the cable stops.
If they are not, grind the housing end vertically to the
pull direction (h). Using a grinding wheel would ease
this grinding, requires however a good feel for it, as
the friction reducing plastic housing is at risk of melt-
ing as a result of the created heat inside. If necessary,
cool it down with water.
Blunt tools crush the cables unnecessarily and require
a lot of reworking. If necessary, reshape the round
outer housing, if they were crushed.
30 31
Brakes
a
b
c
d
front rear
g
f
e
h

Open the little thin plastic tube with a needle, a point-
ed spoke or a very small Phillips head screwdriver (a).
The outer housings are mounted to the brake lever/
shifter units and to the AX-Lightness and engage
brake callipers with cable stops.
As a preventive measure for creaking noises and cor-
rosion, apply a little grease to the cable stops and the
counterbearing on the brake calliper.
Grease the inner cables by pulling them through
some bearing grease between thumb and index n-
ger (b), while inserting the cables through the hous-
ings and the cable stops to the brakes.
Slide the outer housings completely into the mounts
on the brake lever/shifter units and into the cable
stops at the brake. Fix the housings in two to three
areas with two to three tightly wound layers of insula-
tion or fabric tape to the handlebars, before winding
on the bar tape (c).
Insert the inner cable through the adjustment bolt
and slide the outer housing completely into the ad-
justment bolt.
Release the bolt of the yoke-type brake cable clamp
and remove the slotted cable clamping part. Move
the yoke over the brake cable and slide the clamping
part on the cable (d). Slide the clamping part com-
pletely into the yoke with the slot being positioned
crosswise to the yoke (e). Press the AX-Lightness and
engage brake a little together. Hang the yoke back
into the brake arm mount and tighten the cable.
Tighten the Allen screw with a 3 mm key until the
Bowden cable is a little tight.
Hold the brake cable xing tight with an 8 mm
open-ended wrench and tighten the Allen screw
with a torque wrench to 3 Nm (f).
Adjust the AX-Lightness and engage brake, as de-
scribed in the chapter “Synchronising and read-
justing the brakes”. Check once again the cable t
at all stops.
Forcefully pull the brake lever to the handlebars (g)
several times. This stretches the cables and crushes
the outer housings a little. Readjust as the lever travel
increases.
Shorten the inner cable by using the cable cutter by
about one to two centimetres after xing the brake
cables.
Protect the sharp-edged inner cable against fraying
with a cable end sleeve (h).
GBowden cables and brake cables dier a lot
and must therefore not be mixed up. The
inner cables of Bowden cables are slimmer
and have a clearly smaller head. The outer
housings of Bowden cables have wire-rein-
forcements in pull direction, which prevent
the housings from being crushed.The outer
housings of brake cables, in contrast, have
a spiral-shaped steel reinforcement which
makes them a little more exible than their
Bowden cable counterparts.
IWith some brake lever/shifter units you can
decide on your own, whether both cables
run in the handlebars’ front or whether the
one runs in the handlebars’ front and the
other one in the rear. Your decision primari-
ly depends on the handlebars used.
IMake sure the stem is in the highest posi-
tion, otherwise you will no longer have the
possibility to change the handlebar posi-
tion without mounting new cables.
32 33
Brakes
a
b
c
d
g
f
e
h

RIMS WHEELS....................................................34
General notes on mounting and compatibility.....................36
Quick-releases and thru axles......................................37
Quick-releases ........................................................... 37
How to securely mount the wheel........................................ 38
Thru axles................................................................ 39
Notes on how to mount rear wheels ........................................42
Tyres, inner tubes, rim tape, ination pressure .....................43
Valves.................................................................... 44
Rim trueness and spoke tension.......................................... 46
Wheel removal ....................................................47
Wheel mounting (mountain bike/road racing bicycle) .............48
Tubular tyres ......................................................50
Tyre removal ............................................................. 51
Tyre mounting with common tubular tyre glue........................... 51
Clincher and folding tyres .........................................54
Tyre removal ............................................................. 54
Tyre mounting ........................................................... 55
Truing up wheels ........................................................ 57
Mounting the sprocket assembly ..................................58
Dismounting the sprocket assembly...............................60
Mounting the brake rotors ........................................61
Brake pads for rim brakes..........................................62
Tips on braking....................................................63
What to bear in mind with rim brakes .................................... 64
35
Rims - Wheels
34
RIMS - WHEELS

General notes on mounting
and compatibility
The wheel consists of the hub, the spokes and the rim
(a). The tyre is mounted onto the rim, either a tubular
tyre that must be glued on the rim or a clincher or
folding tyre which has an inner tube inside. There is a
rim tape running around the rim well to protect the
sensitive tube against the spoke nipples and the edg-
es of the rim well, which are often sharp.
A quick-release (b) or a thru axle connects the AX-
Lightness and engage wheels with the frame and the
fork.
The AX-Lightness and engage wheels are subjected
to considerable stress through the weight of the rider
and any carried baggage as well as through bumpy
road surfaces and terrain. The permissible total weight
for all AX-Lightness and engage wheels is 110 kg. Al-
though AX-Lightness and engage wheels are man-
ufactured with great care and delivered accurately
trued, spokes and nipples can lose a little tension on
the first kilometres/miles. Ask your AX-Lightness and
engage dealer to check and true up the wheels after
you have bedded them in over about 100 to 300 kilo-
metres (60 to 180 miles) or 5 to 15 hours of use.
After the bedding-in period, check the AX-Lightness
and engage wheels regularly. It will, however, rarely
be necessary to tighten the spokes.
aObserve the permissible total weight of 110
kg so as not to overload the wheels.
gBefore replacing the tyres, make sure the
new tyres have the same size as the ones
mounted before. Bigger sized tyres may
collide with parts of the frame or the fork
and lead to a wheel blocking.
GPlease note that aero wheels may be aect-
ed by side winds and drift.
gBe sure to check the dimensional
accuracy of tyres and rims. If in
doubt, bring your components
to your AX-Lightness and engage
dealer. He can decide, whether
this is a problem which can be
solved or whether the component
must be replaced.
ATruing (retruing) wheels is a dif-
cult job which you should de-
nitely leave to a specialist.
ATo avoid any damage it is recom-
mended that you store AX-Light-
ness and engage wheels in a
wheel bag when transporting
your bicycle with the wheels re-
moved or when you do not use
them for a longer period of time.
Quick-releases and thru axles
Quick-releases
Most road racing and mountain bikes are tted with
quick-releases (c) to ensure fast adjustments, assem-
bly and disassembly. Be sure to check whether all
quick-releases are tight before you set o on your
bicycle. Quick-releases should be handled with great-
est care, as they directly aect your safety. Practise the
proper use of quick-releases to avoid any accidents.
Quick-release retention mechanisms basically consist
of two operative parts (d):
1. The hand lever on one side of the hub which cre-
ates a clamping force via a cam when you close it.
2. The tightening nut on the other side of the hub
with which the preload on the threaded rod
(quick-release axle) is set.
GMake sure the levers of both wheel quick-re-
leases are always on the side opposite to the
chain. This will help you to avoid mounting
the front wheel accidentally the wrong way
round. If you are in doubt or if you have any
questions, contact your AX-Lightness and
engage dealer or our service centre.
GNever ride a bike without rst having
checked whether the wheels are securely
fastened. Risk of accident!
AIf your AX-Lightness and engage bicycle is
equipped with quick-releases, be sure to
lock it to an immovable object together
with the wheels when you leave it outside. ITo be on the safe side you can re-
place the quick-releases by special
locks. They can only be opened
and closed with a special, coded
key or an Allen key (e). If you are
in doubt or if you have any ques-
tions, contact your AX-Lightness
and engage dealer.
36 37
Rims - Wheels
a
b
e
d
c
Table of contents