Axair PH7 User manual

Axair PH7
Operating Instructions
Air purifier/humidifier
1118887 D/E/F 0308

1Introduction 16
2Important notes 16
2.1 Intended use 16
2.2 Safety instructions 16
2.3 Notes on the Operating Instructions 16
3Product overview 17
3.1 Design 17
3.2 Functional description 17
3.3 Unpacking, checking the delivery and removing the transport lock 17
4Notes on correct location 18
5Operation 18
6Maintenance and cleaning 20
6.1 Maintenance intervals 20
6.2 Maintenance 20
6.3 Disposal 22
7What if...? 23
8Technical data 24
9Spare parts list 25
Contents

16
1Introduction
We thank you for having purchased the Axair PH7. The
Axair PH7 is an all-season unit for air purification and air
humidification.
These Operating Instructions will help you to fully benefit
from all features offered by the Axair PH7. This manual
contains all information required for the correct operation
and maintenance of the Axair PH7.
The Axair PH7 is designed in accordance with the latest
state of the art and the present safety regulations. In the
event of improper use, however, danger can arise for the
user or third parties and/or impairment of the unit or other
material assets. Please read and observe all safety
notes stated in the Operating Instructions of your Axair PH7.
If you have questions, which are not or insufficiently an-
swered in this documentation, please contact your Axair
representative. They will be glad to assist you.
2Important notes
2.1 Intended use
The Axair PH7 is intended exclusively for airhumidification
and air purification of rooms within the specified oper-
ating conditions. Any other type of application is consid-
ered as not conforming with the intended purpose and may
lead to hazard when operating the Axair PH7.
Operation of the equipment in the intended manner requires
that all the information in these instructions is observed
(in particular the safety instructions).
2.2 Safety instructions
–Carefully read and adhere to the instructions, direc-
tions and notes given in the present Operating Instruc-
tions of the Axair PH7. Any improper use of the unit is
strictly forbidden.
–The Axair PH7 must only be operated and serviced by
persons being familiar with the unit.
Persons not familiar with the Operating Instructions,
including children and persons under the influence of
alcohol, drugs or medicaments, must not operate the unit
unless under supervision.
–Except for the steps mentioned in this manual, the user
must not carry out further operations with the Axair PH7.
All repairs (e.g. replacement of the mains cable or
replacement of the control unit etc.) must be carried
out by your Axair supplier only.
–Danger of electrical shocks! The Axair PH7 operates
at mains voltage:
–observe all local safety regulations regarding the
handling of mains-powered electrical devices.
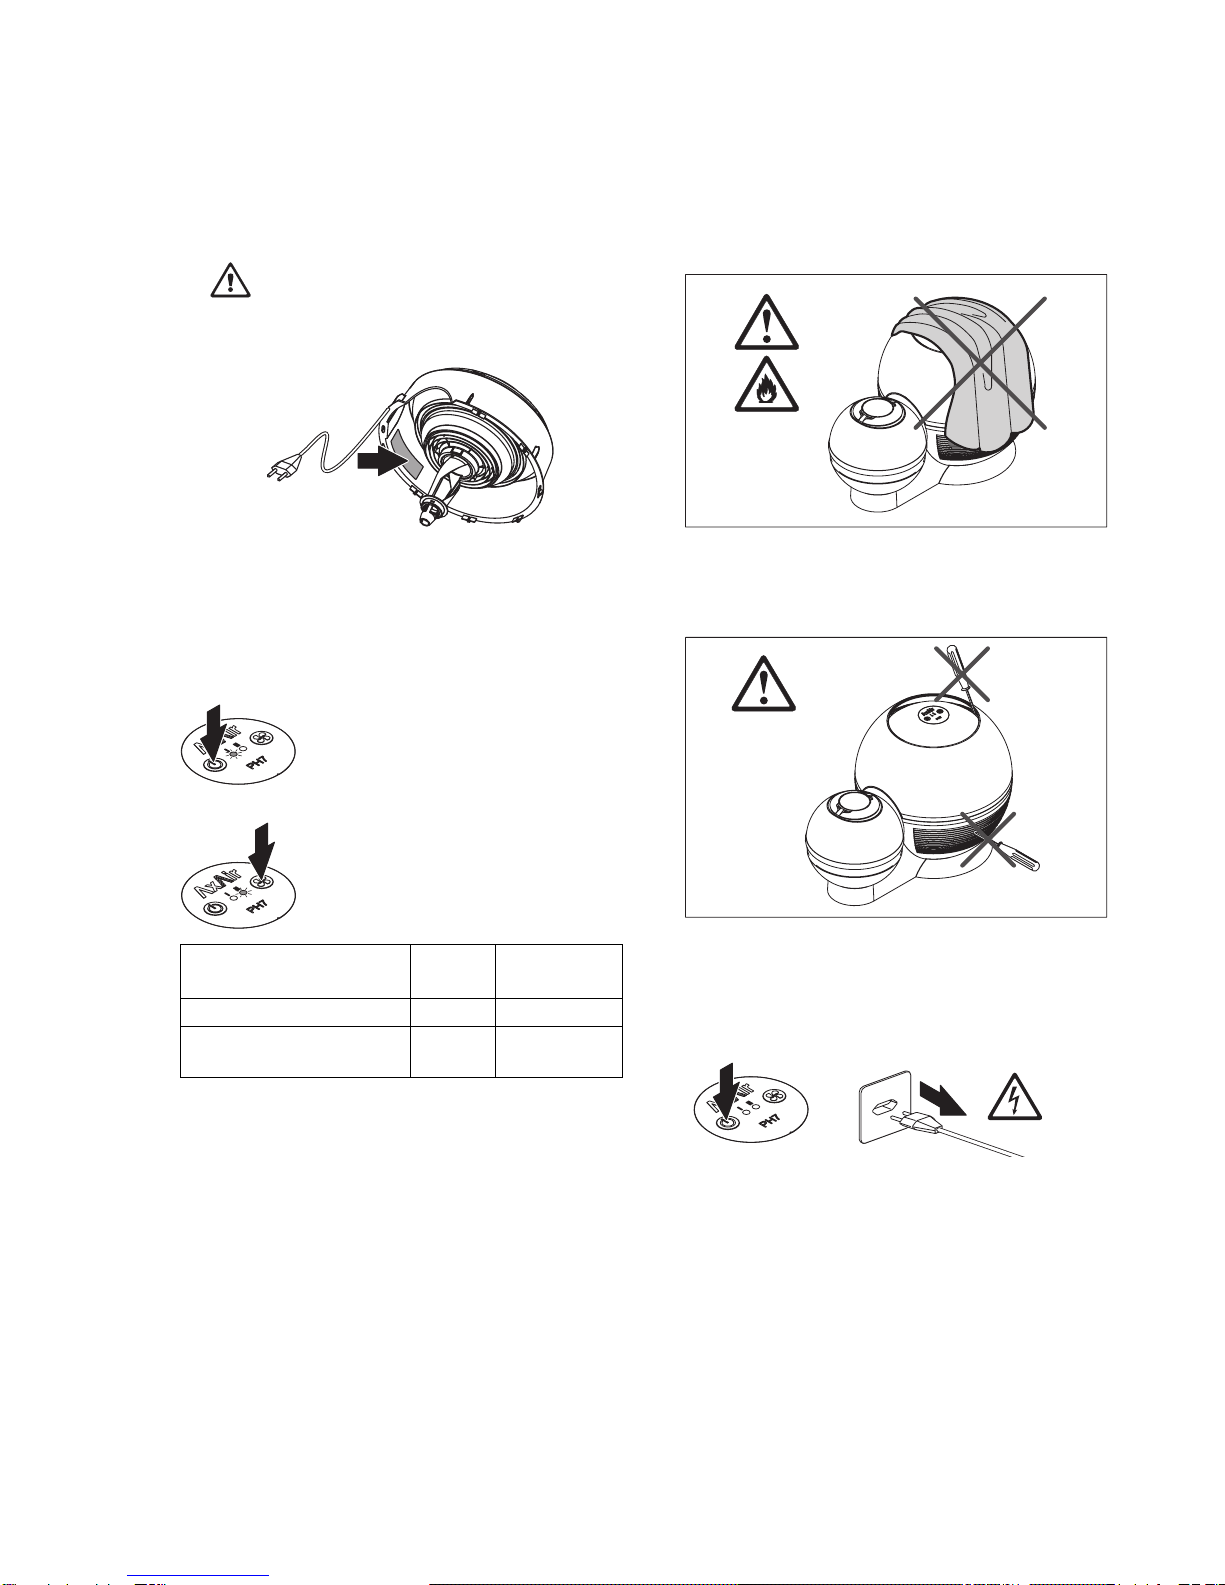
–the fan housing incorporates all electrical compo-
nents. Never immerse the housing into water and
protect it from splashes.
–Never remove the mains plug by pulling the power
cord. Make sure your hands are absolutely dry when
pulling the plug out of the socket.
–Handle the mains cable (and the extension cord, if
used) with care: do not lead the cable over sharp
edges, do not jam it, do not strain it, do not place
it on hot surfaces and avoid contact with oil and
solvents. Never use damaged cables or extension
cords!
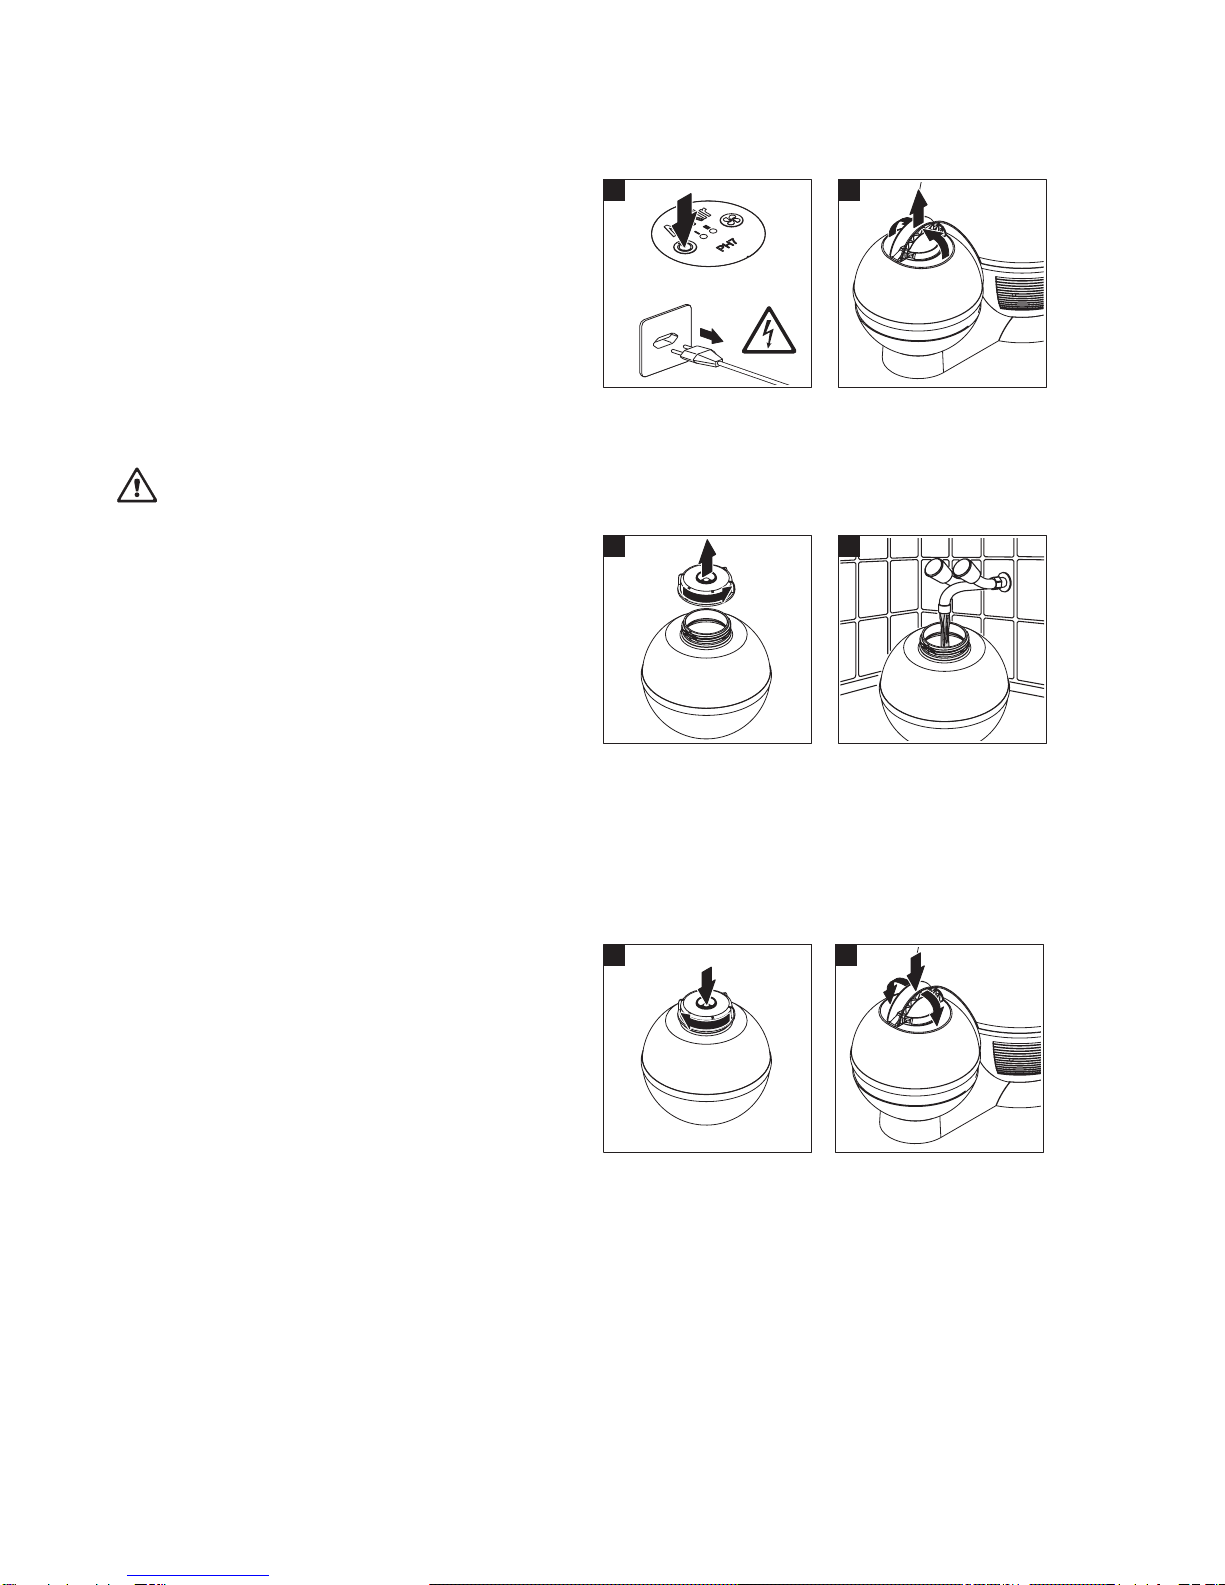
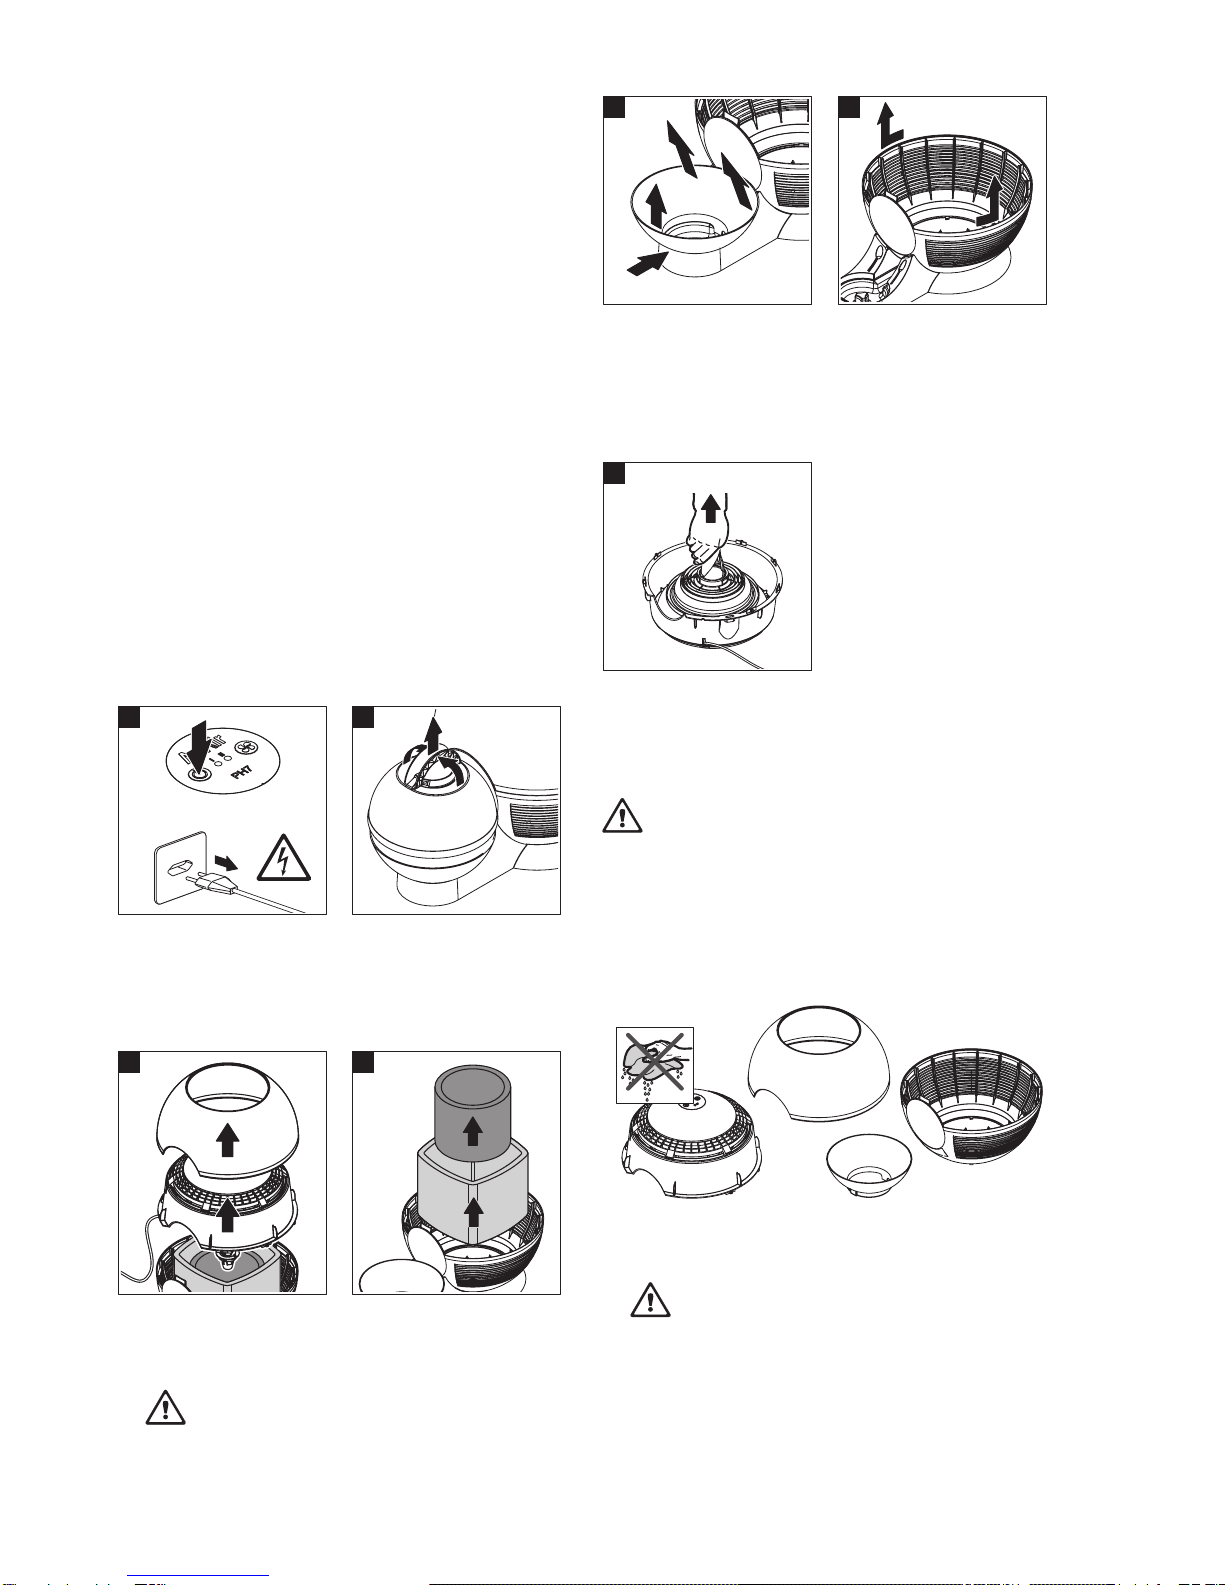
–Caution! Before cleaning and carrying out maintenance
work on the Axair PH7 switch the unit off and discon-
nectitfromthemains(pullmains plug out of the socket),
then wait until the fan comes to a stop.
–Caution! Take appropriate measures to prevent chil-
dren from playing with the Axair PH7. Children are
unaware of the hazards associated with electrical appli-
ances. Never leave the unit running unsupervised. Nev-
er allow the mains cable to hang down.
–Caution! Damaged units must not be set into opera-
tion.
–No technical modifications must be applied to the
Axair PH7.
–Use original spare parts from your Axair supplier exclu-
sively.
2.3 Notes on the Operating Instructions
This pictogram designates safety notes and dan-
ger references which, if not observed, may lead to
injury and/or material damage.
Please keep the Operating Instructions in a safe place
where they will be at hand whenever you need them.
If the Operating Instructions are mislaid, please contact
your Axair supplier for immediate replacement.

17
3Product overview
3.1 Design
3.2 Functional description
1Hood
2Fan speed key
3Fan speed LEDs
4On/Off key
5Fan housing
6Impeller
7Activatedcharcoalvaporizermat
1
5
7
8
10
9
13
14
11
12
PH7 Plus
4
PH7
PH7
PH7 Plus
3 2
6
1
24
5
6
7
3
A
The Axair PH7 is an all-season unit for air humidification
and air purification.
Via the level regulating valve (2) the water flows from the
water tank (1) to the base tub (3). The impeller (4) sucks up
the water from the base tub and projects fine drops towards
the activated charcoal vaporizer mat (5).
The fan (7) located in the upper part of the fan housing takes
in ambient air. The filter (6) purifies the air which is then
moistened by the activated charcoal vaporizer mat. Finally,
the purified and moistened air is exhausted to the room, via
the slots in the upper part of the housing.
Note: If the Axair PH7 is operated without water it works as
air purifier only and no humidification takes place.
3.3 Unpacking, checking the delivery and
removing the transport lock
•Unpack the Axair PH7.
Important! The original packaging of the Axair PH7
was designed for optimum safety during transportation.
Please preserve the original packing material as well as
the transport lock (see below) in case you once have to
return the unit for some reason.
•Lift up the hood. Pull out the mains cable from the cable
duct in the air intake screen and carefully lift up the fan
housing. Then, remove the transport lock “A”.
8Triplex filter (PH7)
9Hepa filter (PH7 Plus)
10 Water tank
11 Level regulating valve
12 Tank base
13 Air intake screen
14 Base tub

18
•Check the delivery for completeness. The Axair PH7
is supplied ready for operation, equiped with a filter
(PH7: Triplex filter, PH7 Plus: Hepa filter) and the acti-
vated charcoal vaporizer mat.
Check the equipment for damage. Please report any
damage to your Axair supplier and to the carriers, as
required.
•Put on the fan housing. Lead the mains cable via the
cable duct in the air intake screen down to the base tub.
Then, put on the hood.
4Notes on correct location
Caution! The Axair PH7 must not be installed
in hazardous locations and the unit must not be used
in rooms where water splashes may occur.
Please observe the following notes for the correct position-
ing of the Axair PH7:
Important! Empty the base tub before moving the unit,
otherwise water could possibly escape.
–To ensure proper operation place the Axair PH7 on a
solid horizontal surface only.
–To make sure the air is entirely recirculated do not
locate the Axair PH7 in narrow recesses, behind
curtains etc. Keep a minimum space of 0.5 m be-
tween the unit and nearby walls or furniture.
Make sure the air intake and exhaust slots are not
covered thus ensuring the purified and moistened air
can leave the top of the unit without hindrance.
–Do not locate the PH7 close to cold outer walls and do
not expose the unit to direct sunlight or powerful heat
sources (lamps, radiators, etc.).
–If the Axair PH7 is used in a particular location for an
extended period the filter and the activated charcoal
vaporizer mat absorbs the odour of the room. When
moving the unit to another location, the Axair PH7 emits
the odour of the previous room for a certain time. This
may be inconvenient if the unit is moved from a room
heavily loaded with smell to an almost neutral environ-
ment.
Note: if the unpleasant odour does not disappear after a
certain period, the filter and the activated charcoal va-
porizer mat must be replaced.
5Operation
Filling the water tank
21
43
5 6
1. Switch off the Axair PH7 via the On/Off key and remove
the mains plug from the wall outlet).
2. Swivel up the carrying handles of the water tank and
remove the water tank to the top.
3. Swivel down the carrying handles, and place the water
tank onto the side with the carrying handles. Then,
remove the level regulating valve.
4. Thoroughly rinse the water tank and the level regulating
valve with hot water, then fill the water tank with cold tap
water. Do not use additives.
5. Screw in the level regulating valve.
6. Turn the water tank, then swivel up the carrying handles.
Carefully insert the water tank into the unit, then swivel
down the carrying handles. The water now flows into the
base tub.

19
Connect the unit to the mains
•Make sure the required supply voltage (see type plate
inside the housing) matches the local mains voltage.
To do so, disassemble the fan housing, check the spec-
ification on the type plate, then assemble the fan hous-
ing again. Please follow the information on dismantling
and assembly given chapter 6.2.
Caution! Do not connect the Axair PH7 to the
mains if the voltage does not match!
–Important! Never move the Axair PH7 if the water tank
or the base tub are filled with water. The water could
escape and moisten the filter thus making it unusable.
–Caution, fire hazard! Make sure the air intake and
exhaust slots are not covered by objects such as clothes
when the unit is in operation as this could cause danger-
ous accumulation of heat inside the unit.
•Connect the mains plug to the wall outlet.
Recommendation! Connect the Axair PH7 to a wall
socket featuring a fault current breaker (if available).
Switching on the unit/Setting the fan speed
Switch on the Axair PH7 via the On/Off
key. The unit starts running at the fan
speed selected last (the corresponding
fan speed LED lights).
Press the fan speed key to select the
desired fan speed according to the fol-
lowing table.
PH7 PH7 Plus
Fan speed I II I II III
Air recirculation in m3/h 100 145 80 100 130
Vaporizing capacity in dl/h 3.0 4.0 2.8 3.5 4.0
(at 45%hr and 23°C)
Notes on operation
–Check the level of the water tank on a regular basis and
fill up as required (see section “Refilling the water tank”).
Recommendation: for optimum purification the Axair
PH7 should always be operated with water. As an
exception to the rule, the unit may be operated without
water in rooms that are rarely aired thus preventing
excessive humidification (however, this should not be
done in the heating period). In this case the Axair PH7
works as air purifier only.
–Important! Never operate the PH7 without filter and
activated charcoal vaporizer mat.
–Caution, risk of damage! Do not insert foreign objects
into the air intake and exhaust slots.
Putting the unit out of operation
•Switch the Axair PH7 off, remove the mains plug from
the wall outlet and wait until the fan comes to a stop.
In case you want to put the Axair PH7 out of operation for an
extended period:
•Empty the water tank and the base tub. Clean the com-
ponents as described in chapter 6.2. Make sure the
water tank and the base tub are absolutely dry, then
reassemble the unit. Store the unit in an appropriate,
dust-free location.

20
6Maintenance and cleaning
6.1 Maintenance intervals
The maintenance intervals mostly depend on the load of the
ambient air, the water quality and the operating time. Con-
sider the following indications as a guideline:
weekly:
–clean fan housing
–empty and clean base tub
–clean impeller
–rinse water tank with hot water
every 4 weeks:
–delime base tub and impeller
every 3 months:
–replace activated charcoal vaporizer mat
as soon as the filter replacement indicator appears (all
LEDs are blinking) or after 6 months at the latest:
–replace Triplex filter or Hepa filter, respectively
6.2 Maintenance
Disassembling the unit
5. Press the snap lock of the base tub, then pull up the tank
base to remove it from its support.
6. Turn the air intake screen counterclockwise to the stop,
then lift it up (bayonet lock).
21
4
3
5 6
ca. 2 kg
7
1. Switch the Axair PH7 off, remove the mains plug from
the wall outlet and wait until the fan comes to a stop.
2. Swivel up the carrying handles of the water tank and
remove the water tank to the top.
3. Lift up the hood. Pull out the mains cable from the cable
duct in the air intake screen. Then, carefully lift up the fan
housing and put it aside, with the impeller on top.
Caution! To prevent damage make sure the
impeller is not facing the bottom when putting the
fan housing aside.
4. Remove the activated charcoal vaporizer mat and the
filter.
7. Remove the impeller from the snap lock of the fan.
Cleaning
Caution! Do not use solvents, aggressive agents or
abrasive cleaning aids (e.g. scouring cloth).
In case you have to use cleaning or deliming agents
strictly adhere to the relevant application notes and
safety instructions.
•Hood, fan housing, air intake screen and tank base
Rub with a damp cloth and use a vacuum cleaner to
remove dust from the inner and outer side of the housing,
as required.
Caution! Prevent water from entering the fan
housing.

21
•Base tub, impeller and level regulating valve •Hepa filter (PH7 Plus only)
2
ca. 2 kg
1
43
Accumulation of lime in the base tub, on the impeller or
in the level regulating valve promotes the development
of microorganisms which may lead to unpleasant odour.
If there is accumulation of lime, use a commercially avail-
able deliming agent (e.g. acetic cleaning agent or 8-
percent formic acid), then rinse thoroughly with fresh
water.
If there is no formation of lime, clean the parts with luke-
warm soapy water, then thoroughly rinse with fresh
water.
•Water tank
Rinse with hot water. Clean the water tank with acetic
cleaning agent as required, then thoroughly rinse with
fresh water
•Activated charcoal vaporizer mat
Carefullyrinsethevaporizer mat with luke-
warm water (without additives), as re-
quired. The vaporizer mat must be re-
placedafter it has been inusefor 3 months
at the latest. The vaporizer mat is non-
polluting and may be thrown in the trash.
Filter slightly soiled/filter in use for less
than 6 months:
Vacuum the filter on both sides (use the
lowest power setting of the vacuum clean-
er).
Filter replacement indicator is activated
(all LEDs are blinking): replace filter.
•Triplex filter (PH7 only)
Filter replacement indicator is activated
(all LEDs are blinking): replace filter.
The Hepa filter cannot be cleaned.
Reassembling the unit
Caution! Before reassembling the Axair PH7 check
all components for possible damage. Do not reuse
damaged parts but replace them before reassem-
bling the unit.
For the replacement of defective components
(e.g. mains cable, indicator lamp, etc.) please
contact your Axair supplier.
1. Push the impeller into the snap lock of the fan until it
properly engages.
2. Important! After the impeller has properly engaged, turn
it back and forth a couple of times. Then have the
impeller rotate at high speed and check for eccentricity.
Repeat above procedure as required.
3. Insert the air intake screen into the notches of the base
tub, then lock the screen by turning it clockwise to the
stop.
4. Locate the tank base in the base tub, then press the base
down until it properly engages in the snap lock of the
base tub.

22
5. Insert the Triplex filter (or the Hepa filter, respectively)
into the base tub (Important! Make sure the filter does
not get in contact with water, otherwise the filter must
be replaced).
Important! When inserting the Triplex filter make sure
the entire inner perimeter of the filter is located behind
the ridge of the air intake screen.
Important! When inserting the Hepa filter make sure
the entire inner perimeter of the filter is evenly located on
the ridge of the air intake screen.
7. Place the fan housing on the air intake screen and align
both parts. Then, put on the hood.
8. Lead the mains cable via the cable duct of the air intake
screen down to the base tub.
6
7 8
9 10
5
6. Fold the activated charcoal vaporizer mat (as shown in
the figure above), then insert the mat into the base tub.
Finally, unfold the activated charcoal vaporizer mat and
press it towards the inner ridge of the base tub.
Important! Make sure the activated charcoal vaporizer
mat is properly seated at the bottom of the base tub and
does not rest on the ridge.
9. Fill up the water tank (if required) and attach it to the unit.
10. Reset the filter replacement indicator: Connect the
mains plug to the wall outlet. Then, simultaneously
press the On/Off and the fan speed keys and keep
them depressed (approx. 4 seconds) until all LEDs
light up briefly (approx. 2 seconds).
6.3 Disposal
Please observe the local regulations for correct disposal of
the entire unit or particular components . If in doubt, consult
your Axair supplier.

23
7What if...?
The following table lists symptoms of malfunction that may occur in daily operation, together with possible causes and
suggested remedies.
Symptom Cause Remedy
Unit does not operate after having
pressed the On/Off key.
Unit is not connected to the mains or
mains failure.
Wrong mains voltage.
Unit is defective.
Connect the unit to the mains or have
the mains supply checked.
Check main voltage.
Contact your Axair supplier.
Unit is operational but emits a
brushing sound.
Caution! Set unit out of
operation without delay.
Fan housing mounted incorrectly.
Impeller improperly located.
Mount fan housing correctly.
Install impeller properly.
Insufficient humidification. Accumulation of lime on impeller and/
or activated charcoal vaporizer mat.
No water in the water tank.
Intake/exhaust slots of the fan
housing and/or filter badly soiled.
Clean impeller. Clean or replace
activated charcoal vaporizer mat.
Fill up water tank.
Clean fan housing. Clean or replace
filter.
Unit is switched on, all LEDs are
blinking (filter replacement
indicator).
Filter and/or activated charcoal
vaporizer mat soiled.
Clean or replace Filter and/or activat-
ed charcoal vaporizer mat.
Important! After filter replacement re-
set filter replacement indicator.
Unit is switched on, one of the LEDs
lights, fan does not rotate.
Caution! Set unit out of
operation without delay.
Drive jammed:
–Fan housing mounted incorrectly.
–Impeller improperly located.
Excess temperature switch of electric
motor triggered:
–Ambient temperature too high.
–Wrong mains voltage.
–Electric motor jammed or dam-
aged.
Mount fan housing correctly.
Install impeller properly.
Remove the mains plug from the wall
outlet and wait approx. 1hour
(cooling time).
The unit is designed for operation at
room temperature.
Check mains voltage.
Contact your Axair supplier.

24
8Technical data
Axair PH7 Axair PH7 Plus
System
Air cleaning: three-layer filter with activated charcoal Hepa filter with activated charcoal
Air humidification: cold evaporation
Dimensions (W x H x D) 590 x 382 x 383 mm
Weight 5.7 kg (dry)
Mains connection via twin-core power cord
Supply voltage 220…240 V, 50/60 Hz or 100…115 V, 50/60 Hz
Capacity per fan speed position I II I II III
Air recirculation (m3/h) 100 145 80 100 130
Humidification capacity at 45 %rh and 23 °C (dl/h) 3.0 4.0 2.8 3.5 4.0
Power consumption at 230 V (W) 17 24 12 15 26
Acoustic capacity level (dBA) 46 53 44 48 52
Sound intensity level (dBA) 40 47 38 42 46
Impeller polystyrene, attached to fan
Triplex filter
–Structure coarse filter – activated charcoal filter – fine dust filter
–Filter surface 0,2 m2
Activated charcoal vaporizer mat polyurethane foam with activated charcoal coating
Water tank made of transparent SAN with incorporated level regulating valve, removable
capacity: 6.0 litres
Base tub made of impact-proof polystyrene,
resistant to commercially available deliming and cleaning agents
Admissible operating temperature room temperature
Admissible ambient humidity 0…80 %rh, non-condensing
Conformity (standards) SEV, VDE, GS, CE

25
9Spare parts list
4
1
2
3
5
6
9
7 8
10
11
12
13
14
15
16
17
18
19
20
Pos. Spare parts Type SAP-No.
1Water tank cpl. 1118659
2Covering band 1118657
3Level regulating valve 1104407
4Tank base 1118677
5Base tub 1118658
6Air intake screen 1118660
7Triplex filter 1118613
8Hepa filter 1118614
9Activated charcoal vaporizer mat 1118615
10 Hood, large 1118664
11 Impeller cpl. 1104377
12 Support 1118661
13 Fan 1118665
14 Motor support 1118662
Pos. Spare parts Type SAP-No.
15 Set of rubber bearings (3 pcs.) 1118670
16 Motor 2-step, 230 V 1118666
2-step, 100 V 1118667
3-step, 230 V 1118668
3-step, 100 V 1118669
17 Mains cable normal 1103268
Japanese 1115938
Korean 1105876
18 Control unit 2-step, 230 V 1118672
2-step, 100 V 1118673
3-step, 230 V 1118674
3-step, 100 V 1118675
19 Hood, small 1118663
20 Keypad 2-step (PH7) 1118678
3-step (PH7 plus) 1118679

Notes

Manufacturer:
Axair Ltd. Systems for Air Treatment
A WMH Walter Meier Holding Company
CH-8808 Pfäffikon (Switzerland), Talstr. 35-37, P.O. Box
Telephone +41 55 416 6111, Fax +4155 416 62 62
Consulting, Sales and Service:
Reg.No.40002-2
Table of contents
Other Axair Air Cleaner manuals