Installation:
he antenna has two built in 3mm studbolts to mount this unit in your bike. he badge side with the rfid logo should
not be covered with metal, what will decrease the operating range significantly. o operate with your EASY RFID,
the tag is to be placed in front of the Logo.
he control device can be placed anywhere you want. However, there´s a status led in the control module
implemented that flashes 2 times when using a not identified tag and even 3 times or 4 times when stored a new
tag in the control device. So it might make sense to implement the control module in the way that you can identify
the led.
he Easy RFID comes together with a small piezo speaker that can be connected to the yellow cable. he piezo will
beep if you now hold a tag in front of the rfid logo. Just leave this line (and also the Piezo speaker) unused
If you don´t want to have your bike beeping.
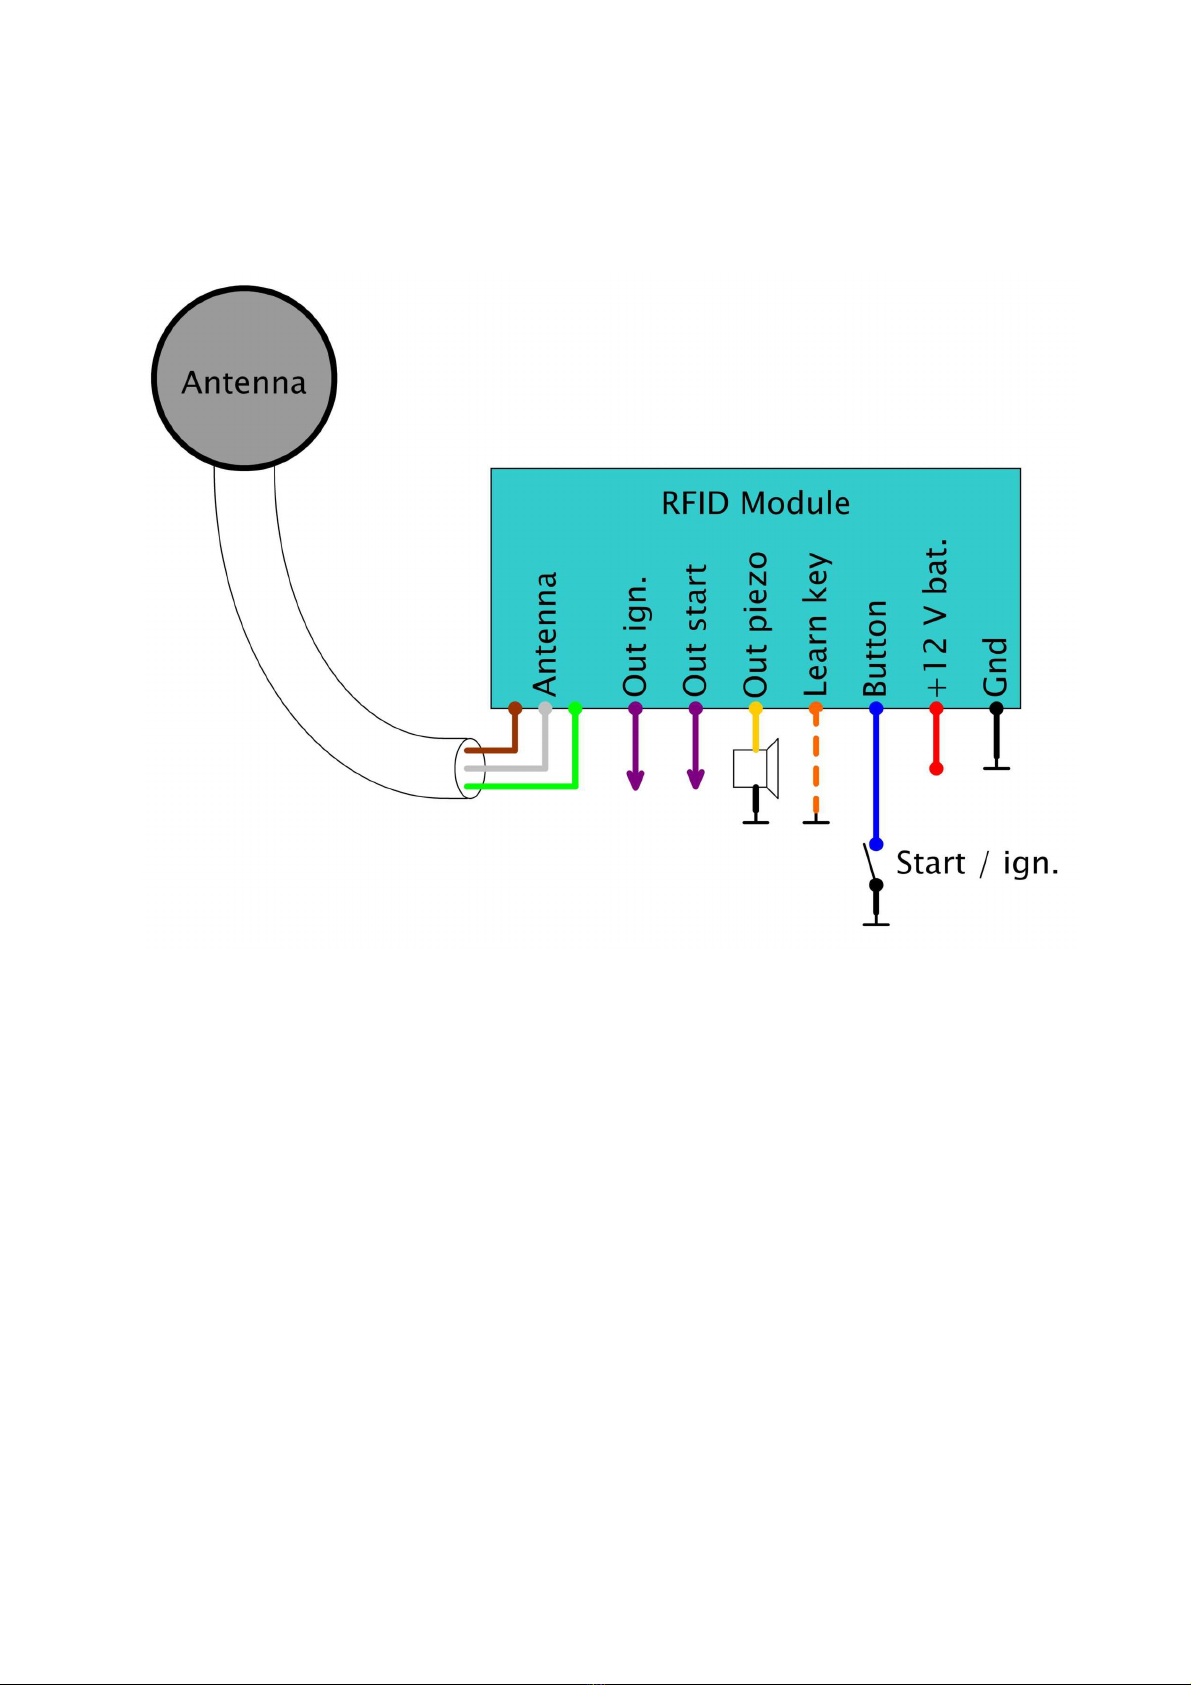
After having connected all the wires to the Main unit and having ensured grounding you just have to connect the
three thin wires of the grey cable that comes out of the antenna:
white to white
Brown to brown
Green to green
hat´s it :-)
Operation:
A press on the button activate the RFID module for 15 seconds. he ignition output switch on if you hold an
identified tag within 15 second close to the antenna. A "beep" inform you that the ignition is on. he module fall
back to sleep if it don´t recognize a tag within this time. You can control now the starter by pressing the button once
again if the ignition is switched on. With a short press less than a ¼ second on the button the ignition and also the
Easy RFID is switched off again.
he status led on the control device flashes for 2 times if a tag in range of the antenna is not identified and the
Easy RFID falls back to sleep again and consume no current.
he Easy RFID can learn the id of 2 different tags (125 kHz, EM4001). he orange cable is connected to ground if
you want to store a new tag. Press the start button and hold the tag after the press in front of the antenna. he
status led flashes for 3 times (tag one) or 4 times (tag two). he maximum distance is about 6 - 8 cm, depending
on the used tag.
By the way: he small mini implants made for pets that can be bought for 3 or 4 Euros on the web have a smaller
range. he used antenna is of course smaller and allows often only a range of a few mm.
Here´s a summary of the status led signals:
1 x flashes: he tag has been succesfully recognized and the Ignition output is activated. he piezo indicate it as
well.
2 x flashes: he tag has not been recognized and te EASY RFID falls asleep again after release the button.
3 x flashes: he EASY RFID had learned the first tag.
4 x flashes: he EASY RFID had learned the second tag.
Please consider that the EASY RFID may only be installed by qualified service-technicians.
Any liability of the manufactor for damages or accruing disadvantages of the user caused by inappropiate using or
installing the EASY RFID are distincly excluded.
Please notice the respective traffic regulations. Further on, the Company Axel Joost Elektronik declares
that the EASY RFID is applica le to the usa le CE-Norms and the regulations of ROHS are accomplished.
The EASY RFID is conform to 2014/53/EU, EN50364, EN00330 For further quesitions we are availa le at
info@elektronik ox.de.
However, we wish you a lot of fun with the EASY RFID and always have a good and safe ride!
Techn. specs:
Dimensions control module: 40 mm x 25 mm x 12 mm, antenna module: Diameter 29 mm x 19 mm
Power consumption in standby mode: About 30 uA
Housing: black ABS, potted with 2-K Casting compound
Input Voltage range: 9 - 16 Volt
Connections: Control cables: 0,14 mm², poer cables 1,5 mm², 20cm lenght each
Maximum range to tag: 6-8 cm, depending on the monting position and the used tag
Maximum ambient temperature: 60 degrees Celsius
Maximum current from 12 V connection: 20 Amperes permanent current for ignition, 3 Amperes for start
relay
2 / 2