AxioBionics Wearable Therapy Installation guide

SURFACE ELECTRICAL STIMULATION
SYSTEM1
Wearable Therapy®
CARE & INSTRUCTIONS
USER GUIDE,

The Axiobionics Wearable Therapy Garments with Cutaneous Electrodes
are Intended to be Used to Apply Electrical Stimulation Current to the
Patient’s Skin via Electroconductive Media Gel.
Examples of Electrical Stimulation Applications of the Garment Are:
1) Transcutaneous Electrical Nerve Stimulation (TENS) for Pain Relief,
2) Neuromuscular Electrical Stimulation (NMES) for:
• Retarding or preventing disuse atrophy
• Maintaining or increasing range of motion
• Re-educating muscles
• Relaxation of muscle spasm
• Increasing local blood circulation
• Prevention of venous thrombosis of the calf muscles immediately after surgery
3) Functional Electrical Stimulation (FES)
Indications For Use:
1Surface Electrical Stimulation System refers to 21 CFR Sec. 882.1320 Cutaneous electrode: (a) Identication. A cutaneous
electrode is an electrode that is applied directly to a patient’s skin to apply electrical stimulation.

Page 1 of 38
Warnings
Electrical burn to the skin may occur if garment is
not securely t to body.
Never use garment unless all contact points are
covered by an electrode.
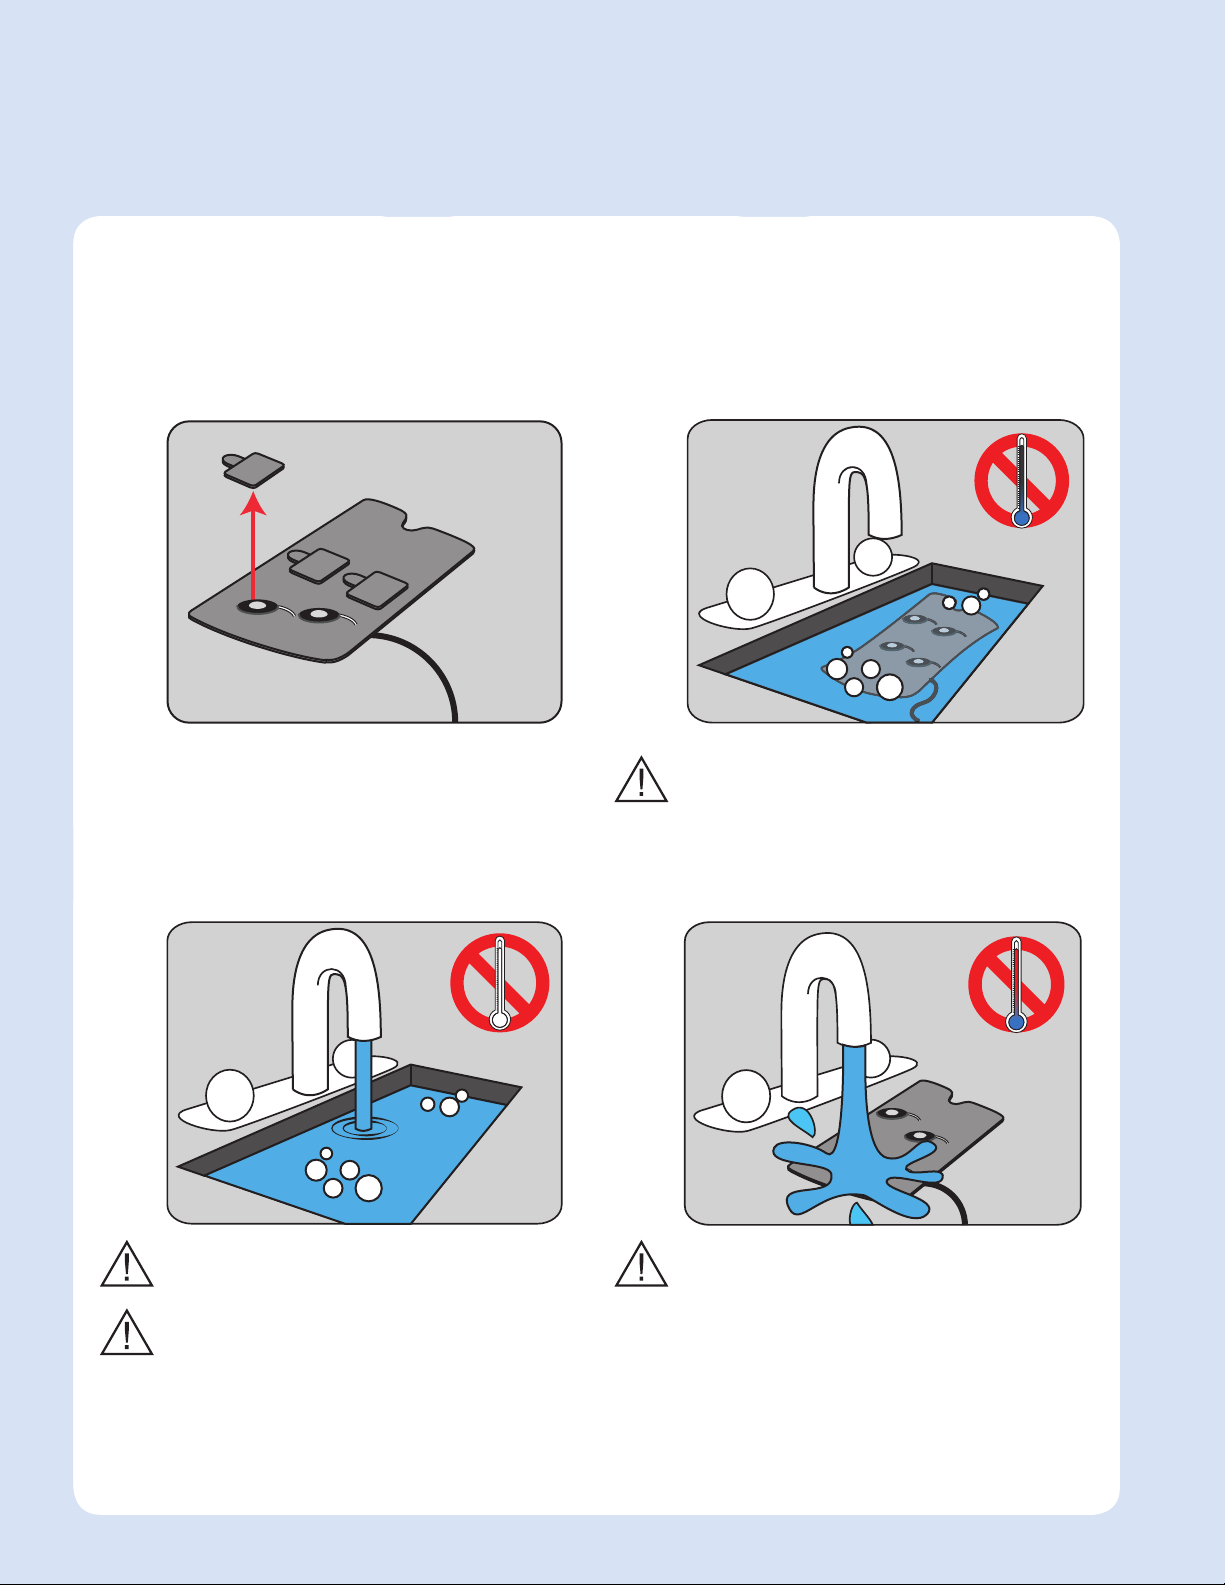
The garment should be completely dry before
wearing. Hazardous electrical shock may occur if
garment is moist.
The Wearable Therapy System is to be worn only on
the aected body part of the patient for whom it is
tted. It should not be worn by anyone else or on
any other part of the body.
Wearable Therapy is not for transthoracic
stimulation.
Apply stimulation to normal, intact, clean, healthy
skin only.
Always empty the bladder prior to putting on the
garment and stimulating. If a bowel or bladder
accident occurs at any time during a session,
discontinue stimulation immediately and remove
the garment.
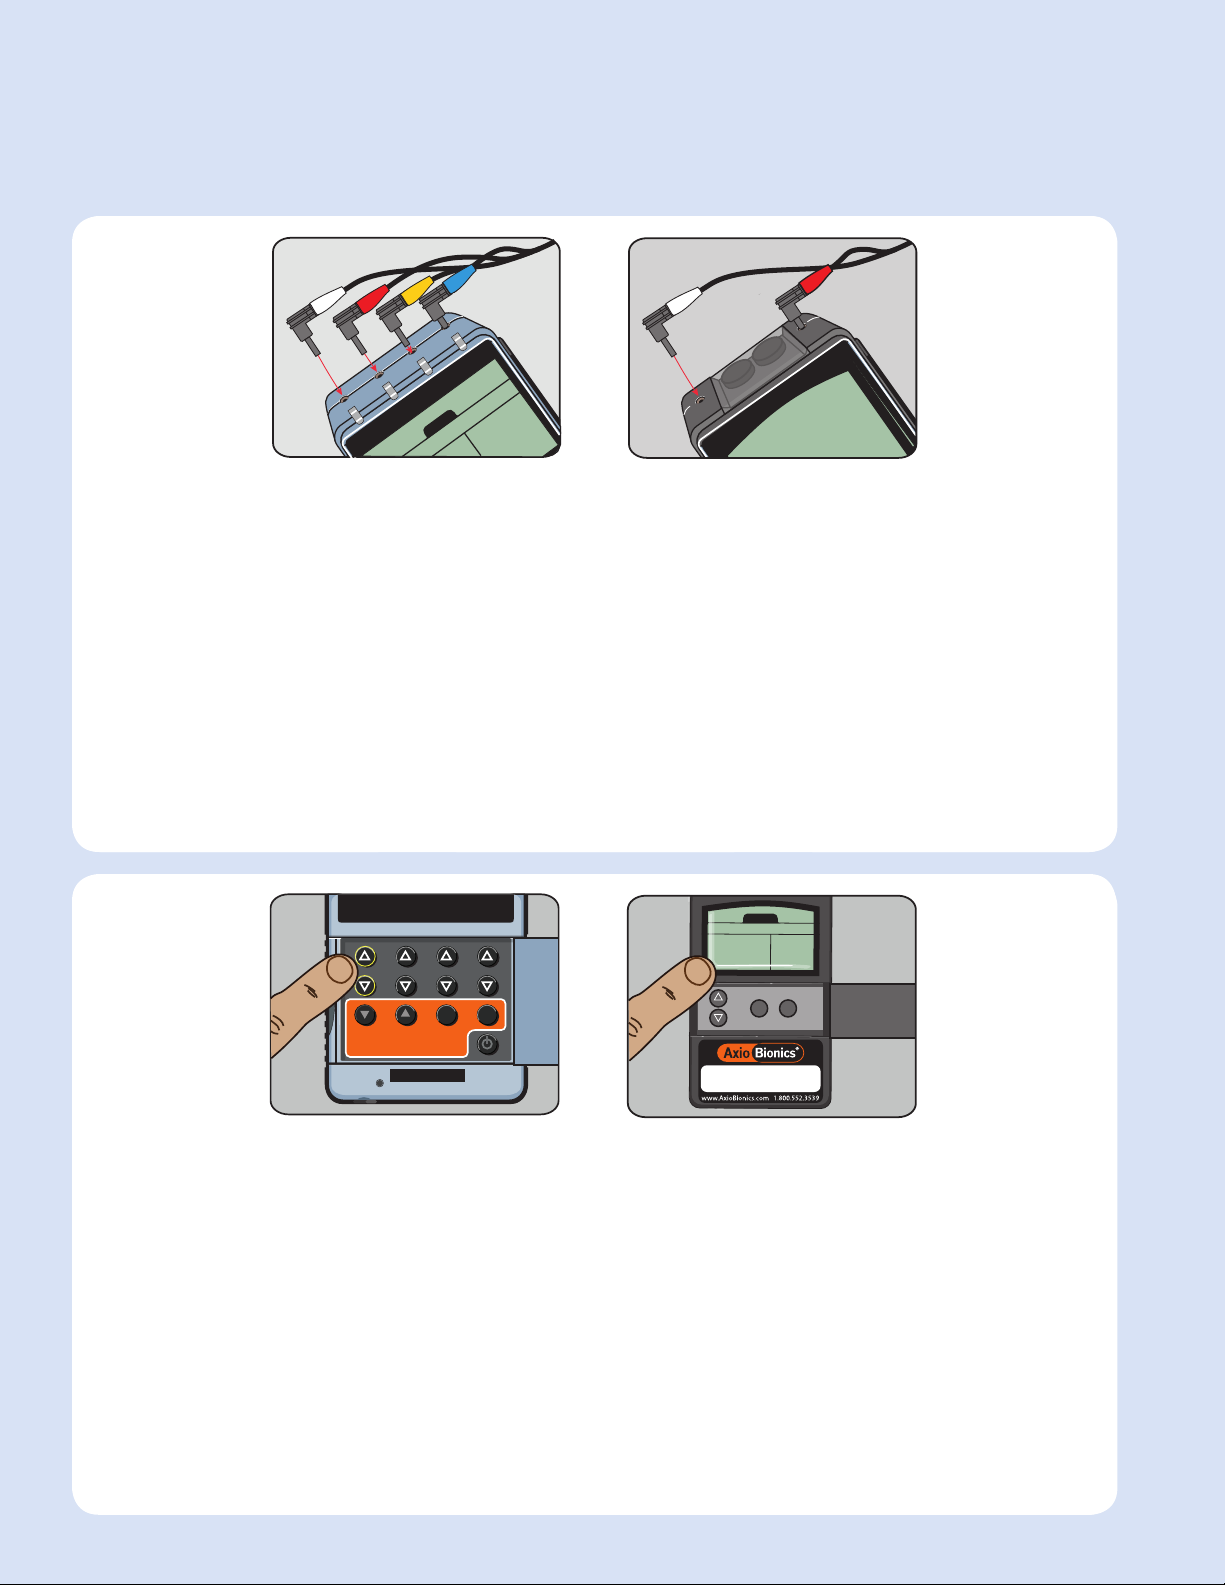
Only an authorized doctor or clinician should t
and program the Wearable Therapy System.
Do not wear the Wearable Therapy System over
swollen, infected, or inamed areas. Do not wear
the system over skin eruptions or varicose veins.
Do not place stimulation electrodes over your neck
because this could cause severe muscle spasms
resulting in closure of your airway, diculty in
breathing, or adverse eects on heart rhythm or
blood pressure.
WARNINGS, PRECAUTIONS & ADVERSE REACTIONS
Read this instruction manual as well as the stimulator instruction manual before operation. Be sure
to comply with all WARNINGS and CAUTIONS in the manuals. Failure to follow instructions can cause
harm to user or device. Before wearing the Wearable Therapy electrode garment it is imperative that
you understand all precautions and contraindications. Refer to your stimulator manual for information
pertaining to stimulator procedures and safety precautions.
Do not place stimulation electrodes across your
chest because the introduction of electrical current
into the chest may cause rhythm disturbances to
your heart, which could be lethal.
Electrical stimulation should never be used on the
eye region, over the carotid sinus nerves, over the
laryngeal or pharyngeal muscles, over the chest
region, transcerebrally, or during pregnancy.
Do not place stimulation electrodes over open
wounds or rashes, or over swollen, red, infected,
or inamed areas or skin eruptions (e.g., phlebitis,
thrombophlebitis, varicose veins).
Do not place stimulation electrodes over, or in
proximity to, cancerous lesions.
The size, shape, and type of electrodes may aect
the safety and eectiveness of electrical stimulation
and recording.
The electrical performance characteristics of
electrodes may aect the safety and eectiveness
of electrical stimulation and recording.
Using stimulation electrodes that are too small or
incorrectly applied could result in discomfort or
skin burns.
You should contact the manufacturer of the
electrical stimulator or recording device if you do
not know if the electrode can be used with the
stimulation or recording device.
Do not attempt to repair or modify the
Wearable Therapy System.
Modifying, cutting, or in any way altering the
garment or electrodes from their original condition
may be dangerous and will alter your warranty.

Page 2 of 38
Precautions
Wearable Therapy electrode garments must be
utilized in the manner prescribed for you by your
doctor or clinician. Severe injury may result if used
incorrectly.
The long-term eects of cutaneous electrodes
for electrical stimulation and/or recording are
unknown.
Do not use the Wearable Therapy System without
the electrodes. NEVER use the garment when one or
more electrode contacts are exposed.
The Wearable Therapy System electrodes must be
saturated with BioGel before use and periodically
checked to ensure they are moist with gel.
Turn o the Stimulator before removing, adjusting
or replacing the electrodes.
Persistent redness, lesions, or blisters are signs of
irritation. Stop using the Wearable Therapy System
until any irritation is completely gone.
Since the eects of stimulation of the brain are
unknown, stimulation electrodes should not be
placed on opposite sides of your head.
Keep electrodes out of the reach of children.
Use caution if electrodes are applied over areas of
skin that lack normal sensation.
The Wearable Therapy electrode garment may
require some alteration in standard electromedicine
methods and this should be discussed with your
therapist prior to using Wearable Therapy.
If you notice any change in comfort level of the
stimulus or alteration in muscle contraction quality
this could indicate a substantial reduction in gel
in one or more electrodes. Cease the stimulating
program immediately. Steps should be taken to
check each electrode. Add gel to those electrodes
that are lacking before proceeding.
Adverse Reactions
No known side eects have been reported from
wearing the Wearable Therapy electrode garment
without electrical stimulation.
Electrical burns to the skin have been reported. You
may experience skin irritation and burns beneath
the stimulation electrodes applied to your skin.
After removing the Wearable Therapy System, it is
normal for the areas under the pocket electrodes to
be red and indented. The redness should disappear
in approximately one hour. Please consult your
physician if irritation continues.
Possible side eects from the Wearable Therapy
system are: hypertension, hypotension, nausea,
faintness, tachycardia, muscle and/or ligament
damage, bone fracture, and an uncomfortable
sensation from stimulation.
Autonomic dysreexia has been reported in spinal
cord injury patients.
Allergic dermatitis from electrode gel has been
known to occur in some patients.
If any of these conditions should occur, discontinue
therapy immediately and seek medical attention.

Page 3 of 38
ELECTRODE PREPARATION
Unfasten garment. Lay it at, with
the inside of the garment facing
up. Remove the electrodes from
the garment by detaching them
from their respective locations.
Each electrode is equipped
with two tabs, which when pulled
apart, separate the hook and
loop closure. Grip both tabs
and pull apart.
BioGel
Full
Once the electrode is open, insert
the nozzle of the BioGel bottle
and squeeze a liberal amount of
Gel into the pocket, lling the
interior of the electrode until it is
approximately ⁄ full. If necessary,
gently shift the electrode back
and forth to allow the BioGel to
settle in the bottom of the pocket.
Repeat this step for each electrode
122P
Close the electrode by fastening
the hook and loop. When the
electrode is properly lled it looks
and feels like a pillow. Electrodes
lled this way will last for 8 hours
or more on the body without
relling.
CAUTION: Patients lacking
sensation should not wear
garment longer than 4 hours
without checking BioGel
electrodes to ensure gel is evenly
distributed across electrode.
Gently spread the BioGel within
the pocket to cover the entire
interior surface area. The pocket
is properly saturated when the
outer surface is moist, but not
leaking. Repeat this step for each
electrode.
Wearable Therapy electrode
garments require BioGel in each
electrode pocket for electricity
to transmit to the body. Only
if the proper amount has been
injected will the garment perform
as expected and in a safe manner.
When lled appropriately, the
garment can be worn up to 8 hours.
If longer wear time is desired, you
may slowly extend this time with
caution. This is because BioGel
electrodes require a sucient
amount of gel in the pocket to
conduct electricity. The gel dissipates
throughout the day. The rate of
dissipation will vary depending on
the patient and other conditions.
Therefore, each patient should take
special precaution when increasing
wear time. It is advisable that this be
done under medical supervision.
12
4 53

Page 4 of 38
Once the electrode has been
prepared, attach it to the garment.
Match each numbered electrode
to its respective icon.
122P
122P
122P
122P
Orient the electrode in the same
direction as the nearest icon.
Electrical contact is made by
matching the silver dot on the
electrode with the silver dot on
the garment.
IMPORTANT: Make sure ALL
electrodes are axed to the
interior of the garment and that
there are no exposed electrode
contacts. NEVER use the garment
when one or more electrode
contacts are exposed. Serious
injury may result.
IMPORTANT: Cover all unused
domatrodes before applying
garment.
APPLYING ELECTRODES TO THE GARMENT
1
45
2 3
NOTES:

Page 5 of 38
PROTOCOLS
MODE
LG-8TM Combo
CH1 CH2 CH3 CH4
CH1 CH2 CH3 CH4
MODE
Patient:
4 Channel
Stimulator
2 Channel
Stimulator
CH1:
CH2:
MODE
LG-8TM Combo
CH1 CH2 CH3 CH4
CH1 CH2 CH3 CH4
MODE
Patient:
4 Channel
Stimulator
2 Channel
Stimulator
CH1:
CH2:
Protocol 1
Ramp Up 3 Seconds
On Duration 10 Seconds
O Duration 10 Seconds
Rate 25 Hz
Width 300 Pulse
Mode EMS A (Alternate)
Protocol 2
Ramp Up 3 Seconds
On Duration 10 Seconds
O Duration 10 Seconds
Rate 25 Hz
Width 300 Pulse
Mode EMS S (Synchronous)
Custom Protocol
Ramp Up
On Duration
O Duration
Rate
Width
Mode

Page 6 of 38
Identify connectors on the end of lead wire (1-4 connections). Identify
the corresponding channel ports to insert lead wires. Your stimulator may
dier slightly from the one pictured. Connect lead wire cable #1 to its
corresponding port of stimulation, as labeled on the Axio stimulator. Do this
for subsequent lead wires.
1
2
1
2
3
4
MODE
CH1 CH2 CH3 CH4
1
2
1
2
3
4
MODE
CH1 CH2 CH3 CH4
MODE
Patient:
SET MODE
122P
LG-8TM Combo
SET MODE
Clinician Zone - Program Setup
(not for patient use)
MODE
Patient:
SET MODE
122P
LG-8TM Combo
SET MODE
Clinician Zone - Program Setup
(not for patient use)
Setting Intensity Levels
Increase the intensity of channel
#1 to the level that produces
the best result your AxioBionics
clinician may have provided you
with suggested intensity levels.
Use them as a guideline. You may
increase or decrease the stimulus
to optimize results. Contact your
AxioBionics clinician for assistance
with stimulator settings.
STIMULATOR SET UP
Once on the body, gelled, and
connected to the stimulator,
the Wearable Therapy electrode
garment is ready for operation.

Page 7 of 38
STORING THE ELECTRODES
Storing the Electrodes
Step 1. After using the garment, remove it from your
body and lay the garment at with the elec-
trodes facing upwards.
Step 2. Remove electrodes and place the gelled, non-
Velcro side of each electrode onto the gelled,
non-Velcro side of its mate and place them
inside an air-tight container to prevent evapora-
tion of the Gel.
Do not place velcro side of electrode to non-
Velcro side. This will cause damage to the
electrode surface.
OR
INCORRECTCORRECT
GEL SIDE
GEL SIDE
VELCRO SIDE
VELCRO SIDE
NOTES:

Page 8 of 38
How to Clean the Garment
BioGel Velcro electrode should be washed at least once
per week while in use.
Step 1. Remove the electrodes from the garment.
Step 2. Prepare a bath of lukewarm soapy water using
Ivory Liquid Hand Soap® (or similar mild hand
soap). Add just enough soap to produce a
soapy bath. Suggested concentration: 1 tea-
spoon per 1 gallon of water.
Never use bleach on this product since this will
harm the garment and void the warranty.
Do not expose the garment to extreme
temperatures.
Step 3. Soak garment and its integrated wires and ca-
bling in bath until gel and soil has loosened from
the garment. If gel has dried, longer soaking time
may be required. No more than 10 minutes.
Do not machine wash or machine dry
the garment.
Step 4. Rinse garment thoroughly by hand using cool
or lukewarm water until free of soap and gel.
CLEANING THE GARMENT
No Hot Water
No Hot Water
No Hot Water
Step 1. Do not soak the garment longer than
10 minutes.

Page 9 of 38
Step 8. For faster drying time, place the garment di-
rectly in front of a fan.
Step 5. Once the washing is complete, lay the garment
on a dry towl..
Step 6. Roll the towel up and squeeze out excess water
and moisture.
Step 7. Remove the garment from the towel and lay at
on a drying rack until completely dry.
CLEANING THE GARMENT
NOTES:
OR

Page 10 of 38
How to Clean the Electrode
BioGel Velcro electrodes should be washed at least once
per week while in use.
Step 1. Remove the electrodes from the garment.
Step 2. Prepare a bath of lukewarm soapy water using
Ivory Liquid Hand Soap® (or similar mild hand
soap). Add just enough soap to produce a
soapy bath. Suggested concentration: 1 tea-
spoon per 1 gallon of water.
Never use bleach on this product since this will
harm the electrode and void the warranty.
Do not expose the electrodes to extreme
temperatures.
Step 3. Soak electrodes in bath until gel has loosened
from the interior. If gel has dried, longer soaking
time may be required.
Do not machine wash or machine dry
the electrodes.
Step 4. Remove electrodes from soap bath and
massage the interior and the exterior of the
electrode with your hands while washing
under a faucet.
CLEANING THE ELECTRODE
No Hot Water
No Hot Water

Page 11 of 38
Step 8. Remove the electrodes from the towel and lay
at until completely dry
Step 9. For faster drying time, place the electrodes
directly in front of a fan.
Step 5. Rinse electrodes thoroughly by hand using cool
or lukewarm water until they are free of soap
and gel.
Step 6. Once the washing is complete, lay the elec-
trodes on a dry towel.
Step 7. Roll the towel up and squeeze out excess water
and moisture.
CLEANING THE ELECTRODE
No Hot Water

Page 12 of 38
APPLYING THE GARMENT
BioBelt–AB
1. Patient should be lying down facing up. Place strap behind back.
2. Place AB panel on the abdomen below the ribs and above the symphysis
pubis. (Figure 1)
3. Fasten the strap to one side of the AB panel. (Figure 2)
4. Center the AB Panel with the torso. (Figure 3)
5. Fasten the strap to the other side. Pull rm to snug the t. (Figure 4)
Wearable Therapy electrode
garments must be applied directly to
skin. No Clothing should intervene
between electrode and skin
Figure 1 Figure 2
Figure 3 Figure 4
Channel2Label
Part#0000473
Channel1Label
Part#0000472
Channel2Label
Part#0000473
Channel1Label
Part#0000472
Ribs
Symphysis Pubis
Channel2Label
Part#0000473
Channel1Label
Part#0000472
Channel2 Label
Part# 0000473
Channel1 Label
Part# 0000472

Page 13 of 38
APPLYING THE GARMENT
BioBelt–Lumbar
1. Position the BioBelt behind the body and align
center tab with the center of the back. (Figure 1 and
Figure 4)
2. Wrap BioBelt around the body and fasten the left
and right sides together. The BioBelt should be
applied with rm pressure. (Figure 2)
3. Grab the outer elastic bands and pull forward. Fasten
these two bands to the belt for increased support.
(Figure 3)
Wearable Therapy electrode
garments must be applied directly to
skin. No Clothing should intervene
between electrode and skin
Figure 1 Figure 2 Figure 3
Figure 4- Applied Garment - Back Figure 5- Applied Garment - Front
Back Front Front
Center Tab
S1
Center of Back
S1

Page 14 of 38
APPLYING THE GARMENT
BioBelt–Lumbar
with Ab Panel
1. Fasten the AB Panel to the BioBelt on one side only.
(Figure 1)
2. Position the BioBelt behind the body and align center
tab with the center of the back. (Figure 1)
3. Wrap BioBelt around the body and fasten the left and
right sides together. The BioBelt should be applied
with rm pressure. (Figure 2)
4. Grab the outer elastic bands and pull forward. Fasten
these two bands to the belt for increased support.
(Figure 3)
Wearable Therapy electrode
garments must be applied directly to
skin. No Clothing should intervene
between electrode and skin
Figure 1 Figure 2
Figure 4 - Applied Garment - Front
Figure 3
Back Front Front
Page 14 of 38
Channel2Label
Part#0000473
Channel1Label
Part#0000472
Channel2Label
Part#
0000473
Channel1
Label
Part#
0000472
Center Tab
S1

Page 15 of 38
APPLYING THE GARMENT
BioMiniBelt–Lumbar
1. Fasten the left and right side panels to the back panel
by aligning the orange dots as noted in the gure
above.
2. Align BioMiniBelt center tabs with the center of
the back.
3. Wrap BioBelt around the body and fasten securely.
Wearable Therapy electrode
garments must be applied directly to
skin. No Clothing should intervene
between electrode and skin.
Center of Back
Left Side
Panel
Right Side
Panel
Back Panel
Back
Front

Page 16 of 38
APPLYING THE GARMENT
BioShortX
1.
BioShortX is laid out on top of a bed with the two thigh
sleeves placed laterally and away from central portion
of the belt. (Figure 1) The patient transfers from a
wheelchair to a bed and lays on the belt. The patient
positions the buttocks (gluteal muscles) over the gluteal
electrodes and centers the buttocks on the electrodes.
The belt is wrapped around the torso and fastened.
(Figure 2)
2.
3.
Wearable Therapy® electrode
garments must be applied directly to
skin. No Clothing should intervene
between electrode and skin.
Figure 1
Figure 2
Figure 3
Figure 4 Figure 5
Method 1: BioShortX is Laid Flat on Bed

Page 17 of 38
APPLYING THE GARMENT
Figure 1
BioShortX
1.
The patient transfers from a wheelchair
to bed. While sitting upright, the
BioShort is placed behind the back and
shifted down under the buttocks/gluteal
muscles. (Figure 2) The buttocks are
centered over the gluteal electrodes
and the belt is fastened. (Figure 2)
2
.
3.
Wearable Therapy® electrode
garments must be applied directly to
skin. No Clothing should intervene
between electrode and skin.
Figure 2
Figure 3 Figure 4
Method 2: BioShort is Placed Behind the
Patient’s Back (self-application by a
paraplegia patient)

Page 18 of 38
APPLYING THE GARMENT
BioShorts
1. Position BioShorts under the body as shown. (Figure 1)
2. Wrap the BioShorts around each leg and fasten securely to the hook
opposite the strap. (Figure 2)
3. Be sure to pointer is center on the knee as shown. (Figure 3)
4. Wrap privacy panel as shown. (Figure 2 and 4)
5. Fasten the upper and lower waist straps securely. (Figure 5)
Wearable Therapy electrode
garments must be applied directly to
skin. No Clothing should intervene
between electrode and skin.
Figure 1 Figure 2
Figure 3
Figure 4 Figure 5
Privacy
Panel
Privacy
Panel
Table of contents
Popular Medical Equipment manuals by other brands

GE
GE Vital Signs enFlow Service manual

Luxfer
Luxfer EasyPulse 1901-765 Series Instructions for use

North-Vision Tech
North-Vision Tech Prince-100B user manual

Natural Ozone
Natural Ozone Multipurpose Ozonator user manual

Respironics
Respironics REMstar Plus with C-Flex user manual

Belmont Medical Technologies
Belmont Medical Technologies CritiCool user manual