AXT ELECTRONIC VSE User manual

© werbe-bo.de, Titelfoto: shishiga / fotolia.com
INSTRUCTION MANUAL
Electronic Doorkeeper VSE
Thank you for purchasing the Electronic
Doorkeeper VSE.
Please note the general information on
the back of this sheet and the safety
instructions in the manual.
AXT-electronic GmbH & Co. KG
Wartburgstrasse 10
99817 Eisenach / GERMANY
Phone: 0049 3691 721070
service@axt-electronic.de
www.axt-electronic.de

2 mm
Upper
outer
drill hole
Marten protection rail
(optional)
Lower
outer
drill hole
Lower
stop
Marten protection rail
(optional)
ASSEBLY
Electronic Doorkeeper VSE
1. Using a level, mount the lateral guide rail vertically.
Align the upper hole towards the outside. If an optional
protective rail is available, use it to mark the lower attach-
ment holes. Align the protective rail horizontally.
2. Align the door and mark the position of the second
guide rail. Ensure that there is enough side clearance for
the door between the two guide rails. Attach the second
guide rail.
3. Now connect the Doorkeeper VSE to the door (attach
cord to door) and insert the door into the rails. Using
the Doorkeeper VSE, bring the door into the desired
upper position (door open). The cord of the Doorkeeper
VSE must be exactly vertical. Mark the position of the
Doorkeeper VSE.
4. Unscrew the lid and attach the Doorkeeper VSE in the
marked position.
5. Mount all optional accessories such as external LED,
external manual control or external twilight sensor (see
wiring diagram on the next page).
START OF OPERATION Electronic Doorkeeper VSE
1. Remove the white plastic tab from the battery holder. If necessary, connect the optionally available power supply
. The device goes through a start proce-
dure, which ends with „Welcome...“. The display is then deactivated, and the Doorkeeper VSE is ready to accept entries.
2. For the initial set-up, hold the red magnet against the„Menu“ control panel for 3 seconds. You will see various status messages one after the other.
3. Now set the language, time and date via the menu operation. (Please refer to the explanations on the right.)
The basic settings are now complete and the display is deactivated again. The Electronic Doorkeeper VSE is now immediately ready for use with the factory default
settings. Test the closing and opening of the door by using the manual control (SA) to ensure a smooth operational pro
cedure.
Factory Default Settings: The Doorkeeper VSE is preset to a combined, light-time control. It opens daily at 8 o‘clock a.m.,
but only when it is light. In the evening the Doorkeeper VSE closes automatically when it gets dark, or at the latest, 10 o‘clock p.m.
General Information: A long battery life is guaranteed if you only use AA Mignon alkaline batteries! If the batteries in your new device last only a few days or
weeks, there is most likely a mounting error (e.g. door blockage). Via manual operation with the red magnet,
check to see if the door can be completely opened (limit switch contact in the Doorkeeper VSE).
Assembly Information: There should not be an upper stop or obstruction! Switching off during opening and closing is carried out via switches in the device. Door weight
must be a minimum of 200 gr. And a maximum of 3.0 kg. The maximum stroke of the pulling cord is 70 cm. To prevent the door from freezing in winter, coat the rails with a
small amount of lubricant. Neither the cord nor the inside of the Doorkeeper VSE is to be exposed to lubricants or directly lubricated. When installation is not directly possible
or desired above the door, please observe the separate information on our website. To extend the connecting cord between the door and the Doorkeeper VSE, an additional
cord may be used (without noticeable weight addition), but NOT a chain or carabiner, as the additional weight would result in the deactivation of the automatic switch-off
when the door is closing.
The Doorkeeper VSE can be used in four dierent opera-
ting modes (each separately for morning and evening).
„LUX AND TIME“ Combined Controlling
Light sensor and timer jointly control the opening and
closing times. Opening in the morning when„light AND
opening time reached“, closing in the evening when
„dark OR closing time reached“.
„LUX ONLY“ Twilight Controlling
Only the light sensor controls the opening and closing
times. In the morning it opens when the light sensor
detects „light“, in the evening it closes when „no light“
is detected. This depends on the light sensitivity setting
of the light sensor.
„TIME ONLY“ Time Controlling
The light sensor is deactivated via software. Only the
switching times of the internal timer are active. Ope-
ning and closing times must be dened for automatic
operation.
„MANUAL“ Manual Controlling
Light sensor and timer are deactivated. Opening and
closing can only be carried out with the manual control
(SA).

OPTIONAL ACCESSORIES
Electronic Doorkeeper VSE
Power Supply
The power supply unit is connected to the contacts 1 at the bottom (blue cable) and 2 at
the top (red cable). After plugging in the power supply, the Doorkeeper VSE starts (LED
ashes several times, the last green, display shows status information, and then welcome...
) and is now ready for operation (LED and display o). If the cord was unwound, it is now
fully retracted.
Outdoor-light Sensor ASb
The cables of the outdoor-light sensor are marked blue. Connect the cables of the out-
door-light sensor to the contacts 6 (white cable) at the bottom, and 5 (brown cable) at the
top. When using the ASb, please unscrew the internal twilight sensor (see sketch above)
or darken completely with a black cap.
External Manual Control SA
The cables of the external manual control are marked red.
Connect the cables of the external SA to the contacts 8 (white cable) at the bottom and
7 (brown cable) at the top. Instead of the external manual control with magnet, a separate
button (non-locking, not a switch!) can also be connected here to manually control the Door-
keeper VSE.
External LED
The cables of the external LED are marked green. Connect the cables of the external LED
to the contacts 10 (white cable) at the bottom and 9 (brown cable) at the top. (If the polari-
ty is reversed, the LED flashes red regularly after closing, not green).
Manual Controlling
„SA-Function“
Opening and closing of
the door by holding the
red magnet against the
SA marking.
Twilight Sensor
When using the out-
door-light sensor ASb,
please unscrew the internal
sensor or darken it comple-
tely with a black cap (up to
the screw terminal!).
LED-Indicators
Device in Closed Mode (1x green)
Light ashes when the Doorkeeper VSE has received the signal to close the door and the
internal limit switches conrm that no further weight is pulling on the device. Therefore,
the door should now be closed. Please check the door regularly for smooth running to pre-
vent it from getting stuck when closing.
Batteries Expired (2x red)
You should replace the batteries to ensure safe operation. For optimum battery life, use only
alkaline batteries.
Error Limit Switch (3x red)
Limit switch error for open mode. The cord is possibly wound incorrectly or the maximum
stroke of 70cm is not sucient. This error is also indicated when the limit switch for the open
mode is raised during the closing movement!
Error Overload (1x red)
Door is blocked when opening. Check for the smooth opening and closing of the door with
the manual control.
Information:
The LED signal for the error or
operating mode is only displayed for
approx. 2 hours after activation in
short intervals. The LED therefore does
not flash all night long!
Power Supply
Outdoor light sensor
External man. control
External LED

Status Display
To check the settings, activate the display by briey touching one of the three control pa-
nels with the red magnet. The display shows the current status of the Doorkee-
per VSE. Following this, the settings for the entire week will be briey displayed in order to
check the values. The display deactivates automatically.
MENU OPERATION
Programming via the operating elements
Menu: Activate main menu (press for 3s) / Conrm Input (save)
Back: Decrease by one value in the step / Back to menu
Up: Move forward one value in the step / Scroll up menu
Down: Move backward one value in the step / Scroll down menu
Main Menu and Settings
To activate the main menu, hold the red magnet for 3 seconds against the“Menu”control
panel. By scrolling with„Up“ or „Down“ you can select one of the 9 menu options. Hold
the red magnet again against„Menu“ to navigate to the selected menu item and change
the settings. With„Up“ and „Down“ you can change the selected values, with„Menu“ you
conrm and save your settings, afterward, you will then be automatically taken to the
next value. Once all sub-menus have been scrolled through and saved, you automatically
return to the main menu. To exit the menu, select menu item 9 and conrm. After approx.
1 minute, the menu will be automatically exited if no entries are made. The menu/display
is also deactivated if, for example, the engine starts up during menu operation because the
device has detected darkness.
„LIGHT THRESHOLD“ Light Sensitivity
For the combined control „LUX AND TIME“ and the twilight control „ONLY LUX“, the light
sensitivity of the light sensor can be adjusted from 1 - 10 lux. 1 Lux is for closing later in
the evening and opening earlier in the morning. (Note: with this minimum setting for the
opening mode, there is a risk that the door will also be opened at night if there is strong
moonlight or scattered light due to snow or outdoor lighting) – 10 Lux is for closing earlier
in the evening and opening later in the morning. (Note: With this maximum setting for the
closing mode, the door may also be closed during a heavy thunderstorm during the day.)
The value for„Open“ should be at least one value higher than the value for„Close“.
The Term LUX:
In the working modes, „LUX“ means that the light sensor is also responded to. If this information
is missing, the light sensor value is not observed. In relation to the sensitivity setting, Lux stands
for light intensity.
„LIGHT DELAY“ Twilight Delay
If you want to close the door well after dark, use the light delay which can be set in the closing
mode. Here, the delays are adjustable from 1 to 90 minutes. An active twilight delay can be
interrupted or terminated by a closing time or the manual control, thus closing the device
prematurely.
1. Time of day
2. Opening mode
3. Closing mode
4. Language
5. Date
6. Daylight saving
7. Cursor-Type
8. Reset
9. EXIT
LUX AND TIME
LUX AND TIME
Light threshold
Light threshold Light delay
Light threshold
Light threshold Light delay
Mo - Su
Mo - Su
Sa - Su
Sa - Su
Sunday
Sunday
ONLY TIME
ONLY TIME
ONLY LUX
ONLY LUX
MANUELL
MANUELL
german
english
french
Day Symbol manual controlled
Night Symbol Time Weekday
Open time Twilight control Close time
Door closed Date
Information Weekdays:
Weekend time setting always overwrites the total week time.
Sunday time settings always overwrites the weekend and total week time. When you
save new settings for the entire week, any deviating weekend and Sunday times will be
overwritten. Therefore, first set the time for the whole week, reenter the menu and then
change the times for weekends or Sundays if desired.
Overview menu navigation
no twilight controled
Day Symbol Time Weekday
Door opened Date

Error / Failure Analysis Solution / Explanation
No reaction to manual control Do you use the related magnet and hold it
against the corresponding control panel?
Not every magnet works. A corresponding magnetic eld is required.
We also supply replacement magnets. Please contact us, or have a look in our shop. Always
hold the magnet against the corresponding control panel for SA/manual control.
A component of the manual control is
defective.
Send us the printed circuit board for inspection and repair.
Power supply all right? (e.g. if there are no
reactions even to darkness or brightness)
Are the batteries full, correctly inserted, the plug power supply connected, functional, the
socket functional? Are the cables in good condition (cable breakage, gnawed)?
No reaction to darkness or
brightness
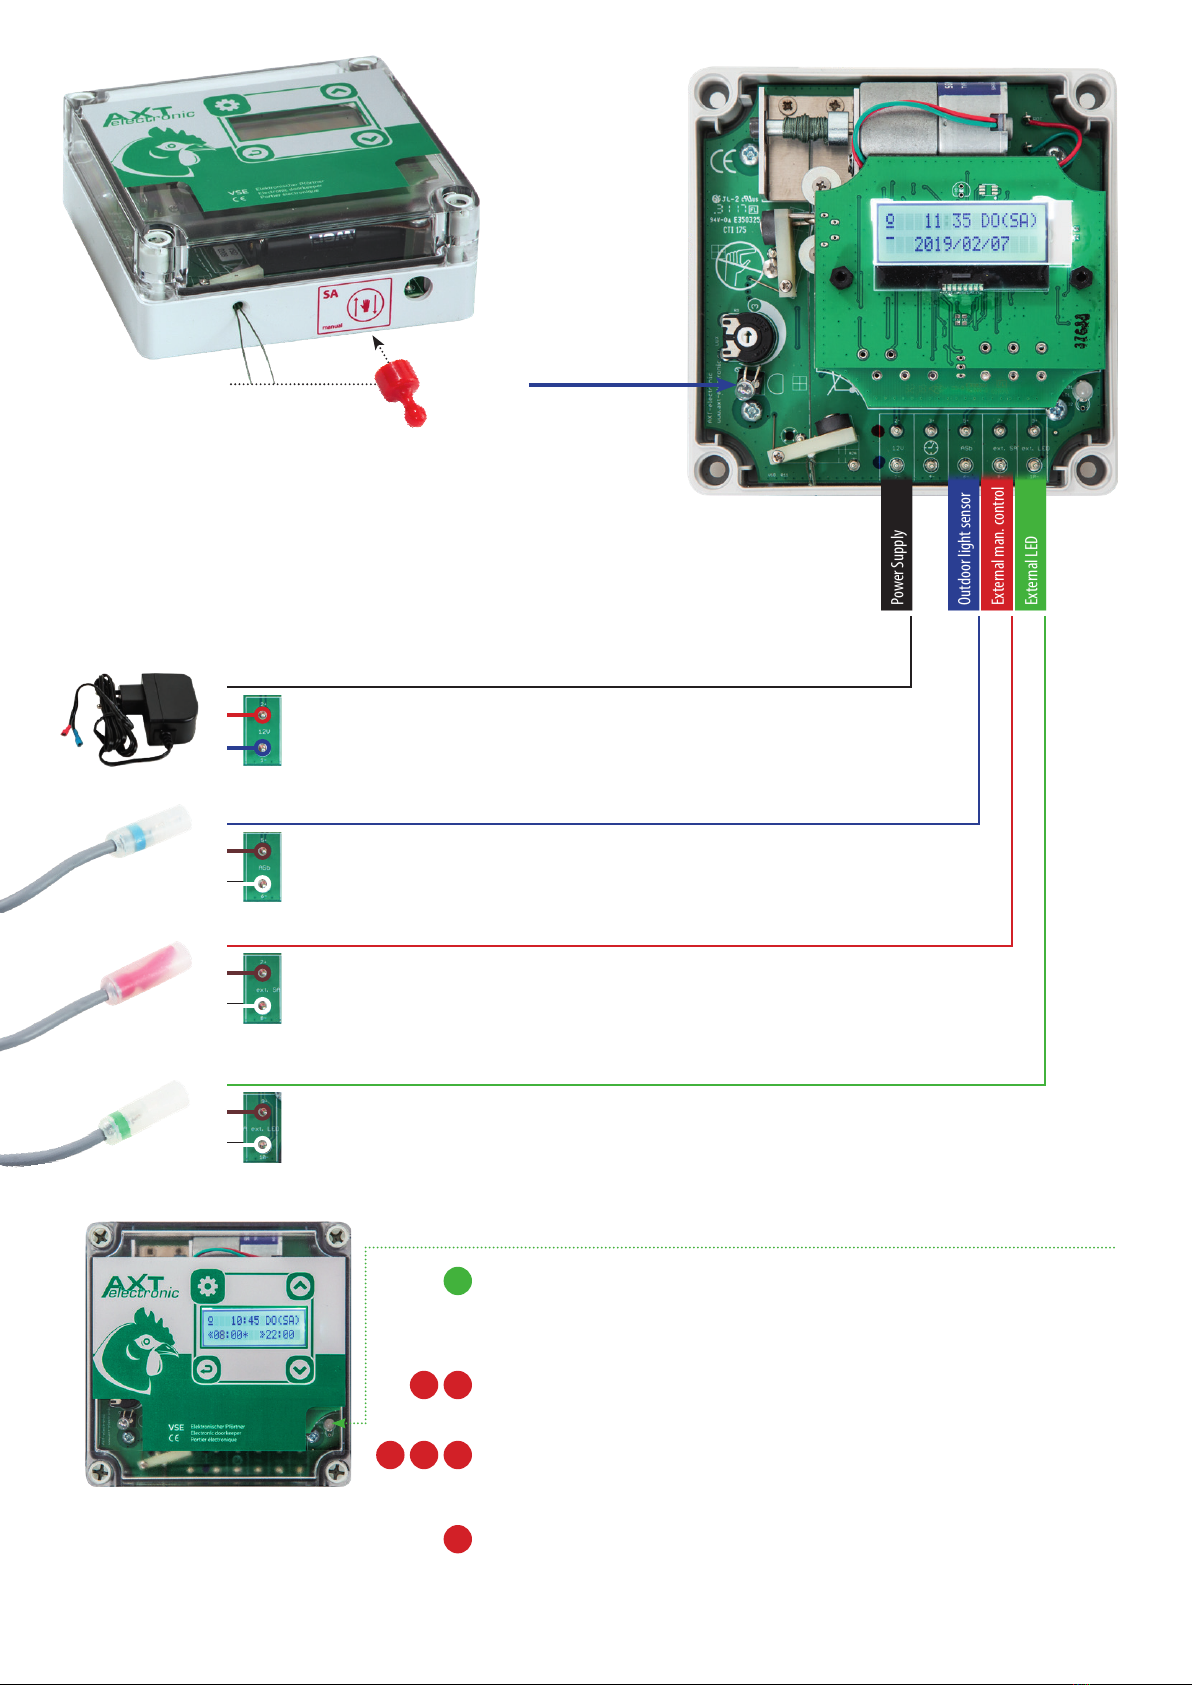
The internal sensor is removed, an exter-
nal sensor "ASb" is not connected.
Without a light sensor there is no reaction to changes in light. If no sensor is installed, the
cable bridge must be plugged into pins 5+6 and a timer must be connected to take over
automatic control.
The contacts of the internal sensor touch
each other.
Short-circuit: the door remains open. Carefully bend the contacts apart again.
The internal sensor is not installed in the
correct direction.
The sensor has a at side. It points to the edge of the housing, not inwards in the direction of
the battery holder.
The internal sensor is correctly installed,
but defective.
If only the internal sensor is used, not an external one, you can request a replacement from us.
The sensor simply has to be plugged into the screw terminal (the right way round).
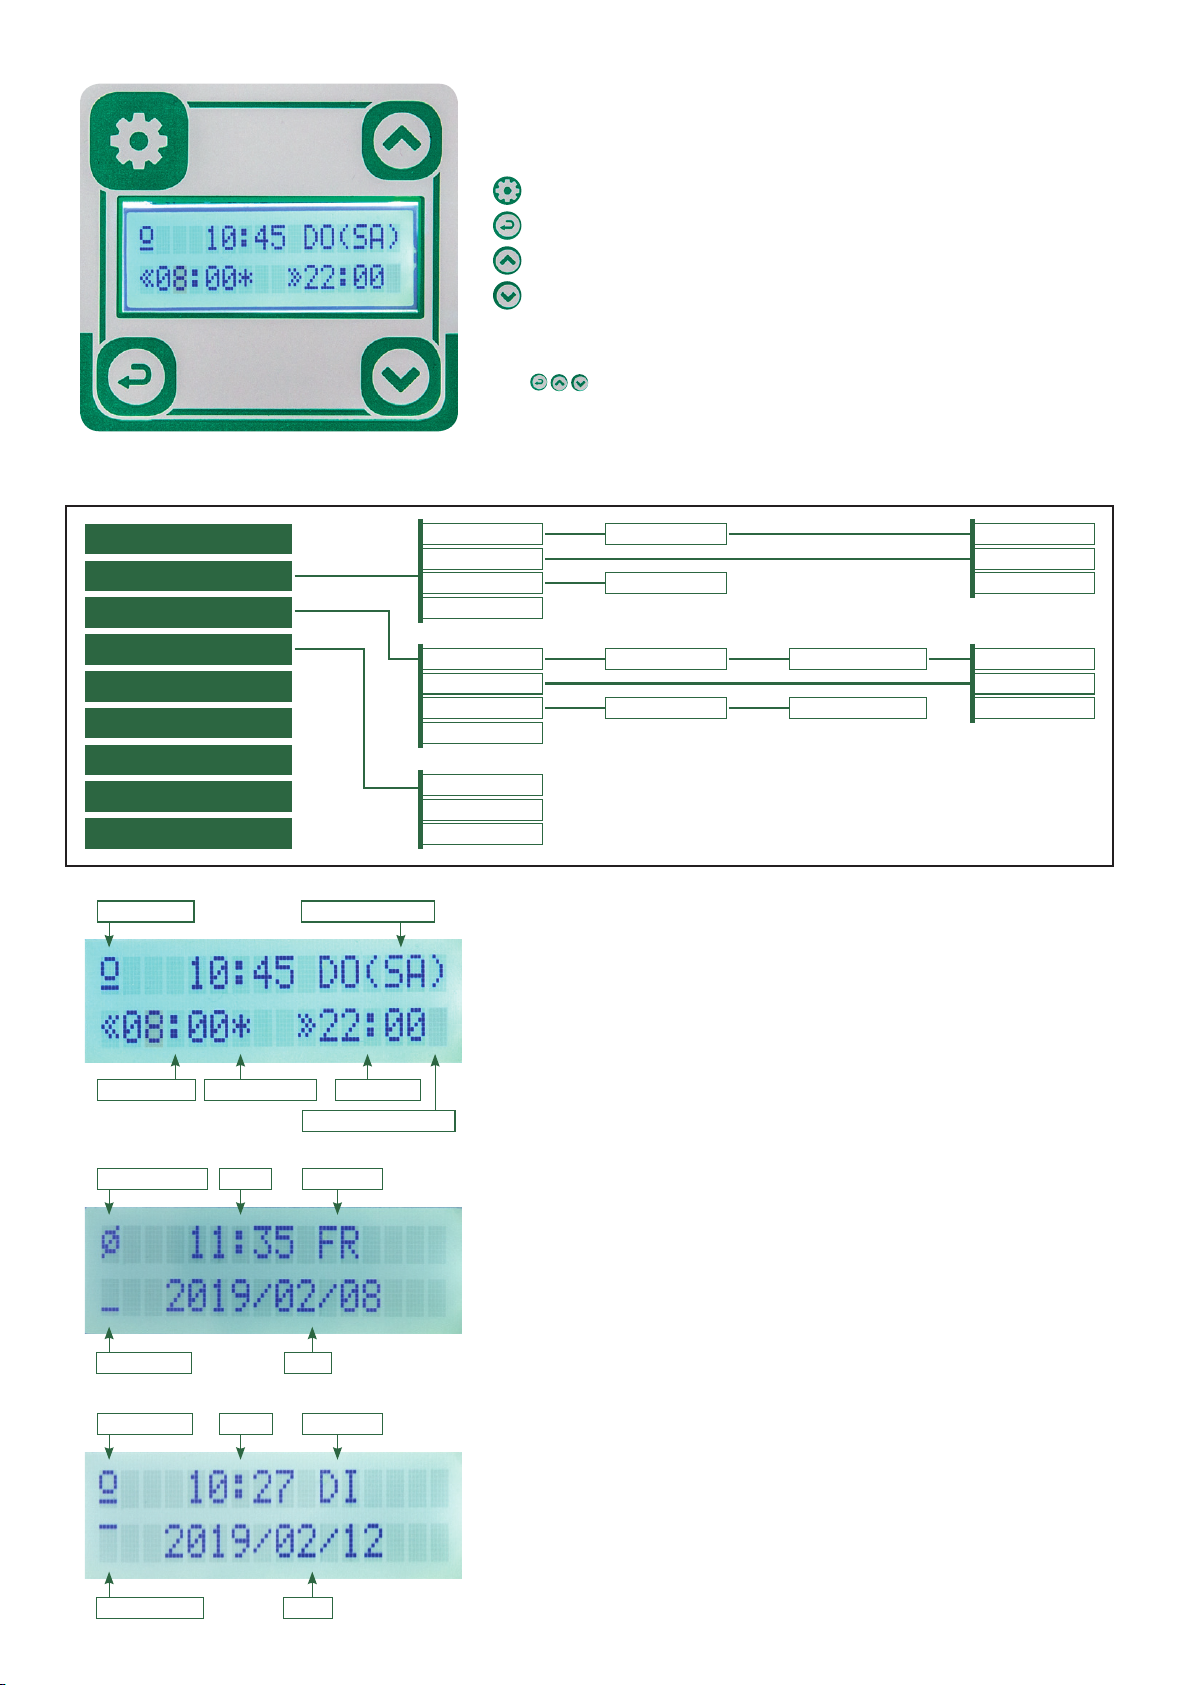
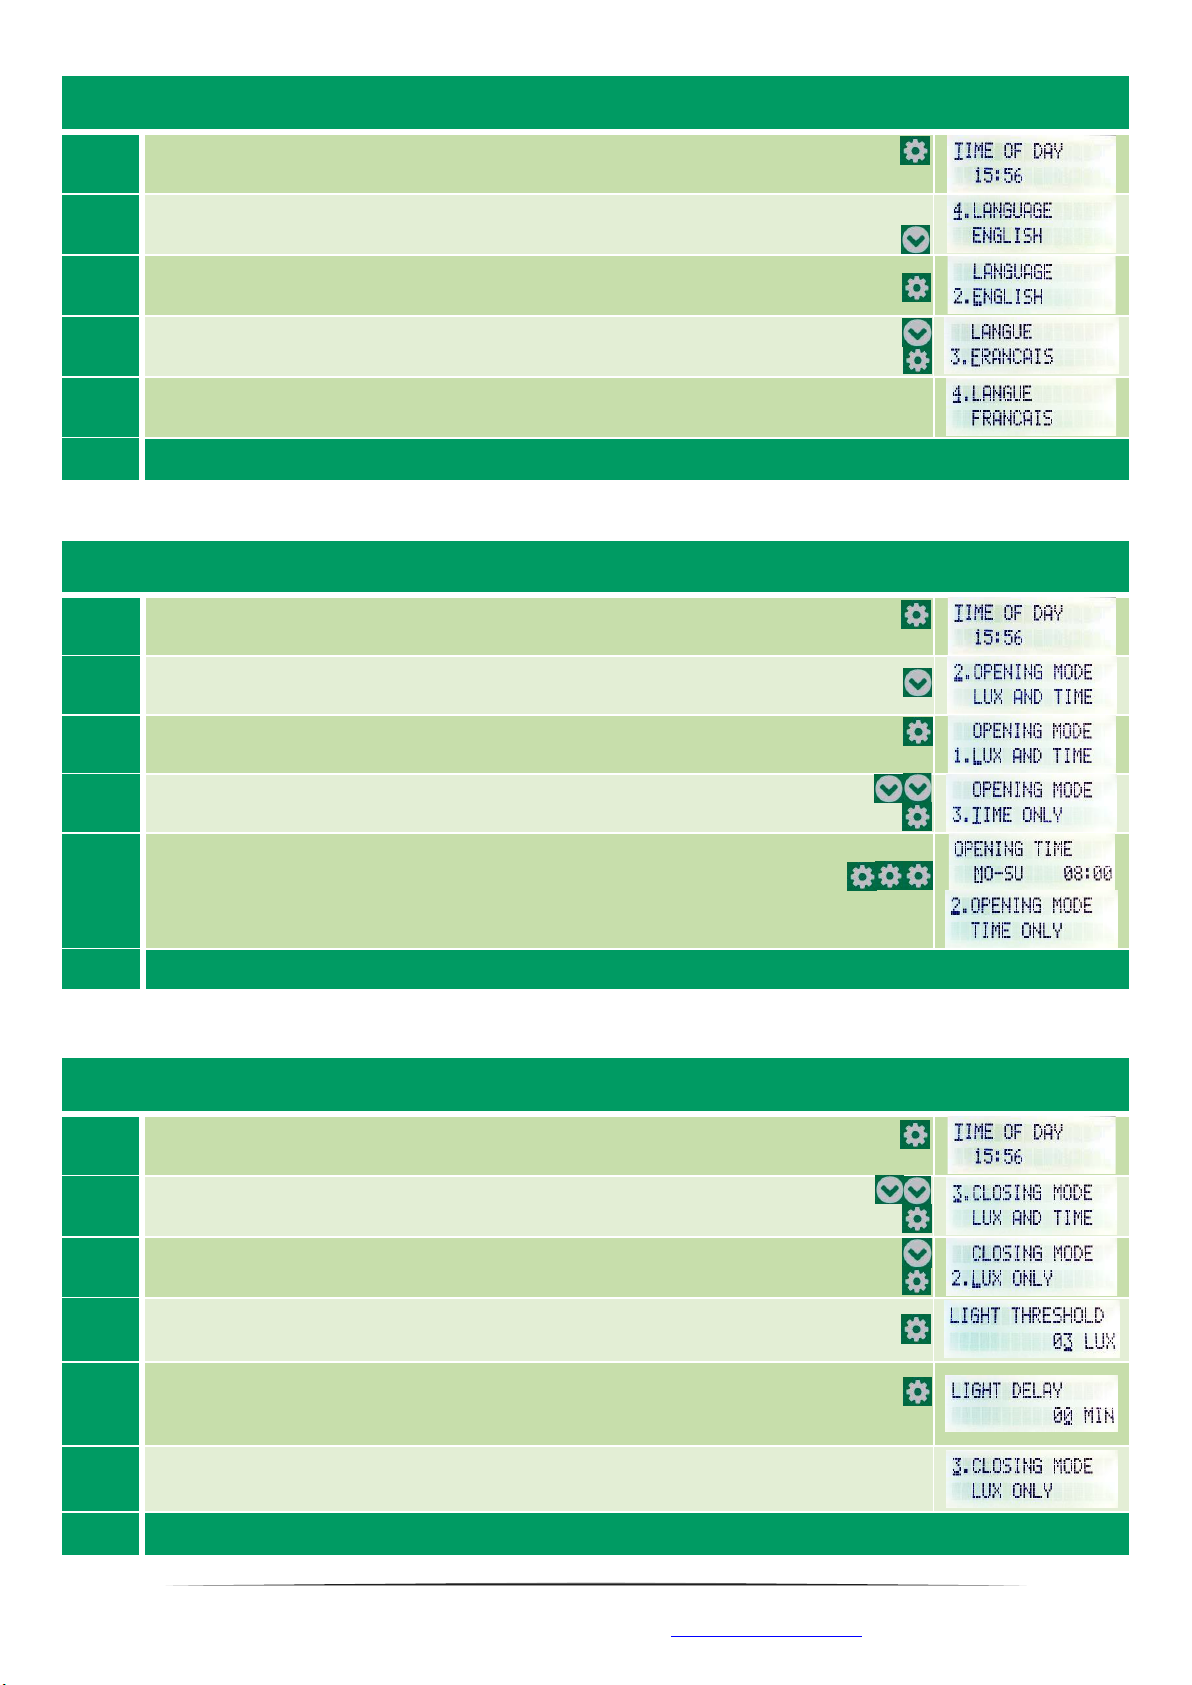
The operation mode for this time of day
does not contain„LUX“.
The VSE only reacts to light/dark at this time of day if the operating mode also contains the
„LUX“ element. Otherwise the light sensor will be ignored. Set the operating mode to„LUX
AND TIME“ or„LUX ONLY“. In addition, it is not possible to open by light if the time ranges
between any closing and opening times. If you want to open the door here, use the manual
control.
Rewind error, but cord correctly
wound up
Limit switch E2 was raised during closing Hold the SA-Magnet to the SA control panel to clear the fault and release the cord by using
the SA eld again. Observe the behaviour of the limit switch when closing, is there a reason
why it might be lifted?
Limit switch E2 not correctly adjusted
Replacement of the printed circuit board required. Please get in touch with us.
Door stopped halfway Batteries completely empty and unit
switched o.
The device is switched o if the operating voltage is too low, as safe operation is not guaran-
teed. The batteries must be replaced. Previously the indicator "Battery empty" was displayed.
The opening/closing movement is not terminated in this case. Please try new batteries.
You have operated the SA function during
opening or closing.
If the motor is running in one direction and you use the SA function, the motor stops. Use it
again to run the motor in the opposite direction.
Slider got stuck when closing. Slider is blocked in the rails. As a result it no longer pulls on the device, it does not close any
further. Check rails for dirt, bends or similar. The slider door has to pull with its weight on the
Doorkeeper until the door touches the ground.
Slider is blocked when opening / overload. If the slider jams when opening, an attempt is made to open it again and again for a while. An
error is displayed. After approx. 1h no further attempt is made to open. Actuate the SA to get
the device out of the error state. It will close and you can remove the blockade.
Cord very tight in opened
condition
Limit stop does not work. If the white limit switch is pulled extremely far towards the motor, a component of the limit
switch is defective. Please send the device for repair.
Slider blocks during opening. The limit switch may only be triggered by raising the limit switch inside the device. This hap-
pens through a resistance in the cord. If the slide moves against an obstacle before this, this is
not a regular switch-o, but an error (overload).
Open despite dark It was opened with SA? Close again with the SA Function
You are using an external light sensor, but
have not removed the internal one. In the
stable it is bright, therefore the device
opens due to the illumination of the
internal sensor.
Remove the internal sensor from the screw terminal so that only the external sensor is active
or darken the internal sensor completely with a black cap.
The batteries last only a few days
/ weeks / maximum
1 year
The slide weight ranges between 2,5
and 3,5kg, as well as a normal up to long
stroke from 30cm.
In these situations, the battery life may be reduced to approximately 1 year. Note that even
very cold temperatures can reduce battery life in the long run.
The white limit switch is not raised, but
the slider still jams.
The slider moves against a resistance during opening before the white limit switch can be
triggered. This is a fault condition and costs energy. Remove the blockade against which the
slide moves during opening.
Despite the limit switch being raised, an
attempt is still made to open. The cord is
tensioned very tightly.
The limit switch component is defective. Send us the printed circuit board for inspection and
repair.
Battery type is not okay, so it is either
zinc-carbon battery used, or rechargeable
batteries (rechargeable batteries).
Only use alkaline batteries, or lithium batteries (but which means unnecessarily higher costs).
Device reacts with open or close
after exiting the menu.
You have changed the current time-of-day
or changed the opening/closing times.
The device reacts according to the set
operating times in relation to the time-of-
day. After leaving the menu, the situation
is checked again.
If you want to return to the state that was active before changing the times, press SA to open
and close again manually.
You closed during the day via SA, but
changed the time-of-day afterwards.
After changing the time-of-day or operating times, the doorkeeper re-evaluates the situation
after leaving the menu. The info on whether manual operation was performed is deleted when
the times are changed. The re-evaluation has shown that the last status does not correspond
to the set times and lighting conditions. The appropriate state is established (open, closed).
Various error output in format
„SysError ... 0x50 0xF4...“
These error messages are system-internal
errors that can have various causes.
In most cases, the system itself initiates a reboot. This restarts the communication between
the motor board and the internal timer. This can take up to one minute.
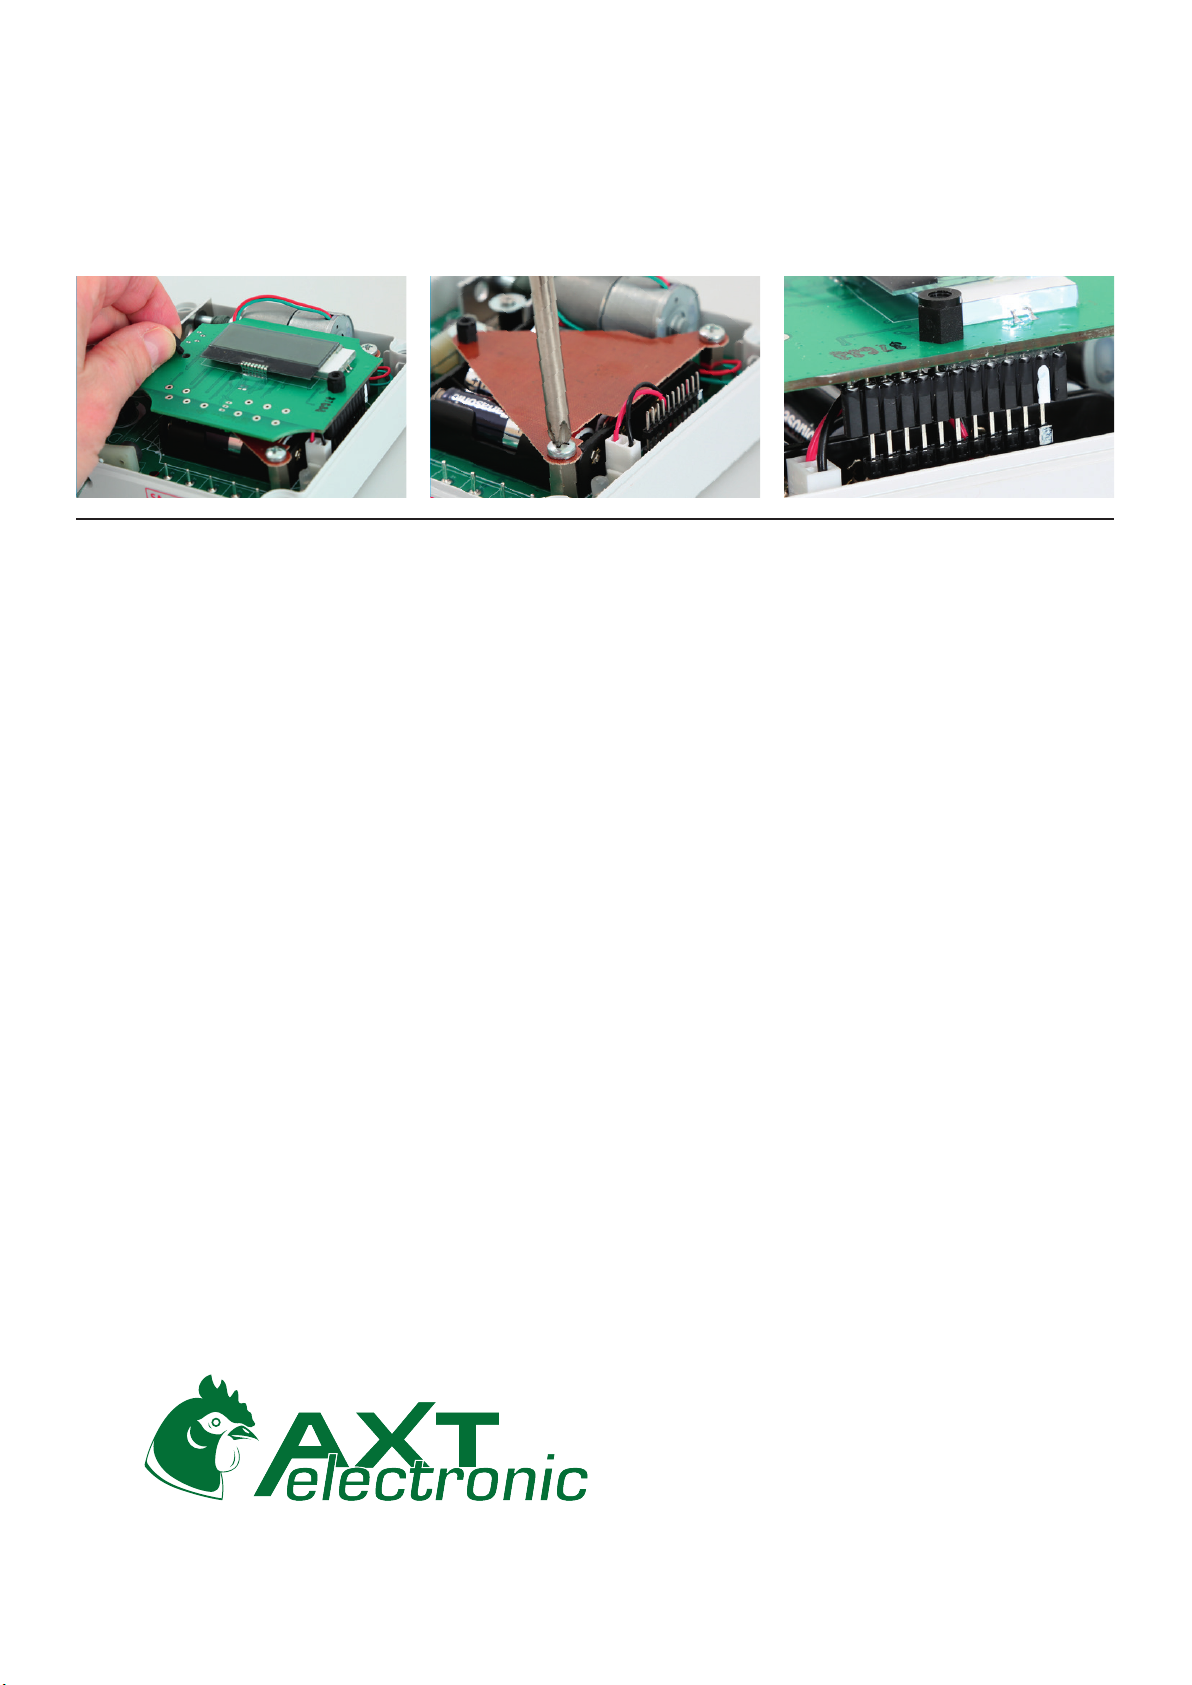
Then the system continues to work. Nevertheless, check the time. If no independent restart is
possible, the error is repeated constantly. In this case, remove the internal clock, disconnect
the plug from the battery holder and wait 5 minutes. Now reconnect the battery holder and
immediately (while the LED is ashing yellow) replug the internal clock. Both parts will now
couple and restart together. You may need to update the time-of-day.
ERROR ANALYSIS

© werbe-bo.de, Titelfoto: shishiga / fotolia.com
AXT-electronic GmbH & Co. KG
Wartburgstrasse 10
99817 Eisenach / GERMANY
Phone: 0049 3691 721070
service@axt-electronic.de
www.axt-electronic.de
Battery Disposal
Do not dispose the batteries in the household waste, but
bring them please to the public or from private places
pursued disposal places (appropriate boxes in supermar-
kets or similar.) All indicated battery running times refer
to the operation with our sliders (weight between 300g
and 1kg).
Disclaimer
Electronic devices can fail for various reasons. The usage
of our devices does not release you from the obligation
to regularly check and monitor the welfare of the animals
and the function of the device. We accept no liability for
damage and consequential damage resulting from incor-
rect installation/operation or defects in the equipment.
Safety instructions
Power supply dry room - The plug power supply is de-
signed for dry rooms. Please place it dry and under nor-
mal room conditions (humidity). If you need a power
supply unit for humid rooms or outside, please contact
us. We may have some in stock.
IP class housing - the housing necessarily loses the IP66
class, because holes in the housing are necessary (cord).
However, condensation can escape better through the
openings if the unit is correctly installed. This also ensures
better rear ventilation. Cable glands and strain reliefs on
the VSD/E are not prescribed or necessary by us, but can
be implemented by customers using cable ties or knots
in the cable, if necessary.
Risk of injury during manual intervention - Any manual
intervention in the mechanics of the device or the slider
attached to it represents a risk of injury. We are not liable
for any damage resulting therefrom. Make sure that the
system is voltage-free when interventions are made or
when you touch moving parts.
Submissions due to repairs
Devices under warranty will be repaired by us free of
charge and returned if the defect falls under the warranty
conditions. (Excluded from warranty repairs are devices
for which the customer has already carried out interven-
tions (soldering, paint removal, etc.) without prior agree-
ment. These devices will be repaired at the customer‘s
expense.)
Devices outside the warranty will be repaired and re-
turned at the customer‘s expense. The repair costs de-
pend on the founded error and the countermeasure tak-
en, but never as high as a new purchase.
Sequence of a submission for repair:
1. You cannot resolve the error using the table.
2. Contact us if you are not sure what to send. If possible,
send pictures of the devices in advance by e-mail
(cover open + assembly with door).
3 We usually need the devices + accessories such as
external sensors or the timer together for repair.
4. We do not need the aluminum door with us!
5. Remove the devices from the installation site. Remove
the xing screws for the wall.
6. Clean the devices (blow them out with compressed
air, remove heavy impurities on/inside the housing,
etc.). Check that no mites are present in the device.
7. Pack the devices, power supply (battery holder, batter-
ies, power supply unit), + further accessories (timers,
ext. cable extensions) safely in a package.
8. Put in a note with error description as well as your
contact data and remarks. This speeds up the repair.
9. Send the devices to:
AXT-Electronic GmbH & Co. KG
-Repair-
Wartburgstraße 10
D-99817 Eisenach, Germany
10. If we indicate that only the printed circuit board is
to be sent in, it is also sucient to send the printed
circuit board in a padded envelope and as a letter.
11. The repair will usually not take longer than 4 days.
The transport time to us and back to you, can hardly
be inuenced by us.
12. For submissions from Switzerland or USA: Please
contact us in advance. There are points that have to
be considered during customs processing and should
be discussed with us. Otherwise deliveries can be
delayed considerably.
Battery Change
The VSE shows you in the display or via the LED the necessity of a battery change. To change the battery, the timer module must be removed. To do this, loosen
ONLY the left fastening screw of the module and carefully pull the module upwards on the right side. If necessary, remove the brown transport lock over the
batteries (this does not necessarily have to be reinstalled later). Replace the batteries. Return the timer module back onto the middle of the contacts (the two
outer contacts on the module remain free, make sure that the two white markings on the contacts t on top of each other). As soon as the module is seated
on the plug contact, it will restart and you will see various status messages. Refasten the left side of the module with the previously removed screw . Replace
the cover onto the VSE and check the settings in the menu. (The timer module maintains the time for approx. 15 minutes without power supply. Your settings
are retained even if the battery change take longer. In this case, however, the device loses the current time. Use the status display to check whether the time
has been retained. If not, simply reset the time in the 1st menu item).

AXT-electronic GmbH & Co. KG
Wartburgstraße 10 99817 Eisenach / GERMANY
Phone: 0049 3691 721070
service@axt-electronic.de www.axt-electronic.eu
Electronic
Doorkeeper VSE
First steps and basic
settings in the menu
navigation

1
AXT-electronic GmbH & Co.KG * Wartburgstraße 10 * 99817 Eisenach * service@axt-electronic.de * www.axt-electronic.de
From this point on, the device can work correctly with our default settings.
The following is the default setting:
Opening:
8 (a.m.) at the earliest, when light
Closing:
at dusk, but not later than 22h (10 p.m.)
Setting applies to all days of the week.
Settings at 1. Start –Basic Settings
1.
-activate the Menu (= hold Magnet for 3sec. at “OK/Menu”)
1. Menu-Item = „Sprache“> „Language“ you need to change it to english
-
Go into the menu-item with “OK”
2.
-
With "down" set language to "2. English"
-Confirm the setting with "OK
-
The setting of the time-of-day follows directly...
3.
2. Menu-Item = „
time of day
“
-Go into the menu-item with “OK”
4.
-
Cursor is positioned on HOUR hh:mm
-Use up or down to set current hour
-Confirm with OK
5.
-
Cursor is positioned on MINUTE hh:mm
-Use up or down to set current minute
-Confirm with OK
-The setting of the current date follows directly
6.
3. Menu-Item = „Date“
-Go into the menu-item with „OK“
7.
-
Cursor is positioned on YEAR
Year
/Month/Day
-Use up or down to set current year
-
Confirm with ok
8.
-
Cursor is positioned on MONTH Year/
Month
/Day
-Use up or down to set current month
-
Confirm with ok
9.
-
Cursor is positioned on DAY Year/Month/
Day
-Use up or down to set current day
-
Confirm with ok
The use "ESC/Back" leads to canceling these three settings. Default values then are applied.
These can/have to be corrected later, see next points.
Menu operation from 2nd start -Application examples
a) Set or correct the current time e.g. 14:30 o’clock (2:30 p.m.)
1.
-
activate the Menu (= hold Magnet for 3sec. at “OK/Menu”)
-Menu item "Time" is already the 1st menu item. Further selection is therefore not necessary.
2.
-Go into the menu-item with “OK”
3.
-
Cursor is positioned on HOUR hh:mm
-Use up or down to set current hour
-Confirm with OK
4.
-
Cursor is positioned on MINUTE hh:mm
-Use up or down to set current minute
-
Confirm with OK
5.
-
Setting completed
-“Saved" is displayed. The setting was changed successfully.
6.
-
Cursor is back on menu-item "1. Time-of-day“
7.
Press down to select a new menu item for setting, or select and confirm the last menu item "EXIT", or wait 1 minute and do not operate anything to have
the menu guidance end automatically.

2
AXT-electronic GmbH & Co.KG * Wartburgstraße 10 * 99817 Eisenach * service@axt-electronic.de * www.axt-electronic.de
b) Change language from English to French
1.
-
activate the Menu (= hold Magnet for 3sec. at “OK/Menu”)
2.
-Use „down“ 3times to go to the menu-item „Language“
3.
-
Go into the menu-item with “OK”
4.
-
With „down“ 1time change the language from „2. English“ to „3. Francais“
5.
-
The language is saved and can be used immediately in the whole menu.
Press down/up to select a new menu item for setting, or select and confirm the last menu item "EXIT", or wait 1 minute and do not operate anything
to have the menu guidance end automatically.
c) To open set "TIME ONLY" mode for all days.
1.
-activate the Menü (= hold Magnet for 3sec. at “OK/Menu”)
2.
-
With „down“ 1time choose menu-item „Opening Mode“
3.
-
Go into the menu-item with „OK“.
4.
-
With „down“ 2times chose the Mode „TIME ONLY“ and confirm with ok.
5.
-It is displayed the Opening time for Monday to Sunday (Mo-Su).
-If you want to leave everything as it is, use „OK“ 3times in a row.
The cursor goes one step further each and confirms the set values.
-Finally, the setting is saved and the system returns to the Opening Mode menu-item.
6.
Press down/up to select a new menu item for setting, or select and confirm the last menu item "EXIT", or wait 1 minute and do not operate
anything to have the menu guidance end automatically.
d) For closing, set "LUX ONLY" mode, close only at dusk, no Time
1.
-
activate the Menu (= hold Magnet for 3sec. at “OK/Menu”)
2.
-
Mark the menu item "Closing Mode" with 2x “down”.
-Press Ok to enter the menu item.
4.
-
With 1x “down”select the mode "ONLY LUX" and confirm with Ok.
5.
-
The light threshold for closing is now requested. This is the sensitivity for detecting darkness.
If you do not want to change anything, confirm the value with “OK”.
The default is 3 lux.
6.
-The light delay for closing is now requested. This is a time value in minutes.
The doorkeeper would close this value as a delay after detecting darkness.
If you do not want to change anything, confirm and save the value with OK.
The default value is 00 min, i.e. „no delay“
7.
-As " LUX ONLY " excludes a time control, nothing else needs to be set, so you immediately return to the menu
item "Closing Mode".
-
The setting was successfully completed.
8.
Press down/up to select a new menu item for setting, or select and confirm the last menu item "EXIT", or wait 1 minute and do not operate anything
to have the menu guidance end automatically.

3
AXT-electronic GmbH & Co.KG * Wartburgstraße 10 * 99817 Eisenach * service@axt-electronic.de * www.axt-electronic.de
The cases given are application examples which are intended to explain and describe the function of the menu in general. Other menus
that are not displayed or explained are operated and set according to the same principle. There are also other options for setting and
adjusting times that are not explained in the above illustrations. General information can be found in the main operating instructions.
We are providing some Videos on our Website with the settings above. Use the QR-Code to get to them:
Reactions to light / dark or manual operation result in the menu operation being terminated and the
display being deactivated. If this happens, simply return to the menu. If possible, do not make settings
at times when the device would probably have to change its status during operation due to already
poor lighting conditions.
If the activation of the Menu (hold magnet on “OK/Menu” for 3 seconds) does not work immediately, remove the magnet for a few
seconds and try again.
e) Set a different opening time for opening on weekends (e.g. SA-SU 9 o'clock, LUX AND TIME)
1.
-
activate the Menu (= hold Magnet for 3sec. at “OK/Menu”)
2.
-
With „down“ 1time choose menu-item „Opening Mode“
3.
-Go into the menu-item with „OK“.
-Use up / down to select the "LUX AND TIME" mode if it is not set but is to be used.
-Confirm the "LUX AND TIME" mode with OK if it has not already been set.
5.
-
Change the opening time selection from Monday-Sunday (MO-SU) with 1x “down”
to Saturday - Sunday (SA-SU).
-
With 1x “OK”place the cursor on the HOUR hh:mm of the opening time.
6.
-Use up and down to set the desired new opening time. If no minutes are to be set,
confirm now with 2x “OK”. Otherwise use 1x “OK”, change the Minutes, and the 1x “OK” to save.
7.
-
You return to the main menu. The setting has been changed.
-When the changed settings are shown after exiting the menu, note and control the Saturday and Sunday
opening times.
Press down/up to select a new menu item for setting, or select and confirm the last menu item "EXIT", or wait 1 minute and do not operate
anything to have the menu guidance end automatically.
f) For Closing, set a twilight delay of 30 minutes (e.g. in "LUX ONLY" mode).
1.
-
activate the Menu (= hold Magnet for 3sec. at “OK/Menu”)
2.
-
Select the menu item Closing Mode with 2x “down”and enter it with “OK”.
3.
-Confirm the "LUX ONLY" mode with OK.
4.
-
Confirm the set light threshold with “OK”or change as required with “up/down”.
5.
-Use the “up/down”keys to set the desired minutes that the device should close after darkness
is detected. 1 to 90 minutes can be set.
-Confirm with „OK“.
6.
Press down/up to select a new menu item for setting, or select and confirm the last menu item "EXIT", or wait 1 minute and do not operate
anything to have the menu guidance end automatically.
Table of contents
Other AXT ELECTRONIC Farm Equipment manuals
Popular Farm Equipment manuals by other brands

Wiesenfield
Wiesenfield WI-CF-200 user manual

Worldwide Construction And Forestry Division
Worldwide Construction And Forestry Division 710G Technical manual

Landoll
Landoll Brillion 4630-36 Series Operator's manual

Amco
Amco AD-540-OS Operator's manual

Roxell
Roxell Titan user guide

NOVACAT
NOVACAT V10 ED Translation of the original operating manual

Kässbohrer
Kässbohrer SILO Series user manual

Hardi
Hardi MERCURY 2000 Instruction book

Neogen Corporation
Neogen Corporation Electro Jac 6 Operator's manual

CapstanAG
CapstanAG EVO Operator's manual

Gaspardo
Gaspardo FBR Plus Use and maintenance / spare parts

360 YIELD CENTER
360 YIELD CENTER 360 Series installation instructions