Axxess AX-LCD User manual

REV. 9/26/2016 INSTAX-LCD
Installation instructions for part AX-LCD
®
axxessinterfaces.com •metraonline.com © COPYRIGHT 2016 METRA ELECTRONICS CORPORATION
Axxess Integrate
®
CAUTION!
All accessories, switches, climate controls panels, and
especially air bag indicator lights must be connected before cycling
the ignition. Also, do not remove the factory radio with the key in the
on position, or while the vehicle is running.
AX-LCD
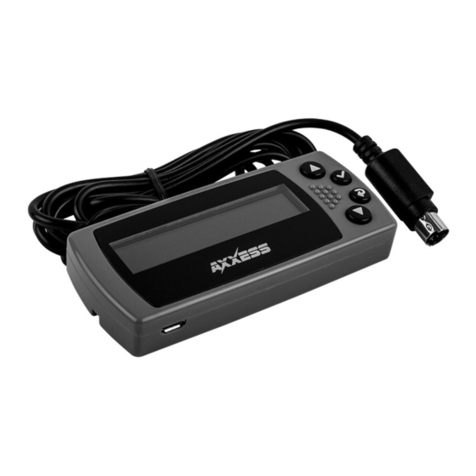
Axxess LCD screen 2000-up
APPLICATIONS
FEATURES
• Retains the personalization menu that is lost when
removing the factory radio in select applications
• Micro “B” USB updatable
• Adjustable 256 color LCD screen
• Wire channel for flexible mounting
BUICK
Century 2004-2005
LaCrosse 2005-2009
Rainier 2004-2007
Rendezvous 2002-2007
Terraza 2005-2008
CADILLAC
Escalade/ESV/EXT 2003-2006
CHEVROLET
Avalanche 2003-2006
Colorado 2015-up
Camaro 2010-2015
CHEVROLET (CONT)
Cavalier 2000-2005
Cobalt 2007-2010
Corvette 2005-2013
Express 2003-2007
HHR 2006-2011
Impala 2000-2005
Kodiak 2003-2009
Malibu 2001-2003
Malibu 2008-2015
Malibu (classic) 2004-2005
Malibu Limited 2016
Applications continued on the next page
• Cutting tool • Crimping tool • Tape • Connectors
(example: butt-connectors, bell caps, etc.)
TOOLS REQUIRED
• LCD Screen
• DIN harness with leads
Connections to be made.................................... 3
Using the LCD screen ........................................ 4
INTERFACE COMPONENTS
TABLE OF CONTENTS

AX-LCD
®
2
CHEVROLET (CONT)
Monte Carlo 2000-2005
Silverado 2003-2006
Silverado (classic) 2007
Silverado 1500 2014-up
Silverado 2500/3500 2015-up
Sonic 2012-2016
Spark 2013-2015
SSR 2003-2006
Suburban 2003-2006
Suburban 2015-up
Tahoe 2003-2006
Tahoe 2015-up
Trailblazer 2002-2009
Trax 2015-up
Uplander 2005-2008
FIAT
500L 2014-up
500X 2016-up
FORD
Edge 2007-2014
Escape 2008-2012
Expedition 2007-2014
Explorer 2008-2015
Explorer Sport Trac 2008-2010
F-150 2009-2012
F-150
(with monochrome screen) 2013-2014
FORD (CONT)
F-250/350/450/550 2011-2012
F-250/350/450/550
(with monochrome screen) 2013-2016
Fiesta (without MyFord Touch) 2011-up
Five Hundred 2005-2007
Focus 2008-2011
Focus (without MyFord Touch) 2012-2014
Fusion 2008-2012
Taurus 2008-2012
Taurus X 2008-2009
GMC
Canyon 2015-up
Envoy 2002-2009
Savana 2003-2007
Sierra 2003-2006
Sierra (classic) 2007
Sierra 1500 2014-up
Sierra 2500/3500 2015-up
Yukon / Yukon XL 2003-2006
Yukon / Yukon XL 2015-up
HARLEY DAVIDSON
Electraglide 2014-up
Limited 2014-up
Road Glide 2015-up
Streetglide 2014-up
HUMMER
H2 2003-2007
H3/H3t 2006-2010
ISUZU
Ascender 2003-2008
H-Series 2005-2009
I-Series 2006-2008
LINCOLN
MKX 2008-2010
MKZ 2008-2009
Navigator 2007-2014
MAZDA
Mazda6 2014-2015
MERCURY
Mariner 2008-2011
Milan 2008-2011
Mountaineer 2008-2010
Sable 2008-2009
OLDSMOBILE
Alero 2001-2004
Bravada 2002-2004
Intrigue 2002
Silhouette 2000-2004
PONTIAC
Aztec 2001-2005
G5 2007-2009
PONTIAC (CONT)
G6 2009-2010
Grand Am 2001-2005
Grand Prix 2004-2008
Montana SV6 2005-2006
Solstice 2006-2009
Sunfire 2000-2005
RAM
1500/2500/3500
(without 8.4” touchscreen) 2013-up
Chassis Cab 3500/4500/5500
(without 8.4” touchscreen) 2013-up
Promaster 2014-up
Promaster City 2015-up
SAAB
9-7x 2005-2009
SATURN
Aura 2006-2009
Relay 2005-2009
Sky 2007-2009
TOYOTA
Camry 2012-2014
Rav-4 2013-up
Tundra 2014-up
Venza 2013-2015
Applications

AX-LCD
®
3
Connections to be made
The AX-LCD allows the retention of the vehicles personalization menu that is lost after removing the factory radio.
The DIN harness with leads is only for the following vehicles:
Fiat 500L 2014-up, 500X 2016-up / Mazda6 2014-2015 / Ram 1500/2500/3500 (without 8.4” touchscreen radio) 2013-up,
Ram Chassis Cab 3500/4500/5500 (without 8.4” touchscreen radio) 2013-up, Ram Promaster 2014-up, Ram Promaster City 2015-up
Toyota Camry 2012-2014, Toyota Rav-4 2013-up, Toyota Tundra 2014-up, Toyota Venza 2013-2015
• Connect the Black wire to ground. • Connect the Red wire to accessory power.
For all other applications that require the AX-LCD screen, connect the DIN cable from the LCD screen
into the DIN connector on the interface. Skip the following steps for these applications.
(this is the wire view of the factory harness)
For the Toyota Camry 2012-2014, Rav-4 2013-up,
Tundra 2014-up, and Venza 2013-2015
The following connections are to be made to the factory
28-pin connector behind the radio:
• Pink of the AX-LCD to pin-9
• Blue/Pink of the AX-LCD to pin-10
For the Mazda 6 2014-2015
The following connections are to be made to the
factory 24-pin connector behind the radio:
• Pink of the AX-LCD to pin-1L
• Blue/Pink of the AX-LCD to pin-1J
(this is the pin view of the factory harness)
For the Fiat 500L 2014-up, 500X 2016-up,
Ram 1500/2500/3500 (without 8.4” touchscreen radio),
Chassis Cab 3500/4500/5500 (without 8.4”
touchscreen radio) 2013-up,
Promaster 2014-up,
Promaster City 2015-up
The following connections are to be made to the
factory 52-pin connector behind the radio:
31 40 49
52
44
41
10
1
(this is the pin view of the factory harness)
• Blue/Pink of the AX-LCD to pin-12
• Pink of the AX-LCD to pin-2

REV. 9/26/2016 INSTAX-LCD
Installation instructions for part AX-LCD
KNOWLEDGE IS POWER
Enhance your installation and fabrication skills by
enrolling in the most recognized and respected
mobile electronics school in our industry.
Log onto www.installerinstitute.com or call
800-354-6782 for more information and take steps
toward a better tomorrow.
Metra recommends MECP
certified technicians
®
axxessinterfaces.com •metraonline.com © COPYRIGHT 2016 METRA ELECTRONICS CORPORATION
Axxess Integrate
®
IMPORTANT
If you are having difficulties with the
installation of this product, please call our
Tech Support line at 1-800-253-TECH.
Before doing so, look over the instructions a
second time, and make sure the installation
was performed exactly as the instructions
are stated. Please have the vehicle apart
and ready to perform troubleshooting steps
before calling.
Using the LCD screen
Main menu options:
• Red adjusts the red backlighting of the LCD
(ranges from 1 to 32).
•
Blue adjusts the blue backlighting of the LCD
(ranges from 1 to 32).
• Green adjusts the green backlighting of the
LCD (ranges from 1 to 32).
• Contrast adjusts the contrast of the LCD
(ranges from 1 to 100).
• Reset puts the color back to the default settings.
Note: The vehicle menu will vary from car to car.
For more information, please see the owner’s
manual that came with the vehicle.
Arrow Up -
Toggles “up” through menu options
Arrow Down - Toggles “down” through
menu options
Return/ESC - Return to the previous menu
Enter - Enter current menu option
• Press and hold the “Return/ESC” button on the LCD screen
for 5 seconds until “Select Interface” comes up.
• Select “Connection Type”, and then press “Enter”.
• Scroll up or down to “Direct Connect”, and then press “Enter”.
• Once done, press the “Return/ESC” button two times to get back to the main menu.
Other manuals for AX-LCD
2
Other Axxess Projection Screen manuals
Popular Projection Screen manuals by other brands

ADEO SCREEN
ADEO SCREEN MULTIFORMAT Installation and operation manual

Screen International
Screen International MODIGLIANI VELVET installation manual

Liberty
Liberty Grandview Skyshow D Series user manual

Elite Screens
Elite Screens Daywalker Series user guide

Da-Lite
Da-Lite LARGE ADVANTAGE DELUXE ELECTROL Instruction book

3M
3M Digiral Walldisplay 9200PD Quick reference guide