Aygunfly Maki User manual

[1]
AYGUNFLY
Maki
User Manual
Please read this manual carefully before your first flight

[2]
Contents
1.Descripton ……………………………………………………………………………..1
2.Safety …………………………………………………………………………………..2
3.Installing the back protector ………………………………………………………….3
4.Reserve parachute …………………………………………………………….……...3
5.Connecting the deployment handle to the deployment bag ……………………....3
6.Connecting the reserve parachute to the harness …………………………………4
7.Inserting the reserve parachute into the harness …………………………………..5
8.Harness adjustment …………………………………………………………………6-7
9.Flying with the Maki………………………………………………………………….....8
10.Rescue parachute deployment ……………………………………………………...8
11.Pockets ………………………………………………………………………………...8
12.Landing with the Maki ………………………………………………………………..9
13.Tandem flying …………………………………………………………………………9
14.Tow bridle connection ………………………………………………………………..9
15.Flying over water ………………………………………………………………….…..9
16.Foot stirrup …………………………………………………………………………….9
17.Maintenance and repairs ……………………………………………………………10
18.Inspection checklist …………………………………………………………………10
19.Repairs ……………………………………………………………………………….10
20.Technical Data ………………………………………………………………………11
21.Meterials ………………………………………………………………………………11
22.Certification label ……………………………………………………………………12
1.Descripton
The Maki is constructed with carefully chose meterials of the highest quatily to
ensure a long life span and highly durable good look.Please read this manuel
carefully before using the harness for the first time.This will help you utilize all
features of the Maki.

[3]
2.Safety
Paragliding is a potentially hazardous sport. When flying a paraglider you have to
accept risks of injury and even death. Incompetent or improper use of the harness
may increase those risks. In case of any doubts please ask your dealer or
manufacturer. Aygunfly do not bear any responsibility for damages or injuries
resulting from paragliding activities.
3.Installing the back protector
The Maki has a 17,5cm back protector that is easily installed through the back
compartment. To install the back protector simply open the zipper at the bottom of
the back pocket. The back protector should slide easily into place and fit neatly inside
the back protector compartment.Finish by closing the zipper to the back protector
compartment.
4.Reserve parachute
The housing for the reserve parachute is below the seat in the front part of the
harness. The container is large enough for most reserve parachutes on the market
today. The reserve parachute has to be linked to the harness before it is inserted into
the built-in pocket.
5.Connecting the deployment handle to the deployment bag
The black loop attached to the handle itself should be passed into the loop on the
deployment bag, and then the entire handle should be passed through its own loop
and pulled tight. For easier extraction, the loop attached to the deployment bag
should be positioned laterally with respect to the centre of the reserve parachute. If
your deployment bag does not have this loop.

[4]
An example of attaching the paraglider whith the carabiner.
6.Connecting the reserve parachute to the harness
The reserve parachute bridle is passed through the loop at the end of the harness
reserve parachute bridle. The reserve parachute itself is then passed through the
large loop in the reserve parachute bridle. This connects the two bridles. The loops
should be pulled as tight as possible to avoid any chance of dangerous friction
developing between the two bridles during the shock caused when the reserve
parachute opens.
Alternatively, attachment of the connection belt with the harness.

[5]
7.Inserting the reserve parachute into the harness
Insert the reserve parachute into the pocket of the harness, so that the handle is
visible and facing outwards, and the loop connecting the handle to the deployment
bag is facing upwards.Thread a thin cord through each elastic loop. This will help
close the pocket. Thread the elastic loops into the smallest of the eyelets on the
pocket flaps. Close the flaps following the order shown in the photographs below.
Push the metal pins on the handle into the elastic loops and under the transparent
cover. It is essential to remove the cords after this operation. The cords should be
pulled out slowly in order not to damage the elastic loops by excessive friction. Lastly,
the handle should be positioned under the elastic cover.
Secure one of the pins with a thread which has a predetermined breaking point. This
thread ruptures at a load of 5 kg.
IMPORTANT:
Every new combination of reserve parachute and harness or the external container
assembled for the first time should be tested by an official harness or reserve
parachute dealer, or by a flying instructor. Deployment of the reserve parachute
should be perfectly feasible from the normal flying position.

[6]
8.Harness adjustment
Before adjusting the straps please install rescue parachute and fill the back pocket
as for normal flight. Watch out for the symmetry –left and right side should be
adjusted the same. First, test flight should be done in easy weather conditions, with
necessary corrections applied afterwards.
Shoulder strap adjustment
With the shoulder belts you adjust the harness on the pilot’s heigh, but also you
adjust the seating position between upright and lying.When correctly adjusted,light
pressure from the shoulder straps shoud be felt on the shoulders.
Back strap adjustment
Use the lumbar straps to set the angle between the thigs and the trunk. During the
adjustment pay attention to the fact that the body load is distributed equal on
shoulder belt and lateral chest belt.

[7]
Chest strap adjustment
The chest belt is closed together with the combined leg straps.The length of the chest
belt can be adjusted. Should not be tightened to much.
Leg strap adjustment
The leg straps arae the most important safeguard against falling out of the
harness.Please pay attention that the length is not to long or too short.
Speed system adjustment
After having adjusted the sitting position to the optimum configuration, the accelerator
must be adjusted. It is safer to start with the speed system a little long and shorten it
following your first flights. Ensure that the speed system cords are free running, and
that they do not rub on the straps of the harness. This harness is compatible with all
normal types of speed system accelerators.

[8]
9.Flying with the Maki
It is essential that you thoroughly check all equipment before launch.
Pre-flight checks:
Always check the following as part of the pre-flight check:
Are the harness and the speed system correctly adjusted?
Are all pockets closed?
Are the reserve deployment handle and pins in the correct position?
Are both carabiners properly closed ?
Are all buckles, belts, zips securely fastened?
Have you closed your leg and chest straps?
10.Rescue parachute deployment
In the event of an emergency, you must quickly evaluate your height and the
seriousness of the incident. A seconds hesitation in deploying the reserve could
prove fatal if there is insufficient height.
If you decide to deploy the rescue:
1- Look for the rescue handle and grasp it firmly with one hand.
2- Pull forwards and upwards on the handle to release the deployment bag from the
rescue container.
3- Look for a clear area, and in a continuous motion, throw the reserve parachute
away from yourself and the glider, preferably into the air stream or against the
direction of spin. After deployment, avoid entanglement and pendulum motions by
promptly pulling in the glider as symmetrically as possible with the B, C, D or brake
lines.
4- On landing take an upright body position and be prepared to do a PLF (Parachute
Landing Fall) to minimize the risk of injury.
11.Pockets
The Maki has a spacious back pocket and two little side pockets. The back pocket
can easily hold the paraglider’s backpack and much more. There are openings in
upper part of the pocket to lead the drink pipe.

[9]
12.Landing with the Maki
While on final approach, get your legs out of the pod and assume upright position.
Never land in the seated position; it is very dangerous for your back even if you have
foam dorsal protection or an airbag, which provide exclusively passive protection.
Standing up before landing is an active safety precaution, and it is much more
effective than passive forms of protection.
13.Tandem flying
The Maki is also suitable for use in tandem flights. It can be used by both the pilot
and the passenger. Its special design, intended to allow for good leg movement,
makes the launch run easier for both the pilot and the passenger.
Caution: Be careful that the passenger's harness does not have a reserve. This
would create a risk of accidental release by the pilot during launch or in flight (side
deployment handle).
14.Tow bridle connection
The Maki harness can be used for towed launches. The tow bridle release should be
hooked directly to the main karabiners, ensuring that the karabiners are positioned
with the opening bar facing the rear. For further details, refer to the documentation
provided with your tow-release, or ask a qualified towing instructor at your flying site.
15.Flying over water
Water landings should be avoided at all costs, as the back protection increases the
risk of the pilot floating in a head-down position. For safety training over water, we
recommend wearing a proper . For safety training over water, we recommend
wearing a proper life jacket with a head support holding the wearer’s head above the
surface even when unconscious.
16.Foot stirrup
Foot stirrup can be fitted to all our harnesses, except for those already incorporating
this accessory. The Foot stirrup is used to keep the legs stretched out and the feet
resting on a support. Some pilots consider this flying position as more comfortable
than the classic seated position with legs hanging. To attach the relax bar to the
harness, follow the instructions provided in the Foot stirrup instruction manual.

[10]
17.Maintenance and repairs
Avoid dragging your harness over rough or rocky ground.
Unnecessary exposure to UV rays, heat and humidity should be always
avoided.
Keep the harness in your rucksack when not in use.
Store all your paragliding equipment in a cool, dry place, and never put it away
while damp or wet.
If the harness gets exceptionally dirty, wash it with water and a mild soap.
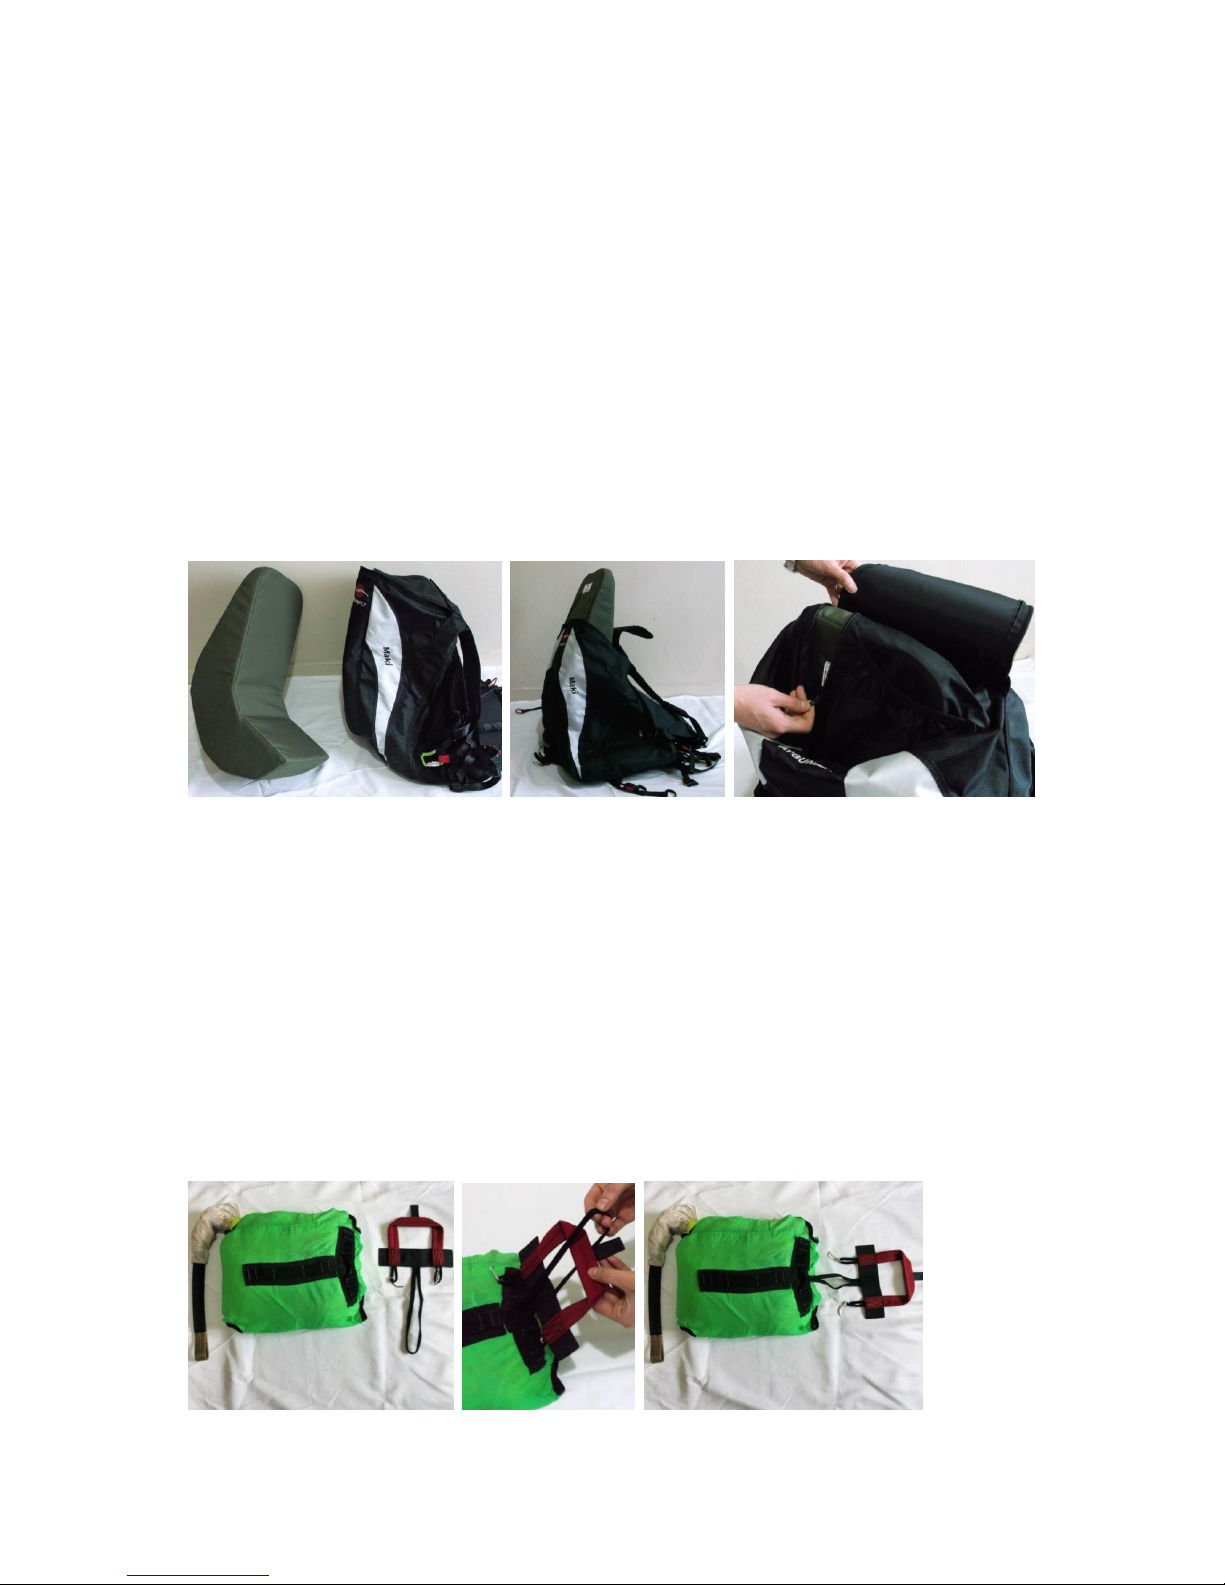
Make sure you first remove all the sub-components: seat board, back plate,
back protection, rescue parachute etc. Allow the harness to dry naturally in a
well ventilated area away from direct sunlight.
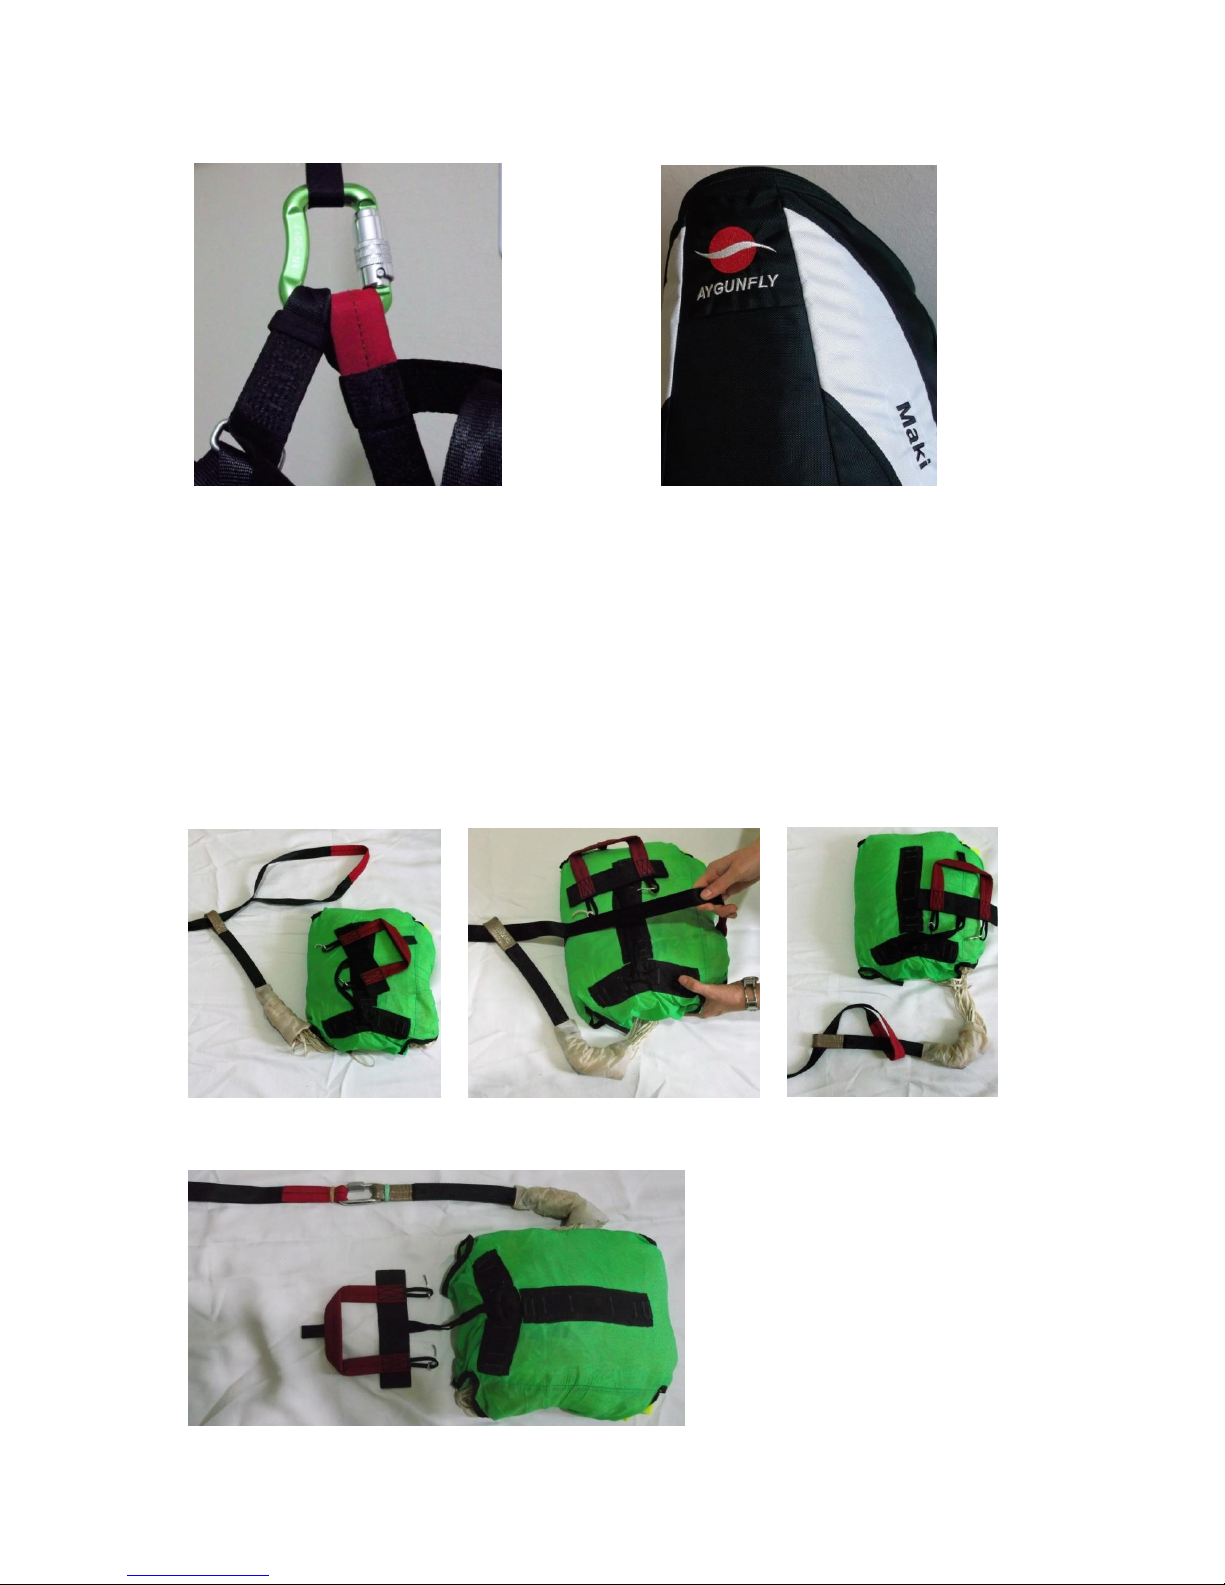
If your rescue parachute ever gets wet (e.g. in a water landing) you must
remove it from the harness, dry it and repack it before putting it back in the
container.
After a hard landing you must check your back protection for damage. A tear
could significantly reduce the efficiency of the protection it provides.
The zips and buckles may be occasionally lubricated with silicone spray, no
more than once a year.
18.Inspection checklist
In addition to regular pre-flight checks, the Gingo II should be inspected thoroughly
on every rescue repack, normally every 150 days.
The following checks should be carried out:
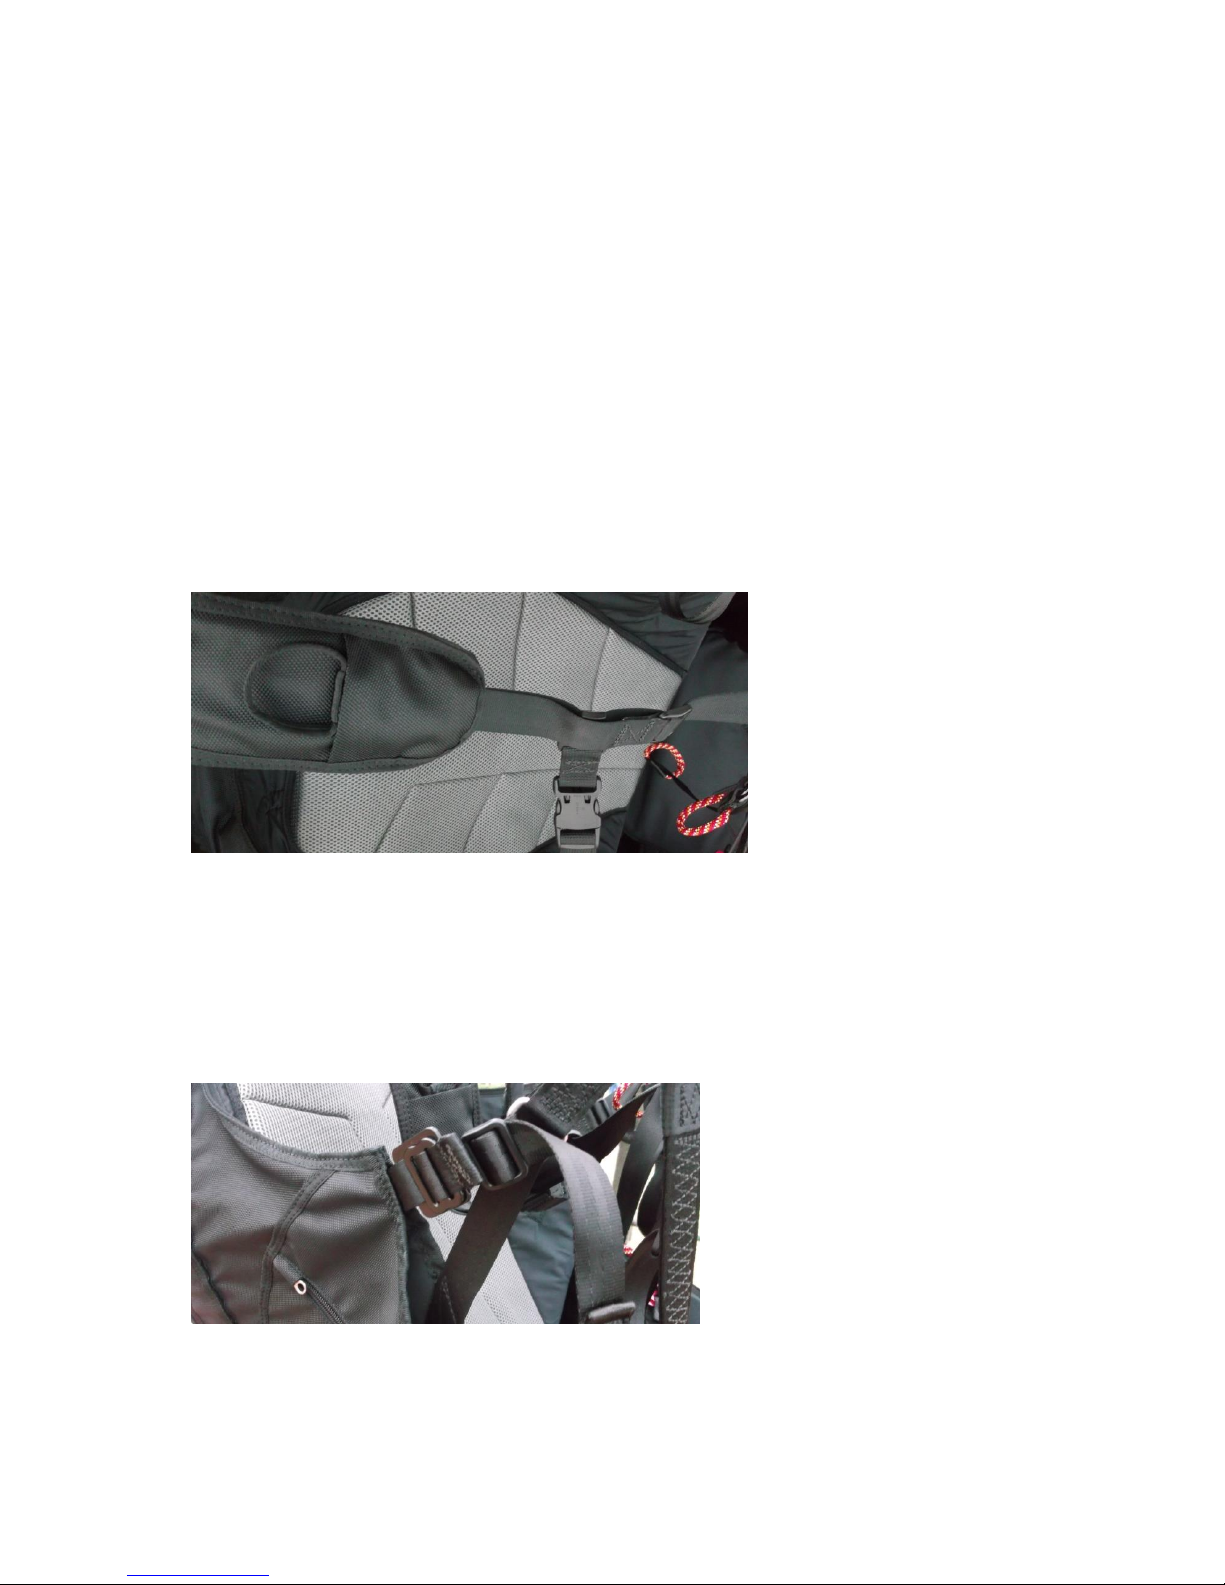
Check all webbing, straps and buckles for wear and damage, especially the
areas that are not easily seen, such as the inside of the carabiner hook-in
points.
All sewing must be intact and any anomalies attended to immediately to avoid
exacerbation of the problem.
Special attention should be paid to the rescue installation, particularly the
elastic and Velcro parts.
The wooden of seat must be free from cracks.
The main aluminium carabiners must be replaced at least every 5 years or
after 500 hours, whatever comes first. Impacts may create undetectable
cracks that could result in structural failure under continuous load.
19.Repairs
As a rule, there is no fixed inspection programme for harnesses. The manufacturer or
an approved specialist should carry out any repair that involves critical parts of the
harness. This will ensure that the correct materials and repair techniques are used.

[11]
20.Technical Data
Size M
Pilot height 160-185cm
Weight 4,9kg
Straps connection type T-Lock
Board width 32cm
Board length 37cm
Carabiner height 45cm
Carabiner distance 35-50cm
Load test certificate EN 1651 Maximum load: 100kg
Soft foam protection certificate LTF 2009 Protection thickness: 17,5cm
Reserve Parachute location Under the seat Volume: 4000-10000cm³
21. Meterials
Fabric Oxford Polyester
Webbing Polyester 25mm 1400daN, Polyester 25mm 900daN
Karabiners 7075 T6 Aluminium 2000daN
Buckles 7075 T6 Aluminium 1000daN
Aygunfly
Halil Aygün
Aydınlıkevler mh.2001sk.Bina no:86 No:4/7
Yenişehir/Mersin/Turkey
Tel:+90 506 491 68 67
e-mail: [email protected]
www.aygunfly.com

[12]
22. Certification label
Table of contents
Popular Accessories manuals by other brands

Mitsubishi Electric
Mitsubishi Electric KD Series user manual

Sentera
Sentera FCVC8-R Mounting and operating instructions

Apogee
Apogee SQ-640 owner's manual

YILMAZ
YILMAZ SKN 301 user manual

Lippert Components
Lippert Components Solera 3000WS Series installation manual

Rice Lake
Rice Lake IQ plus 510 User & installation manual